first model after 10years hiatus shot kal 82
Quebec, Canada
Joined: January 16, 2014
KitMaker: 30 posts
Armorama: 30 posts
Posted: Friday, January 17, 2014 - 02:19 PM UTC
Back at it at last. I have seen a lot of nice builds here so I thought I would share this project.
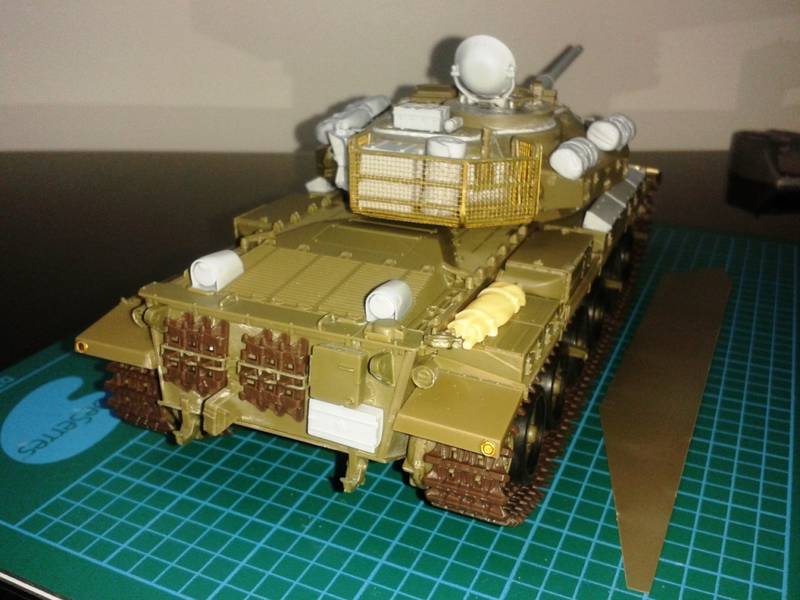
The subject an IDF shot Kal Lebanon circa 1982.
The kit is the AFV club 1973 version, the upgrade set is the really nice DEF models 1982 shot Kal upgrade set, tracks not sure yet but for now I have been fiddling with the AFV club individual track links for stowage I will be using parts from DEF, Black Dog and make some of my own. This vehicle will be placed in a diorama setting so I will be using the recently released Meng IDF tank crew.
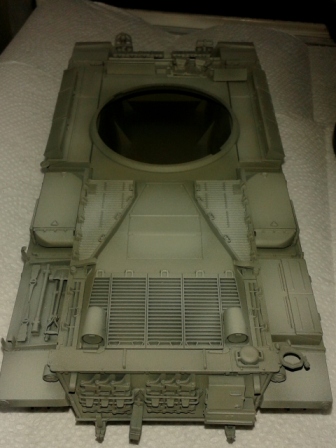
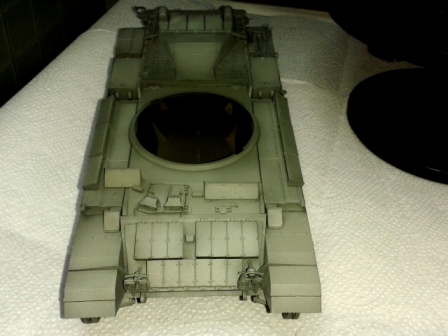
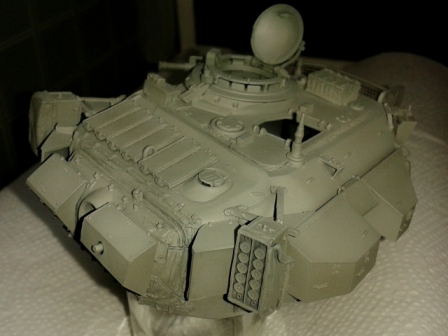
aprt from the DEF upgrade kit is out of box except for modifications to to the light guards made with styrene strips.
the build is realy not that hard even if I find the kit to be overly complex with a lot of subbassemblies and a few very fragile parts like the spare tracl holders. They are easily broken when cut from their sprues.
Painting will be done with Vallejo Air first try with thewse and so far after doing a few test pièces I love them.
right now I am working on a formala for Sinae Grey not conclusive yet. Anybody that has a good formula ou there using Vallejo air?
here are a few photos of some finished assemblies being thrown together for test fitting


California, United States
Joined: August 10, 2012
KitMaker: 1,510 posts
Armorama: 1,443 posts
Posted: Friday, January 17, 2014 - 03:25 PM UTC
Lots of resin-y bits there Brian. Welcome to the site and back to the hobby; looking forward to seeing some paint on your Cent'.
You could always try looking through the sites IDF forum for a correct formula for Sinai grey, or Life Color make quite a few IDF colors too.
What cheek! Let them have it!
Oregon, United States
Joined: December 08, 2005
KitMaker: 556 posts
Armorama: 433 posts
Posted: Friday, January 17, 2014 - 05:38 PM UTC
Nice work and welcome back to the hobby.
What the heck is that thing on the nose?
A veteran - whether active duty, retired, or national guard or reserve -- is someone who, at one point in their life, wrote a blank check made payable to "The United States of America," for an amount of "up to and including my life."
Quebec, Canada
Joined: January 16, 2014
KitMaker: 30 posts
Armorama: 30 posts
Posted: Saturday, January 18, 2014 - 04:41 AM UTC
Thanks Christopher resin there is i do not know why AFV did not opt to bring out a plastic version of the 82 or later shot with all the reactive armour I wouls have preferd styrene to resin but no way around it.
for painting I I used to use enamels before but for many resons now I want to paint with solvent free paints I tested Model air it's really neet sprays well and adheres even unprimed in a different way than solvent paints acrylic resins form a kin that covrs the plastick but it adheres really well. For lifecolor I might try but I heard that adherence is very poor,Still got a bit more work to do before coveringthe cent I will get more photos up then
cheers
Quebec, Canada
Joined: January 16, 2014
KitMaker: 30 posts
Armorama: 30 posts
Posted: Saturday, January 18, 2014 - 04:46 AM UTC
Steve
That thing on the nose? not really sure but I read somewhere that it is some sort of battering ram attachement is it really? maybe someone out there knows and can confirm. as far as the model is concerned, I kind of think of it as a cool looking piece of resin...
Texas, United States
Joined: June 12, 2007
KitMaker: 1,866 posts
Armorama: 1,696 posts
Posted: Tuesday, January 21, 2014 - 10:50 AM UTC
Nice Cent. Looks like you're enjoying your comeback.

That's exactly correct about the thingie on the front, it's an "obstacle clearing device" and were commonly seen on Magach6's and Cents. Seems like they were almost invariably used as a stowage spot for a spare roadwheel too, maybe by design.
Texas, United States
Joined: March 08, 2010
KitMaker: 2,465 posts
Armorama: 2,383 posts
Posted: Tuesday, January 21, 2014 - 05:13 PM UTC
Thats a fine build Brian!
Colorado, United States
Joined: January 20, 2005
KitMaker: 7,219 posts
Armorama: 6,097 posts
Posted: Wednesday, January 22, 2014 - 08:50 AM UTC
Looking good so far. And of course it's one of my favortie subjects. I built mine before the Legend upgrade (actually on an old Tamiya kit) and scratched the battering ram.
Unfortunately I don;t use Vallejo. I got very good good results with a 50/50 mix of MM SAC Bomber tan and headfer white.
A strong man stands up for himself; A stronger man stands up for others.
Admit nothing. Deny everything. Make counter-accusations.
He is not Khan who calls himself Khan. Afghan proverb
Quebec, Canada
Joined: January 16, 2014
KitMaker: 30 posts
Armorama: 30 posts
Posted: Wednesday, January 22, 2014 - 05:09 PM UTC
Hi all
Thanks for all the words of encouragement and to Russell thanks for confirmation of the that nosepeace and to Robert for the color suggestion.
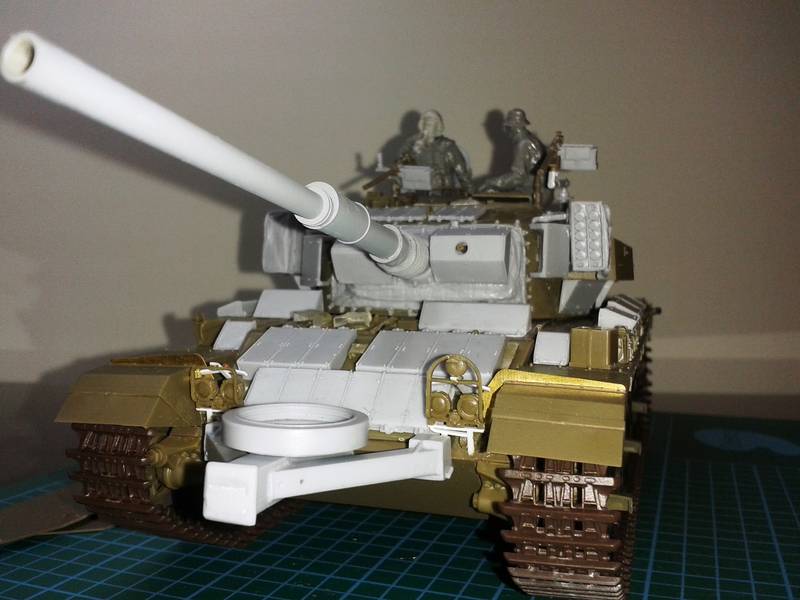
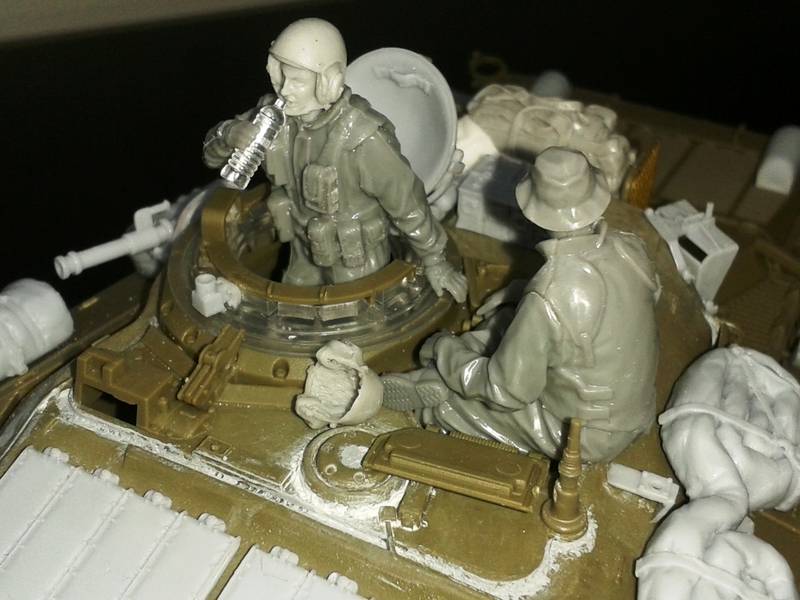
Well the Shot is ready to paint. I added the figures, they are from Meng straight from the box except for the commanders head from a set of IDF tankers by Dvision, the set comes with spare heads. Stowage is from both the DEF upgrade set far Superior than the legend's set as far as I am concerned very crisp well cured resin attached to trees removable with fine cutters you don't need a chainsaw to get them off moulding blocks. like the legends set plus the fact that you do not have to carve into the turret to fit the mantlet the def one fits into place no saws and no putty. The rest of the stowage is from Black Dog.
Here are photos of this weeks progress.


Tasmania, Australia
Joined: November 06, 2009
KitMaker: 368 posts
Armorama: 321 posts
Posted: Wednesday, January 22, 2014 - 06:58 PM UTC
Looking good. Any issues with AFV's kit? I have one in the mail at the moment (and will be ordering Legends "Dalet" conversion kit this week).
Quebec, Canada
Joined: January 16, 2014
KitMaker: 30 posts
Armorama: 30 posts
Posted: Wednesday, January 22, 2014 - 07:55 PM UTC
Andrew I had no real issues with the kit it s a little overcomplicated maybe and care must be taken to snip off certain parts like the spare track supports and the light guards other than that fit is very good and I worked in Sub assemblies all went well. For the upgrade I had both the legends dalet kit and the DEF shot kal 1982 upgrades I did not like the legends kit at all and discarded it with the legends kit major surgery is required for the mantlet you have to saw part of the turret off to fit it.I did not want to get into that and the parts in the legends kit are for the most part stuck on very large molding blocks and require a lot of sawing and sanding. The def kit although not a late dalet has part on strips like sprues all you really need is a good sprue cutter and the quality of the resin I found to be better, harder maybe a bit more brittle but no warpage and I did not break anything.
To each is own but If I would start this project again I would definitaly go the same route. One last thing if you use the kits wheels tires are vynil I tried pva glue it did not really work so I redid them with super glue
Cheers
Texas, United States
Joined: June 12, 2007
KitMaker: 1,866 posts
Armorama: 1,696 posts
Posted: Thursday, January 23, 2014 - 05:08 AM UTC
Nice progress.
The Meng figs look pretty good too. Any comments on them?
JPTRR
 Managing Editor
#051
Tennessee, United States
Joined: December 21, 2002
KitMaker: 7,772 posts
Armorama: 2,447 posts
Posted: Thursday, January 23, 2014 - 06:16 AM UTC
Brian,
I can't wait until you paint it! Ten years hiatus has not dulled your skill.
Ah, Centurion: IMHO one of the best looking tanks, ever, and
the best looking since 1945!

If they demand your loyalty, give them integrity; if they demand integrity, give them your loyalty.--Col John Boyd, USAF
Any plan where you lose your hat is a bad plan.
Quebec, Canada
Joined: January 16, 2014
KitMaker: 30 posts
Armorama: 30 posts
Posted: Thursday, January 23, 2014 - 01:38 PM UTC
I agree even if we are in the 21 century the centurion is still one the nicest tanks ever and the israeli shot kal is like the cent meets dr who it's cool.
As far as the Meng figures they are really nice and Worth it molding and detail is crisp and because torsos and legs are in 2 parts they do not have any flash lines.
The shot is ready to paint I have a bit more testing with the Vallejo airbrush primer and I am working on a Vallejo model air formula haven't got it right yet sinae grey what a weird color
Quebec, Canada
Joined: February 12, 2013
KitMaker: 72 posts
Armorama: 62 posts
Posted: Thursday, January 23, 2014 - 02:09 PM UTC
looking really interesting. looking forward to the paint phase

Al Patterson
Umiujaq, Qc
Custos Borealis, PARATUS
Retired - NO JOB, NO STRESS, NO PAY !!!
"Sarcasm is just one more service we offer free of charge"
North Carolina, United States
Joined: June 06, 2006
KitMaker: 4,691 posts
Armorama: 3,509 posts
Posted: Friday, January 24, 2014 - 02:48 AM UTC
thats a big bite for your first model back,but it is very impressive so far with all of those details.
Quebec, Canada
Joined: January 16, 2014
KitMaker: 30 posts
Armorama: 30 posts
Posted: Tuesday, January 28, 2014 - 12:40 PM UTC
For those of you who have been dropping in time for an update:
The fun part is about to begin
painting phase I will start soon taking the tank apart this evening and will be cleaning the parts to remove mould release agents and finger grease from handling.
Was not sure what road I would take for painting I wanted to do something a la jose ruiz but I tried on a test piece interesting way of doing things because beyond preshading and higlighting it gives a mapping of your weathering to come not my bag of tea and using Vallejo air the technique calls for too much thinning and the paint does not like that. I will try it again one day but maybe with tamya paints.
My technique is to paint the model by zones or call it area painting. I prime I take a couple of black and white photos this gives you a pretty good idea of where the light hits the model for a ''zenithal effect I strat at the bottom and work my way up all vertical surfaces then the horizontal ones.
So the first step will be to prime. I tried Vallejo surface primer on a test piece and wow I like it. I found that a 50/50 ratio of primer and airbrush thinner at 1.5 bar close up to the model aprox 2 inches is very good Mist on the first couple of coats but you must build up and lay down a solid coat and let it cure a day or 2 It it turns in to a very solid base for the base coat to follow. I was also working on an acceptable formula at least for my eyes for idf '' sinae Grey ''
I mix directly in may airbrush cup and I came up with this using model air:
Hemp 3 drops grey green 2 drops camouflage grey 1 drop and white 1 drop this gives me my darkest shade, I will need lighten so I lighten by progressingly adding drops of white, this way I can work a chromatic palette from dark to higlight wit shadows and lighter shades in between using the same basic colors . the result is a greyish green color that looks good to me. if to monochromatic I will be able to play around with filters later after a pin wash to bring out détails.
So I am all set more to come soon
Cheers all hopefully I wont screw up
Texas, United States
Joined: June 12, 2007
KitMaker: 1,866 posts
Armorama: 1,696 posts
Posted: Wednesday, January 29, 2014 - 05:58 AM UTC
I'm looking forward to seeing the results, sounds like an interesting technique.
Quebec, Canada
Joined: January 16, 2014
KitMaker: 30 posts
Armorama: 30 posts
Posted: Friday, January 31, 2014 - 10:32 AM UTC
well Jan 31 2014
WHAT A PRIMING SESSION THIS WAS!
The Shot is primed and set away for curing was a long job but it's nice to finally see the thing in a uniform color I used Vallejo primer for the first time on a model, I love the result.
For those who are still not sure about this love or hate controvercial product, well... I'm sold it sprays beautifully at 15psi thinned with Vallejo airbrush thinner at 60/40 paint vs thinner. I am using my side feed Eclipse for this project I did a 4 hour session misting on sucsessive coats finishing with a lightly heavier no clogs no tip build up and no splatter.
Cleaning easy: Vallejo airbrush cleaner preceeded with a good flushing with tap water.
When I can handle the model I will be back with photos, its starting to look like something
Cheers
Quebec, Canada
Joined: January 16, 2014
KitMaker: 30 posts
Armorama: 30 posts
Posted: Sunday, February 02, 2014 - 12:49 PM UTC
Paint down base coat of a grey green color at last
Quebec, Canada
Joined: January 16, 2014
KitMaker: 30 posts
Armorama: 30 posts
Posted: Monday, February 03, 2014 - 05:47 AM UTC
help!!!!!!!
want tu upload new photos but i have reached limits of space does someone have a clue on how to clean galerie so I can upload new paint in process photos
Colorado, United States
Joined: January 20, 2005
KitMaker: 7,219 posts
Armorama: 6,097 posts
Posted: Monday, February 03, 2014 - 06:22 AM UTC
Just open a Photobucket account. Easy, free, tons of space.
A strong man stands up for himself; A stronger man stands up for others.
Admit nothing. Deny everything. Make counter-accusations.
He is not Khan who calls himself Khan. Afghan proverb
Quebec, Canada
Joined: January 16, 2014
KitMaker: 30 posts
Armorama: 30 posts
Posted: Tuesday, February 04, 2014 - 12:20 PM UTC
major update
Priming fini
Basecoat fini
Base coat on tracks done as well.
the airbrush can rest for a while time to prep the brushes
Color modulation fini or almost.So far all is going well...
Still got détails to highlight with brushes. Here are some of the latest photos

North Carolina, United States
Joined: January 28, 2014
KitMaker: 8 posts
Armorama: 8 posts
Posted: Tuesday, February 04, 2014 - 02:02 PM UTC
Looks great so far! looking forward to the finish line.
California, United States
Joined: August 10, 2012
KitMaker: 1,510 posts
Armorama: 1,443 posts
Posted: Tuesday, February 04, 2014 - 02:08 PM UTC
Looks good so far, Brian. The modulation was done really well.
What cheek! Let them have it!


