_GOTOBOTTOM
Constructive Feedback
For in-progress or completed build photos. Give and get contructive feedback!
C2 MEXAS, Takom 1:35
Lisec
Visit this Community
Croatia Hrvatska
Joined: September 13, 2006
KitMaker: 306 posts
Armorama: 282 posts
Posted: Monday, September 22, 2014 - 09:06 PM UTC
Hi all!
I have started Takom`s MEXAS kit. Something about this beast attracted me from the moment i saw it`s announcement( i have to admit, i was not that into modern armor before, and wasn`t paying attention on resin conversions), so preordered it and voila! Started work on it,got the suspension finished and then i had to take a break from further work until now. I am using Legends Takom Update/detailing and Stowage set and i will be publishing a review of those excellent sets.
Pics of work to follow.


thebear
Visit this Community
Quebec, Canada
Joined: November 15, 2002
KitMaker: 3,960 posts
Armorama: 3,579 posts
Posted: Tuesday, September 23, 2014 - 10:00 AM UTC
This kit really interests me a lot .. I'll be following this one closely ...

Rick
Lisec
Visit this Community
Croatia Hrvatska
Joined: September 13, 2006
KitMaker: 306 posts
Armorama: 282 posts
Posted: Thursday, October 02, 2014 - 02:16 AM UTC
Ok, here are a couple of pics, finished with the suspension( workable), swing arms needed clean-up. Wheels have nice details on the front side but are wrong on the inner . There are resin replacements but i`m not bothered by it as it will hardly be seen.


Will add welding around the lifting hooks(the model,as a whole,has slightly underwhelming weld lines). The back tool box needs work, it has an ugly joint which i used CA glue go fill, handlebar will be cut out and replaced with plastic rod and a new bracing frame added.
Lisec
Visit this Community
Croatia Hrvatska
Joined: September 13, 2006
KitMaker: 306 posts
Armorama: 282 posts
Posted: Sunday, October 05, 2014 - 03:31 AM UTC
Some more work- i reworked the rear toolbox, started shaving off plastic parts to make room for the resin and PE parts, added EMES 18


thebear
Visit this Community
Quebec, Canada
Joined: November 15, 2002
KitMaker: 3,960 posts
Armorama: 3,579 posts
Posted: Monday, October 06, 2014 - 02:20 AM UTC
Very nice work so far .. (told you I'd be watching ! ) How much better are the Legend parts compared to the original parts.. It would be nice to see the before and after shots .... .. Great job on the tool box .

Keep the pictures coming !

Rick
terminators
Visit this Community
France
Joined: February 20, 2012
KitMaker: 1,932 posts
Armorama: 1,907 posts
Posted: Monday, October 06, 2014 - 04:20 AM UTC
Legend Productions parts have a nice finishing.
recceboy
Visit this Community
Alberta, Canada
Joined: July 20, 2006
KitMaker: 706 posts
Armorama: 665 posts
Posted: Saturday, October 11, 2014 - 02:42 PM UTC
Good work so far

This kit has some issues, if you need help drop me a message. I commanded one for 7.5 months back in 2007. I can give you some help with first hand knowledge.

Cheers

Anthony

Author Canadian Leopard DVD Project
Lisec
Visit this Community
Croatia Hrvatska
Joined: September 13, 2006
KitMaker: 306 posts
Armorama: 282 posts
Posted: Thursday, October 16, 2014 - 06:52 AM UTC
Cheers Anthony, will do!

Ok, the tricky part is done-antislip for the turret and rear bin. Started doing the upper plates with the antiskid for the turret blocks, decided on a 600 gradient sanding paper, looks good to me, you be the judge if its an overkill. Added most of the MEXAS blocks on the body, PE holders for the towing cable came from some spares, added Legends grille and did the wiper cable on the front. Resin side toolbox fits perfectly. On the turret, still need to finish up the EMES. Forgot to take the comparison photo, but the kit one is really undersized comparing to the Legend upgrade.
On a sad note, the nice stowage item, the rolled up tarp which goes on the left rear bin, is only usable when the ECM shield is not used


Quality of the pics is what it is, best i could do in the conditions and with the mobilephone...will be better next time
LeoCmdr
Visit this Community
Alberta, Canada
Joined: January 19, 2005
KitMaker: 4,085 posts
Armorama: 3,917 posts
Posted: Thursday, October 16, 2014 - 01:13 PM UTC
Nice work on the anti-slip.

The 600 grit look good on the top of the bins. Don't forget the bolts are still visible on top even with the anti-slip.
Lisec
Visit this Community
Croatia Hrvatska
Joined: September 13, 2006
KitMaker: 306 posts
Armorama: 282 posts
Posted: Sunday, October 19, 2014 - 05:26 AM UTC
Guess i didn`t make good on my promise on better pic quality

I did some preliminary painting to get the hard to reach areas and backs of the blocks, then added the blocks. Aligning them was not easy, Takom screw the pooch with the pucks, no accurate spot was given, just a diagram on the instruction sheet which is frankly not that helpful. The result is a not so perfect fit of the forward blocks and i had to cut the 2 guiding pegs and add a 3rd attachment point as this setup was never going to survive handling.
Keen eye will see a missing antennae mount- broke off...


Lisec
Visit this Community
Croatia Hrvatska
Joined: September 13, 2006
KitMaker: 306 posts
Armorama: 282 posts
Posted: Monday, October 20, 2014 - 06:10 PM UTC
Detailing the rear bin- and here it shows how critical the geometry of the blocks is,and how mine is not kosher. The ECM shield sits a bit too high, and i`m of the mind to pluck it out and redo it. I opted to go with styrene rods instead of the brass rod provided in the set as its easier for me to work with


Lisec
Visit this Community
Croatia Hrvatska
Joined: September 13, 2006
KitMaker: 306 posts
Armorama: 282 posts
Posted: Wednesday, October 22, 2014 - 09:04 AM UTC
Work on rear bin continues, i`m using a combination of Legends update set and Stowage set for the Jerry cans. Until i get the info i need, i`m holding off the left side netting (seeing if there was any instances of installation of the cooler box without the thermal covers. I took down the ECM shield, and lowered it as far as i could, the placement is still not perfect,but still an improvement. The Thales ECM is missing the antennae.


recceboy
Visit this Community
Alberta, Canada
Joined: July 20, 2006
KitMaker: 706 posts
Armorama: 665 posts
Posted: Wednesday, October 22, 2014 - 03:25 PM UTC
Great looking build, here is the answer to the kits markings:

Markings:

The only set of markings on the sheet that are correct are the ones for SHQ. The other marking are for a combat deployed C2 MEXAS. The troop markings were applied in March/April 2007. The markings for 2nd troop are in correct for the kit. The rear marking are from my C2 MEXAS which was the Dozer tank, the tool box sticker. The Canadian Forces Registraion number just below the tool box is incorrect, it should read 78-58132. The markings for 3rd troop are incorrect; they never ever had the MEXAS side armour markings.

The barrel marking that have the Canadian Forces Registration last three are and Squadron names incorrect. By the time these C2 MEXAS entered into long term combat operations they were crewed by another tank squadron, almost all of these names were erased.

The maple leaf decals should have had two different types. There should have been added with another set with the leafs outlined in white.

Anthony

Author Canadian Leopard Series Project
recceboy
Visit this Community
Alberta, Canada
Joined: July 20, 2006
KitMaker: 706 posts
Armorama: 665 posts
Posted: Wednesday, October 22, 2014 - 03:29 PM UTC
With the ECM metal cover, the marking that you would need are for the following troops:

SHQ (SCORPIONS)

19 CFR 78-85161 SQN Commanders Tank
- 45’s marked on the Gunners sight cover with white duct tape
- 117 Radio set antenna mounted behind the commander’s hatch area
- No barrel markings
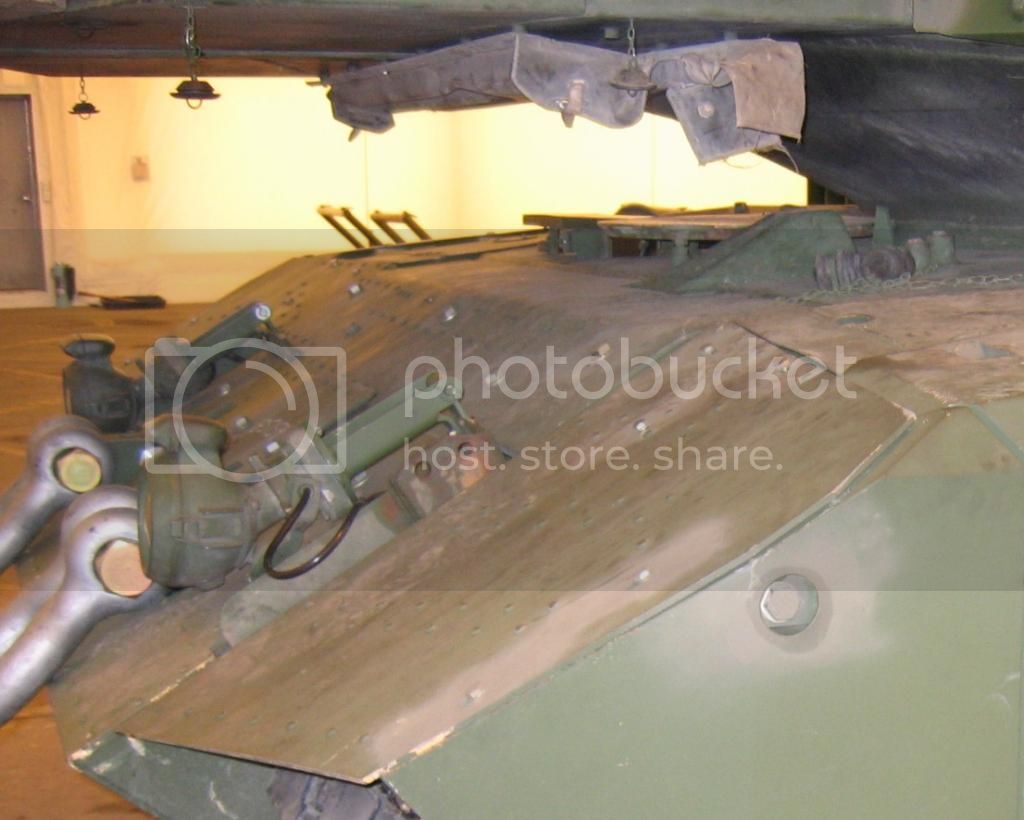
- L/S Armour dented along the side, torn open like a can opener after run in with “jingle truck” on Highway 1.
- Amour sections taken out and repaired on L/S sections and around tool box.
- A.A. C-6 was fitted with coax type barrel and butterflies (SPADE GRIPS)
- Cam pole holders on L & R side of rear of vehicle.
- Shrapnel holes under thermal jacket, due to small arms fire mid-July.
- Fitted with tow chain for recovery of light vehicles.

2nd Troop A-SON (REITENS RAIDERS)

12 CFR 78-85134 Troop Officers Tank
- Troop barrel markings 2 white stripes, spaced every 2 inches, desert palm tree with” LSH” on all L/S back bins, Troop symbol on both side s of armour.
- ALL troop PCM covers with Bore brush & Cable bin.
- 134 re-done in white paint on back CFR under driver’s tool box.
- Troop logo sprayed onto cooling unit mid-July.
- L/S mud flap missing, mid Aug other mud flap torn off.
- R/S cam pole holder only.
- L/S armour #4 sections dented.
- 106 on L/S of thermal jacket in small #’s
- CDN flag taped underneath of barrel mid-July.
- Horse shoe wired onto front armour.
- A.A. Ground mount type with coax barrel and spade grips.

3rd Troop A-SQN (No troop markings)

13 CFR 78-85160 Troop Officers Tank
- Troop barrel marking 3 white stripes spaced every 2 inches.
- Both front fenders dented and half only.
- L/S tool box missing cover.
- No reflectors.
- PCM cover with bore and sigs bins.
- A.A. ground mount, coax trigger with spade grips.

Hope this helps with your build. As you see for the time frame that you want to build, the C2 MEXAS would be a command Panzer.

Cheers

Anthony
Lisec
Visit this Community
Croatia Hrvatska
Joined: September 13, 2006
KitMaker: 306 posts
Armorama: 282 posts
Posted: Thursday, October 23, 2014 - 09:21 AM UTC
Ok, so if i get this straight, for my setup( ECM installed, front mudguards,bore brush,cable reel) i could go for a SQ headquarters tank(Scorpions)but i`d probably had to do spade grips for the MG to be correct, or go for the 2nd Troop and use the markings provided in the set(minus the rear toolbox sticker) and,again, do the spade grips?
Were any of these fitted with the cooling units and not had the thermal covers on?

Why i`m asking is, i don`t believe ill be able to do a 100% accurate job, and if i`m taking liberties, just wandering aloud is that cooling unit feasible, or really not even a possibility. If it`s possible, but i would have the wrong tank reg number, i would forgo the accuracy just for the coolness factor that little box has
recceboy
Visit this Community
Alberta, Canada
Joined: July 20, 2006
KitMaker: 706 posts
Armorama: 665 posts
Posted: Thursday, October 23, 2014 - 01:51 PM UTC
By mid summer most front mud guards were long gone due to heavy combat operations and from banging into things....

The grips can be switched around to wooden butt, replacement gun....

The marking options listed in my post is pretty much that based on the real vehicles on the ground.

Cheers

Anthony
Lisec
Visit this Community
Croatia Hrvatska
Joined: September 13, 2006
KitMaker: 306 posts
Armorama: 282 posts
Posted: Thursday, October 30, 2014 - 09:58 AM UTC
Hello gents, a bigger update next. Thanks to to a friend( cheers Mario Matijasic), i could finally get some decent photos made.
As it stands, the turret is complete(minus the chiller box(will paint it separately and install later)antennae mounts, the MG and,of course, stowage) and awaiting priming with black. ECM is painted and awaiting installation and further dusting. As i write this, the wheels and suspension area are painted,still in the process of weathering. The chassis is missing the rear fenders and front towing eyes(all of which is now installed) and is ready for priming once i complete the weathering on the underside.


Cheers
Lisec
Visit this Community
Croatia Hrvatska
Joined: September 13, 2006
KitMaker: 306 posts
Armorama: 282 posts
Posted: Friday, November 14, 2014 - 02:31 AM UTC
Update- i finished painting the underside but sadly had to button it up before pics could be taken. However, nothing can be seen from the outside I`m a little unhappy with the wash i did for the wheels, need to redo it with the same shade as i used on the Orochi tracks( which build quite easily, albeit need some love cutting them off the sprue and cleaning them up)
First coat of paint is on, next coat will be a bit lighter in shade.
For the fun of it, started doing the figure Takom included- its a bit soft in details and the head is not good, so i raided my spares box and found a Hornet mature head. I did some modelling with Magicsculpt and did the hat and the mustache.
The pics aren`t stellar, the natural light is almost nonexistent these days


LeoCmdr
Visit this Community
Alberta, Canada
Joined: January 19, 2005
KitMaker: 4,085 posts
Armorama: 3,917 posts
Posted: Friday, November 14, 2014 - 03:44 AM UTC
Nice base coat and the figure head looks good.

Why the wiring sticking out the side of the headlights?
recceboy
Visit this Community
Alberta, Canada
Joined: July 20, 2006
KitMaker: 706 posts
Armorama: 665 posts
Posted: Friday, November 14, 2014 - 10:32 AM UTC
Great work so far. The track adjusting tool on the back deck, we never had that type. We used ones that were cut down, re welded into a "Z" type form to adjust the tension on the track with the hull MEXAS armour fitted.

Anthony

Author Canadian Leopard Project DVD Series
Lisec
Visit this Community
Croatia Hrvatska
Joined: September 13, 2006
KitMaker: 306 posts
Armorama: 282 posts
Posted: Friday, November 14, 2014 - 11:37 AM UTC

Quoted Text

Nice base coat and the figure head looks good.

Why the wiring sticking out the side of the headlights?


Thank you I have a couple of pics showing this. Wrong?

@anthony i was not aware of that...
LeoCmdr
Visit this Community
Alberta, Canada
Joined: January 19, 2005
KitMaker: 4,085 posts
Armorama: 3,917 posts
Posted: Friday, November 14, 2014 - 06:13 PM UTC

Quoted Text


Quoted Text

Nice base coat and the figure head looks good.

Why the wiring sticking out the side of the headlights?


Thank you I have a couple of pics showing this. Wrong?


The headlights connect to the extension arms. The headlights have no external wiring. They simply screw on to the socket face of the extension arms. If you look at your pics again you may be able to see that the wiring actually emerges from the outside of the extension arm socket and then runs out of sight below the MEXAS.

I think you may have forgotten to attach the horn and its associated wiring too.
junglejim
Visit this Community
Alberta, Canada
Joined: February 18, 2003
KitMaker: 1,728 posts
Armorama: 1,629 posts
Posted: Friday, November 14, 2014 - 09:15 PM UTC
This should help with the wiring. Unfortunately I never took a good photo of the other side where the horn is attached and wired. Also note the antenna bags - with flaps at both ends.


Cheers,
Jim
Lisec
Visit this Community
Croatia Hrvatska
Joined: September 13, 2006
KitMaker: 306 posts
Armorama: 282 posts
Posted: Sunday, February 15, 2015 - 01:44 PM UTC
Sadly, was not able to do more in-progress updates...here it is in the Canadian armor section- https://armorama.kitmaker.net/forums/231867&page=1
 _GOTOTOP