_GOTOBOTTOM
Armor/AFV: AA/AT/Artillery
For discussions about artillery and anti-aircraft or anti-tank guns.
Hosted by Darren Baker
Pak'ed with detail!
JLModels
Visit this Community
Manitoba, Canada
Joined: February 15, 2014
KitMaker: 117 posts
Armorama: 117 posts
Posted: Sunday, November 09, 2014 - 05:10 AM UTC
A little while ago I realized it had been quite a while since I’d built any sort of towed artillery piece (at least eight years!) and the last anti-tank gun I’d built was the ancient Tamiya 88mm Flak when I was a teenager. Thus I decided to rectify that.

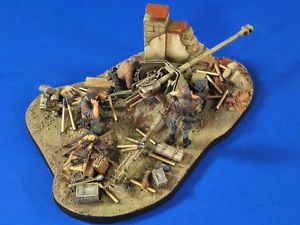
The kit I chose was the AFVclub pak40, which had good reviews on PMMS, as well as ammo and crews available to really take it over the top. The thing that really pushed it over the top for me was that Verlinden just came out with a resin diorama base for it, which would let me concentrate on building the gun and crew, and not worry as much about the base.

So I purchased the kit, and then… kinda went nuts.

One of the glorious and terrifying things about modeling these days is the glut of information available on almost any subject. After just a couple of days of searching I found six walk arounds and 4 books on the Pak40, as well as videos, hundreds of historical photos, etc.

And then I found just how much aftermarket this gun has! Every photoetch manufacturer and their uncle seems to have a pak40 etch set or two. I’ve lost count of how many replacement barrels are available. That’s not including the K59 resin update set which effectively replaces the entire kit gun above the trailing arms!
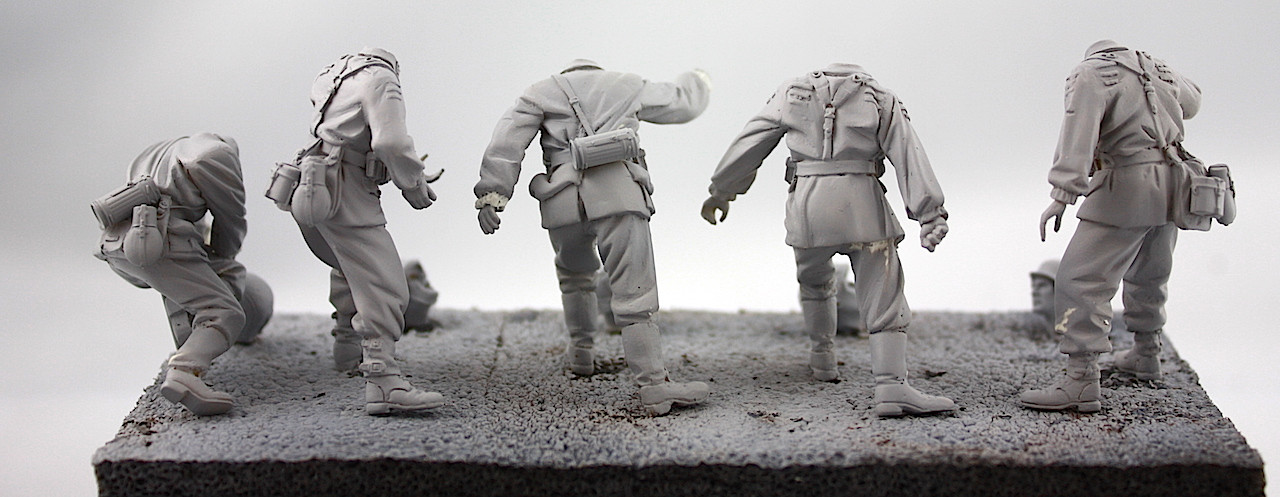
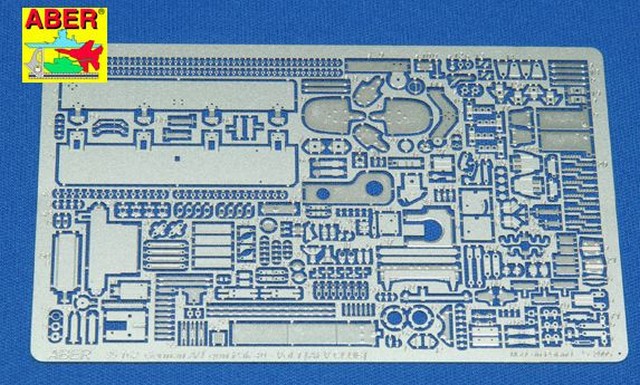
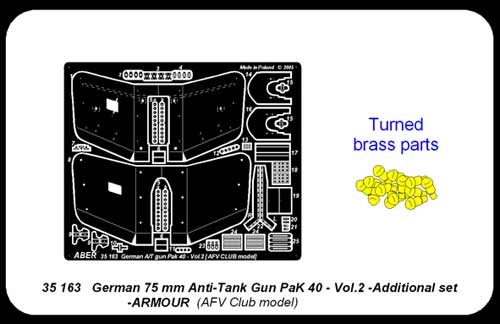
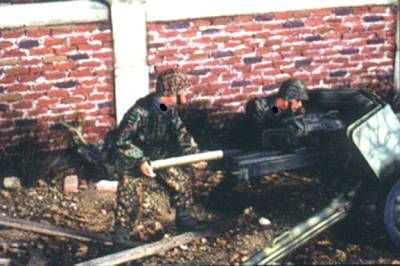
Historically I’ve had the most success with Aber photoetch, so I chose their ‘Basic’ set and their ‘gun shield’ set. For crew I went for Warrior’s SS pak 40 crew #1 and 2, and as mentioned before, the verlinden base.


Finally, mostly because I’d read really good things about K59’s resin stuff, I also picked up their Pak40 update set.


Yes, all of this for one small artillery piece. In the end I think I’m actually only using about 25% of the AFVclub kit. As I said, I’m nuts.

So, with that out of the way, lets get to building!

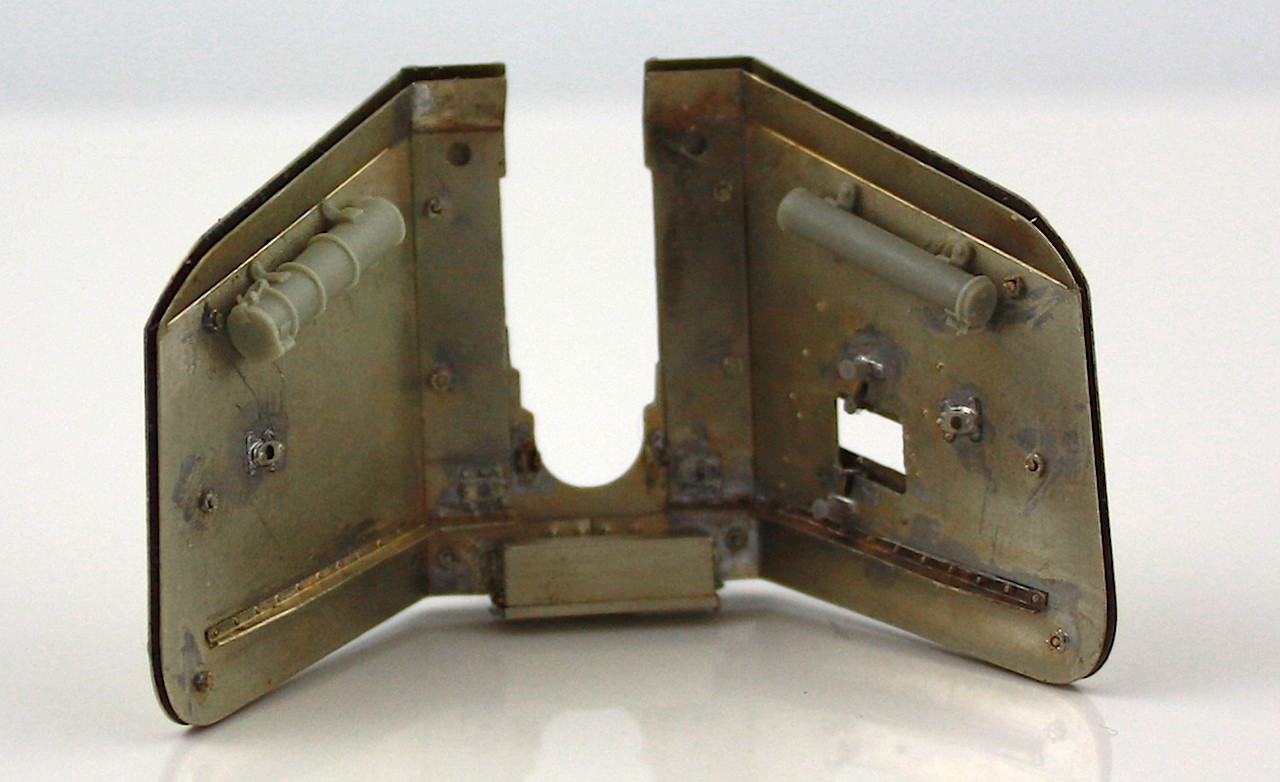
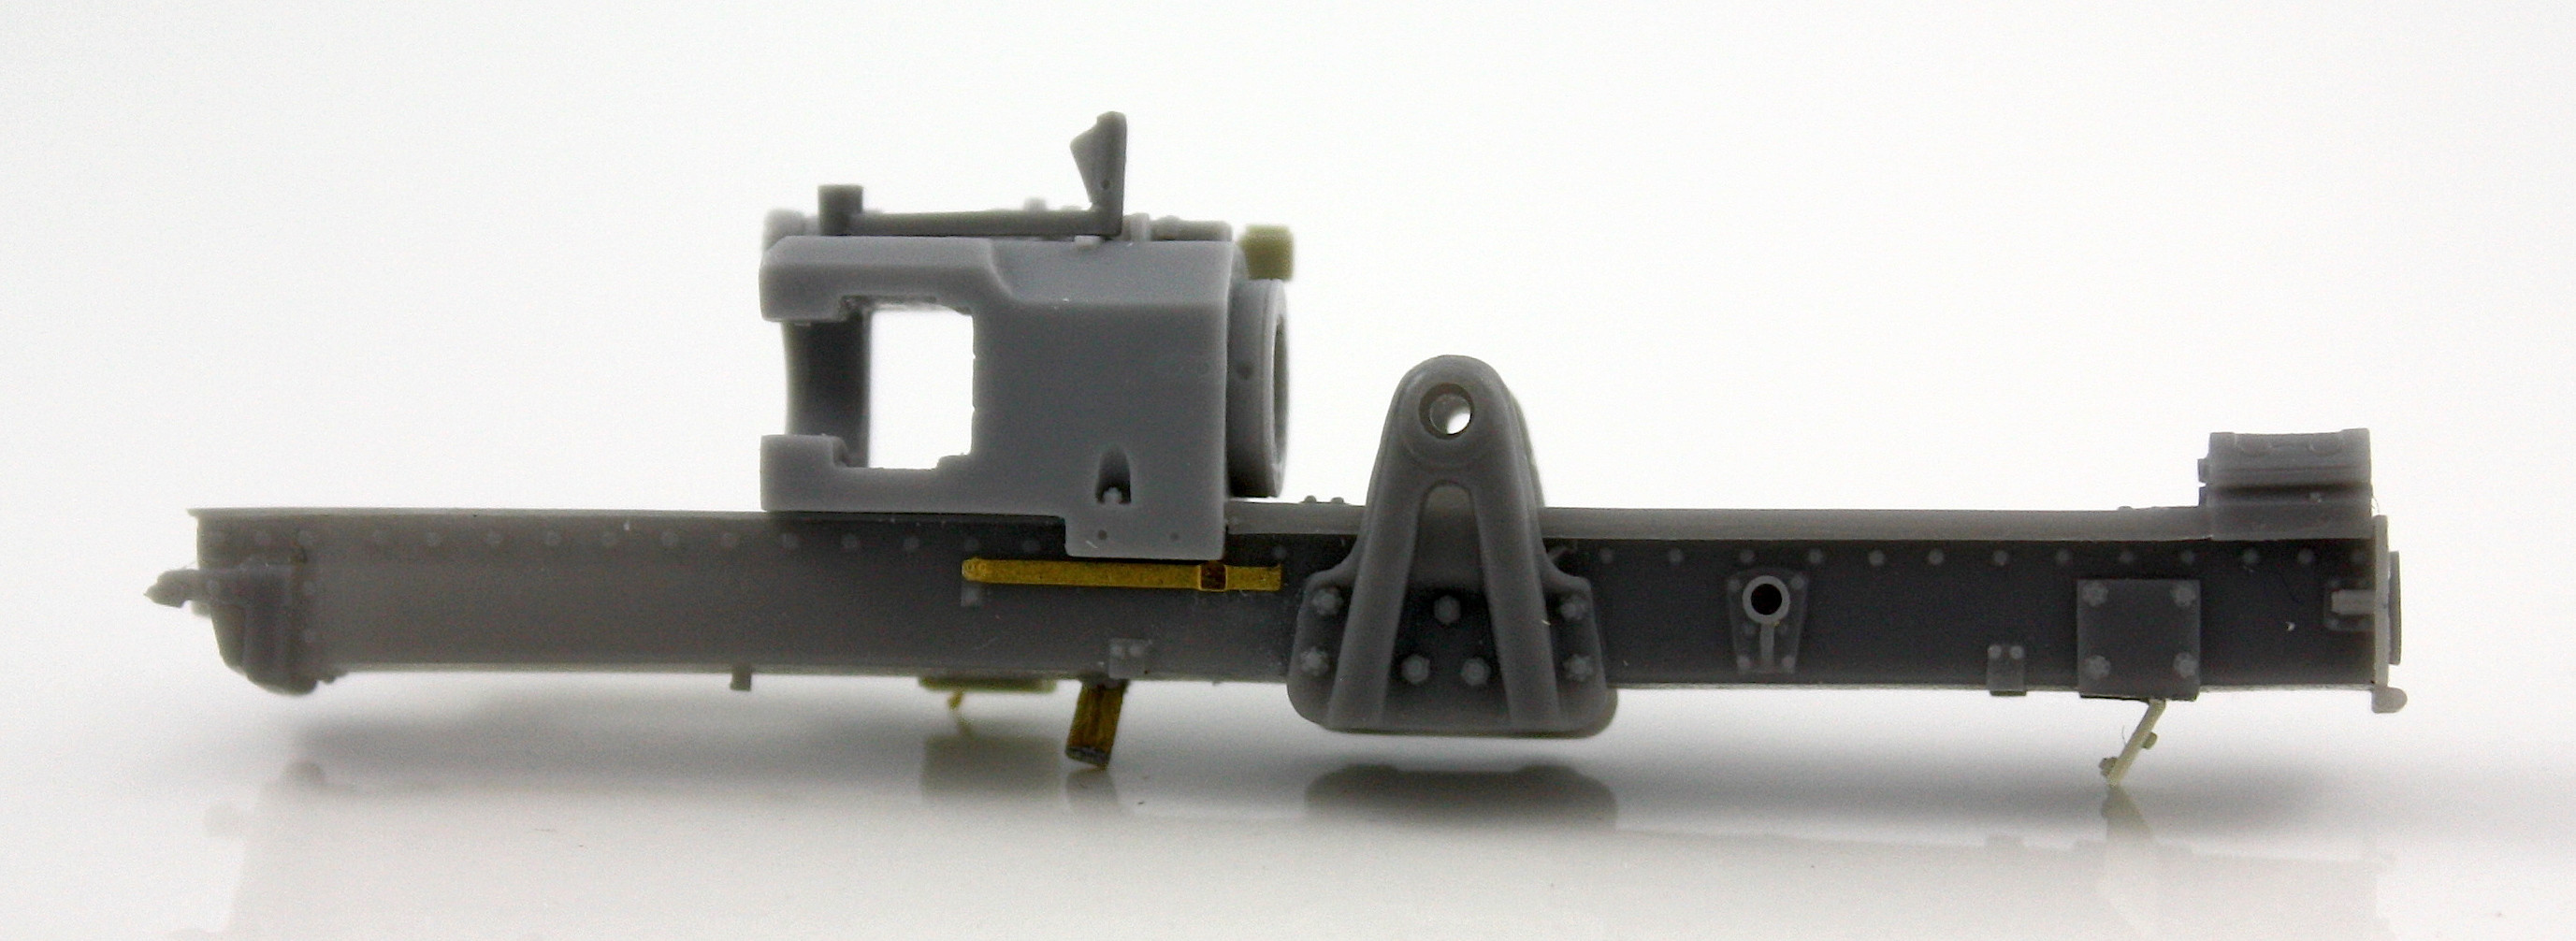
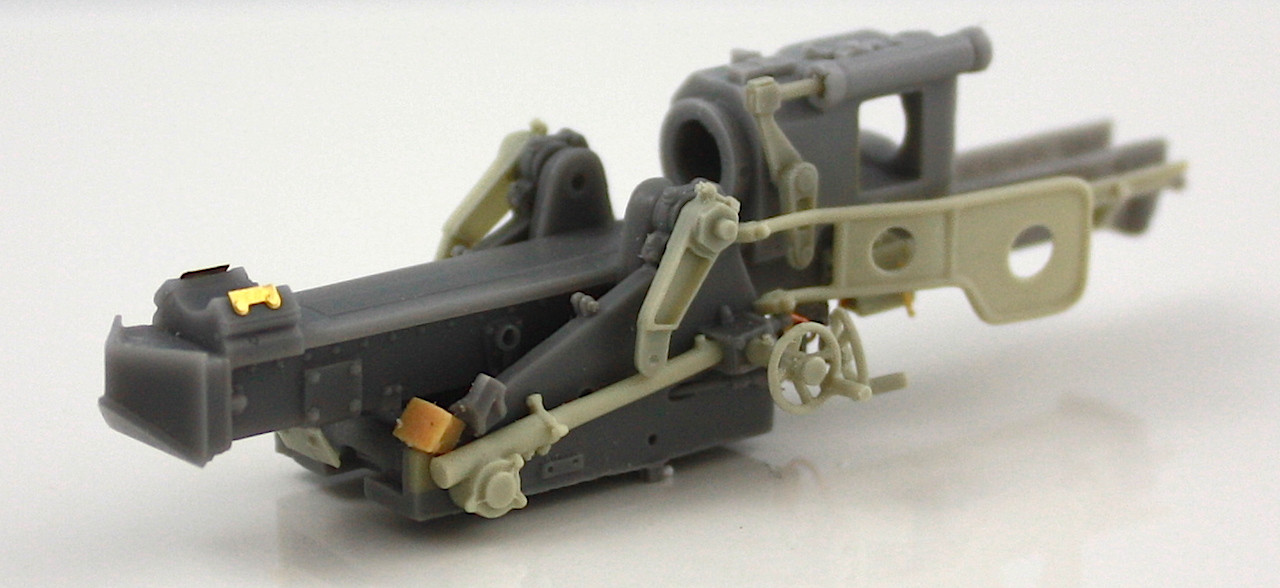
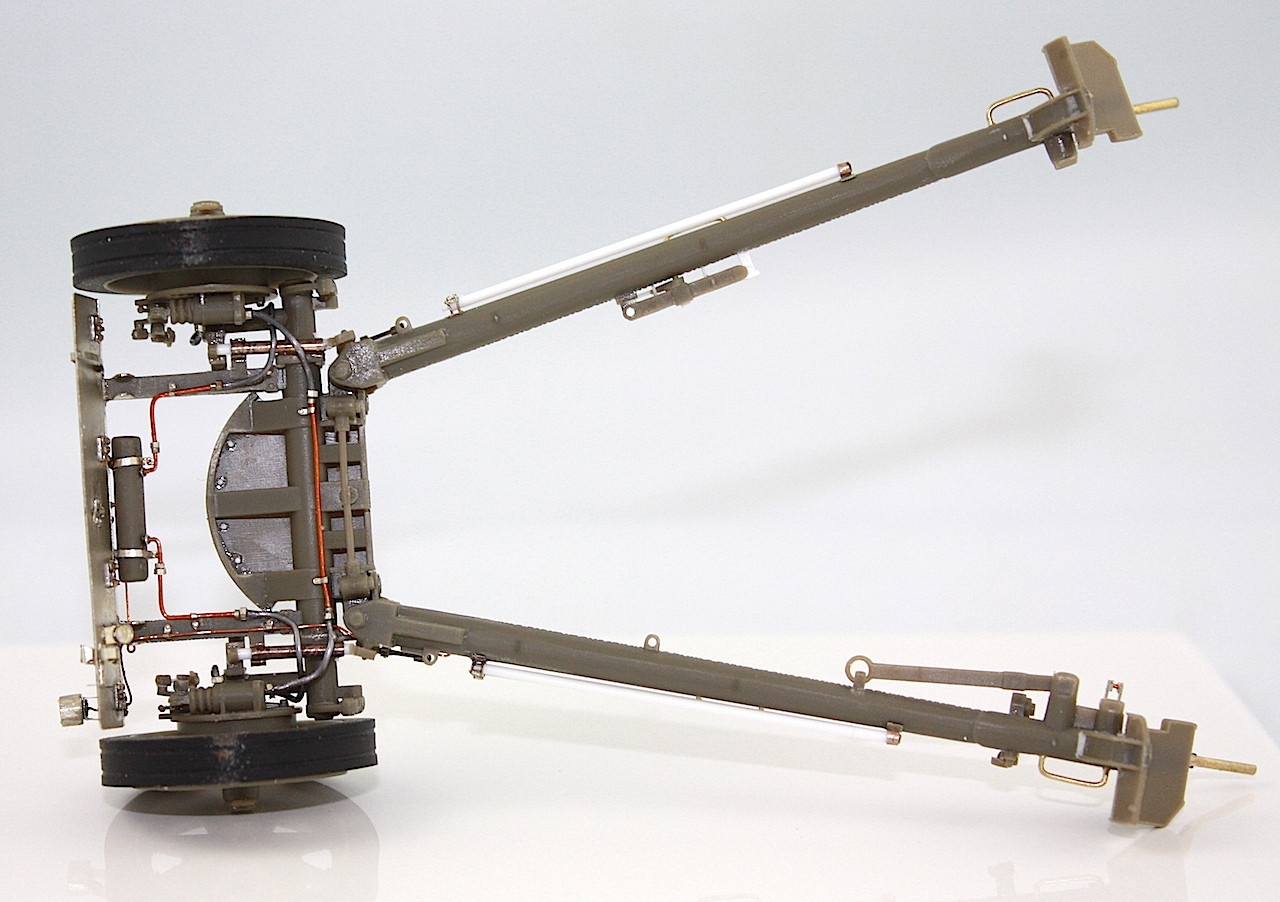
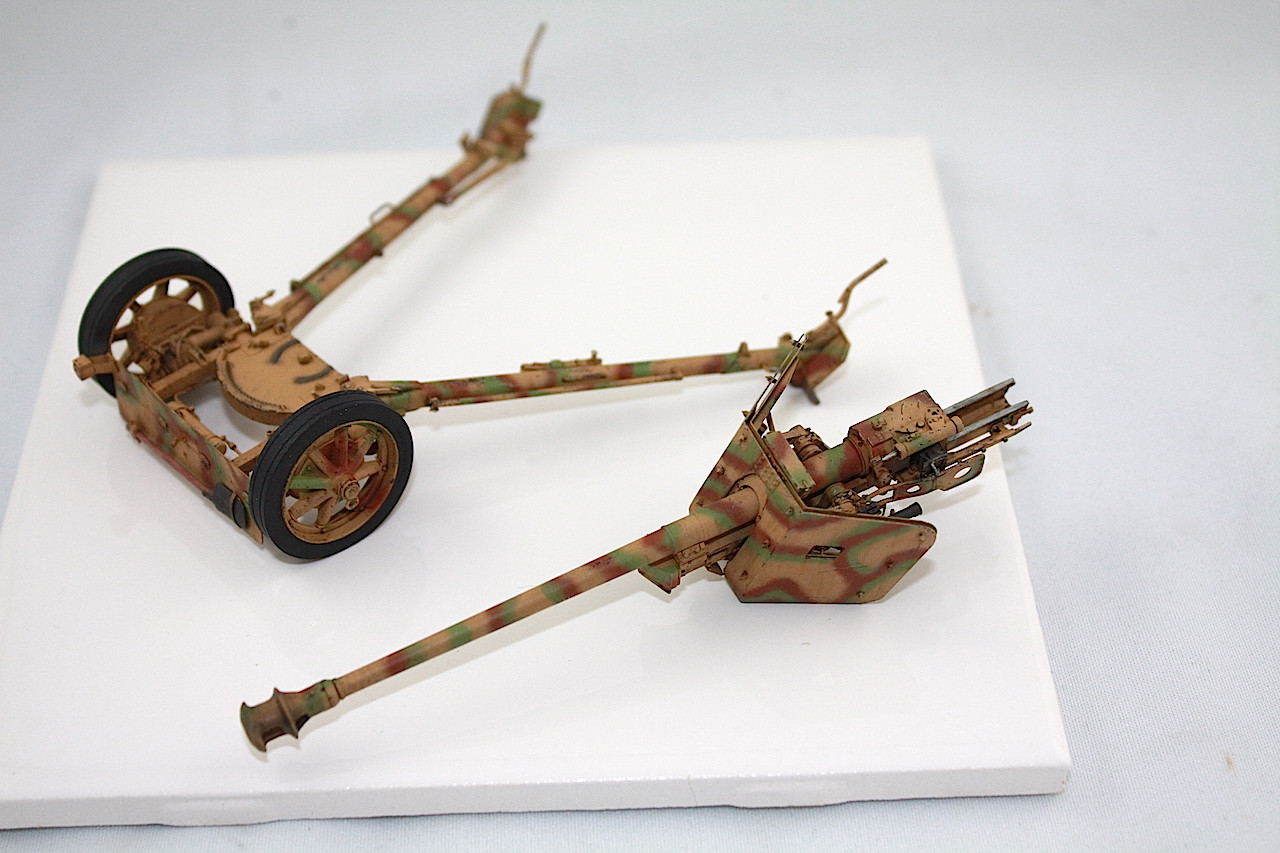
I began with the trailing arms, which went together fairly nicely. The pak 40 had a lot of production variations, especially in terms of wheels, muzzle breaks, and electrical and pneumatic braking. The AFVclub kit including the pneumatic brakes, air tank, and the connectors on the right trailing arm, which I installed. If you want to simplify construction so you don’t need to do all of the air line plumbing you can leave these parts off and fill their locator holes.

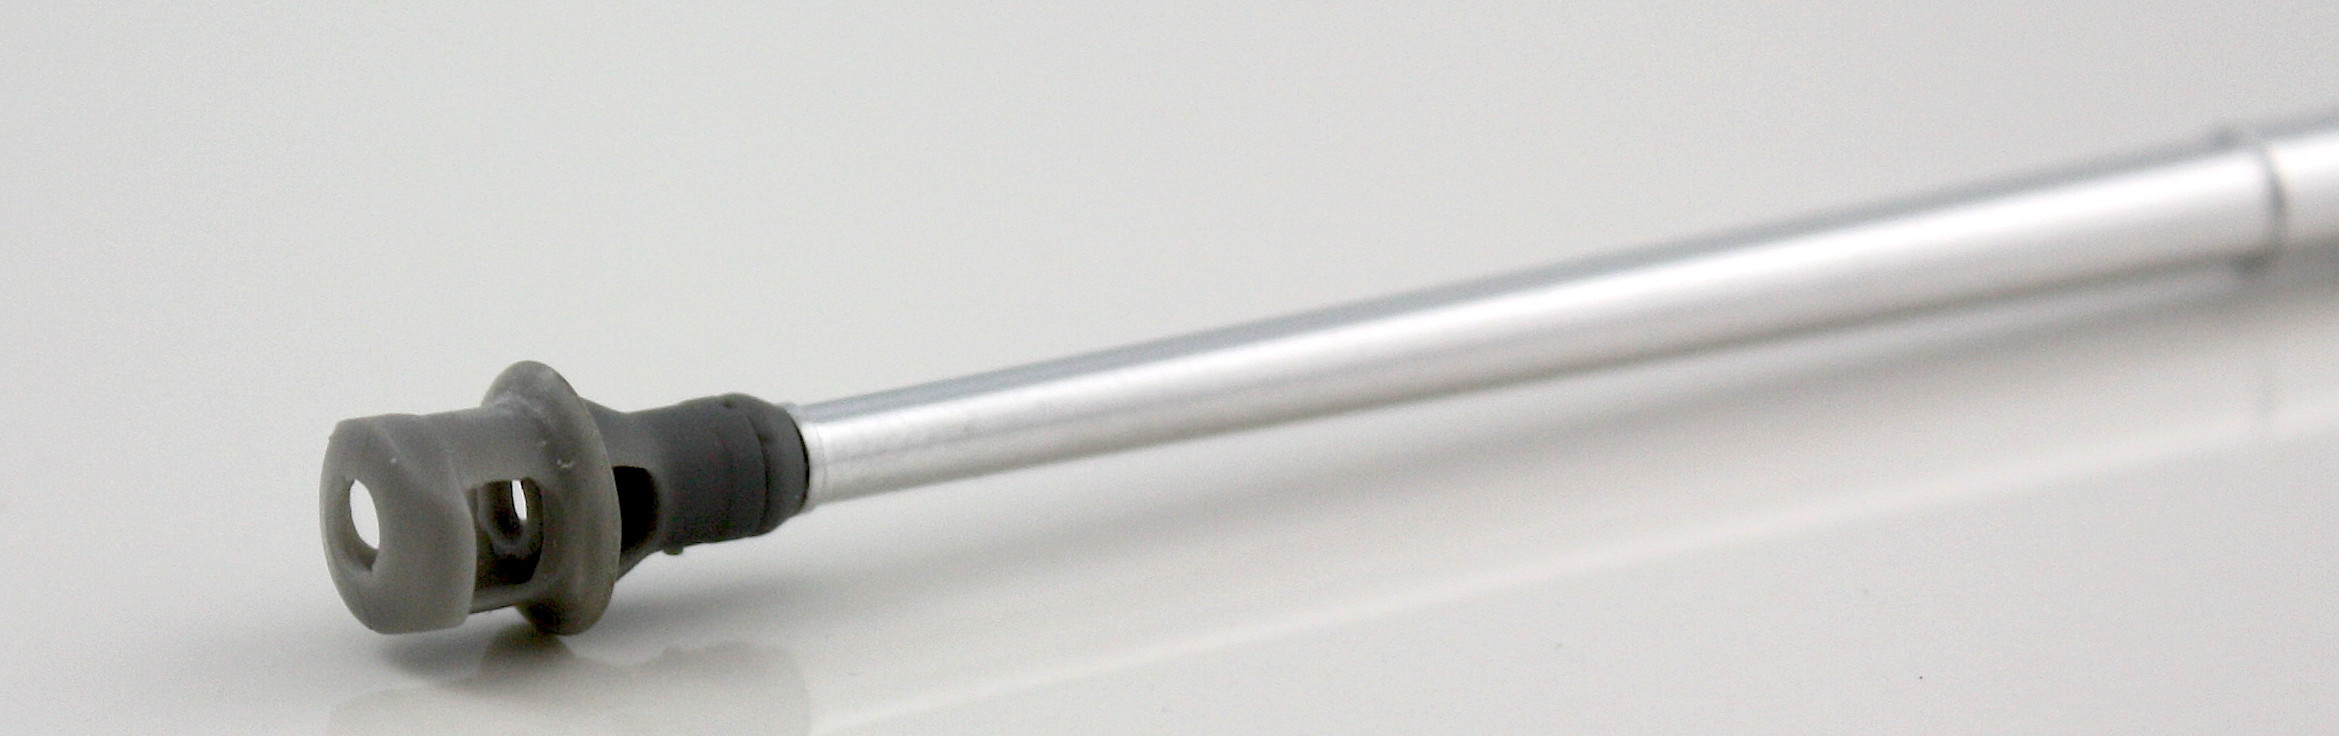
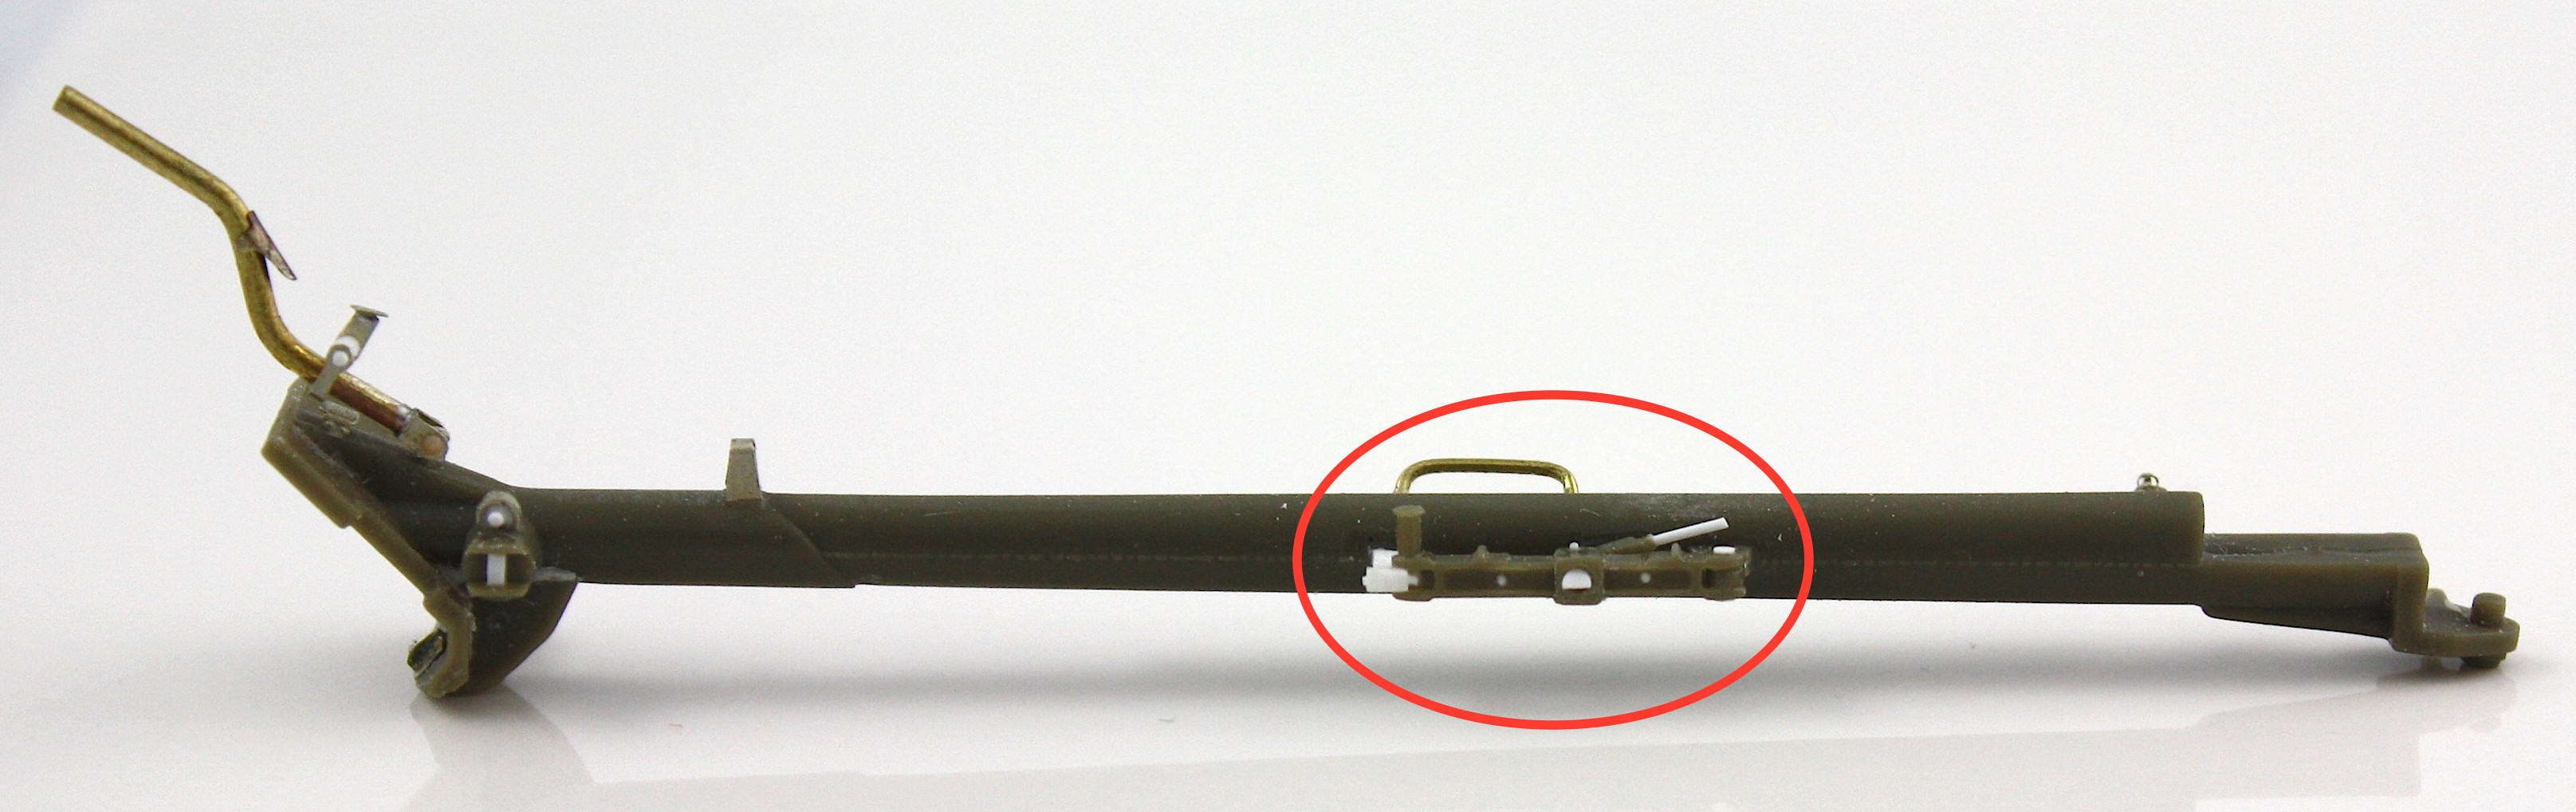
As usual for me, rather than bother removing the mold seams and ensuring roundness of the grab handles, I simply replaced them with brass rod. The gun barrel cleaning rods were also replaced with evergreen plastic rod in the aber mounts.


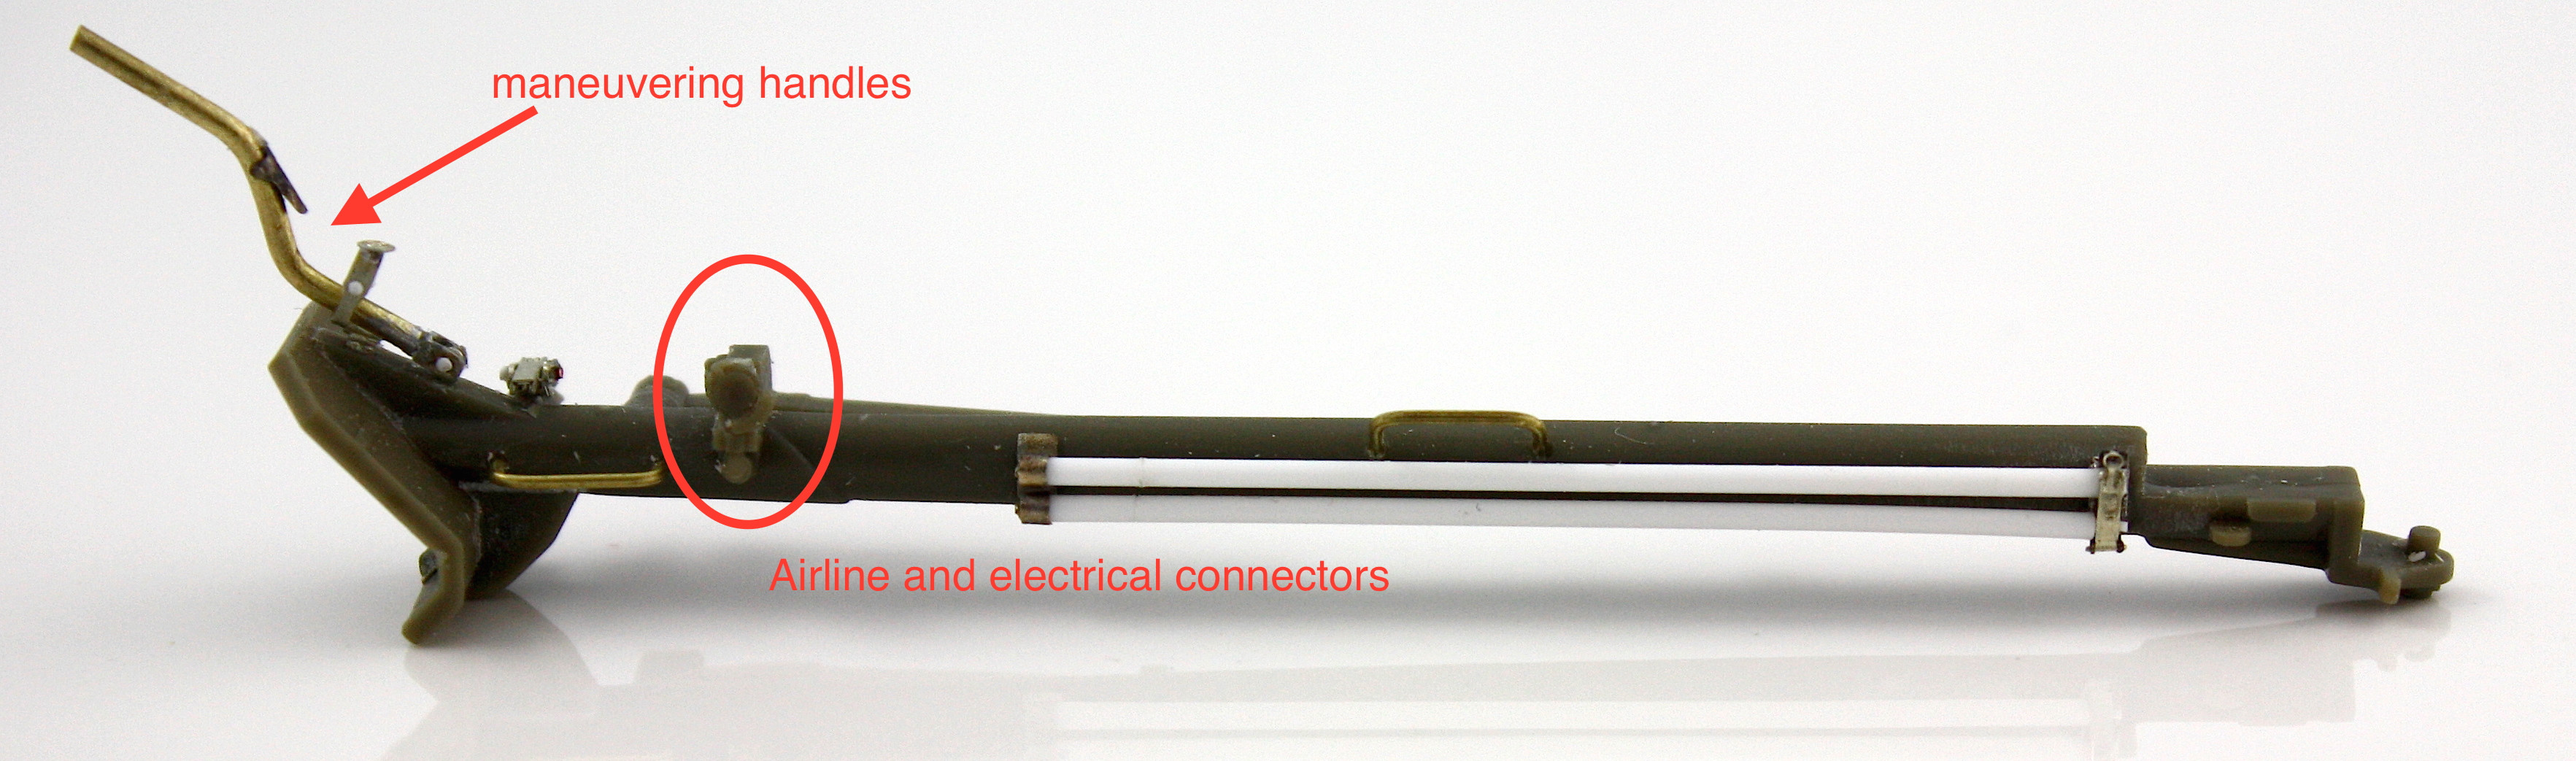
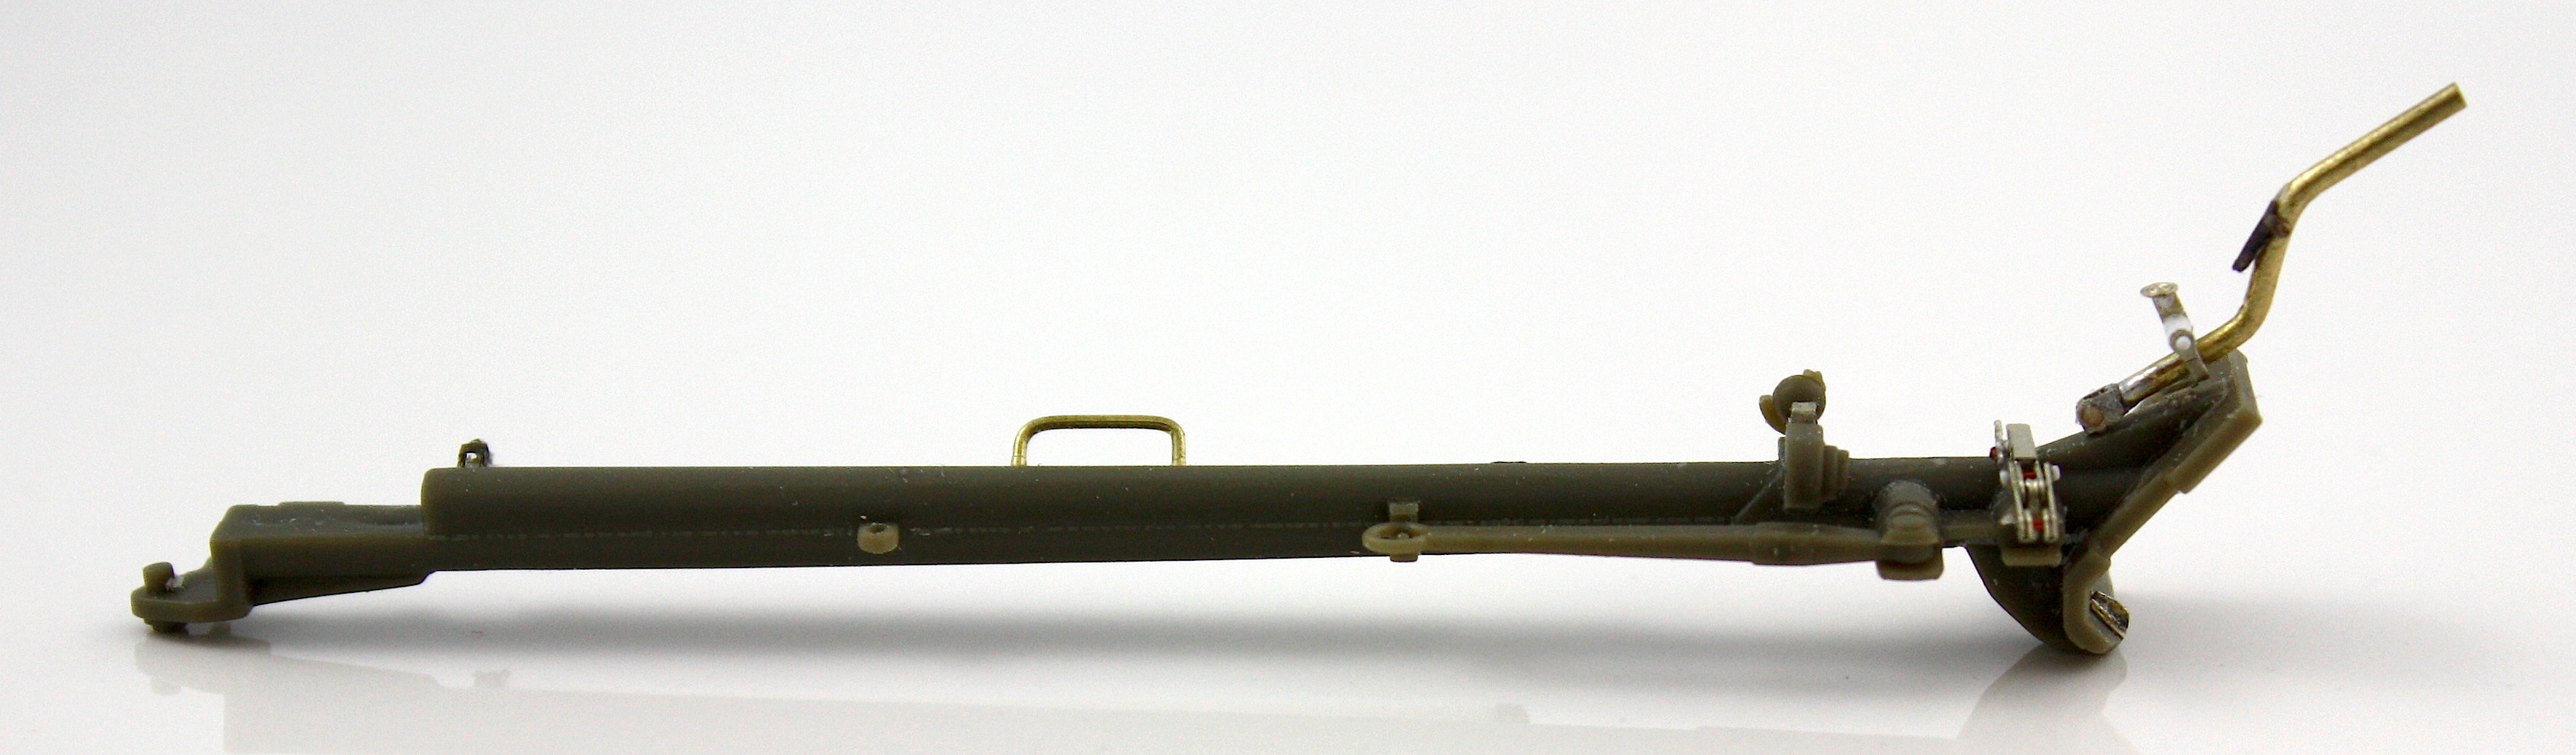
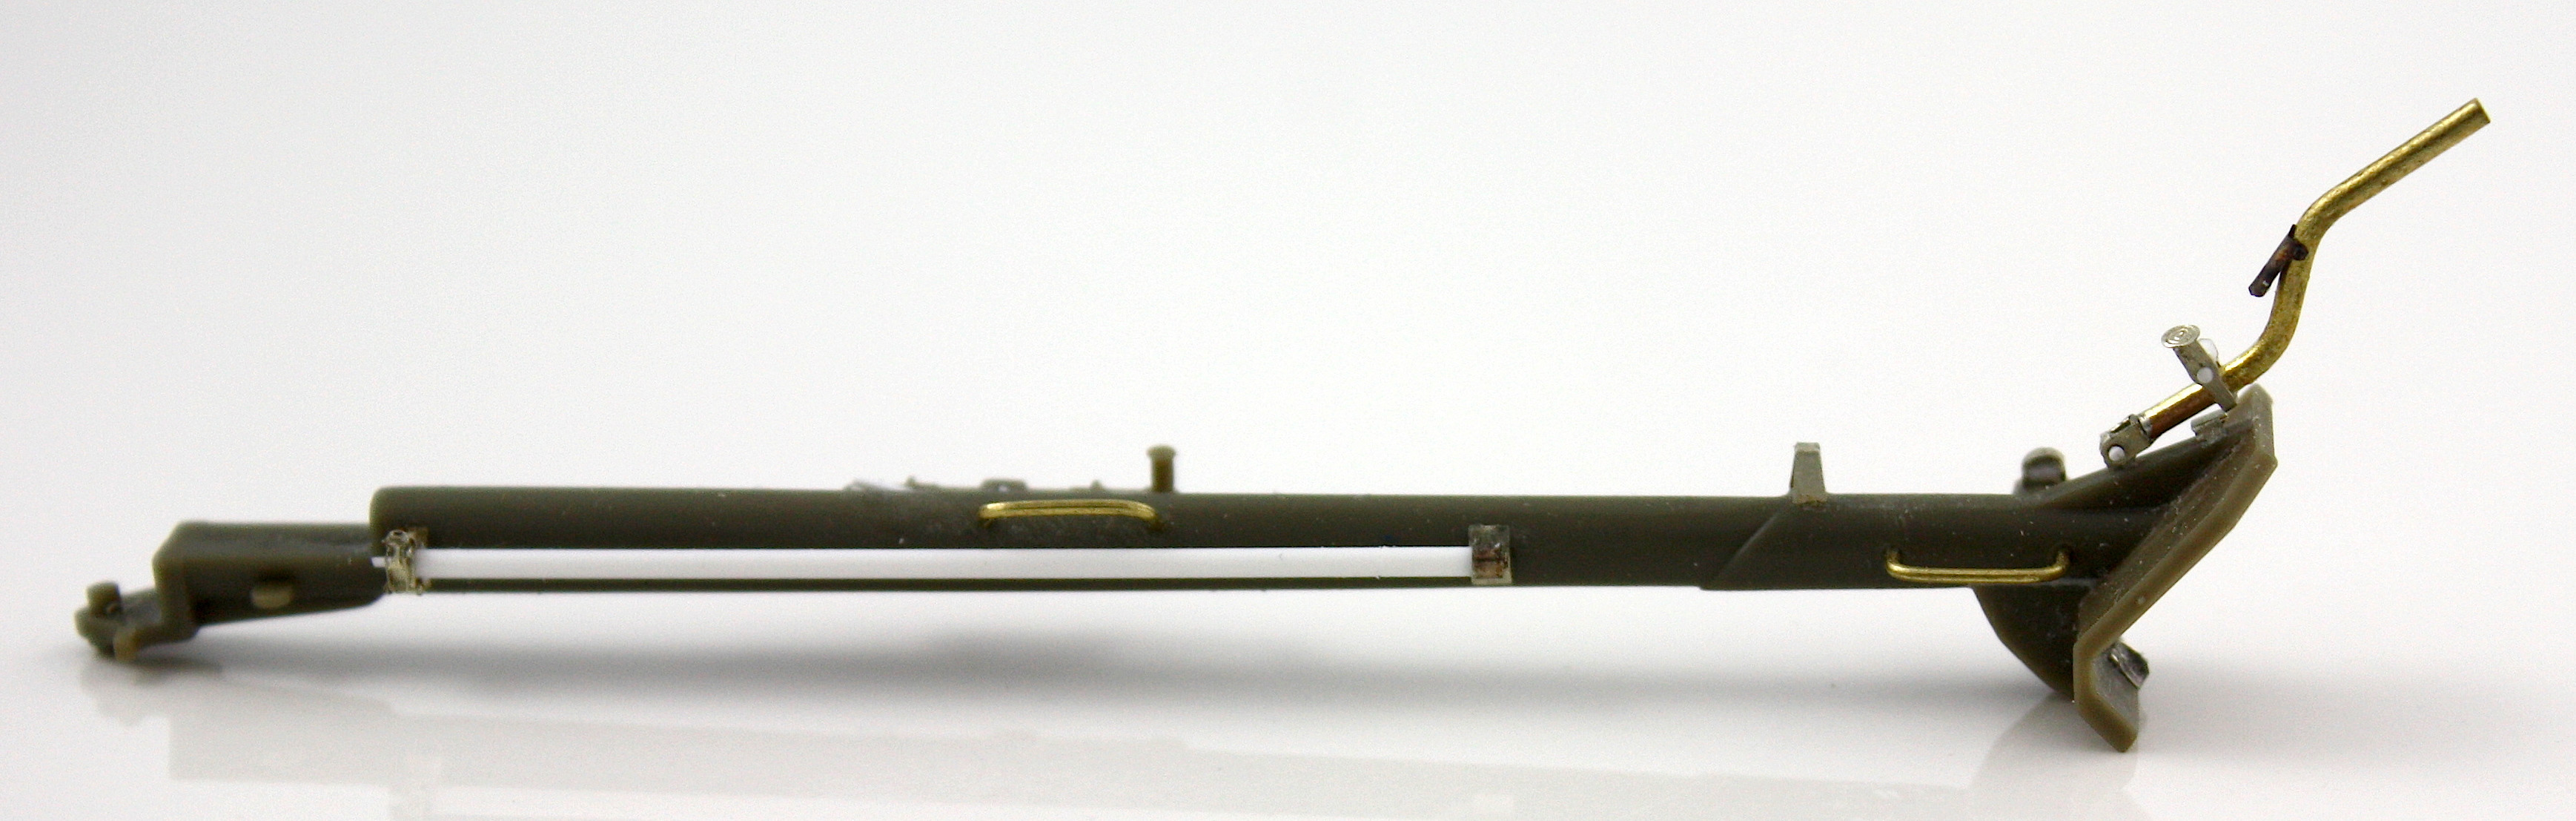
The biggest job here was to replace the folding rear trailing arm maneuvering handles with brass rod and photoetch from the aber set. It all goes together really well, but I HIGHLY recommend soldering these. They are delicate and you’ll probably knock them off a dozen times during construction and finishing if you superglue them instead.

In fact, as a note, this build relies a LOT on soldering. If you want to practice your soldering skills, the Aber pak 40 sets, especially the gun shield is a great place to do so. I actually wound up buying a butane soldering torch to supplement my soldering iron in order to get everything together.

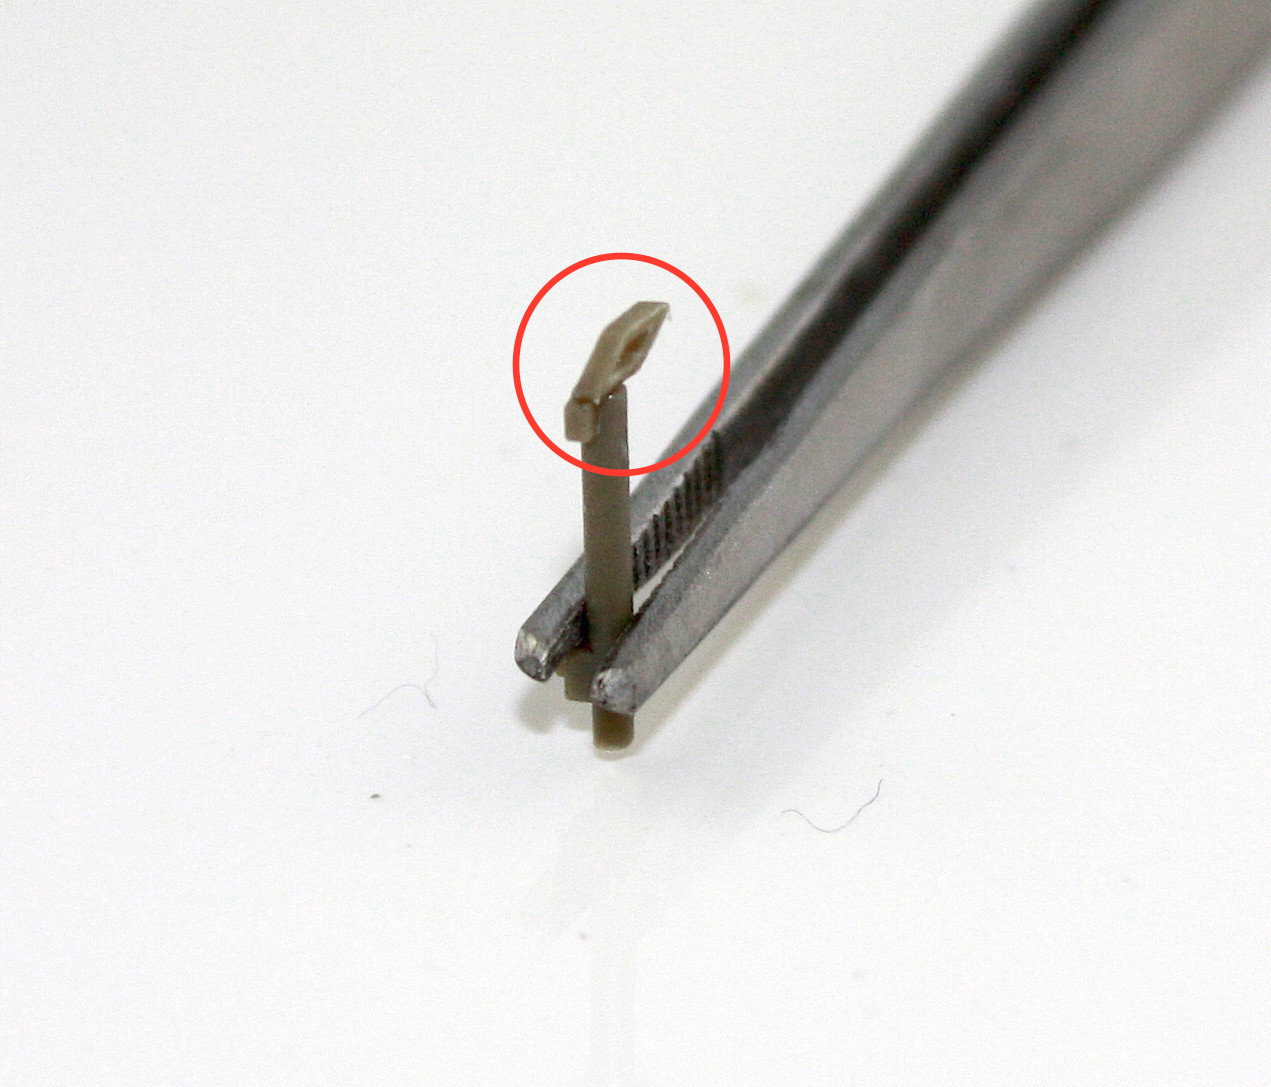
The trailing arm locking brace that connects the two arms together in the center when in travel mode was also detailed as per various walk arounds and book photos. I’ve seen two different styles of handles on this, a straight bar and an angled one. I went with the straight one as it’s more common in historical photos.


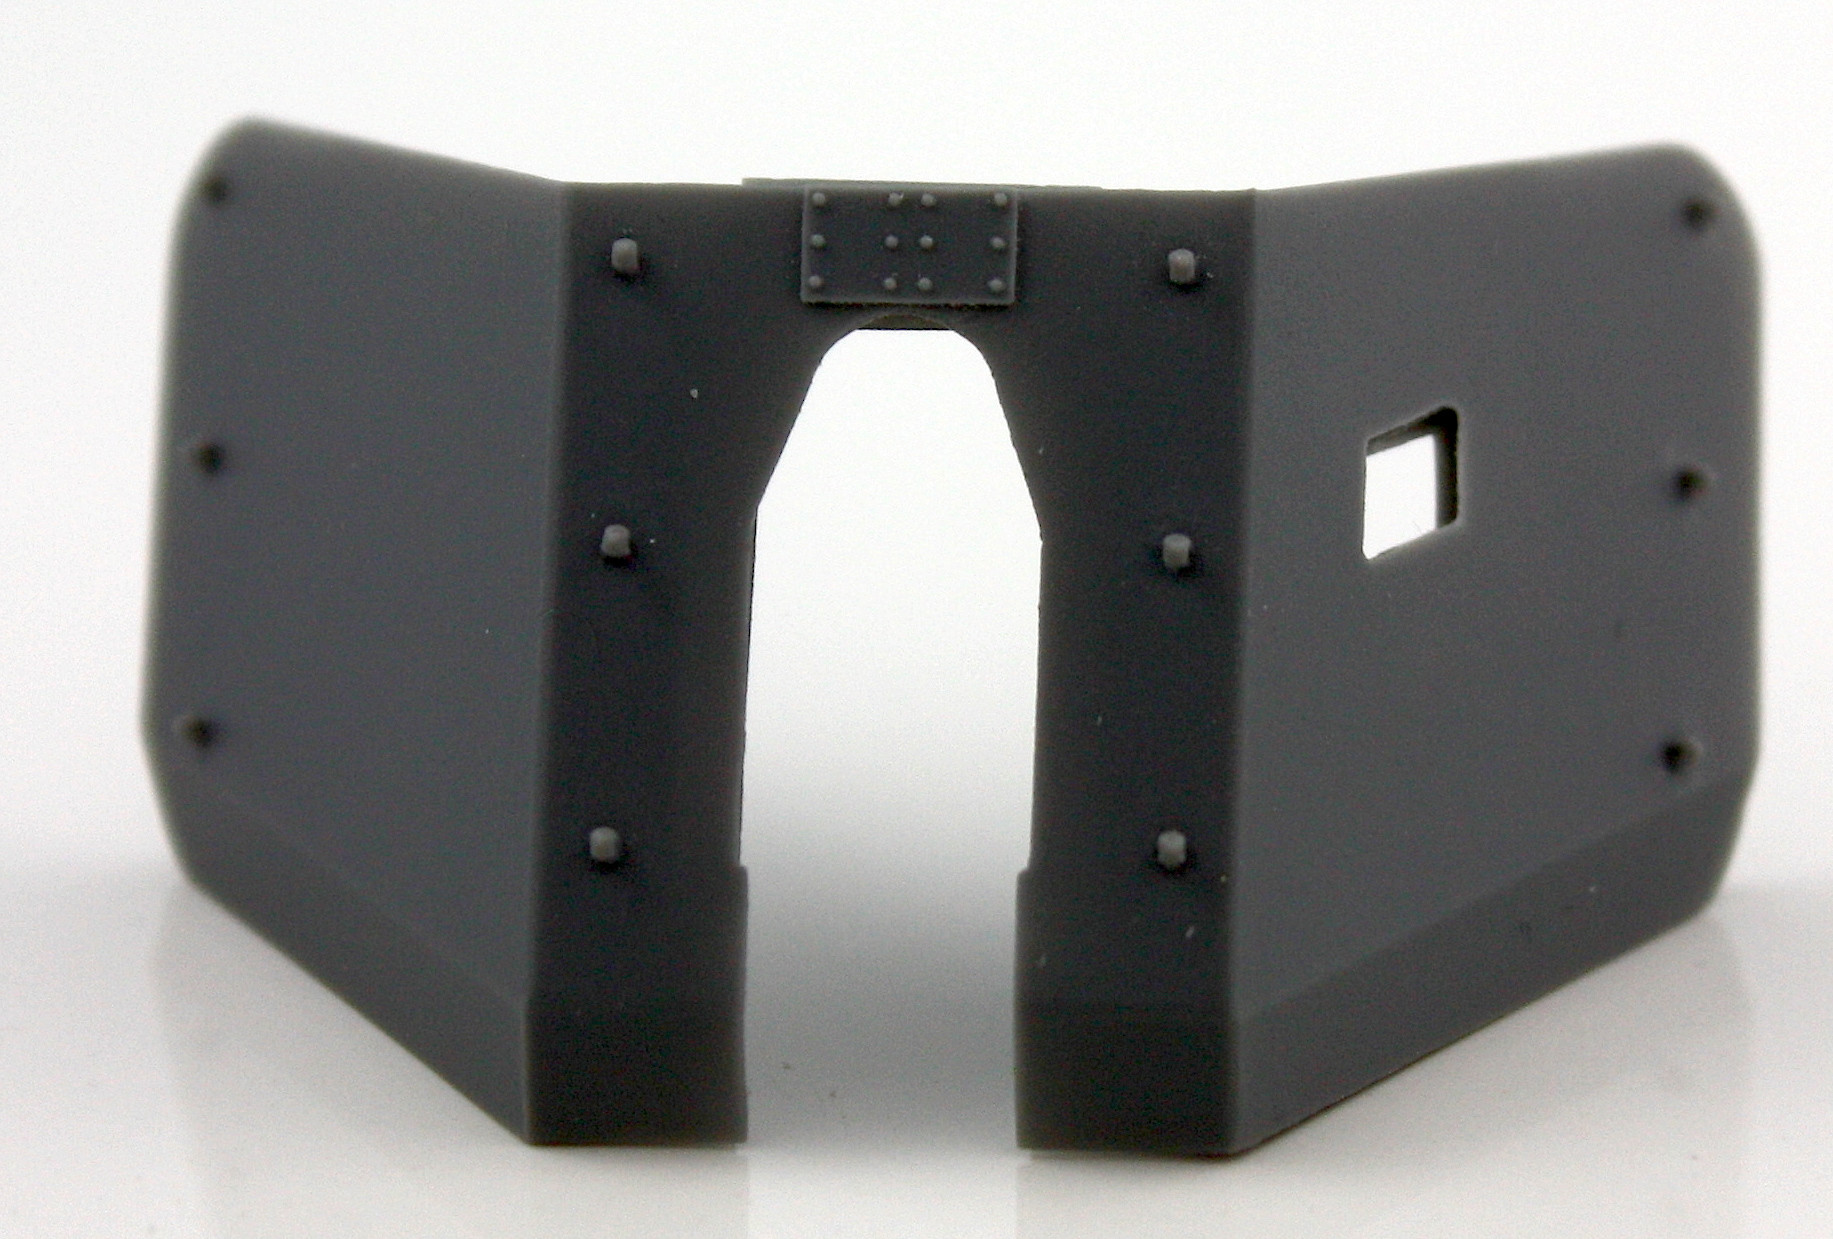
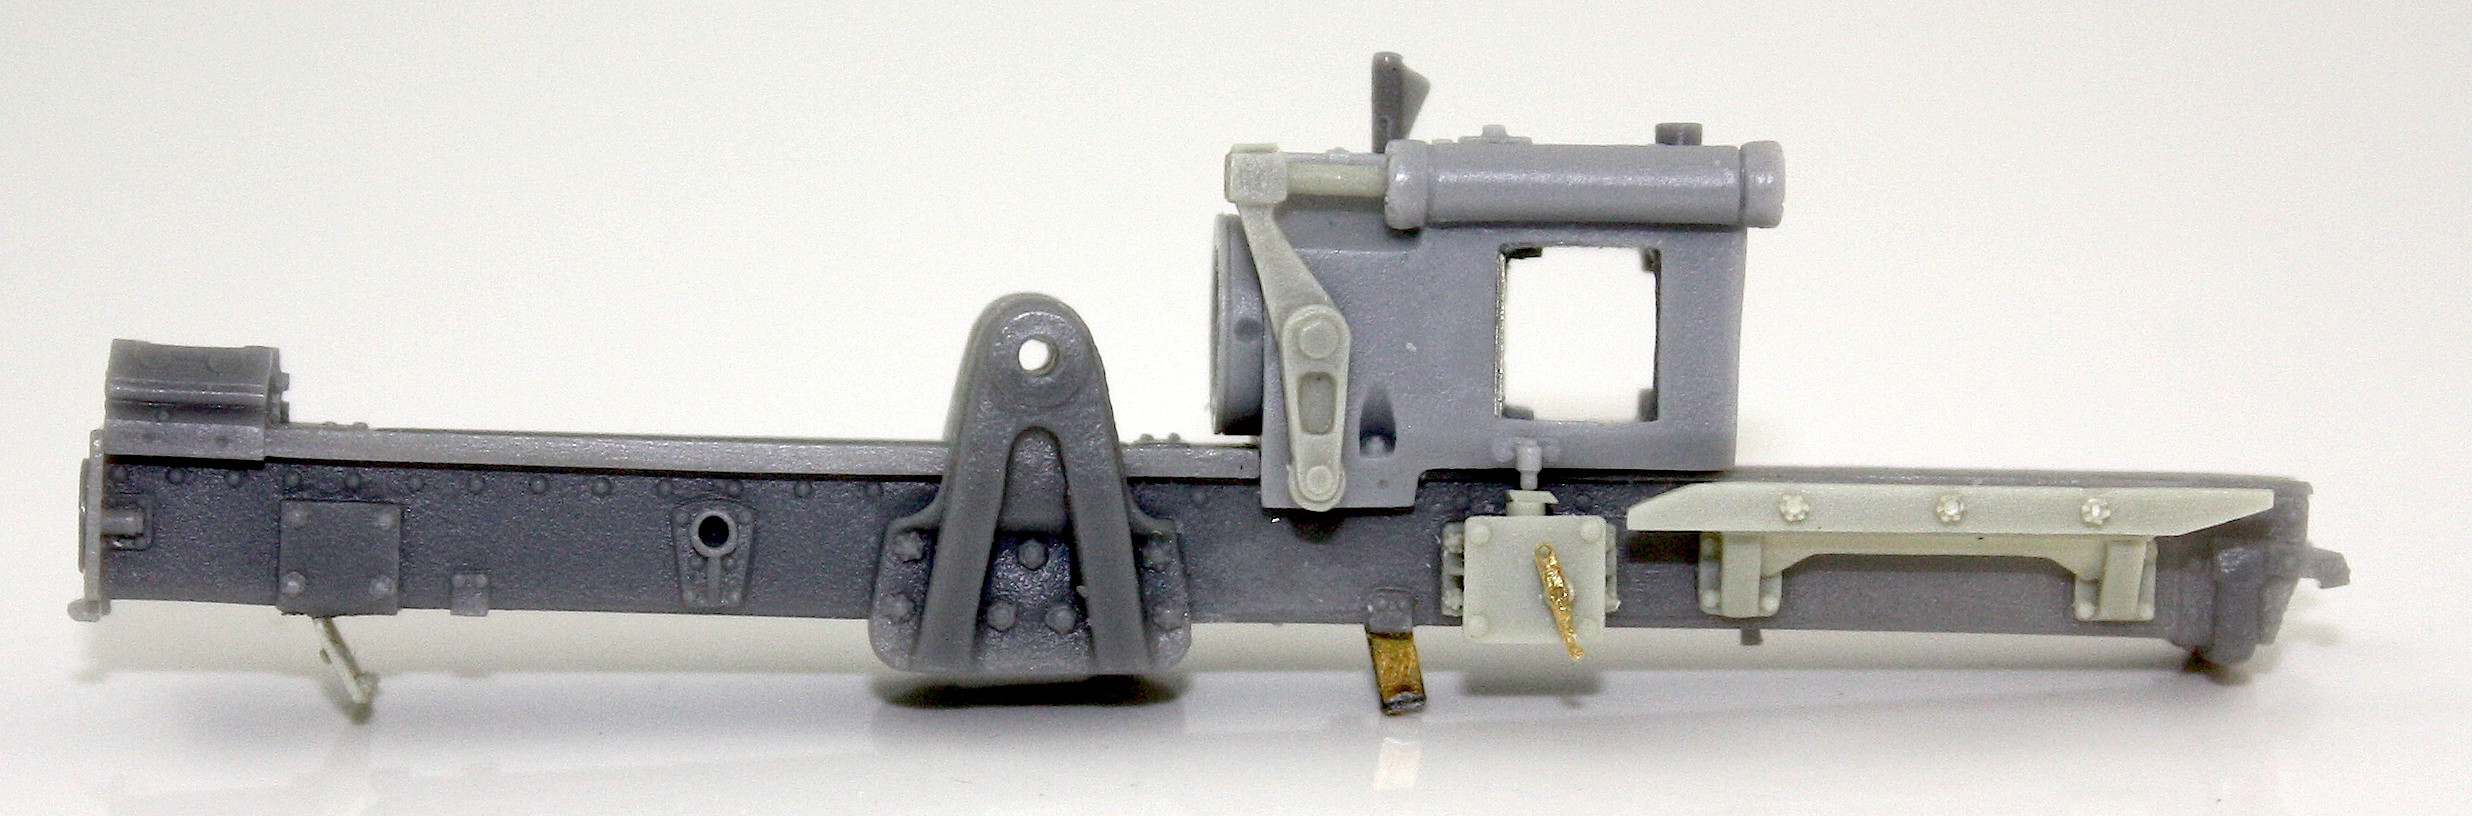
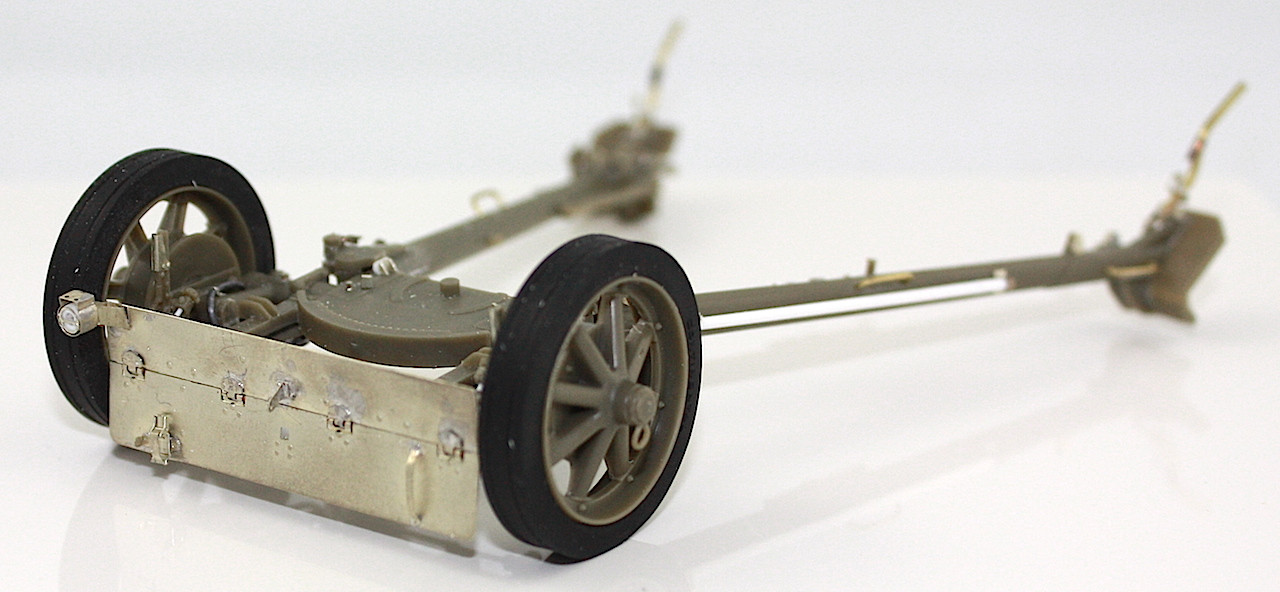
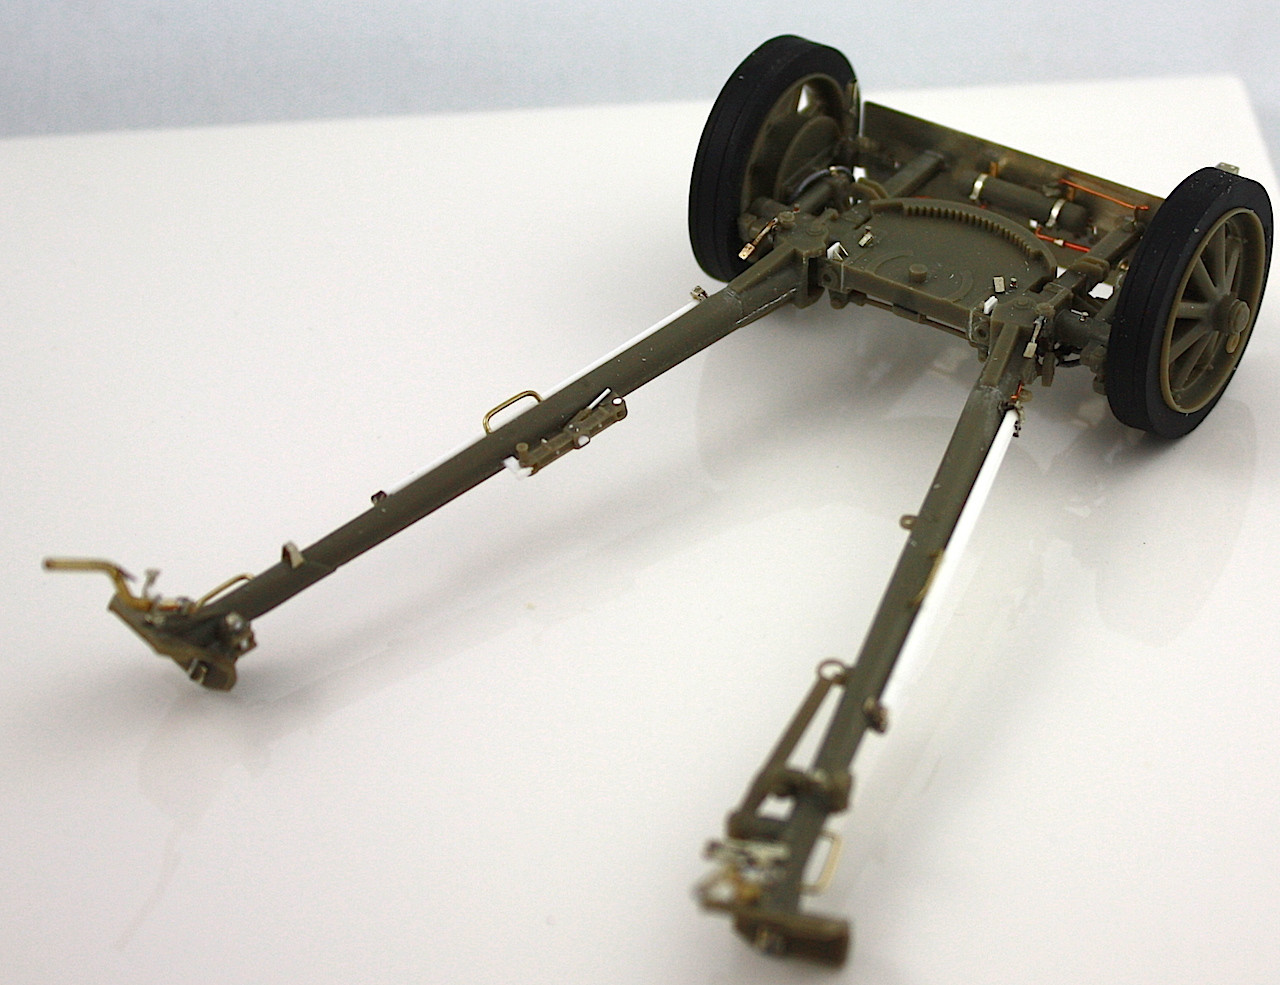
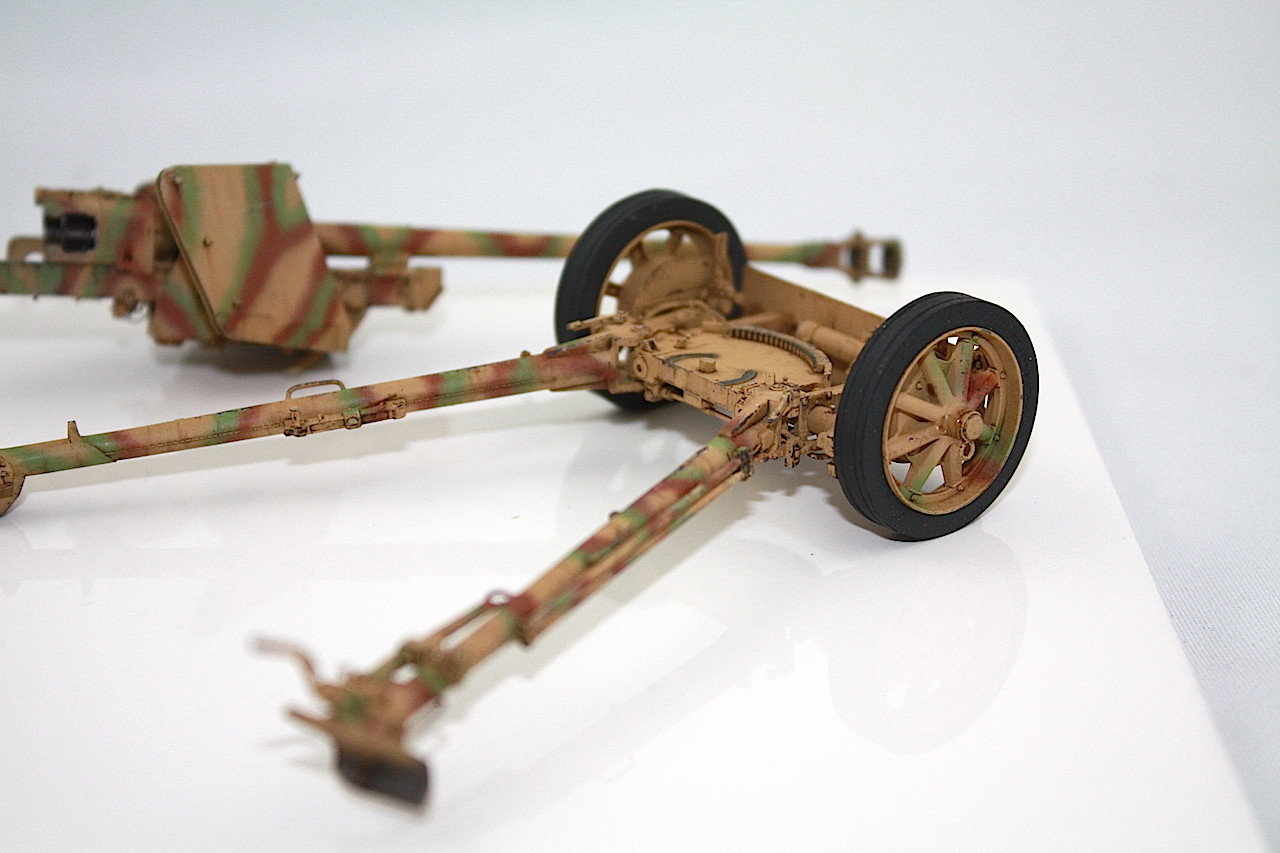
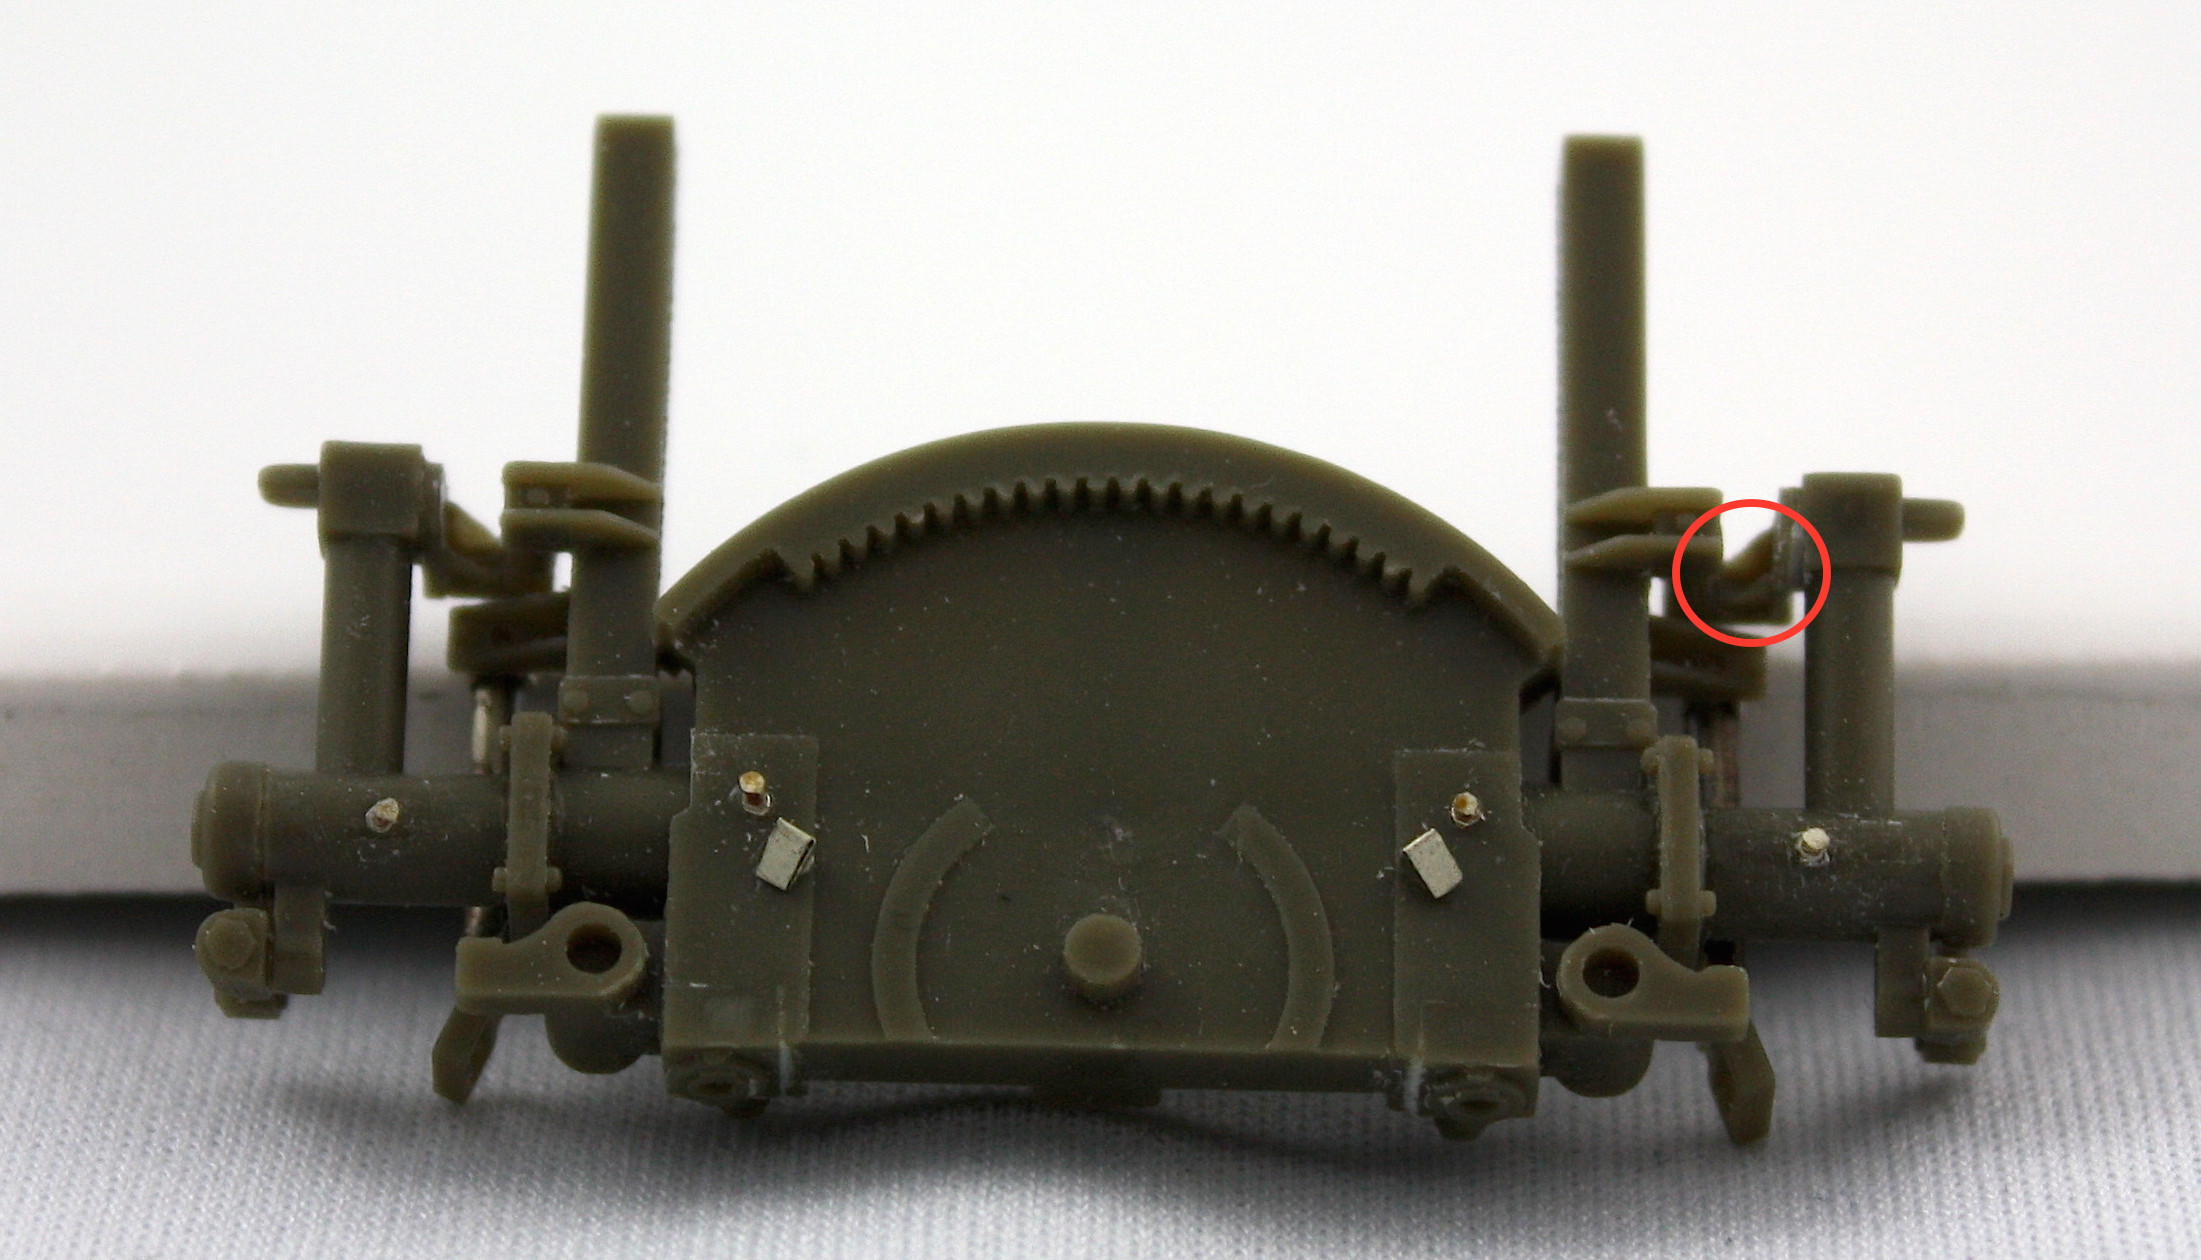
Next it was on to the gun mount base. Here I had some issues with the AFVclub kit. I’m pretty sure I followed the directions correctly, but I got to a point where attaching one of the wheel mount arms in the correct orientation was impossible because the mount points are keyed (a half-circle shaped pin goes into a half-circle shaped hole) but if I put together like that one of the wheel mounts was always upside down. I checked all of the part and part numbers, and every time I assembled it the kit wound up like that. In the end I just opened up the half-circular hole and flipped the part over, and everything matched up with references and such, but it was still surprising.

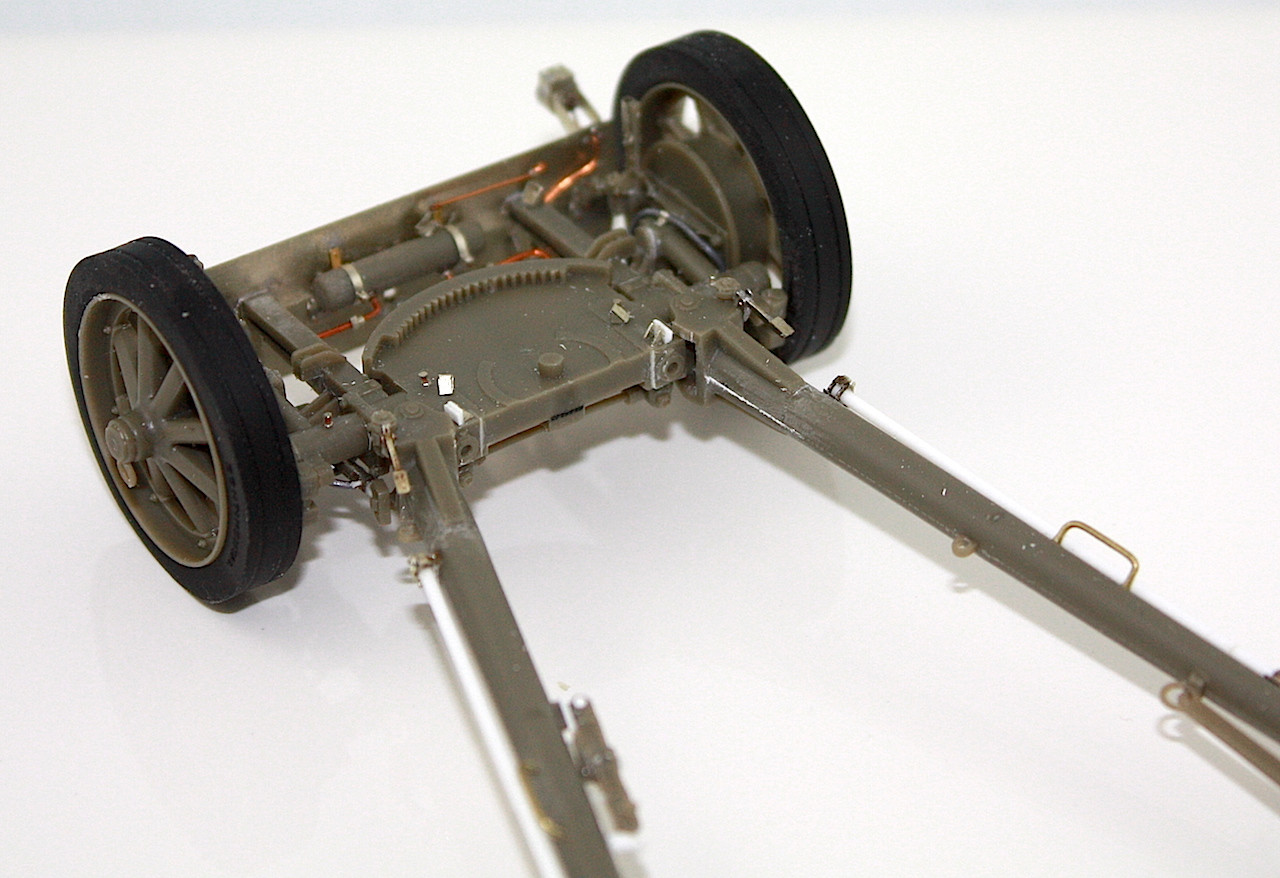
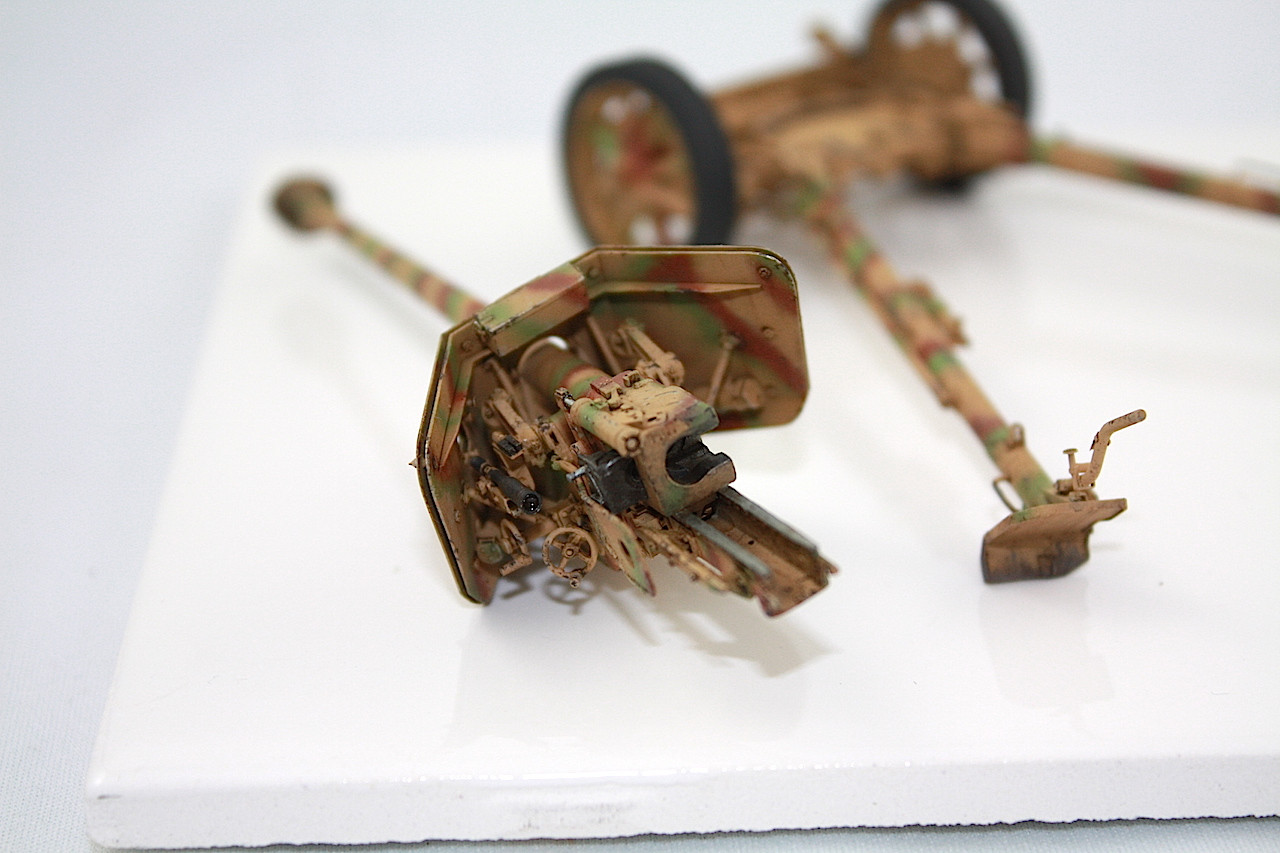
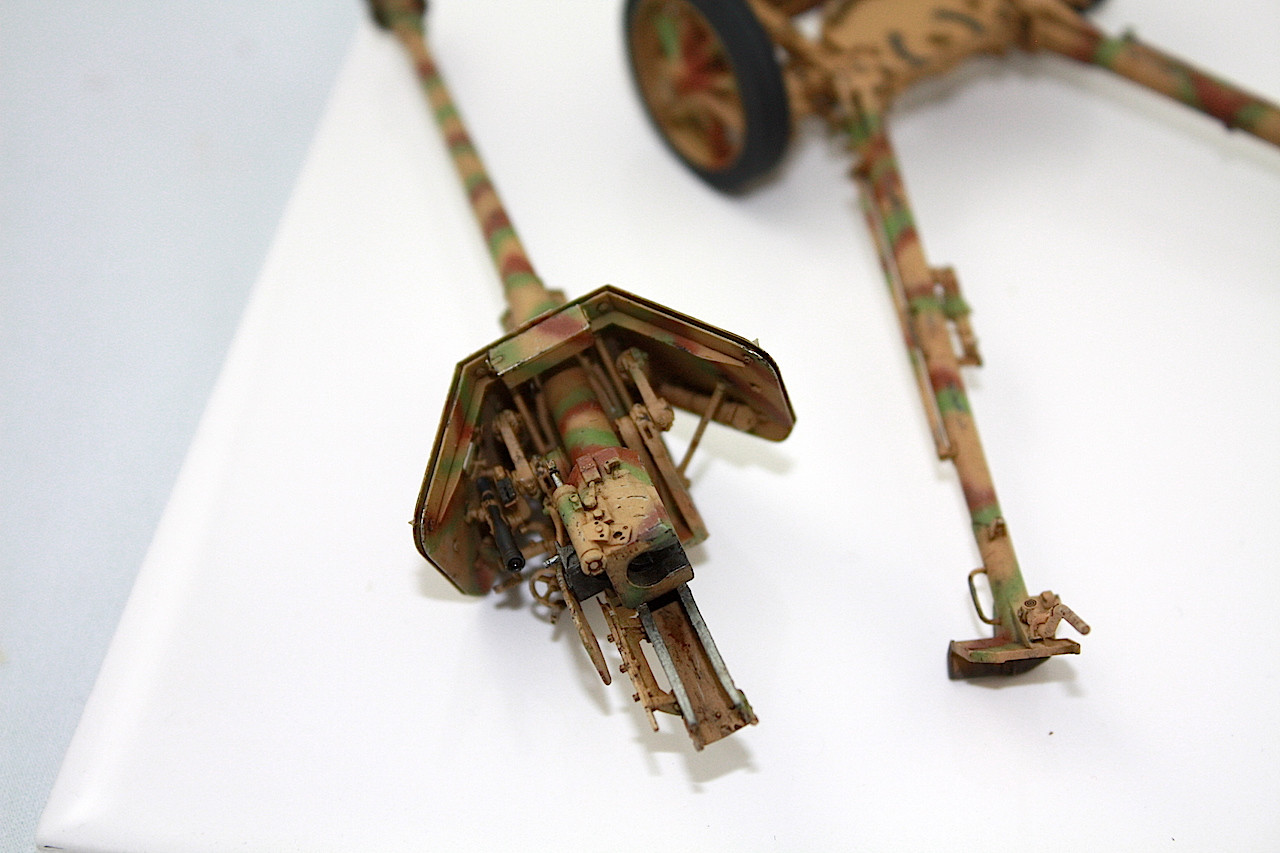
Small bits of photoetch and wire were added here for the gun mount stops and oiling points.
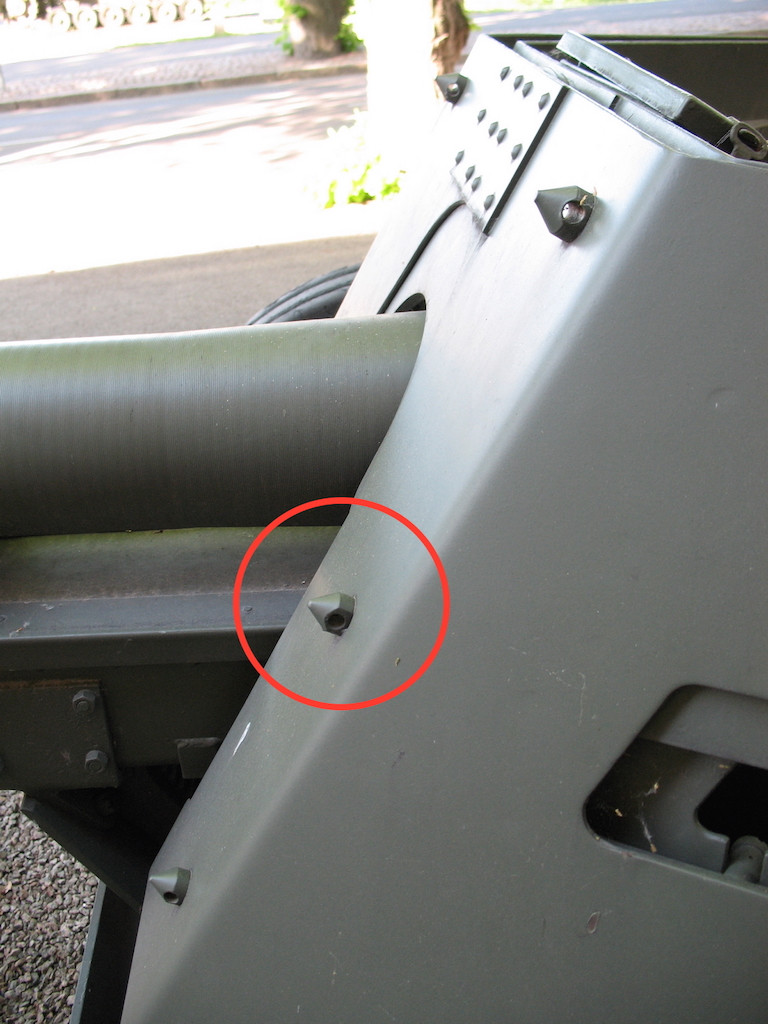
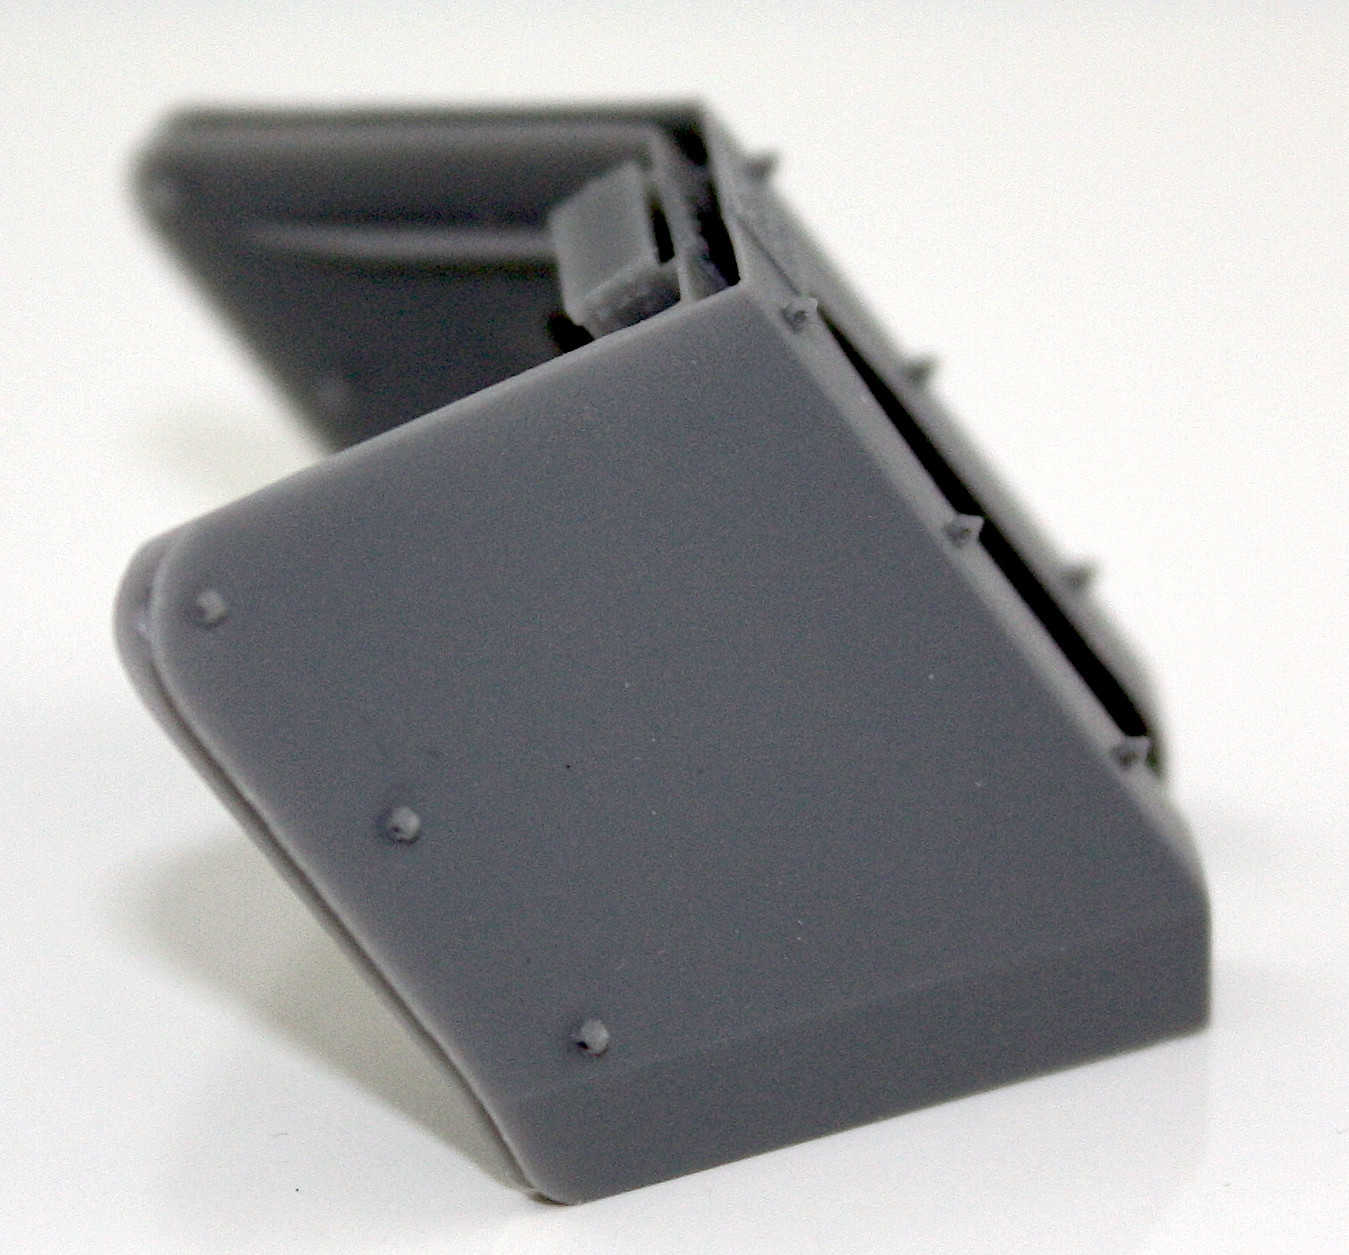
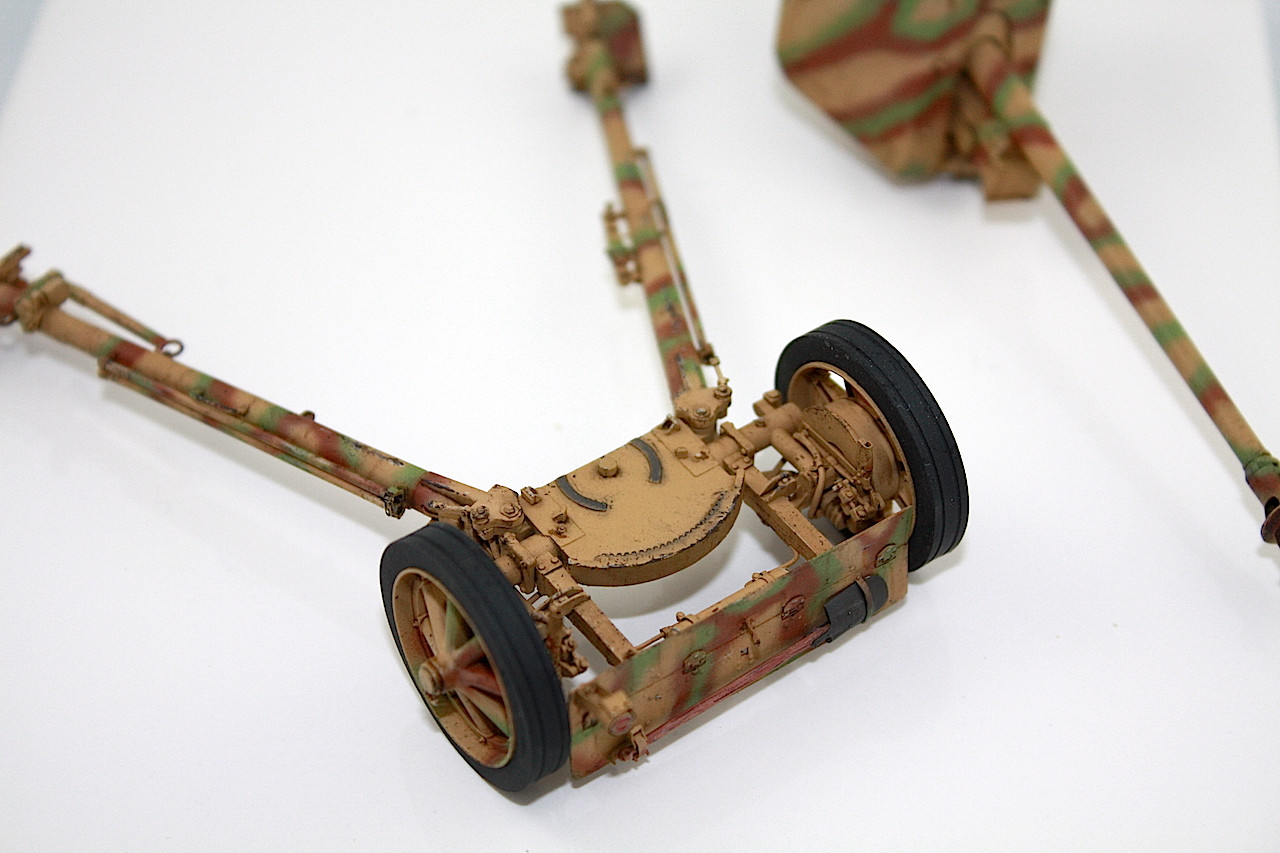
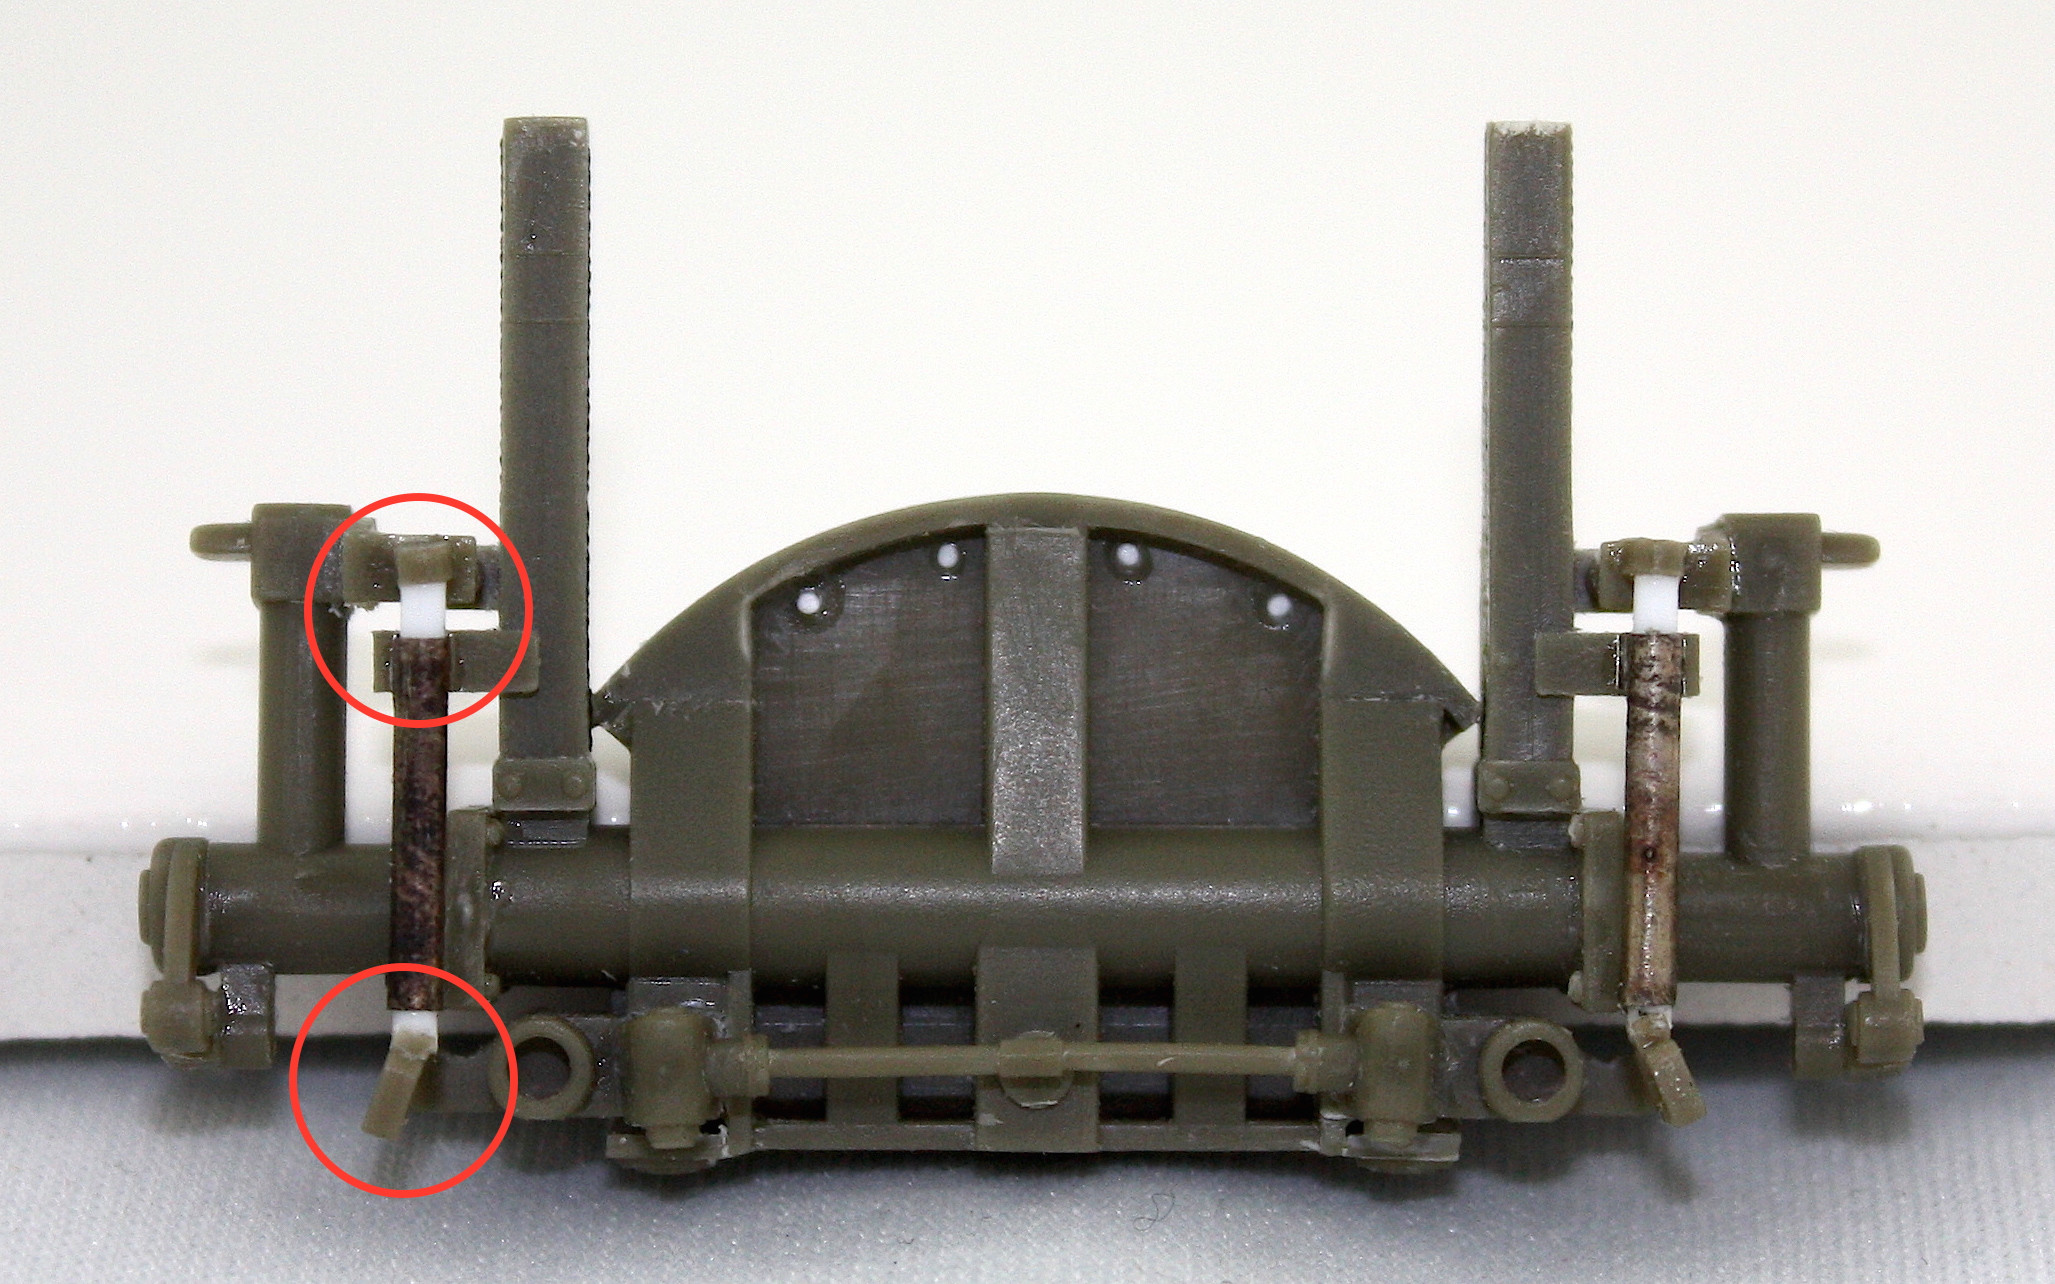
I’m going to be honest here, the AFVclub pak40 base has several unusual accuracy and molding issues related to the two ‘handles’ and rods which lock the axles in place for firing. First off, the kit includes two versions of these handles, one for use when the gun is traveling, and one for firing. The firing handles are angled outwards and their ends lock into mounts on the axle bump stops, while the travel ones are straight and don’t lock into these, enabling the axle suspension to travel.
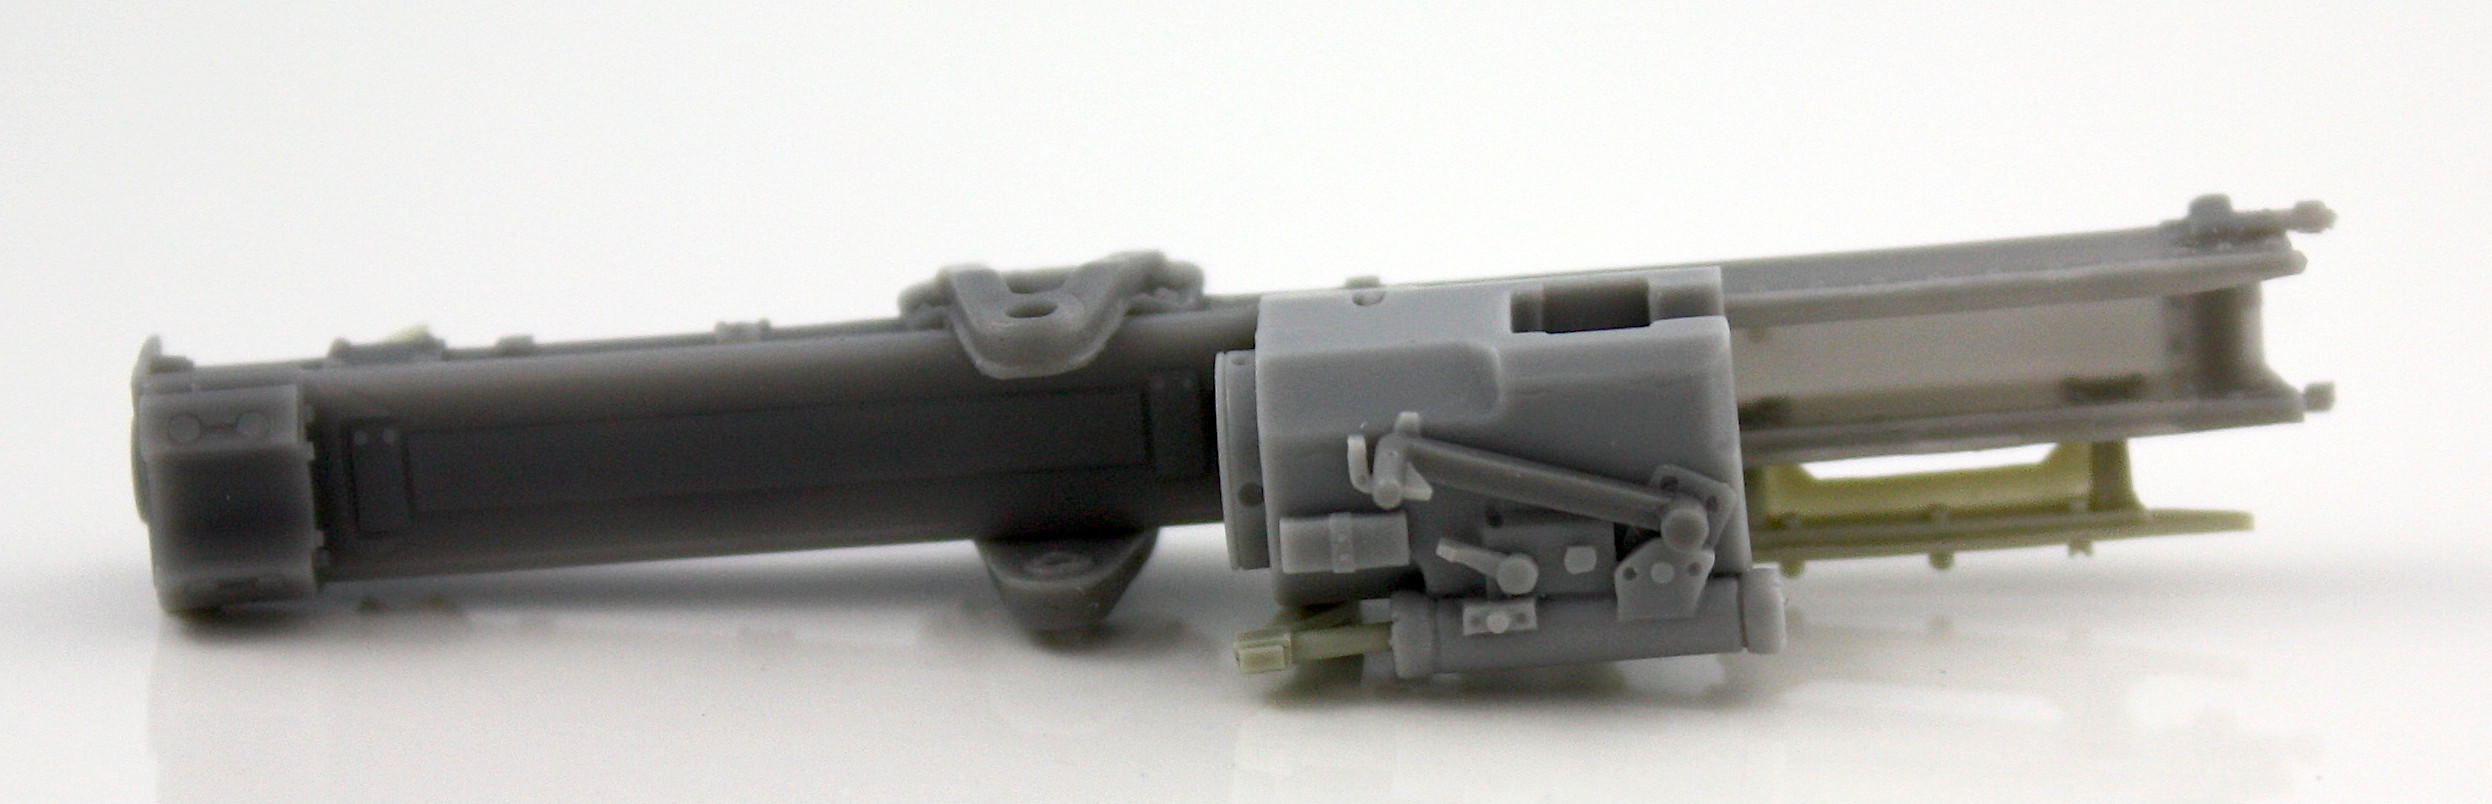
Here’s a list of the issues in the AFVclub kit related to that:

1) The firing handles, because they’re angled, can’t be molded correctly on a two part mold. AFVclub has thus compromised and molded the handle slanted like a parallelogram. But in reality a rectangular handle doesn’t suddenly become a parallelogram when its hinge moves. This means it’s easier to cut off the properly formed handles on the straight part and angle them than trying to fix the angled ones.


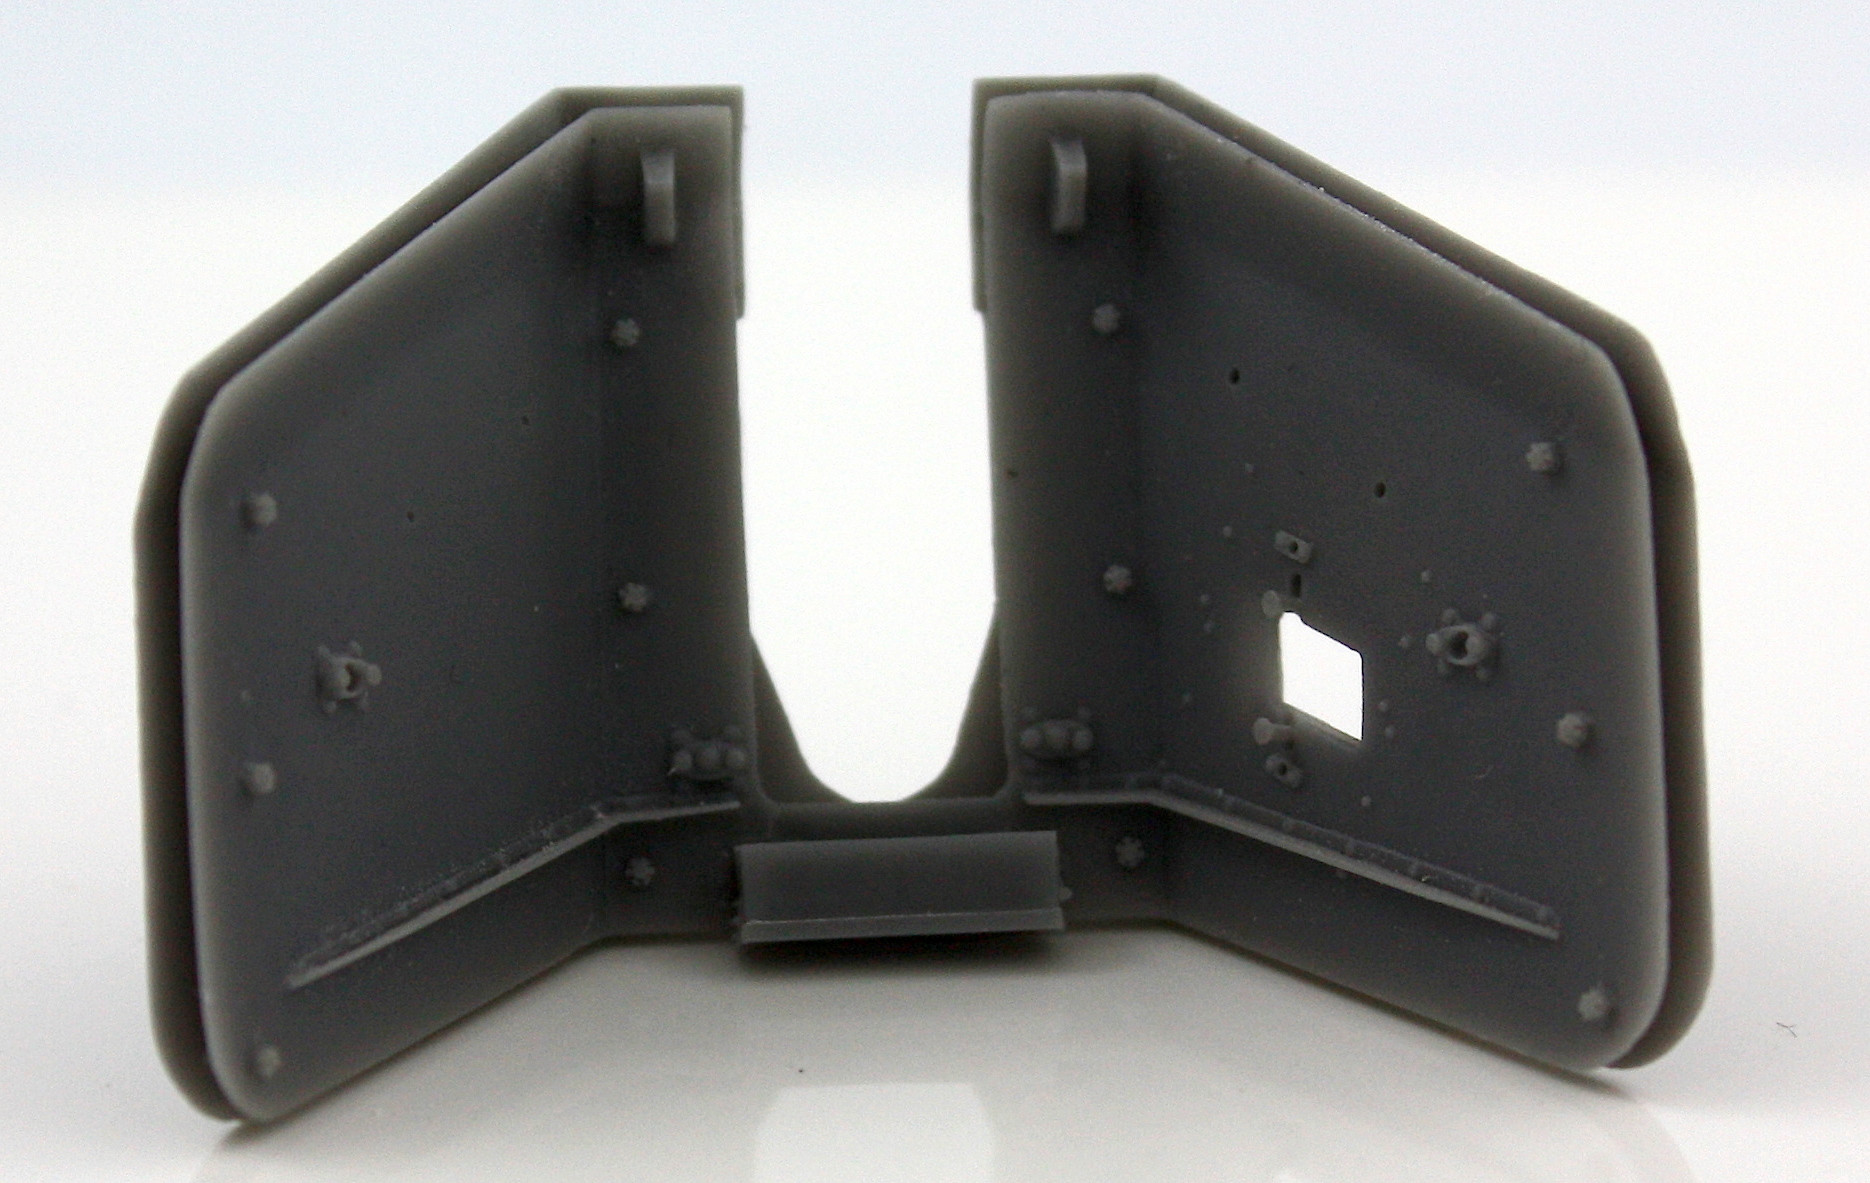
2) The top of the axle bump stop is reinforced by two triangular reinforcing plates, which are molded solid in the kit and not replaced in the aber etch set. These need to be hollowed out.


3) The bump stops don’t actually line up with each other. The ones on the gun platform are fine, but the one on each axle are supposed to be at an angle. AFVclub has molded these as pointing straight down, which means that if the suspension were compressed then only 1/3rd of the bump stop on the axle would contact the upper bump stop on the carriage.


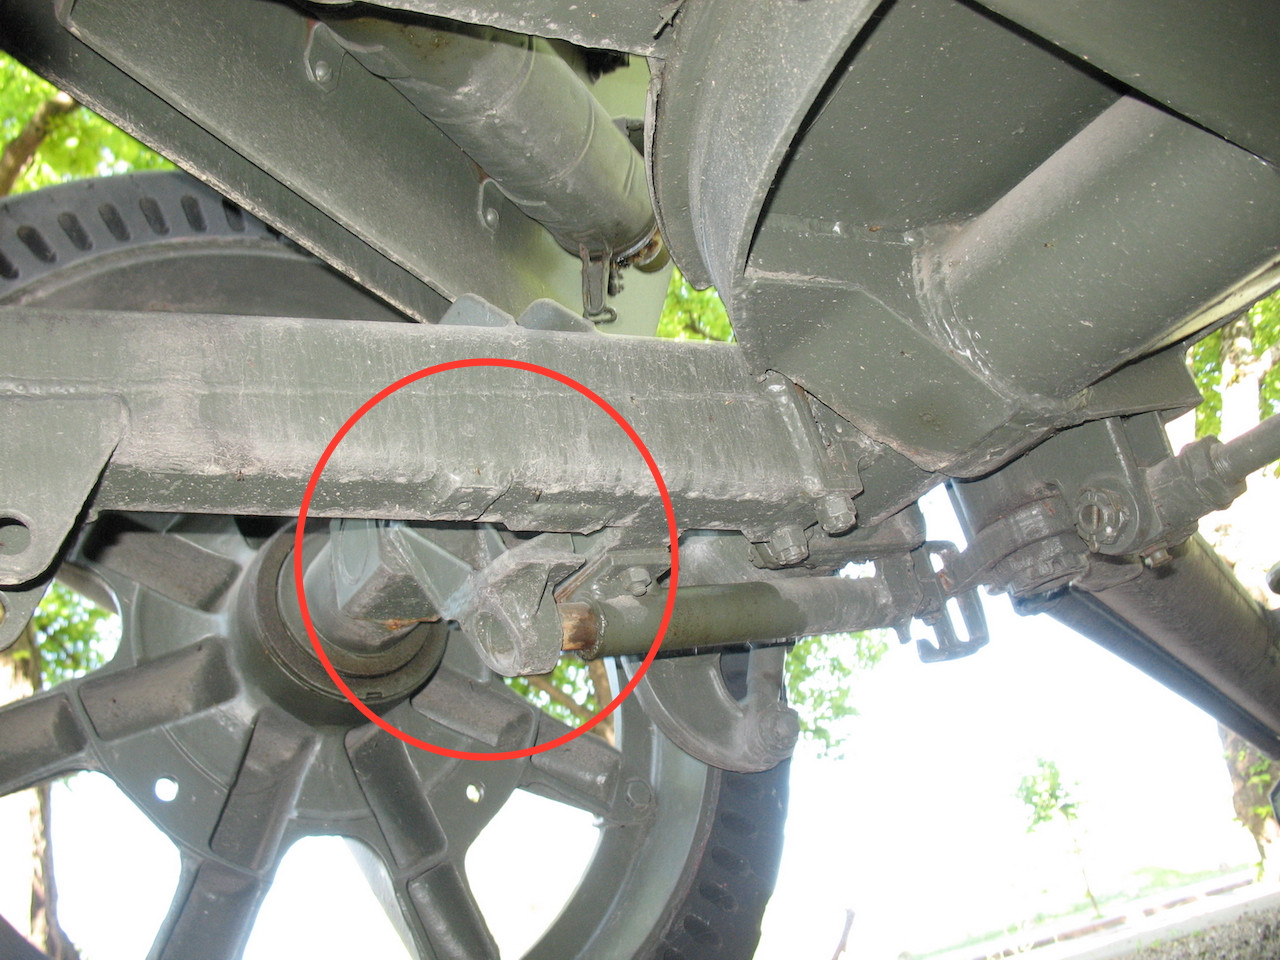
4) When you correct that by cutting off the axle bump stop and repositioning it, you move the locking area that the end of the rod meets up with, meaning that needs to be cut off and glued back on.
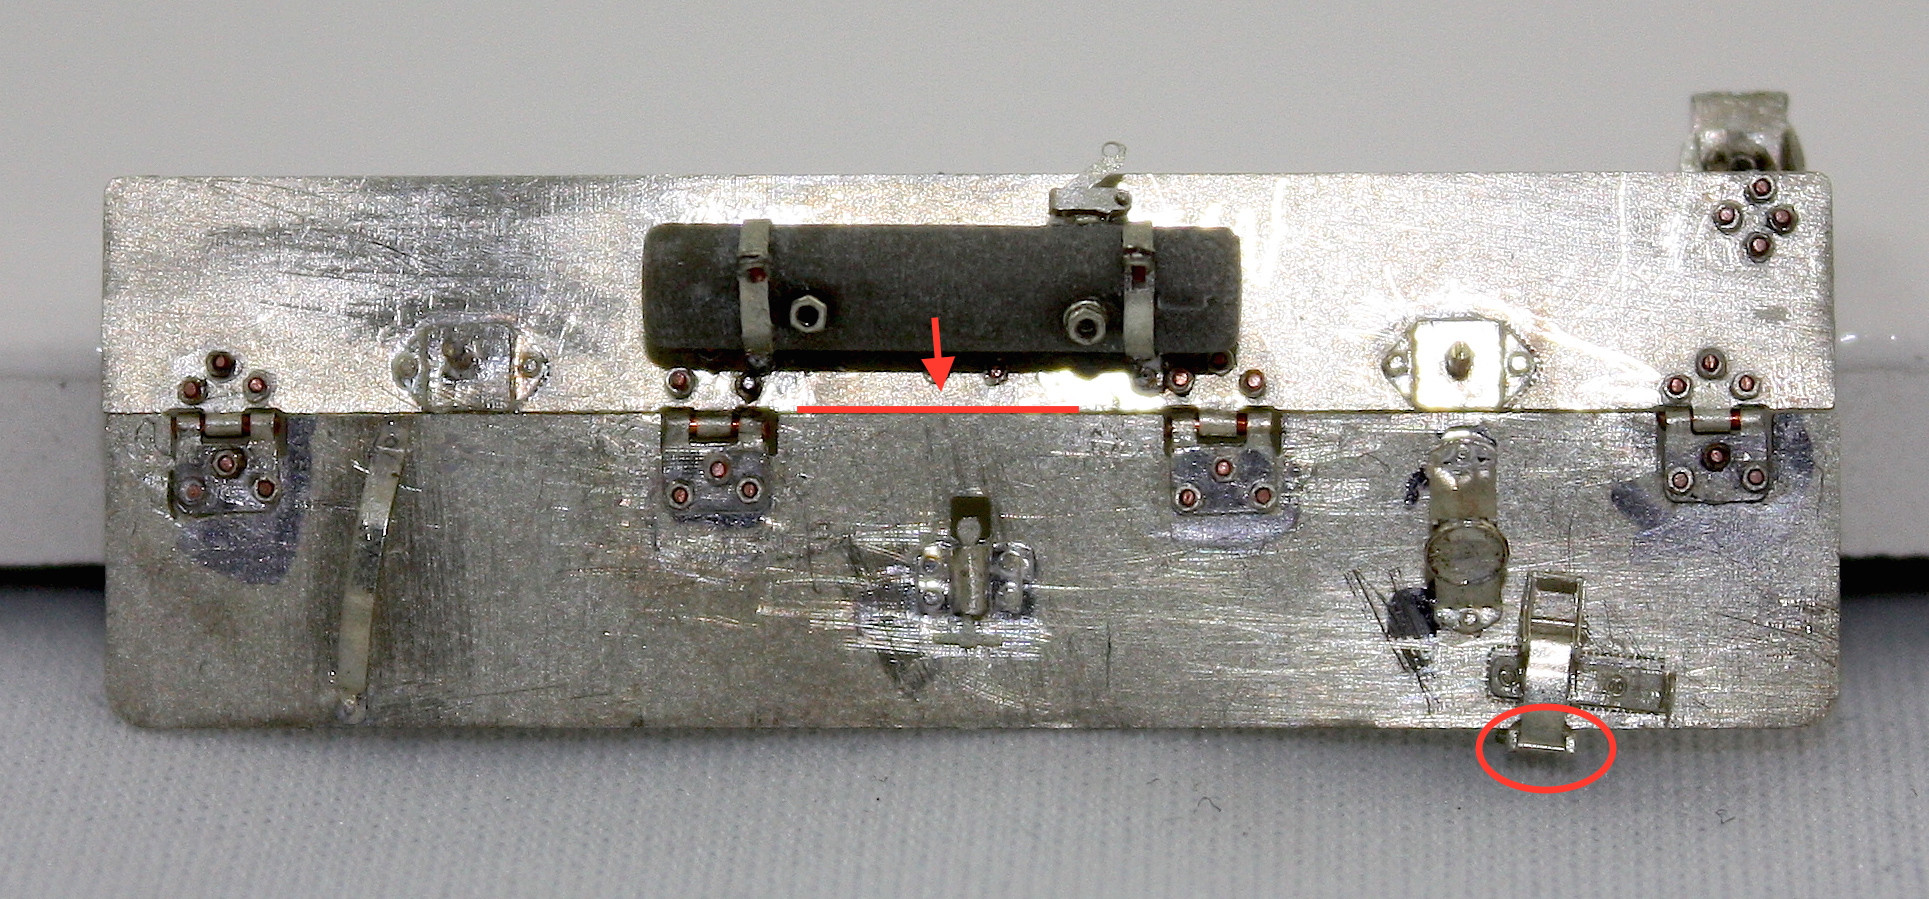
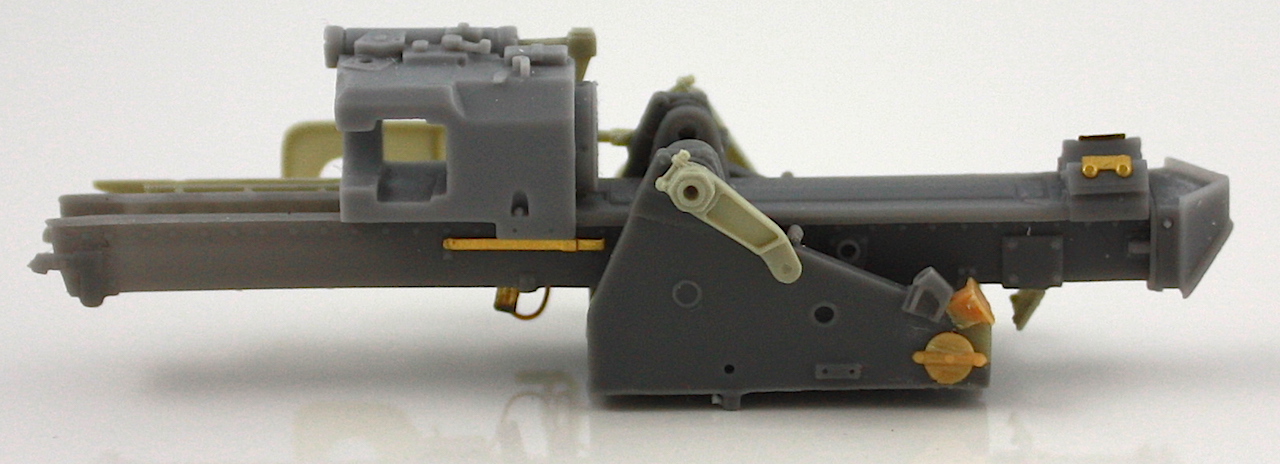


I chose to do all of this for accuracy’s sake, but will admit that when finished, unless you know what you’re looking for, most people won’t notice this, not the four missing bolts on the underside of the gun carriage.

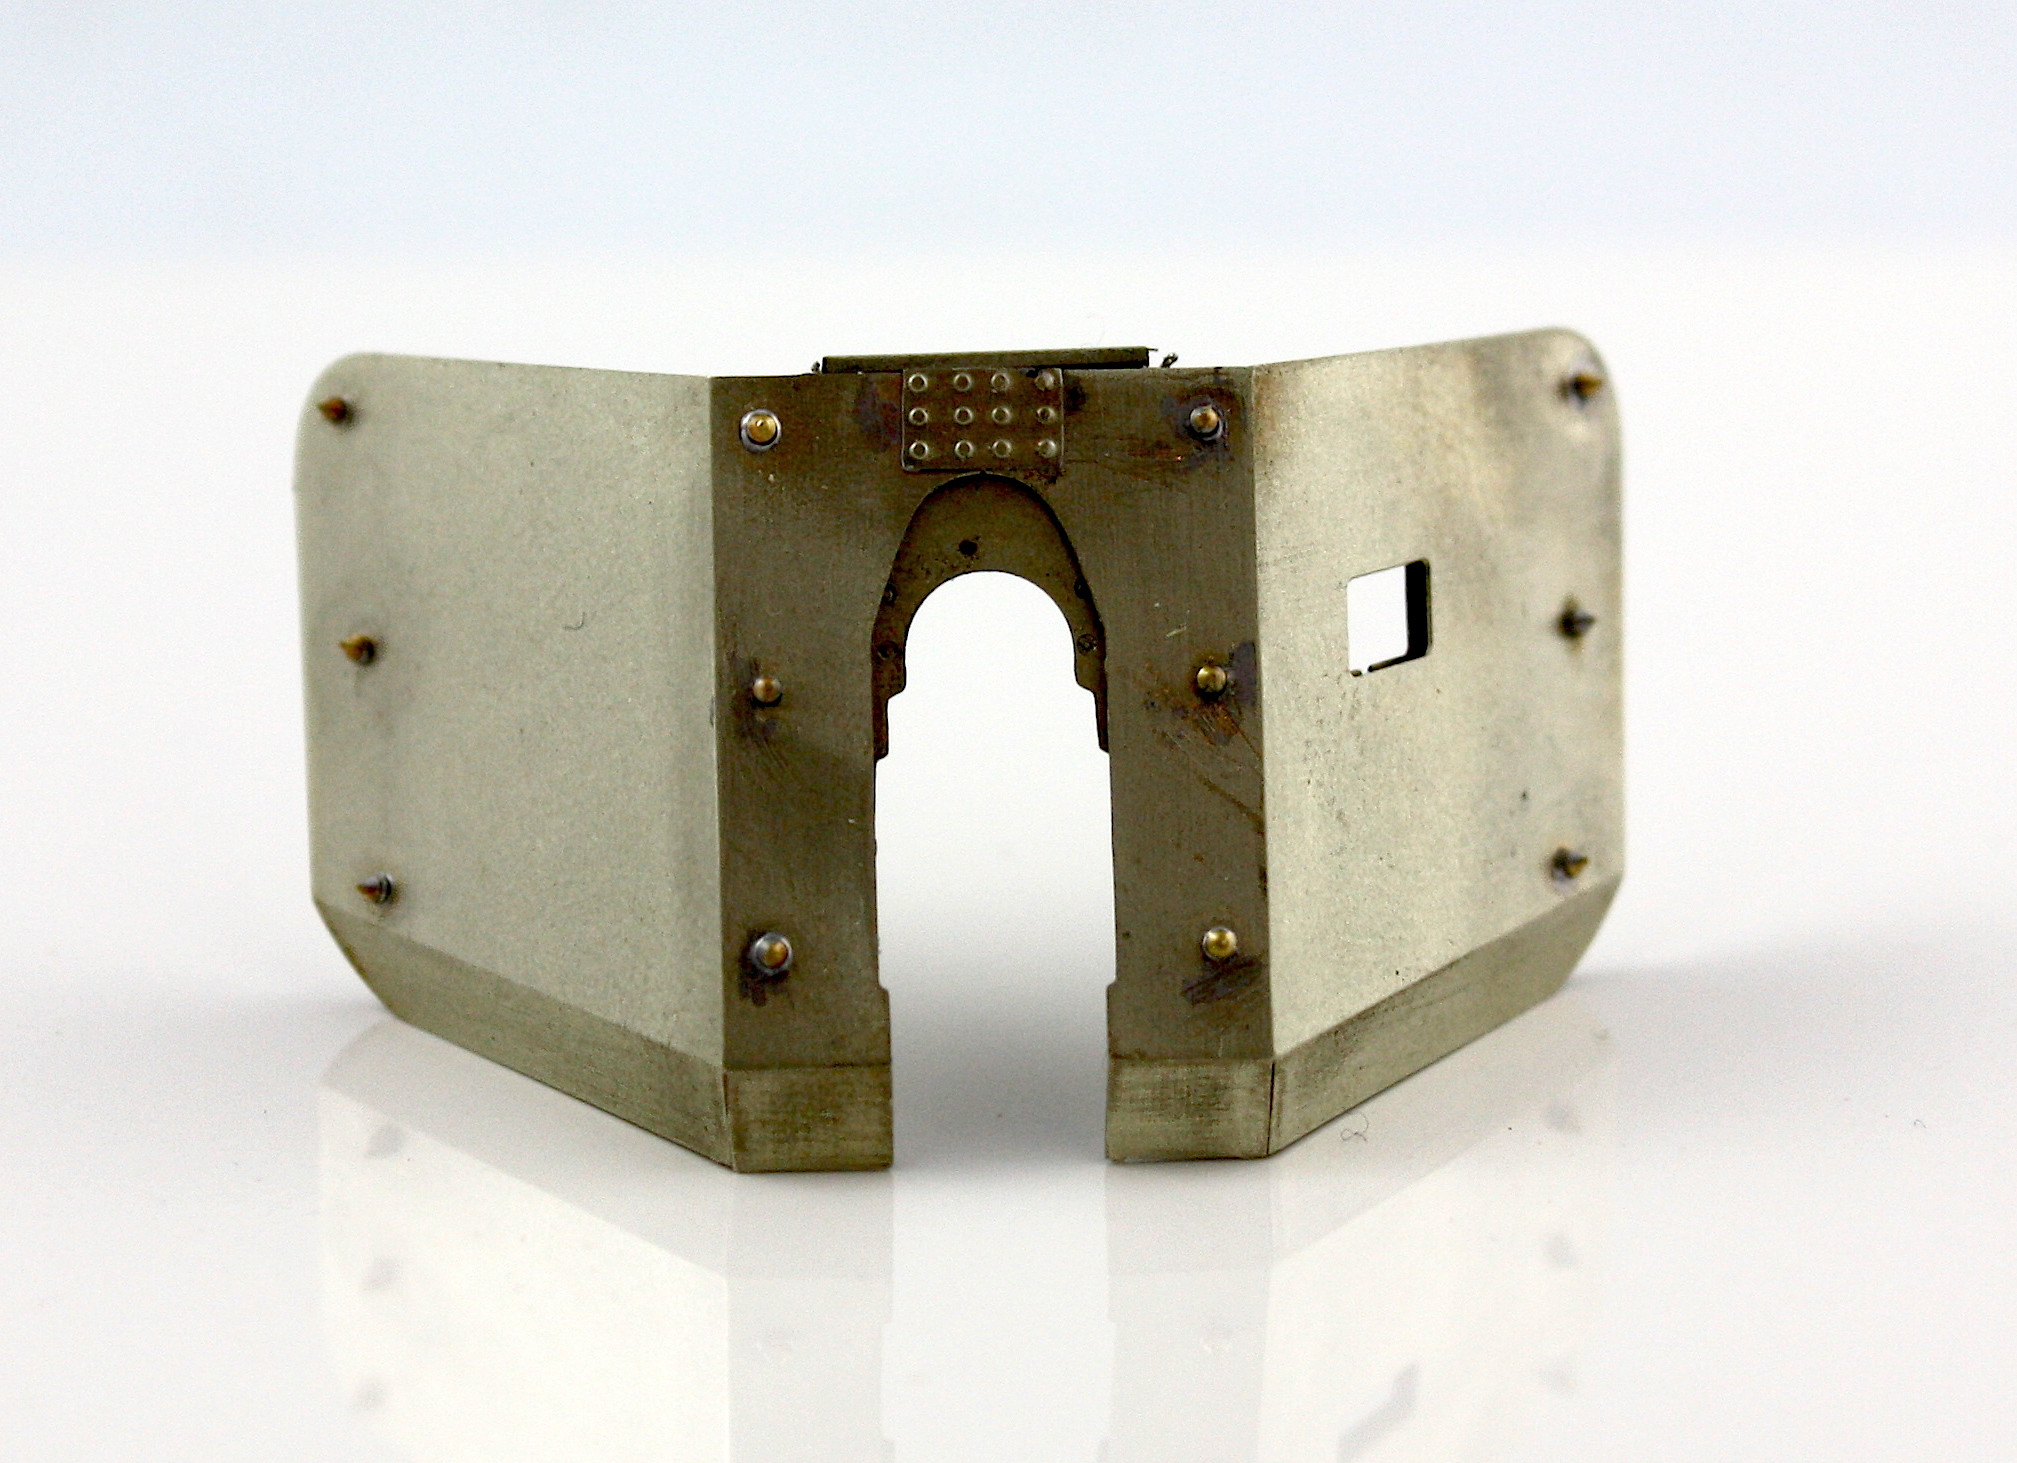
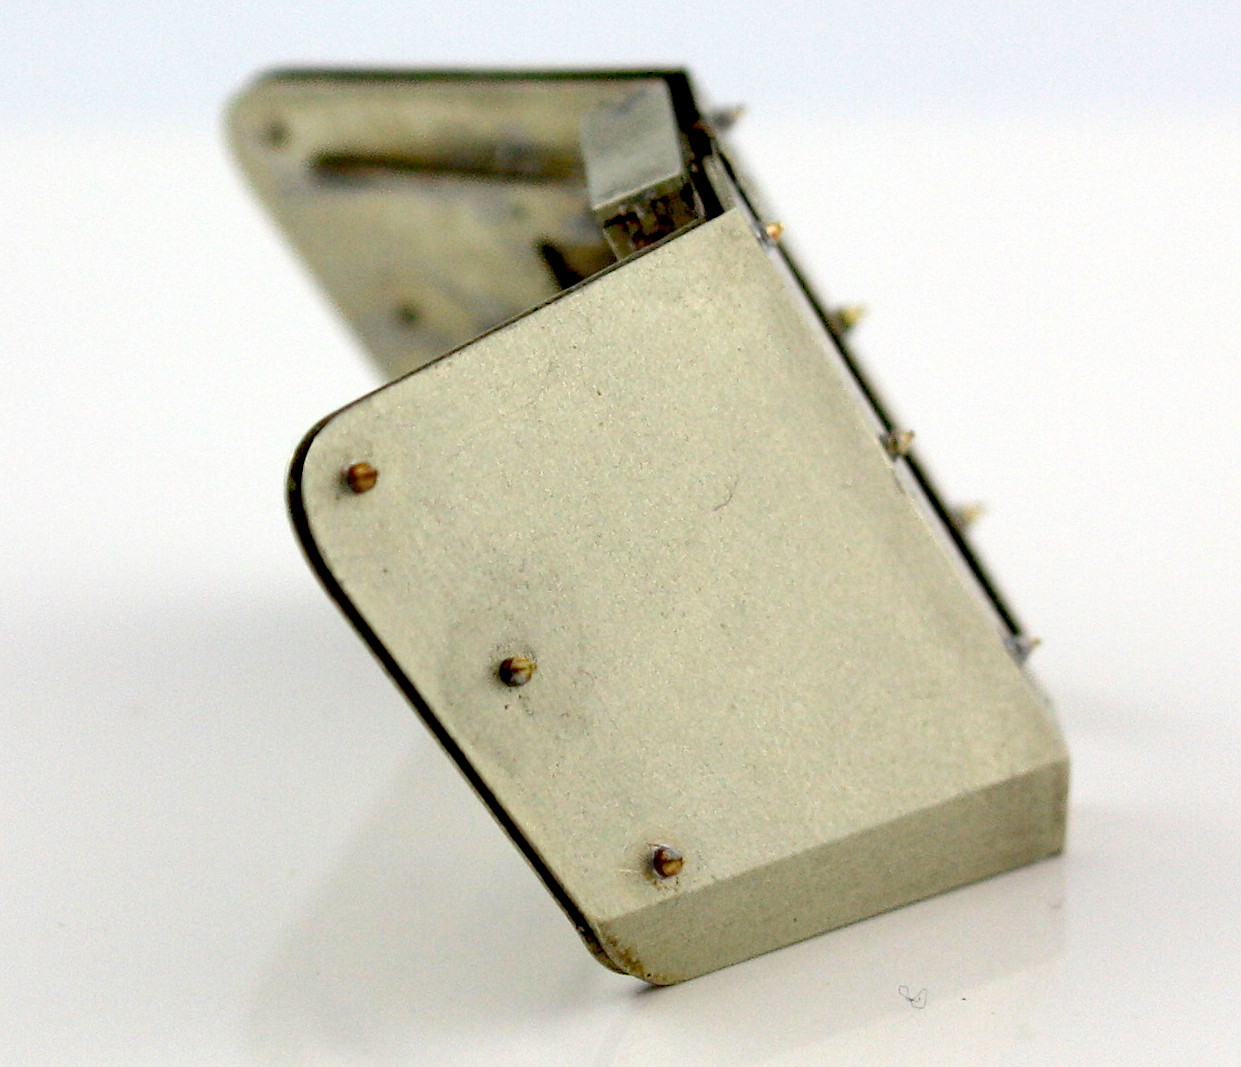
Next up, we get crazy with the lower gun shields. Watch as 5 kit parts become 113 photoetched ones!
Disith
Visit this Community
Scotland, United Kingdom
Joined: April 02, 2014
KitMaker: 62 posts
Armorama: 47 posts
Posted: Sunday, November 09, 2014 - 05:34 AM UTC
Man that is a crazy amount of aftermarket parts its amazing how many additional items are now available now for us to suppliment, add or replace nowadays. Looking forward to see how your build develops as i have one in my stash but have never got around to touching it yet.
JLModels
Visit this Community
Manitoba, Canada
Joined: February 15, 2014
KitMaker: 117 posts
Armorama: 117 posts
Posted: Sunday, November 09, 2014 - 08:27 AM UTC

Quoted Text

Man that is a crazy amount of aftermarket parts its amazing how many additional items are now available now for us to suppliment, add or replace nowadays. Looking forward to see how your build develops as i have one in my stash but have never got around to touching it yet.


Thanks! Yeah, it really is, but I'm certainly not complaining!

To be honest, a lot of it isn't strictly necessary. I know and accept that few people will ever notice the small details when they look at the model. But I'll know they're there, and that counts for something.

Or so I tell myself when I cry myself to bed at night!
JLModels
Visit this Community
Manitoba, Canada
Joined: February 15, 2014
KitMaker: 117 posts
Armorama: 117 posts
Posted: Monday, November 10, 2014 - 05:13 AM UTC
While the AFVclub kit does include phoetched upper gun shields, the lower ones are left to languish as overly thick plastic. How overly thick? Well, the real shields were about 4mm thicks, according to one thread I read by a gentleman restoring an actual pak 40. This means that technically even the aber photoetched shields are overly thick, but only by a tenth of a fraction of a millimeter.

The aber shields also have built-in functional hinges, which actually go together shockingly well and work really well.


The big issue here is the nuts and bolts. The nuts are intended to be crown nuts, meaning they have a ‘crown’ on them that makes them look ridged on the top. Whoever designed the aber photoetch set decided that rather than making these locking nuts using one thick piece of photoetch with the bolt and crown etched in, lets instead make them in two pieces and make you add your own wire for a bolt. And lets do this for over 50 nuts.

This designer is a sadomasochist of the highest order.

This is insane. Even I have my limits and this is them.

Each nut is tiny, less than half a millimeter across, and you have to line up the nut, the nut crown, and the bolt, and then stick them all together without a seam visible or covering up the crown head detail. Soldering them is almost impossible because they’re too tiny and have nothing to hold on to, so you have to glue them.

Out of the ten I tried to do this with, two succeeded. Then as a test I airbrushed them and discovered the crown wasn’t visible under paint anyway or the glue had covered up the crown etching! Thankfully aber includes a lot of extras.

So I compromised, gave up on the crown part, and left the bolts as two pieces. This made them much easier since there isn’t a third part to try to keep aligned, and everything went together from there.

If anyone here actually manages to get these tiny, three part nuts/bolts assembled and the crown visible, I applaud you sir, you are a better modeler than I!


The tool clamps in the Aber set also left my head scratching. Normally aber german tool clamps are great. They go together well and if you’re careful remain fully operational, which makes tool painting a breeze. But the ones in this kit aren’t etched the same way. The normal two prongs at the ends which hold down the latch? Yeah, they aren’t there. At all. Which means there’s no way to lock down the tool latch. They’re shown in the instructions, but just aren’t in the photoetch. So I replaced them with aber clamps that were leftover from a king tiger build I did a while ago.

Lastly, the air tank was added. The straps are needlessly complex 4 part affairs each, but they went together well and look good. The only issue, which I didn’t realize till later, is that the aber set has you mounting the tank too high. In the above image its still shown too high, and I only realized this later when I began plumbing the brakes. The bottom of the tank, rather than lining up in the middle of the shield, should be along the bottom edge of the upper shield. If you don’t do this then the plumbing, and especially the rod for the pressure release valve at the top will be off and at a strange angle. Don’t make the same mistake I initially did! ☺

Next up, upper gun shield insanity.
JLModels
Visit this Community
Manitoba, Canada
Joined: February 15, 2014
KitMaker: 117 posts
Armorama: 117 posts
Posted: Tuesday, November 11, 2014 - 05:08 AM UTC
The upper gun shield of the pak40 is probably its most distinct feature. The two angled plates spaced apart are very challenging for a kit manufacturer to make, especially in plastic. The detailed mount points, gun sight sliding covered, etc, only add to that.

While AFVclub does make their shield out of pre-bent photoetch, the rest of the associated details are rather crud. The two reinforcing braces on the inner side are missing their bolt detail, the storage box above the gun is missing its mounting details, and the plastic molded spacer bolts are overly thick and ridiculously hard to clean up neatly. In fact they’re so ridiculous even AFVclub released a separate brass set instead to replace them. Unfortunately the center section of the bolts still has too large a diameter!

Thankfully we have Aber and K59 to the rescue.

The Aber shield includes all of the missing detail and is perfectly thin, with turned brass bolts of appropriate diameter. Unfortunately it has those evil 2 part crown nuts and requires a lot of delicate soldering. While the aber set does include nice brass bolts, its missing the tiny hole that goes through the cone-shaped part of each one on the outer face of the shield, as seen here:


This is the end result of the aber shield:


The K59 resin shield is gorgeous and has all of the detail molded into just 6 parts, and cleans up and goes together really well with gorgeous crown nuts. The big issue is simply that being resin, it simply can’t be as thin as photoetch while maintaining structure. It’s beveled at the edges, but even those still wind up being double the thickness of the aber shield. You can thin the edges with careful sanding, as I did in the pictures below, but since you have to do so from the gap facing side of either shield, you wind up making the gap between the shields overly wide.

This is the K59 shield after being thinned:


I went back and forth for days trying to decide which to use, and frankly I support anyone who chooses either choice. It came down to shield thickness vs missing cone bolt holes and a pain in the ass to assemble.

In the end I went for the scale thickness. The shield is just too prominent a part of the pak 40 for me to compromise there, and the missing bolt holes are a tinier detail to miss out on than that. So I went with the Aber shield.

In the end I’m glad I did, for a couple of reasons. First off, when assembled correctly, it looks fantastic. Also, all soldered together, its amazingly solid and can be handled easily. But the primary reason is that it allowed me to greatly improve my soldering skills.

To build it, I realized that some of the parts, especially the gun sight cover slides and bolts simply wouldn’t easily hold up to being pressed against a soldering iron without shifting around or deforming, and the possibility of breaking them off if they were simply glued was too high.

So I read a ton on soldering and found a couple of threads here that really helped. First off was this one:

https://armorama.kitmaker.net/forums/187830&page=1

and the second was this build log:

https://armorama.kitmaker.net/forums/181956&page=1

Both of these mentioned using a butane soldering torch instead of an iron. I’d never tried it before but the idea of heating up a part without worrying I’d move it with the soldering iron, or deform it by pressing too hard was too tempting to resist. Thankfully soldering butane torches are cheap, relatively, so I quickly obtained one from my local lee valley tools.

This was a revelation. The shield went together in about 3 hours beautifully by just adding the flux almost as a glue for the two parts, positioning a tiny chip of solder next to the two parts to be joined and quickly torching it. The joint was clean, and solid, and took almost no effort. Even those two part nuts went together great, but that’s also because they’re larger than the tiny lower shield ones and mount over the brass bolts which are anchored in both the shields, so alignment is guaranteed.

Now, don’t get me wrong, I still love my soldering iron. If there is an existing solder joint next to the one you’re soldering, and there are quite a few on this shield, a soldering iron is generally safer and easier to prevent accidentally loosening one part when you solder the one next to it. There are other ways to deal with that but I personally find a soldering iron better there. Both tools now have a place in my arsenal.

The two tubes on either side of the inner gun shield are for the storage of the gun cleaning rod brush and the gun sight, and both came from K59. The mounting points are so thin that I didn’t see the need to replace them with phototech.

Next up, the gun mount and barrel.
justsendit
Visit this Community
Colorado, United States
Joined: February 24, 2014
KitMaker: 3,033 posts
Armorama: 2,492 posts
Posted: Wednesday, November 12, 2014 - 05:29 AM UTC
Hi Jason,

I love the 40! And your build thread is "Pak'ed" with lots of great info. Thanks for sharing! ... thought I'd give it a bump.

—mike
thebear
Visit this Community
Quebec, Canada
Joined: November 15, 2002
KitMaker: 3,960 posts
Armorama: 3,579 posts
Posted: Wednesday, November 12, 2014 - 04:07 PM UTC
Hi Jason ... Hats of to you sir ... but that`s NUTS!!
Great job and your soldering is amazingly clean ... 3 piece bolts!! Yikes!! My fat fingers could never do that..
This is going to be an awesome build and I will be following .

Rick
Giovanni1508
Visit this Community
Napoli, Italy
Joined: April 17, 2014
KitMaker: 652 posts
Armorama: 600 posts
Posted: Wednesday, November 12, 2014 - 06:06 PM UTC

Hi Jason,

Great job. After watching this, I cannot see anymore my several PAK40s...

jrutman
Visit this Community
Pennsylvania, United States
Joined: April 10, 2011
KitMaker: 7,941 posts
Armorama: 7,934 posts
Posted: Wednesday, November 12, 2014 - 07:22 PM UTC
Awesome build going on here. You and Mike Roof with those soldering thingies!! Driving me nuts.
J
bill_c
Staff MemberCampaigns Administrator
MODEL SHIPWRIGHTS
Visit this Community
New Jersey, United States
Joined: January 09, 2008
KitMaker: 10,553 posts
Armorama: 8,109 posts
Posted: Wednesday, November 12, 2014 - 07:43 PM UTC
You may be nuts, Sir, but that's amazing detail work!
JLModels
Visit this Community
Manitoba, Canada
Joined: February 15, 2014
KitMaker: 117 posts
Armorama: 117 posts
Posted: Wednesday, November 12, 2014 - 08:31 PM UTC

Quoted Text

Hi Jason,

I love the 40! And your build thread is "Pak'ed" with lots of great info. Thanks for sharing! ... thought I'd give it a bump.

—mike


Thanks. I was starting to wonder if I'd been too verbose with this write-up, since I was getting so few replies!


Quoted Text

Hi Jason ... Hats of to you sir ... but that`s NUTS!!
Great job and your soldering is amazingly clean ... 3 piece bolts!! Yikes!! My fat fingers could never do that..
This is going to be an awesome build and I will be following .

Rick


I agree, it really is! Still, you should try it, you might surprise yourself!


Quoted Text

Awesome build going on here. You and Mike Roof with those soldering thingies!! Driving me nuts.
J


Entertainingly this is only the forth model i've soldered on! I think its more the right choice of equipment over how skilled I may or may not be. I don't think I'm anywhere as skilled as Mike just yet.


Quoted Text

You may be nuts, Sir, but that's amazing detail work!


May be? Oh no, with this one I'm pretty sure I'm definitely nuts!
JLModels
Visit this Community
Manitoba, Canada
Joined: February 15, 2014
KitMaker: 117 posts
Armorama: 117 posts
Posted: Thursday, November 13, 2014 - 02:31 AM UTC
The k59 pak 40 gun mount is gorgeous. There’s really not much more to say than that. Everything is correct, in scale, and beautifully detailed. It goes together like a dream (after slightly de-warping the resin slide in hot water). To be honest, every aber photoetch part for the gun mount or slide was useless, as the detail was already molded in there and correctly thin (or thick, as the case may be)


The only thing to watch out for is clean up. The resin is VERY thin and very brittle in some places. Always use a thin razor saw when cutting this, never sprue cutters or the like, as you’re almost guaranteed to shatter some of the parts.

Beyond that, I did modify the gun shield mounts at the front to be more accurate by carving off the parts from the AFVclub mount and gluing them to the K59, which allows it to easily work with the aber gun shield (those are the orange colored plastic parts).


The K59 barrel is something I’m a little torn on. I had previously bought an aber pak40 barrel with a turned brass muzzle brake. I love turned brass muzzle brakes because you never have to worry about them being out of round or having mold seams and they’re gorgeously detailed. But when I went to try to add the barrel I realized something unfortunate: the Aber barrel has the thick ring on back end of the barrel machined in, while in the K59 kit this is part of the breechblock. Furthermore, the aber muzzle brake alone won’t fit the K59 barrel because the mounting is different: the Aber brake slides over the end of the barrel, while the K59 brake slides into the end of its barrel. I could have tried modifying the k59 gun breach to accept the aber barrel but that would have required a lot of work and the risk of destroying such a finely cast part.

Thankfully the K59 brake turned out to be so nicely molded and with the same detail the Aber one had that I just decided to use it instead and be done with it rather than trying to jury rig it all together.


Next up, plumbing the brakes and wiring the lights!
Bizarre
Visit this Community
Akershus, Norway
Joined: July 20, 2010
KitMaker: 1,709 posts
Armorama: 1,581 posts
Posted: Thursday, November 13, 2014 - 02:38 AM UTC
this is really impressive detail work!
JLModels
Visit this Community
Manitoba, Canada
Joined: February 15, 2014
KitMaker: 117 posts
Armorama: 117 posts
Posted: Thursday, November 13, 2014 - 03:13 AM UTC

Quoted Text

this is really impressive detail work!


Thanks!
JLModels
Visit this Community
Manitoba, Canada
Joined: February 15, 2014
KitMaker: 117 posts
Armorama: 117 posts
Posted: Friday, November 14, 2014 - 01:46 AM UTC
The brake lines and wiring are something that is traditionally missing from most kits, and the AFVclub pak40 is no exception. The kit does include the air tank and brake cylinders/drums, which is at least a good start.

Be aware that not all pak40’s had the brakes or light installed. This seems to have been a feature of the mid-production batches and seems to have been deleted/removed towards the end of the war to simply production. The early models also had different wheels, those being the same pressed steel wheels of the 50mm pak38, and there’s some debate as to whether or not those early guns had the breaking system.

Strangely, while the Aber photoetch set does include clamps and connectors for the braking system, they actually only show part of it in the wiring diagram, and make no mention of the wiring for the light.

It’s actually really difficult to find clear pictures of the brake cabling system, as they are underneath the gun and apparently a lot of people don’t think to take images of that area.

Thankfully one gentleman did so with the pak40 at Aberdeen and posted the images online. They can be found here:

http://www.calvaria.com/brake/

As you can see if you study the images he posted, the brake line and light wire both run down the inside of the tube of the right trailing arm, then exit at the connection to the gun chassis. The light wire then runs along side the right leg of the underside of the main gun chassis and up to the light, held in place by a couple of screwed in clips.

The brakes take a more complex path. They exit the right trailing arm then split into two and both lines connect to the back of the brake-actuating cylinder. Both then exit the brake-actuating cylinder on the side, loop up over the suspension arms and then follow down their respective sides of the gun chassis shield mount to enter the air tank. Presumably they did this to ensure equal air pressure on both brakes.

In order to replicate this system I had to install the lower gun shield first, then began wiring from the air tank and working back using 0.5mm lead wire from plus models. The clips and clamps are from the aber photoetch set, and while tiny, were actually relatively easy to fold. Just remember that their placement is based on actual pak40 photos and not to use the layout in the aber instruction manual or you wind up putting on too many connectors on each wire and missing a brake line.


You can also clearly see the air release valve and its rod at the top of the air tank and connected to a small mount on the right side of the lower shield connecting arm. This was a bear to install because originally I had the tank mounted too high and the rod was at a bizarre angle. Removing the air tank, lowering it, and then hooking everything back up was NOT a fun task! Make sure you don’t make the same mistake I did!

Next up, choosing a gun crew!
jvazquez
Visit this Community
New Jersey, United States
Joined: September 26, 2006
KitMaker: 857 posts
Armorama: 811 posts
Posted: Friday, November 14, 2014 - 02:02 AM UTC
Awesome work!! I never knew there that much underside detail on a pak gun!
JLModels
Visit this Community
Manitoba, Canada
Joined: February 15, 2014
KitMaker: 117 posts
Armorama: 117 posts
Posted: Friday, November 14, 2014 - 02:36 AM UTC

Quoted Text

Awesome work!! I never knew there that much underside detail on a pak gun!


Thanks! It was difficult finding clear enough images of the underside of an intact gun with the braking system. The later ones without the breaks are much simpler.
JLModels
Visit this Community
Manitoba, Canada
Joined: February 15, 2014
KitMaker: 117 posts
Armorama: 117 posts
Posted: Saturday, November 15, 2014 - 05:14 AM UTC
Now that primary construction was done on the pak 40, it was time to turn my attention to the crew.

A pak40 was usually operated by a crew of 5; namely the gunner, loader, commander, and two additional ammunition handlers. That being said, I’ve seen pictures of them being operated by anywhere from two people to six, so there’s quite a bit of flexibility there.

A lot of different manufacturers make pak40 crews, and the Dragon versions of the gun comes with their own crews, adapted from Dragon’s other figure kits. AFVclub doesn’t make its own crew, but Hobbyfan, their resin companion company do make a couple of them. SOGA miniatures makes a couple of early crew sets as well (wearing early to mid-war uniforms and equipement) and having seen them up close, they are gorgeous.

That being said, I want my gun in operation and I wanted to try something different. I’ve built and painted several dozen figures by this point, but I’ve never done a Waffen-SS gun crew. In fact the only waffen-SS crew I’ve ever done was a couple of crew figures for a king tiger and their camouflage wasn’t all that complex. For this gun crew I wanted to try a more complicated camo scheme, such as the Plane Tree or Oak leaf schemes.

That’s when I ran across the Warriors pak40 gun crew set 1 and 2. When I first started modeling Warrior was considered one of the best resin figure makers around, back before Alpine miniatures, Stalingrad, etc existed. Since they had the uniforms I wanted I took the risk.


When they arrived I was… surprised, to say the least. The heads and uniform details are REALLY nice. In fact the heads are as good as any Hornet head I’ve seen and have great expressions. The uniforms have nice folds and smock details.

That being said, the hands and mold quality were terrible! Every single hand needed to be replaced because they were all oversized and every finger looked square-ish and chunky rather than round. Some of the figures had dozens and dozens of air bubbles, some of which were quite large, and large mold seams along their legs, which reminded me of poorer-quality styrene figures.

I actually debated just tossing them and picking up a set from Soga miniatures, but I had already spent a good amount of money on them, and they had really nice heads so I decided to go ahead with them.

After replacing every hand with Hornet hands, replacing all of their equipment with Dragon Gen2 stuff, sanding, puttying, priming, re-sanding, re-priming, etc. I finally wound up with something I think should look decent.


And yes, in case you’re wondering, the pale yellow resin visible on some of the figures after priming was the result of finding yet more mold seams and air bubbles after the second sanding and priming!

Next up: Painting and washes!
jrutman
Visit this Community
Pennsylvania, United States
Joined: April 10, 2011
KitMaker: 7,941 posts
Armorama: 7,934 posts
Posted: Saturday, November 15, 2014 - 06:35 PM UTC
That wiring is really top notch bubba. I have one of these kits and will have to bookmark your build for sure. As a point of interest,a lot of the details you've pointed out and subsequently added are also used on the LfH18/40 as that late gun used the same mount and trails..
That set of figs is new to me but really looks great after all your clean up. I wonder if it is one of the older sets sculpted my John Rosengrant? That would explain the quality of art and the bad casting could just be the molds not being"kept up"?
J
Biggles2
Visit this Community
Quebec, Canada
Joined: January 01, 2004
KitMaker: 7,600 posts
Armorama: 6,110 posts
Posted: Saturday, November 15, 2014 - 08:46 PM UTC
Isn't Warriors owned by VLS now? I had the very same Warriors figures from about 10 - 15 yrs ago, and they weren't as badly cast as yours - as a matter of fact they were nearly flawless.
JLModels
Visit this Community
Manitoba, Canada
Joined: February 15, 2014
KitMaker: 117 posts
Armorama: 117 posts
Posted: Saturday, November 15, 2014 - 09:16 PM UTC

Quoted Text

That wiring is really top notch bubba. I have one of these kits and will have to bookmark your build for sure. As a point of interest,a lot of the details you've pointed out and subsequently added are also used on the LfH18/40 as that late gun used the same mount and trails..
That set of figs is new to me but really looks great after all your clean up. I wonder if it is one of the older sets sculpted my John Rosengrant? That would explain the quality of art and the bad casting could just be the molds not being"kept up"?
J


Quoted Text


Isn't Warriors owned by VLS now? I had the very same Warriors figures from about 10 - 15 yrs ago, and they weren't as badly cast as yours - as a matter of fact they were nearly flawless.


Those are my thoughts exactly. 10-15 years ago these were probably fantastic figures. But the molds either have been reused past their prime or have been stored improperly. There were a couple of creases where I had to pick mold rubber out of them!
JLModels
Visit this Community
Manitoba, Canada
Joined: February 15, 2014
KitMaker: 117 posts
Armorama: 117 posts
Posted: Monday, November 17, 2014 - 06:49 AM UTC

Warning: Long post ahead!

I’ll admit right away to forgetting to take a few images in between painting steps here. My bad.

The Pak40 came in a variety of paint schemes, with some early models being standard german grey, then switching to yellow, and then whatever camo schemes the crews thought up at the time. There’s even some evidence of a few pak40s in north Africa, but that’s a little hotly debated on places like axishistory.com.

I initially planned to do the gun in just a basic dark yellow, maybe with some foliage used as camouflage. However one thing I did want to use with this gun was the Verlinden pak40 display base. The reason is simply that I didn’t want to get caught up spending a lot of time making a diorama base for such a small gun from plaster, white glue, etc, as I’d done on my last few builds. I wanted something simple so that I could concentrate on the gun and crew, and the Verlinden base fit the bill.

But, since the verlinden base had the gun semi-hidden behind a damaged wall, I couldn’t see the crew of the gun spending time to put a lot of foliage and such around the gun, which might just stick out like a sore thumb against the wall anyway.

This left me with a rather boring, un-foliaged yellow gun (couldn’t be early german grey since I was using a waffen-SS camouflaged crew after all). So I decided to go for a red brown and olive green camo scheme.

Simply put, there is no standard for camo schemes for pak40s. Anything seems to have gone, from hand brushed blotches and stripes, to airbrushed blotches, to airbrushed stripes. Sometimes only the main gun shield and barrel were camo’ed. Sometimes the entire gun was. Sometimes the breach block was left bare, or yellow, and sometimes it was camo’ed too.

What I ended up going for was a base of dark yellow, and striped camouflage based on images I’ve seen, but done entirely freehand until I got a look that I thought looked decent.

The dark yellow was done with the following recipe:

2 parts XF-60 Dark Yellow
1 part XF-59 Desert Yellow
1 part XF-15 Flat Flesh
1 part XF-2 Flat White

This recipe is from this thread: https://armorama.kitmaker.net/forums/191338&page=1

It sprays a little lighter than normal german dark yellow, but that’s perfect since as you weather it, the color darkens and winds up being a really good shade, IMHO.

Also, no primer was used at all on the model. The figures got primed, as I plan to paint them with Vallejo acrylics (which brush paint beautifully but don’t have good adhesion on bare resin) but the gun itself didn’t. Why? Because I’ve found Tamiya acrylics honestly don’t need it. I’ve mentioned in prior threads of mine that I’ve gone a lot of primer testing and simply put, straight Tamiya acrylics adhere as well as Mr. Surfacer primer, and better than the Vallejo or AK-interactive primers. In the latter cases FAR, FAR better.

The gun was painted dark yellow while broken down into the subassemblies, namely: the main gun shield, the gun mount, the barrel, and the chassis with trailing arms.

After letting this dry for a day or so I began assembly. Everything went smoothly and was added in the order suggested by the K59 instructions until I got to adding the main gun shield to the gun mount. The lower two shield support arms fit fine, but the upper two K59 shield support arms didn’t fit at all. They were almost 3mm too short somehow, and wouldn’t reach the shield. If I tilted the shield back they would fit, but then everything else was off.

Strangely enough, when I tested it with the k59 shield, it all fit perfectly. Suffice it to say I was confused.

I scratched my head for a bit and checked my Aber shield against the K59 shield and the AFVClub shield. They all matched in angles, so what was wrong? Then I noticed that the AFVclub shield wouldn’t fit the K59 upper shield mount arms and realized what had happened.

Remember how I mentioned in post 3 that the k59 shield is gorgeous but due to the limitations of the resin is thicker than the Aber one? They got around that by beveling the edges, but that doesn’t change the fact that the shield is effectively too ‘fat’ or thick, compared the real one, or the photoetched Aber or AFVclub one. They make up for that by shortening the upper gun shield mounts.

Realizing this, I checked the AFVclub upper gun shield mounts (which are molded onto the gun cradle sides) and sure enough, they were 2 -3mm longer than the K59 ones.

So using the K59 ones as templates with the correct AFVClub length, I made replacements out of 0.25” evergreen plastic rod, painted them the dark yellow, and voila, everything lined up.

Panic averted!

Once the gun shield was mounted to the cradle, I slide the barrel in (making sure the proper side of the muzzle brake was facing up) and then added the other small details (the elevation mechanism below the gun barrel, the gun sight which was painted separately, etc). Everything lined up and fit perfectly.

Now it was on to spraying camo.


Here’s also one area where Aber’s functional clamps are a godsend. The barrel cleaning rods were in place when the camo was painted, as I figured the gun crew might have been too lazy to remove them when they applied the camo in the first place, as has been seen in many historical photos. What the aber clamps let me do was then remove the gun cleaning rods, and put them back in a different order! This means they have the camo on them, but its distinct from the rest of the camo on the trailing edges and adds some nice, subtle interest for those who notice it.


Also as a note here, I’ve seen images with Pak40s using wood gun cleaning rods, and metal ones, so go nuts. If you want to woodgrain them, there’s evidence of that too!

After that dried for a couple of days I added a filter of Mig productions ‘tan for german tricolor camo’ to unify the color a little, then a wash of AK-interactive ‘wash for DAK vehicles’.

Once the wash was applied, let dry, and the excess removed a couple of hours later with some mineral spirits, I began the chipping process. In many previous models I’ve gone extremely easy on chipping. It can REALLY be overdone very easily and it isn’t all that realistic sometimes. That being said, I wanted this to be a gun that had seen some use. It’s a mid production gun that I figure has been in service for at least a year, so some wear and tear would be expected.

That and I really just finally wanted to go to town on a model and weather it ‘dirty’.

Chipping was accomplished with a 50/50 mixture of vallejo pale sand and german camo beige for the lighter scratches, and german camo brown for the darker chips. I went heavy on this (at least heavy for me) but tried to put the chips and scratches in areas they would at least make sense.

This was followed by AK-interactive dark streaking grime applied in vertical streaks down to the barrel, gun shield and trailing arms, let dry, and then mostly removed using white spirits.


Some AK engine oil was added around the various grease fittings on the gun carriage, and the muzzle brake was darkened using mig ‘smoke’ pigments. This isn’t to replicate gunpowder reside, which was mostly a thing of the past with the newer propellants, but more to represent heat discoloration of the muzzle brake paint. Apparently when firing the gun the barrel gets HOT, according to a gentleman who owns a restored one and posted a video of himself firing it on Youtube! BTW, you should check that out toward the end of the video, the dust cloud and kick of this gun is amazing to see!

Video 1

or

Video 2

Next up: Painting the figures and working on the ammo.
justsendit
Visit this Community
Colorado, United States
Joined: February 24, 2014
KitMaker: 3,033 posts
Armorama: 2,492 posts
Posted: Monday, November 17, 2014 - 09:06 AM UTC
Hi Jason,

That is frickin' gorgeous!!! You just bumped another 40 up higher on my wish list.

And I can't wait to get home so I can watch the videos on a larger display -- very cool!

--mike
JLModels
Visit this Community
Manitoba, Canada
Joined: February 15, 2014
KitMaker: 117 posts
Armorama: 117 posts
Posted: Monday, November 17, 2014 - 08:40 PM UTC

Quoted Text

Hi Jason,

That is frickin' gorgeous!!! You just bumped another 40 up higher on my wish list.

And I can't wait to get home so I can watch the videos on a larger display -- very cool!

--mike


Thanks! I have to admit I am really enjoying the PAk40. There's so much info out there on them!
abbatoys
Visit this Community
Michigan, United States
Joined: October 12, 2014
KitMaker: 38 posts
Armorama: 22 posts
Posted: Tuesday, November 18, 2014 - 06:06 AM UTC
Wow, the detail is amazing... I have one in the box to work on, but don't think I can hold a candle to this build.
 _GOTOTOP