OIF USF-I QRF Mosul, Iraq 2007
Florida, United States
Joined: July 19, 2014
KitMaker: 249 posts
Armorama: 249 posts
Posted: Tuesday, July 28, 2015 - 01:37 AM UTC
Quoted Text
for year I been trying to figure out how to construct blast or smoke.I use cotton,result was not very satisfied, just how do you do it.could you give use step by step how you construct the IEd explosion.
Hello Richard, thank you for your interest and for looking. The IED blast was my first attempt so it's a prototype. Read a few post back for specific items used to create my initial version.
It was easy to make but finding the perfect shape will take time and effort. I used Buffalo Snow instead of cotton, wire ( to support and shape the blast ), and a battery operated candle for light source.
Take your time with it, PM me if you have more questions.
JGphins
Milano, Italy
Joined: November 30, 2007
KitMaker: 642 posts
Armorama: 234 posts
Posted: Tuesday, July 28, 2015 - 08:13 PM UTC
Hi JG!
Why do you have to delete pics?
I ask because I use Photobucket to store my images and some times ago I was warned that I had no more bandwidth, which caused me to delete some pics just to find out that it was useless!

You see, each time a pic of yours is seen, it conveys traffic to Photobucket and that, in turns, depletes bandwidth. Since Photobucket lets you use only so much bandwidth for free, if your pics are popular (and your thread really is!

) you end up with all bandwidth depleted in a very short time! Fortunately it is restored at the beginning of each month, which is lucky as it is July 29! So double check before deleting images that it is a real storage problem and not a bandwidth one!
I hope it helps!
ciao
Edo

Florida, United States
Joined: July 19, 2014
KitMaker: 249 posts
Armorama: 249 posts
Posted: Sunday, November 15, 2015 - 11:27 AM UTC
Hello again, sorry about being M.I.A. for the last few months... Was called for duty (Army training) but I'm back home now and soon will be back to work on this project.
Marcos/Ed, I will try alternate sites to post update pictures once I make progress. Thanks again for the tips.
After reviewing the current 75" (L) x 10" (D) layout foundation I have determined that an additional 4" (D) is required in order to better accommodate the X6 U.S. Military vehicles and their x12 dismounted soldiers. In addition, I need the space to also add a brick wall fenced in perimeter for the mosque and minaret structures on the next section of the layout. I am also still considering adding in the I.E.D. explosion to the scene and the added space should accommodate that well.
Here's a quick draw of the revised floor plan:

My first task at hand will be to construct the required additional foundation areas, plaster street and sidewalk addition, paint, and detail. Then I'll add in some initial light weathering and the completed Verliden power street light with generator. Hopefully I can complete this soon and provide you all with an update shortly.
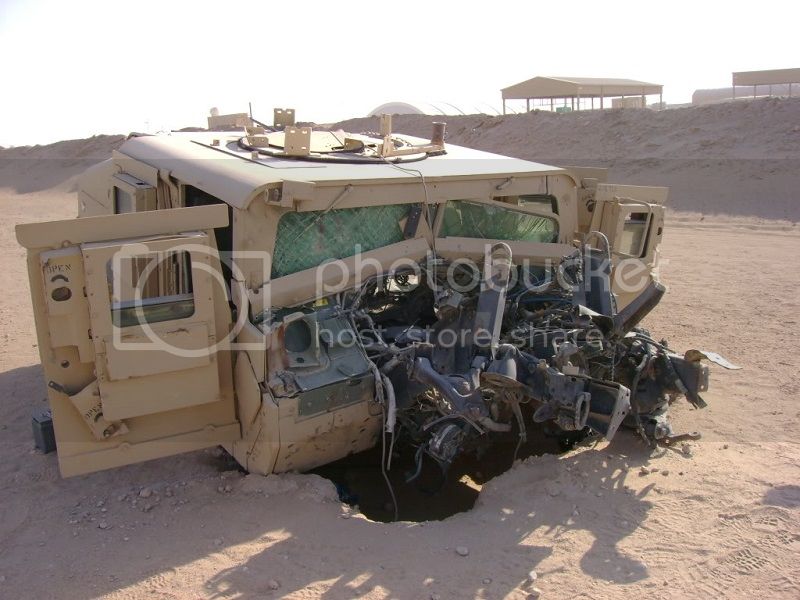
Question: should I model the after effect of an IED or the actual explosion? Here's a cleaned up ref pic from pre-mob training of after effect IED hit:

Thanks again to all for the support and inputs.
JGphins

#429
Massachusetts, United States
Joined: October 14, 2003
KitMaker: 1,086 posts
Armorama: 964 posts
Posted: Sunday, November 15, 2015 - 11:58 PM UTC
The test you did of the bast itself looked pretty convincing, I would go with both aspects (after effects and the blast) you could reasonably say it was a secondary device to hit the QRF. God knows that happened often enough in Al Anbar around that time. Glad to see you're still at it, Brother.
Doc Ski
HM1(ret.) USN
"Those who deny freedom to others deserve it not for themselves; and under a just God, cannot long retain it." Abraham Lincoln
Florida, United States
Joined: July 19, 2014
KitMaker: 249 posts
Armorama: 249 posts
Posted: Monday, November 16, 2015 - 12:11 AM UTC
Tracking. Thanks for input doc.
I'll draw up the scene possibilities and determine if I have the required skill level to achieve a realistic result.
In the mean time, the revised floor plan extension should keep me busy for a while...
Love the hobby but these big projects take a lot of time, money and effort to complete. Still got about 40 plus figures to build, paint and that alone is a huge challenge.
Once completed I will share the project with my unit and place it in the reserve center for all our soldiers to enjoy. It's important to do this right so I'm taking my time on this one.

#429
Massachusetts, United States
Joined: October 14, 2003
KitMaker: 1,086 posts
Armorama: 964 posts
Posted: Monday, November 16, 2015 - 12:29 AM UTC
I know what you mean, my unit from '06 is having its' 10 year reunion which is what my Fallujah project is for. Like yours, everything is on me, hope your Household-6 is as understanding as mine where that's concerned! Let me know if I can help you in any way.
Doc Ski
HM1(ret.) USN
"Those who deny freedom to others deserve it not for themselves; and under a just God, cannot long retain it." Abraham Lincoln
Florida, United States
Joined: July 19, 2014
KitMaker: 249 posts
Armorama: 249 posts
Posted: Tuesday, November 17, 2015 - 08:28 AM UTC
Not much as far as updates to report but nonetheless I just wanted to share a new pic. The tire in background is pending heavy weathering (new items received) and so is the wooden pallet. I will start detailing brick rubble, garbage bags, and general various garbage items to the scene once I complete the added depth to the base... Pending materials on order to commence the construction.


As always, I welcome any suggestions. Thank you for looking.
JGphins
Florida, United States
Joined: July 19, 2014
KitMaker: 249 posts
Armorama: 249 posts
Posted: Tuesday, November 17, 2015 - 09:19 AM UTC
Below is the considered vehicle placements, added sidewalks, electrical power lines, IED after effect damaged M1151, secondary IED location...

From left to right: (Vehicles - represented by oval markings) IED damaged M1151, QRF MRAP #1, QRF MRAP #2, M1151 - cordon, MPCV Buffalo 6x6, M1114.
MPCV arm extended inspecting possible IED, secondary IED blast set off... Engaged foot soldiers, multiple enemy personnel IVO rooftops and buildings, U.S. forces taking fire...
That's the scene in mind to convey - open for any suggestions before finalizing plan. Thanks for looking and feed back.
JGphins
England - North West, United Kingdom
Joined: April 17, 2005
KitMaker: 751 posts
Armorama: 740 posts
Posted: Tuesday, November 17, 2015 - 04:20 PM UTC

#429
Massachusetts, United States
Joined: October 14, 2003
KitMaker: 1,086 posts
Armorama: 964 posts
Posted: Tuesday, November 17, 2015 - 05:42 PM UTC
Layout and what you have so far looks really good, Brother. The premise works run with it!!
Doc Ski
HM1(ret.) USN
"Those who deny freedom to others deserve it not for themselves; and under a just God, cannot long retain it." Abraham Lincoln
Pennsylvania, United States
Joined: April 10, 2011
KitMaker: 7,941 posts
Armorama: 7,934 posts
Posted: Tuesday, November 17, 2015 - 07:10 PM UTC
Lots of really nice work so far. That female fig is really well done.
J
Florida, United States
Joined: July 19, 2014
KitMaker: 249 posts
Armorama: 249 posts
Posted: Tuesday, November 17, 2015 - 10:59 PM UTC
Thanks Paul, John, and Jerry for input.
Figures at this scale is something completely new for me. I assume the hardest challenge is getting the facial tones & details right... I'll get plenty of practice on this dio, I have about 30 soldiers & 10 locals left to make...
My next update might take a while, it's going to be a pic of the completed base expansion to the 1st half section pictured above. I also have to build a new support bracket to hold the additional 4" to 5" (D) overhang.
Perfect time to plan ahead and include a support system on the shelf to hold the final piece, a Plexiglass cover to protect the models from dust.
I'll take progress pics to post once done. Thanks again for looking and inputs, they are always helpful and appreciated.
JGphins

European Union
Joined: February 15, 2002
KitMaker: 2,289 posts
Armorama: 1,231 posts
Posted: Monday, November 23, 2015 - 05:04 PM UTC
Looks good, and gets better all the time.
I have not read all comments, only looked at the pictures.
What you need is rubble. The part of the buildings that are missing due to bullet holes en explosions, must be compensated by the same amount of rubble. Heaps and heaps of it. Concrete, bricks, roof tiles, broken pipes, glass, wiring...
Have fun !
Who the hell is General Failure, and why was he reading my hard disk ?
Where's my funky Iraqi general rank that was here on my profile a few years ago? Did they strip my rank, after all I've done for this forum ? Robbery!!
Florida, United States
Joined: July 19, 2014
KitMaker: 249 posts
Armorama: 249 posts
Posted: Sunday, January 24, 2016 - 09:39 AM UTC
Hello, I know its been a while since my last update but its been hard finding time to work on dio...
As previously mentioned, I wanted to add an additional 6 inches deep to increase the street size, add more sidewalks, and provide ample space to accommodate all of the QRF US ARMY vehicles, plus the large IED explosions.
First I had to remove the dio's shelve, add addition bracing to support the added weight, strip plaster off the base face, cut a clipboard to size, paste it all together, then start the plaster process...
Here's what it looks like at this point:

,

,

,

,

,

,

,

,

,

,

,

Can't wait for the plaster to dry to paint and weather this section then add the IED plus other details.
California, United States
Joined: January 03, 2016
KitMaker: 36 posts
Armorama: 18 posts
Posted: Sunday, January 24, 2016 - 09:50 AM UTC
this diorama is amazing!
I love the backdrop, it really adds to the scene.
Just one question, how did you cut the foam, whenever I cut foam it always ends up all messed up, unlike yours.
Good luck with the rest of the dio!
Florida, United States
Joined: July 19, 2014
KitMaker: 249 posts
Armorama: 249 posts
Posted: Sunday, January 24, 2016 - 10:02 AM UTC
Thanks!
I use DOW Styrofoam 1/2 inch trick. Also known as BLUE BOARD. You can find it at your local Home Depot or Lowes. Easy to cut with an X-ACTO blade, paste with Elmer's white glue and paint only with water base paints or chemicals will melt the foam. If you are using the white foam it will break apart and be very difficult to work with. Let me know if you need any more info.

,

JGphins

#429
Massachusetts, United States
Joined: October 14, 2003
KitMaker: 1,086 posts
Armorama: 964 posts
Posted: Sunday, January 24, 2016 - 06:12 PM UTC
Doc Ski
HM1(ret.) USN
"Those who deny freedom to others deserve it not for themselves; and under a just God, cannot long retain it." Abraham Lincoln
California, United States
Joined: January 03, 2016
KitMaker: 36 posts
Armorama: 18 posts
Posted: Monday, January 25, 2016 - 08:22 AM UTC
thanks for the info!
I think the problem that I have is that the foam I use is too thick.
I'll pick up some of that 1/2 inch foam the next time at home depot.
Pennsylvania, United States
Joined: April 10, 2011
KitMaker: 7,941 posts
Armorama: 7,934 posts
Posted: Monday, January 25, 2016 - 08:38 AM UTC
Lots of great work! Love the backdrop of course!
J
Florida, United States
Joined: July 19, 2014
KitMaker: 249 posts
Armorama: 249 posts
Posted: Wednesday, January 27, 2016 - 01:41 PM UTC
MRAP wheels testing new road:

,

,

Visual inspection of added street width:

,

,

,

Prep and frame street edges for paved road construction begins:

,

,

Paved road plastering completed:

,

Once plaster sets I will prime sidewalks, glue in place, and then the fun begins; painting & weathering. Shortly after that I will add loads of brick rubble debris, trash, and install street power line poles. Should take a while but I'm loving every minute.
England - South West, United Kingdom
Joined: March 13, 2015
KitMaker: 418 posts
Armorama: 235 posts
Posted: Thursday, January 28, 2016 - 12:44 AM UTC
That display is looking awesome.


#429
Massachusetts, United States
Joined: October 14, 2003
KitMaker: 1,086 posts
Armorama: 964 posts
Posted: Thursday, January 28, 2016 - 08:18 PM UTC
Brother, it's getting better and better. I really love how it blends into your backdrop seamlessly; you're really creating something you can be proud of!

Doc Ski
HM1(ret.) USN
"Those who deny freedom to others deserve it not for themselves; and under a just God, cannot long retain it." Abraham Lincoln
Florida, United States
Joined: July 19, 2014
KitMaker: 249 posts
Armorama: 249 posts
Posted: Sunday, January 31, 2016 - 11:05 AM UTC
Hello, just wanted to share some progress of the weathered street addition. This weathering was a bit difficult because I had to blend the new fresh pavement section into the previously weathered street. After several stains, powders both wet and dry, curved in cracks /pot holes and lots of steel wool sanding...

,

,

,

I might still add a bit more work to the streets before moving on to painting & weathering the new sidewalk section.
Thanks to all for looking and as always all feedback is welcomed.
Happy modeling!

England - East Anglia, United Kingdom
Joined: April 14, 2015
KitMaker: 188 posts
Armorama: 173 posts
Posted: Sunday, January 31, 2016 - 06:48 PM UTC
Wow that looks fantastic well done.
Looking forward to seeing it fill up.
Paul

#429
Massachusetts, United States
Joined: October 14, 2003
KitMaker: 1,086 posts
Armorama: 964 posts
Posted: Sunday, January 31, 2016 - 07:07 PM UTC
Nice work blending the new with the existing, you managed to pull it off seamlessly. How is the Woodland Scenics stuff to work with? I've looked at it a few times and always wound up sticking with joint compound (had a butt ton left over from a major renovation project, kept SWMBO happy by using it up).
Doc Ski
HM1(ret.) USN
"Those who deny freedom to others deserve it not for themselves; and under a just God, cannot long retain it." Abraham Lincoln


