Wow, some mental institutions have a very clever medical plan.....
Really a very very good work!.
Regards from the south
Alvaro
Hosted by Darren Baker
Tiger 1 jumping into the deep end
alewar

Joined: December 27, 2006
KitMaker: 773 posts
Armorama: 765 posts

Posted: Thursday, May 28, 2015 - 08:31 PM UTC
KelticKnot

Joined: May 11, 2015
KitMaker: 768 posts
Armorama: 12 posts

Posted: Friday, May 29, 2015 - 04:19 PM UTC
Fantastic work! I'm just getting back into modelling and I expect I'll want to do some scratchbuilding and detailing somewhere down the line.
Inspiring stuff, i'll watch you progress with interest. 😊
Inspiring stuff, i'll watch you progress with interest. 😊

SlayerWal

Joined: February 15, 2015
KitMaker: 24 posts
Armorama: 24 posts

Posted: Friday, June 12, 2015 - 09:56 AM UTC
Hi all,
Thank you all for the wonderful comments. You are 100% correct Jesse and I have a good reason why it's not there (please sir ... don't hit me ), I haven't built it yet. That and the gyro will be soon. And Alvaro I'm not insane .... just miss-understood (and the only mental institution in the city I live, Canberra, is called Parliament House
  )
)
Been working on the turret interior. Lots of small fiddly bits to drive one mad (lucky I already am). Most of it is scratch built with some of the Verlinden parts (generally modified) used here and there.
Things that have been done:
Junction Box and Wiring
Gunners Elevation Wheel and linkage
Gunners Back Rest (moveable)
Gunners Seat with footrest
Gun Counterbalance (moveable)
Commanders Traverse Gears
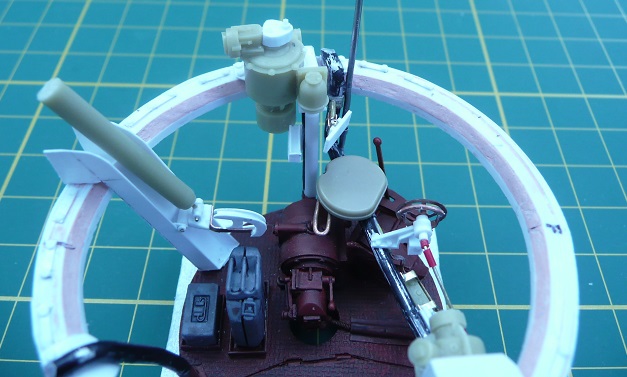
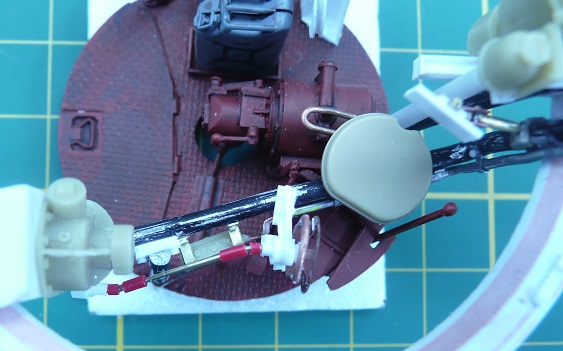
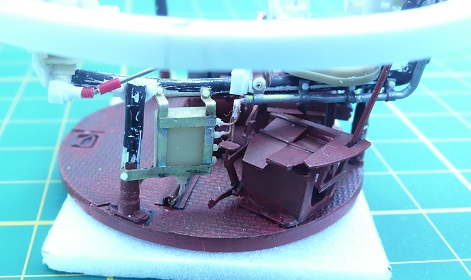
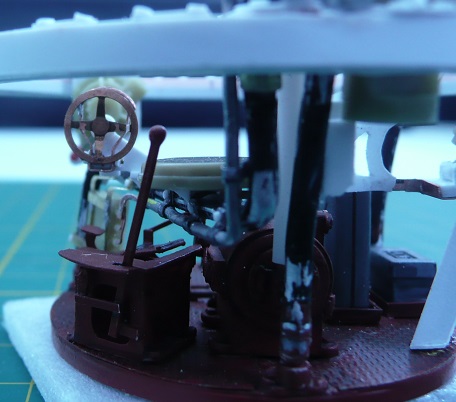
It is as accurate as I could make it. A bit cramped because the Verlinden items are large, however it was workable.
Thanks for looking
Thank you all for the wonderful comments. You are 100% correct Jesse and I have a good reason why it's not there (please sir ... don't hit me
 ), I haven't built it yet. That and the gyro will be soon. And Alvaro I'm not insane .... just miss-understood (and the only mental institution in the city I live, Canberra, is called Parliament House
  )
)Been working on the turret interior. Lots of small fiddly bits to drive one mad (lucky I already am). Most of it is scratch built with some of the Verlinden parts (generally modified) used here and there.
Things that have been done:
Junction Box and Wiring
Gunners Elevation Wheel and linkage
Gunners Back Rest (moveable)
Gunners Seat with footrest
Gun Counterbalance (moveable)
Commanders Traverse Gears


It is as accurate as I could make it. A bit cramped because the Verlinden items are large, however it was workable.
Thanks for looking
Byrden

Joined: July 12, 2005
KitMaker: 2,233 posts
Armorama: 2,221 posts

Posted: Friday, June 12, 2015 - 12:55 PM UTC
This is impressive. I shall send those photos to Dragon one day and ask them if they want to do an interior properly. This, I will say, is how good it needs to be.
David
David
Dmitry78

Joined: October 06, 2013
KitMaker: 79 posts
Armorama: 79 posts

Posted: Monday, June 15, 2015 - 08:04 PM UTC
Peter, a fantastic amount of work!

cheswickthecat

Joined: October 13, 2007
KitMaker: 212 posts
Armorama: 208 posts

Posted: Tuesday, June 16, 2015 - 02:34 PM UTC
every time I look at this build thread, it simply blows me away.
Incredible.
Terry
Incredible.
Terry

SlayerWal

Joined: February 15, 2015
KitMaker: 24 posts
Armorama: 24 posts

Posted: Saturday, June 20, 2015 - 04:44 AM UTC
Hi all,
Thank you once again for all you positive comments
Added a few more bits here and there :
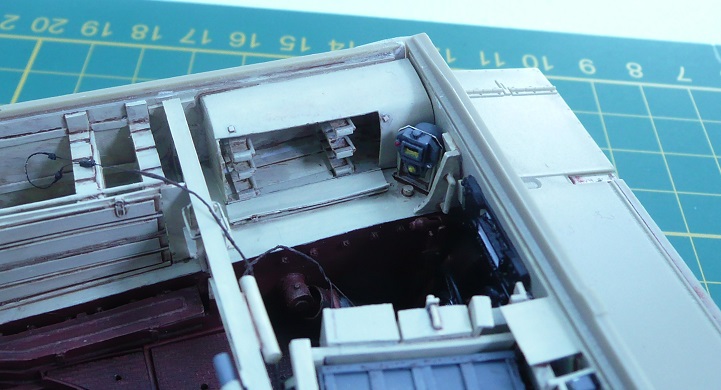
Drivers Ammunition Bin and Gyrocompass (both scratchbuilt since none of the parts I had were very good). Still havent figured out what to do with those Headsets Maybe put them dangling over the back of the chairs.
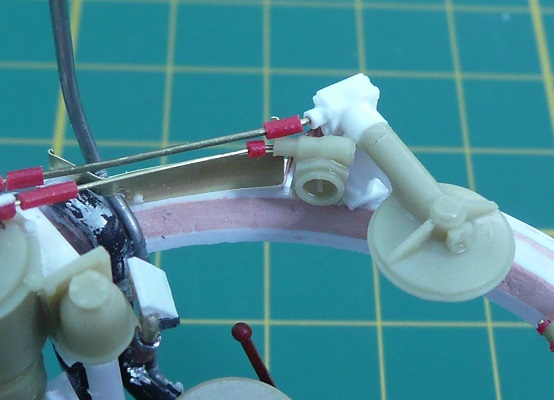
Gunners Traverse Wheel, Position Indicator and Linkages. I have also started to place in the turret storage coamings made out of .005" brass sheet.
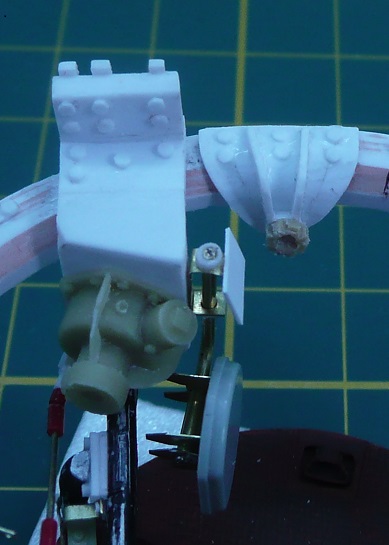
Loaders Seat (folded position) and Travers Lock.
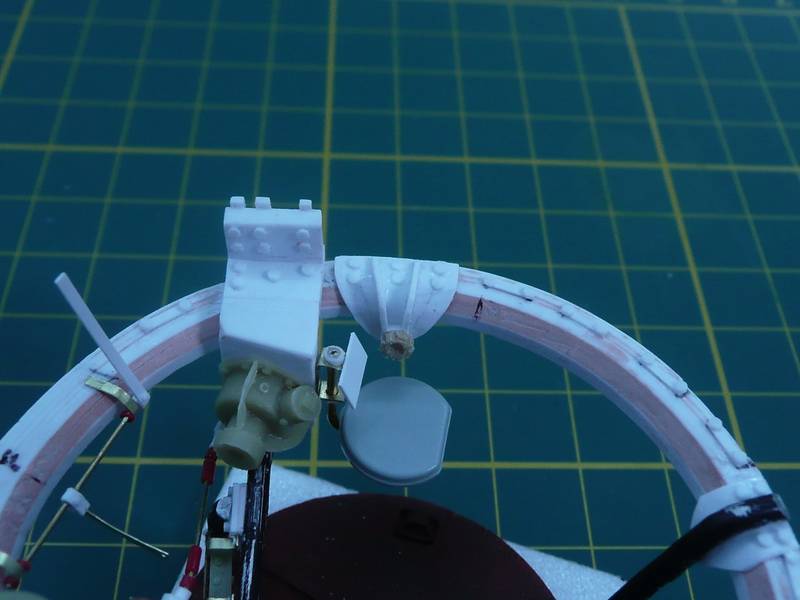
Loaders Seat (use position) and start of Foot MG Trigger.
I am making quite a few bits moveable, even thou they may never get moved, simply to develop the modelling skills required
I will be working on the seat backs to make them look a little better than a strip of plastic.
Lots to go
Thank you once again for all you positive comments

Added a few more bits here and there :

Drivers Ammunition Bin and Gyrocompass (both scratchbuilt since none of the parts I had were very good). Still havent figured out what to do with those Headsets
 Maybe put them dangling over the back of the chairs.
Gunners Traverse Wheel, Position Indicator and Linkages. I have also started to place in the turret storage coamings made out of .005" brass sheet.

Loaders Seat (folded position) and Travers Lock.

Loaders Seat (use position) and start of Foot MG Trigger.
I am making quite a few bits moveable, even thou they may never get moved, simply to develop the modelling skills required

I will be working on the seat backs to make them look a little better than a strip of plastic.
Lots to go


firstcircle


Joined: November 19, 2008
KitMaker: 2,249 posts
Armorama: 2,007 posts

Posted: Saturday, June 20, 2015 - 01:35 PM UTC
Peter, excellent work on all of this. I like how you have the "I can make one of those if I try" attitude to scratching new parts... Then there's the internal struggle on when to accept compromise, combined with later wishing you'd done something different to something that you'd decided to live with.
Also appreciate how much longer it takes to photograph everything and then post it on here... So just make sure you finish and don't run out of steam!
So one question comes to mind - do you have anything in mind to show off all this detail in the end? Or will you just have it visible through open hatches?
Posted: Monday, June 22, 2015 - 05:48 AM UTC
Absolutely astonishing attention to detail and skilled scratch-building and utterly realistic. Thoroughly enjoyable build, well-photographed and explained.
I'm working on an early Tiger I. Thanks for taking me to school.
Best wishes!
I'm working on an early Tiger I. Thanks for taking me to school.
Best wishes!

PanzerGeek

Joined: February 10, 2008
KitMaker: 221 posts
Armorama: 217 posts

Posted: Monday, June 22, 2015 - 07:03 PM UTC
I am totally enjoying this build. Awesome work Peter. Keep it coming. 
Cheers
Todd

Cheers

Todd

SlayerWal

Joined: February 15, 2015
KitMaker: 24 posts
Armorama: 24 posts

Posted: Saturday, June 27, 2015 - 04:34 AM UTC
Hi all,
Once again, thankyou all for for supporting comments. They really help to provide "steam" to the build. They also help me overcome those times where I am cranky with my fat fingers and poor eyesight.
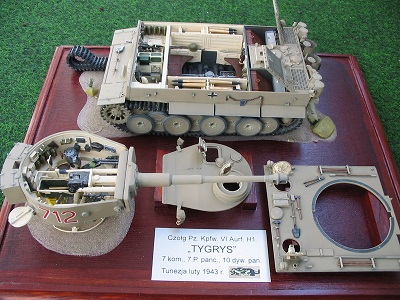
I will probably display it similar to this photo I found.
Added some more bits to the turret ring
Commanders chair (both seats moveable)
Commanders Switches
Remaining Coamings around the turret ring.
Storage boxes in the coamings.
Commanders Chair (both seats up, both down)
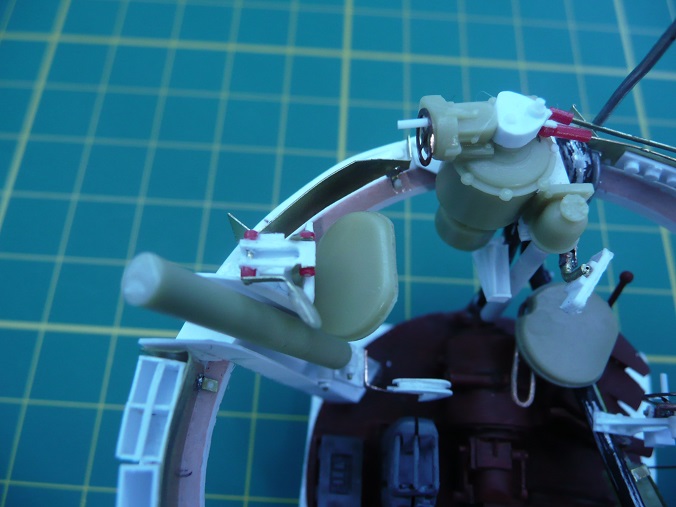
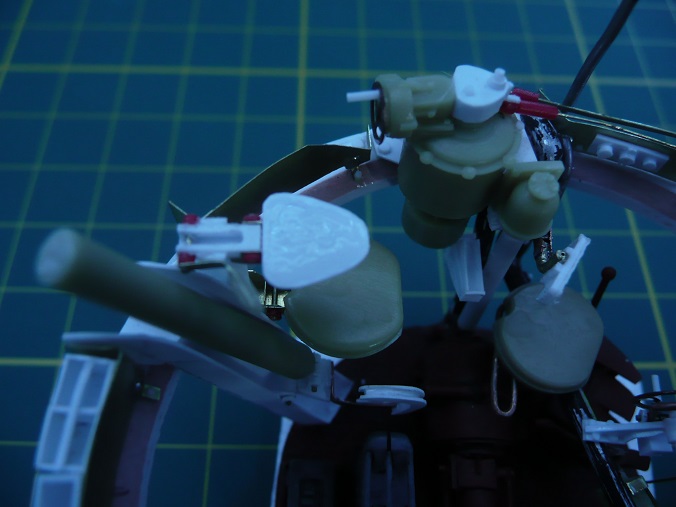
Coamings and storage
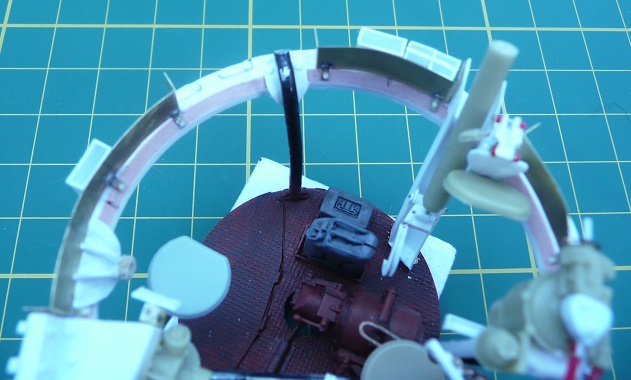
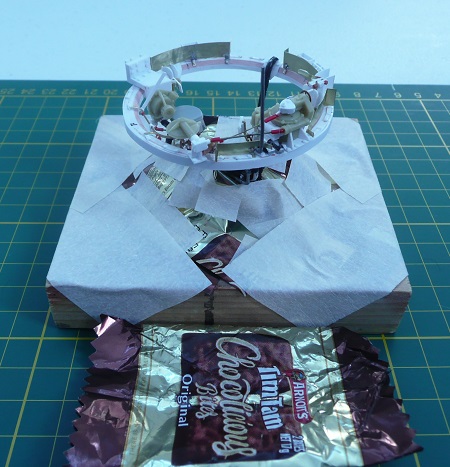
I then washed and prepared the whole unit for undercoat spraying. I used strips on Tim Tam wrappers (shinny surface down) over the already painted areas, which I held together with masking tape. Now I wish to stress how this provides irrefutable proof that Tim Tams (or any other chocolate goodness in a wrapper) is an essential component of successful modelling
Work on other bits and pieces. As this is a Feb 44 Tiger, it will have the TZF 9b (dual) telescopic sight, rather than the 9C (single).

I decided to rebuild the turret mantlet mounts. This was to be able to fill, detail and paint the turret walls against the turret ring without the gun being in the way. It also allows me to work on the gun and mantlet as a separate unit (and possibly have it removeable).
Thats all for this week, have a great day
Once again, thankyou all for for supporting comments. They really help to provide "steam" to the build. They also help me overcome those times where I am cranky with my fat fingers and poor eyesight.
I will probably display it similar to this photo I found.

Added some more bits to the turret ring
Commanders chair (both seats moveable)
Commanders Switches
Remaining Coamings around the turret ring.
Storage boxes in the coamings.
Commanders Chair (both seats up, both down)


Coamings and storage

I then washed and prepared the whole unit for undercoat spraying. I used strips on Tim Tam wrappers (shinny surface down) over the already painted areas, which I held together with masking tape. Now I wish to stress how this provides irrefutable proof that Tim Tams (or any other chocolate goodness in a wrapper) is an essential component of successful modelling


Work on other bits and pieces. As this is a Feb 44 Tiger, it will have the TZF 9b (dual) telescopic sight, rather than the 9C (single).

I decided to rebuild the turret mantlet mounts. This was to be able to fill, detail and paint the turret walls against the turret ring without the gun being in the way. It also allows me to work on the gun and mantlet as a separate unit (and possibly have it removeable).
Thats all for this week, have a great day


SlayerWal

Joined: February 15, 2015
KitMaker: 24 posts
Armorama: 24 posts

Posted: Friday, July 03, 2015 - 10:37 AM UTC
Hi all,
Been an interesting week.
Firstly, I painted the turret ring and all it's fixtures. Then I painted the inside of the turret pieces. All my painting is by brush. I have never used an airbrush, so the little spraying I do is from a can (and you know what they say about old dogs and new tricks).
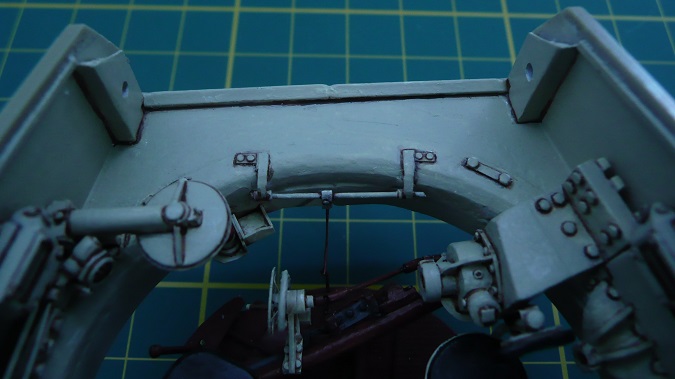

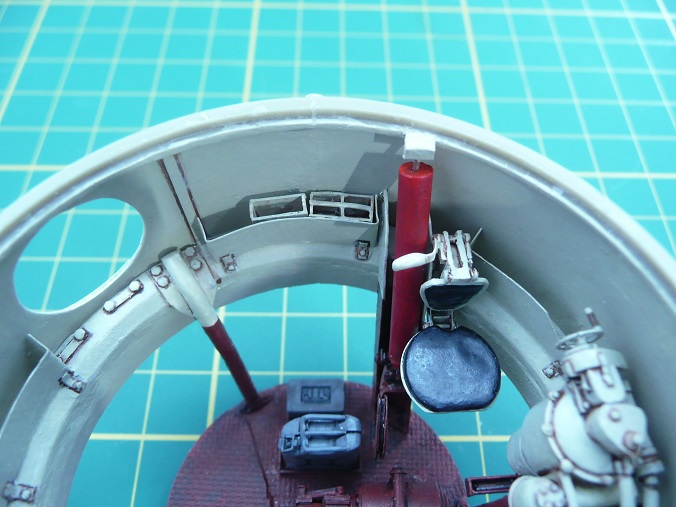
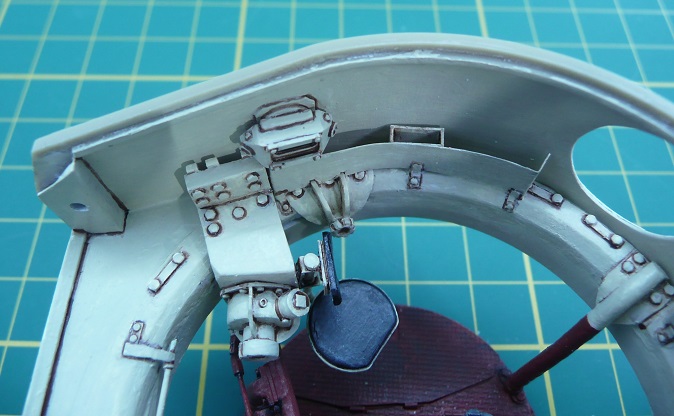
Putting it together I had no end of trouble fitting, glueing and filling the turret walls to the turret ring, but eventually I got it done (to some degree). Some areas it was almost impossible to get at, so my turret ring cowling "has some dents in it" - purposely put there of course
 I will keep working on it.
You may notice the backup trigger. Any Doctor Who fans should know EVERTHING should have a large red button

Happy with the overall result.
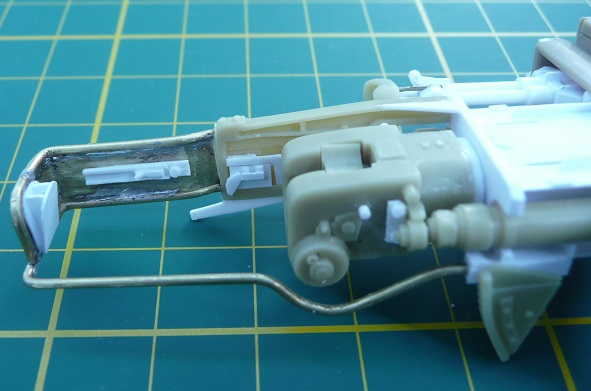
Also been working on the gun assembly. I thought Id practice a bit of metalwork so I built the spent shell basket support out of sheet and tube brass, plus a few parts in plastic.
More next week


SlayerWal

Joined: February 15, 2015
KitMaker: 24 posts
Armorama: 24 posts

Posted: Saturday, July 11, 2015 - 05:39 AM UTC
Hi all,
Minor setback ...... After being so careful for so long I dropped the turret assembly (not the ball ....) and watched it roll across the table and fall to the floor I was not a happy chappy. Took some time repairing the damage, and touching up the paintwork.
Worked on the Turret Painting (touchups, washes and highlighting), Escape Hatch and Gun Assembly.
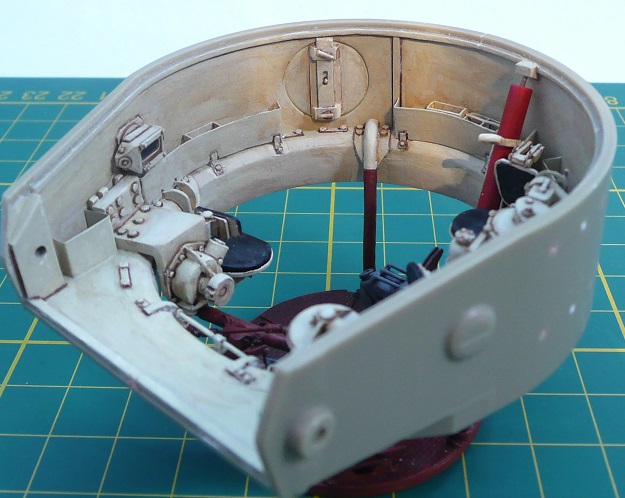
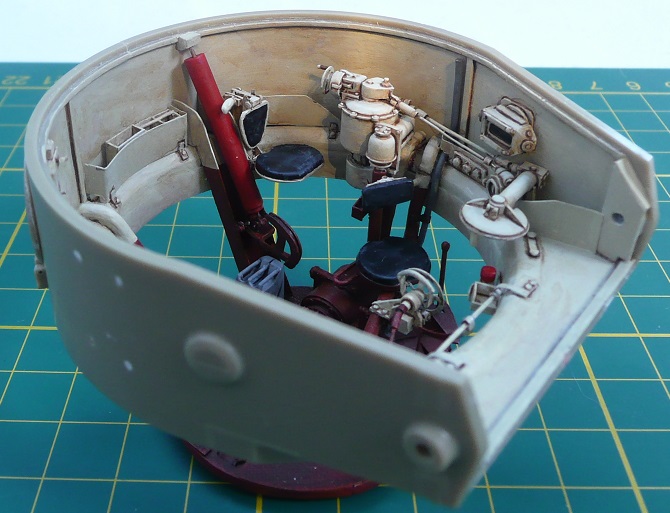
Escape hatch opens and closes as does it's lock.
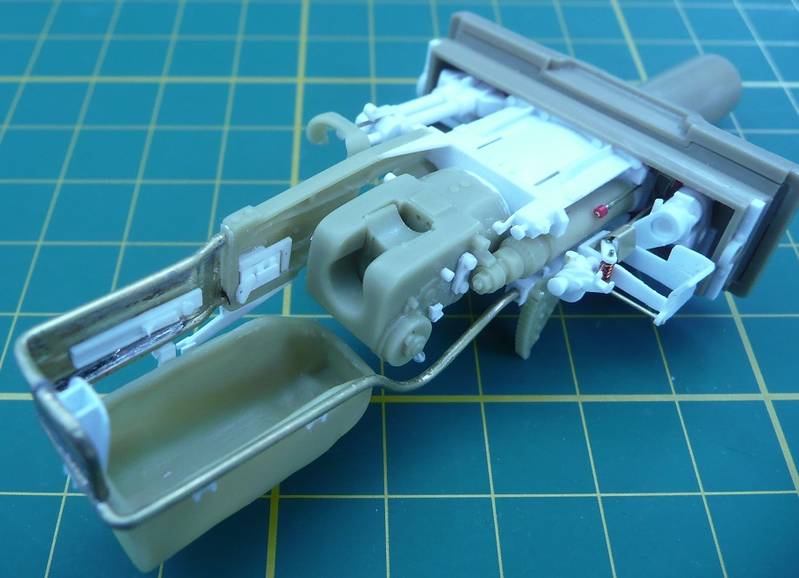
The Gun Assembly has turned out to be a detailed model in itself. Most of it has ended up scratch built with bits and pieces from the Verlinden kit modified. I have included the main firing circuit (as displayed in the Tigerfibel). Also included is the Pedal MG34 mechanism (hard to see, but its all there) and the Backup firing mechanism.
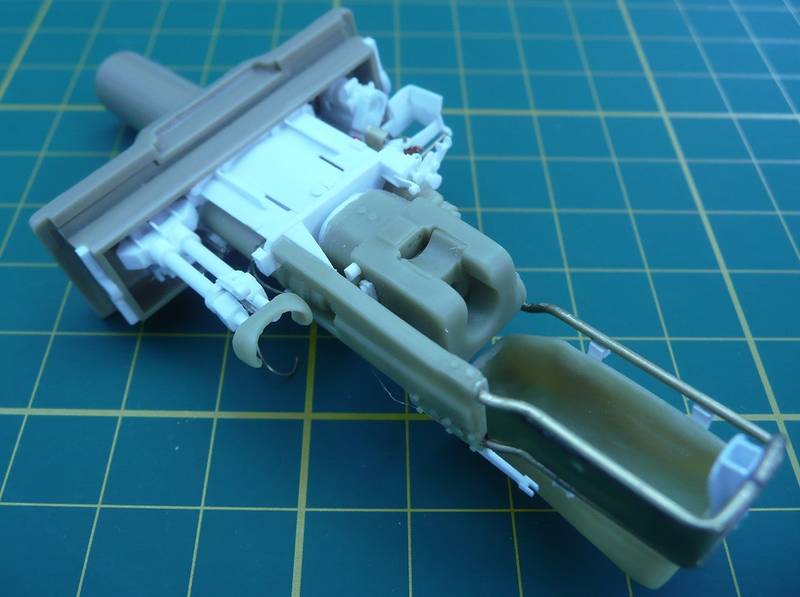
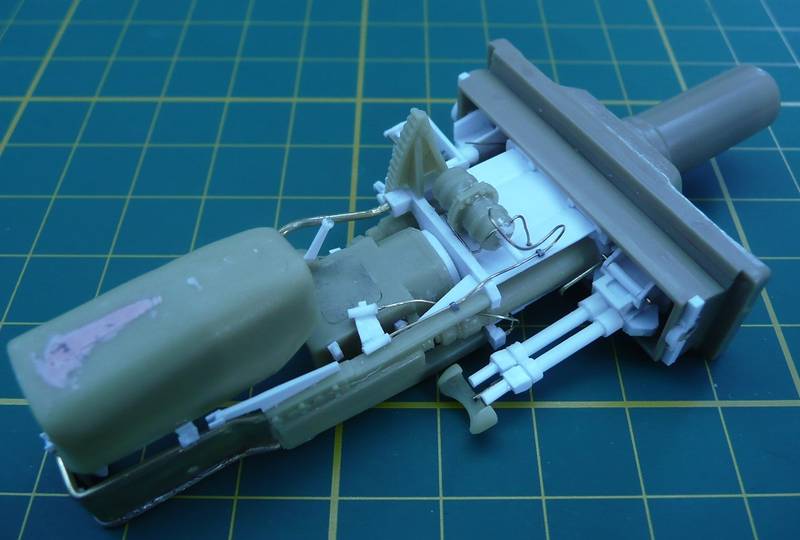
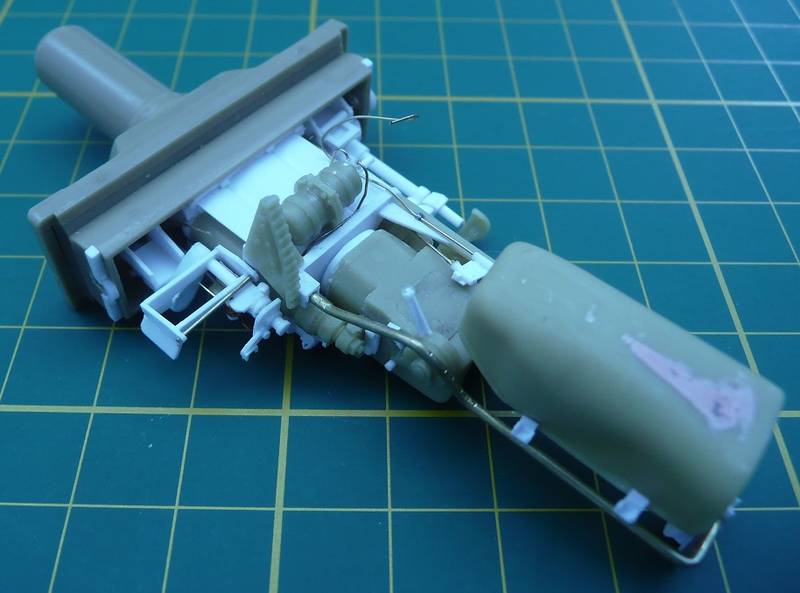
Q. Is it possible to increase your size allowance on Kitmaker Gallery or will I need to use some other photo hosting site when I run out?
That's all this week. Have a great day
Minor setback ...... After being so careful for so long I dropped the turret assembly (not the ball ....) and watched it roll across the table and fall to the floor
 I was not a happy chappy. Took some time repairing the damage, and touching up the paintwork.
Worked on the Turret Painting (touchups, washes and highlighting), Escape Hatch and Gun Assembly.


Escape hatch opens and closes as does it's lock.
The Gun Assembly has turned out to be a detailed model in itself. Most of it has ended up scratch built with bits and pieces from the Verlinden kit modified. I have included the main firing circuit (as displayed in the Tigerfibel). Also included is the Pedal MG34 mechanism (hard to see, but its all there) and the Backup firing mechanism.


Q. Is it possible to increase your size allowance on Kitmaker Gallery or will I need to use some other photo hosting site when I run out?
That's all this week. Have a great day

erichvon

Joined: January 17, 2006
KitMaker: 1,694 posts
Armorama: 1,584 posts

Posted: Saturday, July 11, 2015 - 07:01 AM UTC
Incredible work. I take my hat off to you!

SlayerWal

Joined: February 15, 2015
KitMaker: 24 posts
Armorama: 24 posts

Posted: Friday, July 17, 2015 - 05:01 AM UTC
Hi all,
Bits and pieces week.
Painted the gun assembly.
Painted up some Gurtsacke, Water Bottles, Gasmasks and an MP40 with mount.
So the "I hope its complete" turret interior (unless anyone can please point out anything Ive missed)
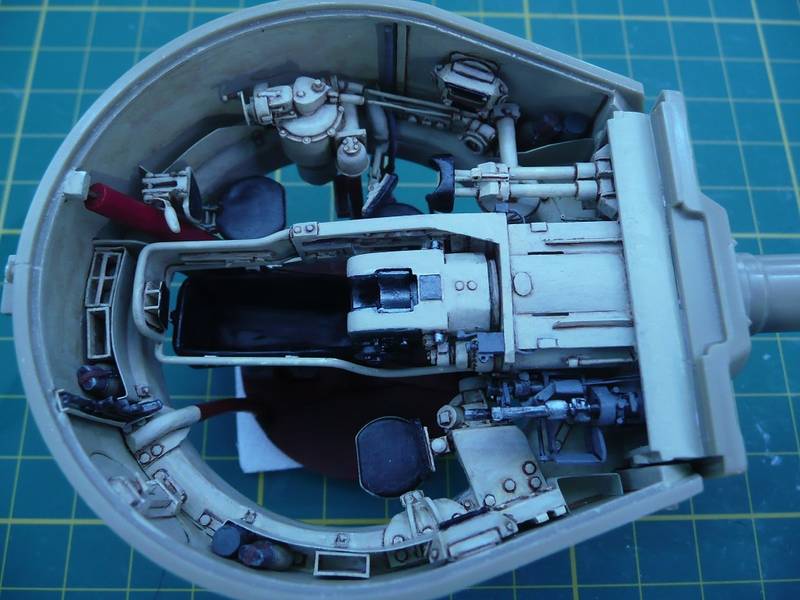
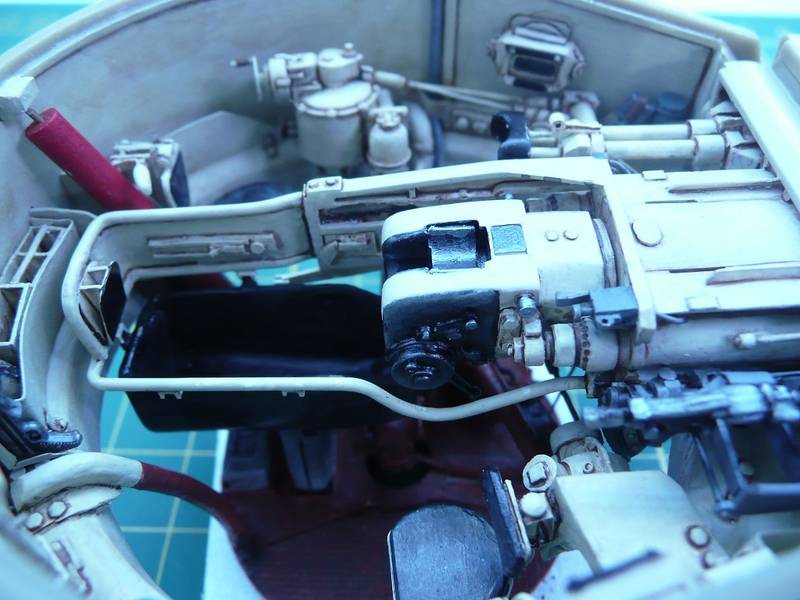
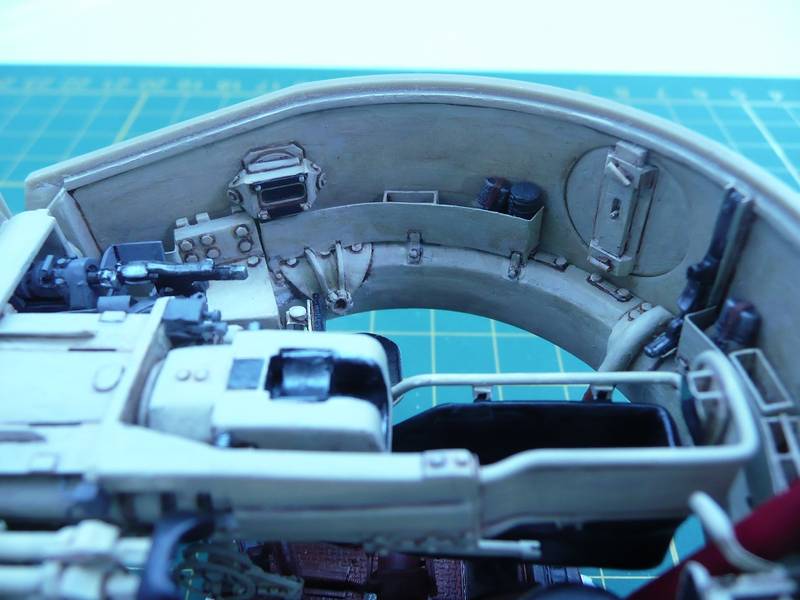
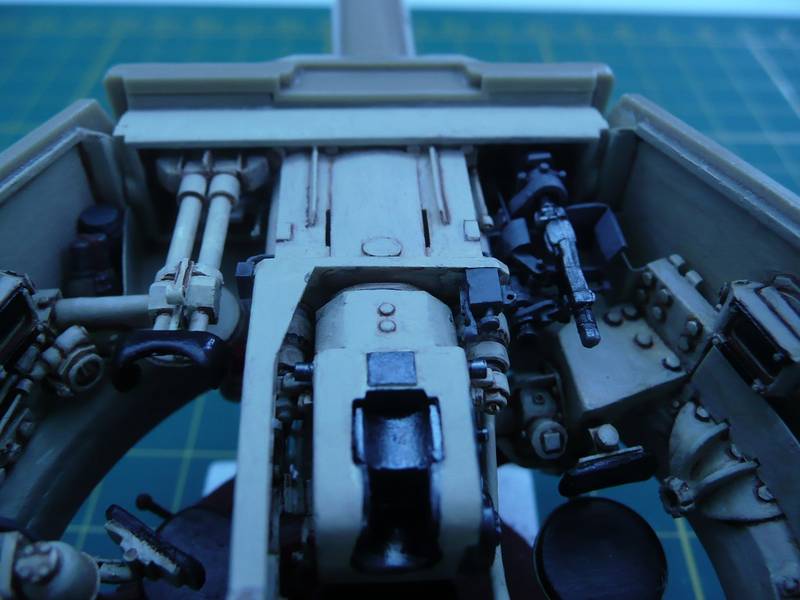
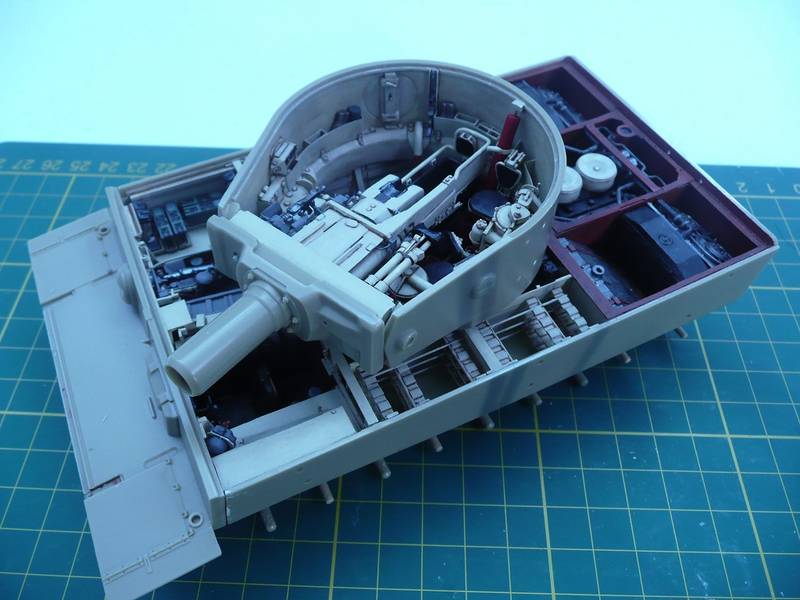
I was thinking that the major parts of the interior were finished. All I had to do was the turret roof interior. Unfortunately, the modelling gods had other plans. Whilest the Commanders Cupola looks fine from the outside, inside was another matter. Of both sets of vision blocks, both looked wrong. All the Academy bits where much larger than they should be and there is no piece/s for the gun travel mount.
So its back to Mr Scalpel and Mrs Styrene for some hanky panky. Results should be next week ....
Bits and pieces week.
Painted the gun assembly.
Painted up some Gurtsacke, Water Bottles, Gasmasks and an MP40 with mount.
So the "I hope its complete" turret interior
 (unless anyone can please point out anything Ive missed)


I was thinking that the major parts of the interior were finished. All I had to do was the turret roof interior. Unfortunately, the modelling gods had other plans. Whilest the Commanders Cupola looks fine from the outside, inside was another matter. Of both sets of vision blocks, both looked wrong. All the Academy bits where much larger than they should be and there is no piece/s for the gun travel mount.
So its back to Mr Scalpel and Mrs Styrene for some hanky panky. Results should be next week ....
Posted: Monday, July 20, 2015 - 05:37 AM UTC
Really wonderful work! Please keep the pictures coming!
brucca111

Joined: September 10, 2006
KitMaker: 184 posts
Armorama: 183 posts

Posted: Monday, July 20, 2015 - 06:00 AM UTC
A truly wonderful job! If I ever get around to doing a late tiger interior, I will be looking at your work for reference. Again, really impressive work.
canopener5

Joined: July 19, 2015
KitMaker: 19 posts
Armorama: 19 posts

Posted: Monday, July 20, 2015 - 06:37 PM UTC
VERY NICE, I DID NOT KNOW U COULD HAVE PAINT & SHARP INSTRUMENT IN A INSANE ASSILUM, LOL. must applaud U too, for working with the straitjacket most would have given up. Hahaha. 


SlayerWal

Joined: February 15, 2015
KitMaker: 24 posts
Armorama: 24 posts

Posted: Friday, July 24, 2015 - 06:18 AM UTC
Hi all,
Thanks again for your supportive comments
The nursing staff let me use a plastic scalpel (as long as I don't lend it to any of my invisible pink elephant friends), and the finger paint is NON toxic. When out of the straight jacket, they put chains on
A productive week spent on the turret roof interior. There is a large amount of detail when you start looking at it. Most of it is scratch built, as very little is provided in any of the kits I had (and those bits that were, were generally too big).


Unfortunately, the commanders cupola is inaccurate in the placement of the hatch mechanism but I could not change that easily (because of the molding of the hole). Since this is a Feb 44, the two ribs are still placed, and the smoke launcher is not (both were Mar 44 changes as far as I can tell). The wiring whilst mostly correct, is guesswork on the loader side (as it is mainly missing in the Saumur Tiger).
There is light at the end of the "tiger 1 interior" tunnel
Thanks again for your supportive comments

The nursing staff let me use a plastic scalpel (as long as I don't lend it to any of my invisible pink elephant friends), and the finger paint is NON toxic. When out of the straight jacket, they put chains on

A productive week spent on the turret roof interior. There is a large amount of detail when you start looking at it. Most of it is scratch built, as very little is provided in any of the kits I had (and those bits that were, were generally too big).


Unfortunately, the commanders cupola is inaccurate in the placement of the hatch mechanism but I could not change that easily (because of the molding of the hole). Since this is a Feb 44, the two ribs are still placed, and the smoke launcher is not (both were Mar 44 changes as far as I can tell). The wiring whilst mostly correct, is guesswork on the loader side (as it is mainly missing in the Saumur Tiger).
There is light at the end of the "tiger 1 interior" tunnel

SlayerWal

Joined: February 15, 2015
KitMaker: 24 posts
Armorama: 24 posts

Posted: Friday, July 31, 2015 - 05:40 AM UTC
Hi all,
Worked on the Commanders cupola, made the vision blocks, forehead rests etc.
Painted the turret roof.


The roof is hinged so it can be opened to see the detail (I guess this makes it a "convertible":)).

Finally finished putting together the Modelkasten tracks. Boy that was a struggle, nearly 1000 parts that had to be cut from the sprues, more than half needing to be trimmed. 380 track pins glued in (without hopefully gumming up the track links) and 380 track guides glued on. But i'm sure many of you have been through that

I would say that the interior is pretty well completed now excluding the hatches (unless anyone can point out something that i've missed). I will probably just have to touch up here and there.
It has taken over 6 months of constant work, a HUGE learning curve, incredible amount of research and an uncountable number of snarls and growls (me, not the dogs). It was well worth it
So that just leaves the minor task of the exterior ..........
If people wish, I can continue this build log. The exterior I will be using several PE detail sets and trying to paint it as a early 44, ss Pz.Abt 101 (NOT Wittmans). People are probably saturated though with Tiger 1 Exterior build logs
Worked on the Commanders cupola, made the vision blocks, forehead rests etc.
Painted the turret roof.


The roof is hinged so it can be opened to see the detail (I guess this makes it a "convertible":)).

Finally finished putting together the Modelkasten tracks. Boy that was a struggle, nearly 1000 parts that had to be cut from the sprues, more than half needing to be trimmed. 380 track pins glued in (without hopefully gumming up the track links) and 380 track guides glued on. But i'm sure many of you have been through that


I would say that the interior is pretty well completed now excluding the hatches (unless anyone can point out something that i've missed). I will probably just have to touch up here and there.
It has taken over 6 months of constant work, a HUGE learning curve, incredible amount of research and an uncountable number of snarls and growls (me, not the dogs). It was well worth it

So that just leaves the minor task of the exterior ..........
If people wish, I can continue this build log. The exterior I will be using several PE detail sets and trying to paint it as a early 44, ss Pz.Abt 101 (NOT Wittmans). People are probably saturated though with Tiger 1 Exterior build logs


jwest21

Joined: October 16, 2006
KitMaker: 3,374 posts
Armorama: 3,126 posts

Posted: Friday, July 31, 2015 - 05:46 AM UTC
good lord, that's awesome!!!! Definitely continue this....beautiful!!! I just started my own "deep end Tiger build". If my turns out half as nice, I will be happy!

SlayerWal

Joined: February 15, 2015
KitMaker: 24 posts
Armorama: 24 posts

Posted: Friday, August 28, 2015 - 10:29 AM UTC
Hi all,
Been a while since my last post, but I have been pottering away at it.
I think my biggest time consumer has been the Aber Super Detail kit. I have had no end of difficulty working with all those small PE parts. The kit itself is fantastic, but this user lacks the skill to do it justice. Most of my time has been spent re-glueing (having first to try and remove the old glue) things that have been knocked off, replacing PE parts (if I can) that have snapped because of multiple folding, losing small bits ... etc etc. I have no idea how they solder the small parts, and I have ended up having to glue almost everything (I did manage to solder the ribs in the side skirts). To me, so far, PE stands for "Painfull Experience". Fortunately, I'm a stubborn old bugger who dislikes giving in ....
I am extremely jealous of those who have the skill (including good eyes and thin fingers) to work with PE.
Anyway, enough of my ranting. For those who are still interested this is what it is currently looking like . (I have still to putty the corners of the zimmerit PE).


Been a while since my last post, but I have been pottering away at it.
I think my biggest time consumer has been the Aber Super Detail kit. I have had no end of difficulty working with all those small PE parts. The kit itself is fantastic, but this user lacks the skill to do it justice. Most of my time has been spent re-glueing (having first to try and remove the old glue) things that have been knocked off, replacing PE parts (if I can) that have snapped because of multiple folding, losing small bits ... etc etc. I have no idea how they solder the small parts, and I have ended up having to glue almost everything (I did manage to solder the ribs in the side skirts). To me, so far, PE stands for "Painfull Experience". Fortunately, I'm a stubborn old bugger who dislikes giving in ....
I am extremely jealous of those who have the skill (including good eyes and thin fingers) to work with PE.
Anyway, enough of my ranting. For those who are still interested this is what it is currently looking like
 . (I have still to putty the corners of the zimmerit PE).


canopener5

Joined: July 19, 2015
KitMaker: 19 posts
Armorama: 19 posts

Posted: Friday, August 28, 2015 - 03:15 PM UTC
Love to see when guys have mental breakdowns, and do this, nice build. Can't wait for mine hahaha.
 |


