_GOTOBOTTOM
Armor/AFV: Axis - WWII
Armor and ground forces of the Axis forces during World War II.
Hosted by Darren Baker
Tiger 1 jumping into the deep end
SlayerWal
Visit this Community
Australian Capital Territory, Australia
Joined: February 15, 2015
KitMaker: 24 posts
Armorama: 24 posts
Posted: Sunday, February 15, 2015 - 01:26 PM UTC
For the last 20 odd years I have predominantly been a very amateur figure painter in various scales (15mm, 28mm). Made some terrain for both gaming and fantasy role playing, but was looking for something different. So I pulled out the dust covered storage boxes in the shed and extracted an old Tamiya Tiger 1 Late (#35146) I had bought 25 odd years ago with a Verlinden Engine Bay (#526) and Interior (#901). I also had a relatively newer Academy Tiger 1 Mid Production with Interior (#13265). So I decided, what the hell, I'm going to make a Late Tiger 1 with interior ...

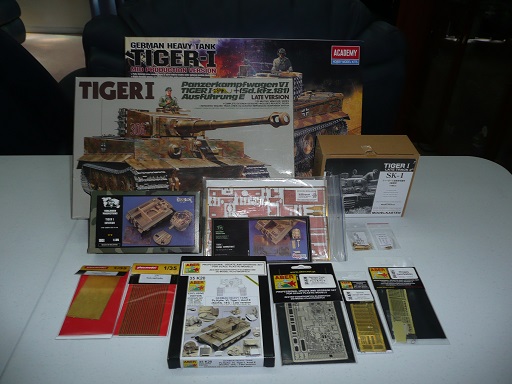
I jumped on the web and started researching and was amazed at the amount of information available. Then I came across Steven Davies build log of a Tiger 1 and David Byrden's Tiger Info site. I must say to both gentlemen, that it was almost as good as sex. I was inspired to attempt something more, so more searching and many dollars later I had a
lot of PE and bits to add to my bundle.


That was back in late December 2014 ....

Since then I have been trying to make a reasonably accurate (allowing for artistic license, my excuse for "i haven't got a clue") model of a Tiger 1.

The major things I have learned so far are :

Man was born with 8 thumbs and 2 fingers.
The carpet monster is NOT your friend.
Little dogs love chewing on plastic bits.
Why is it that even having every tool possible the one I need I don't have.
What was going to be a simple model build has become a doctorate in research.
For every reference answer I get, there are 10 more questions.

That being said, I have had so much fun I'm already thinking about the next one, even though I have months or years left in this one.

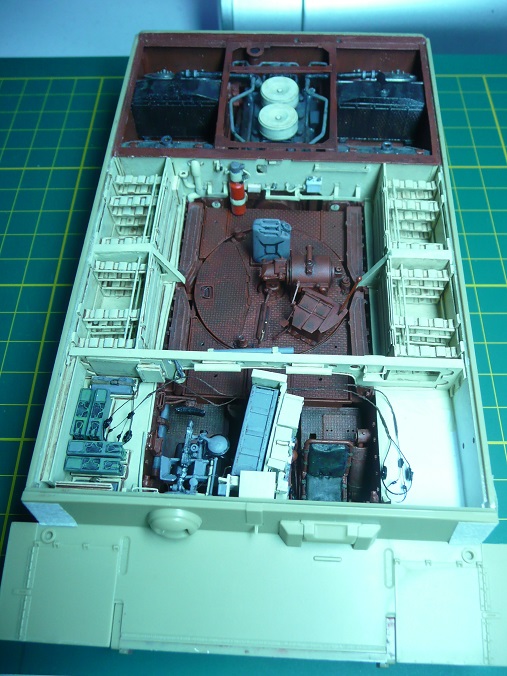
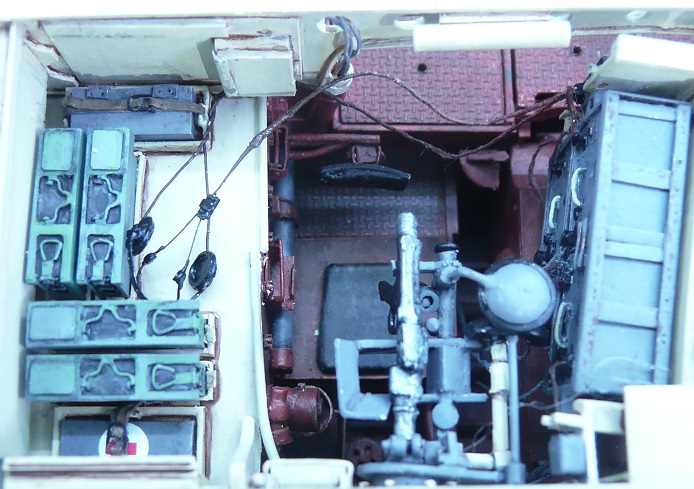
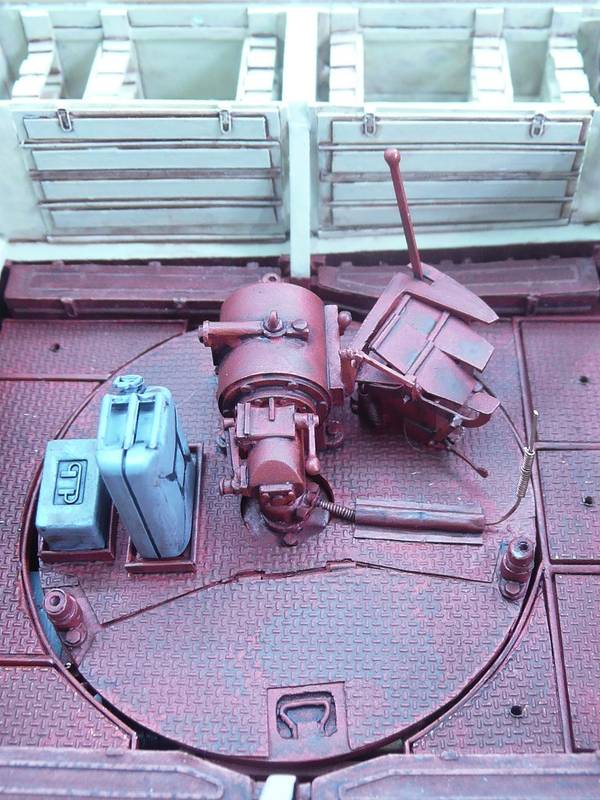
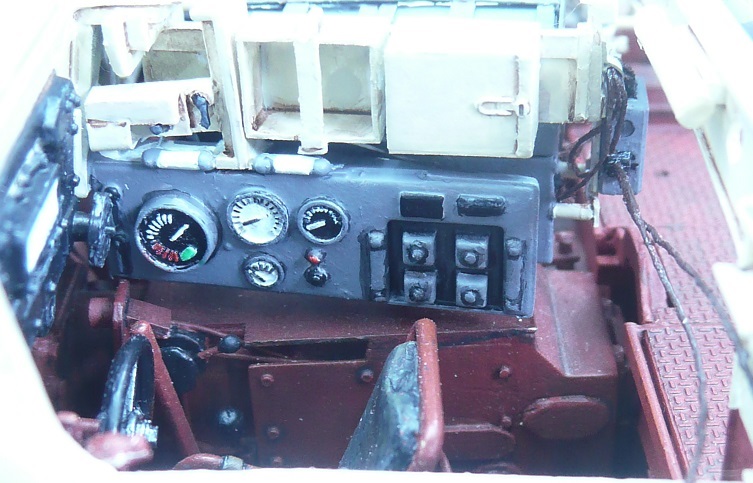
Anyway, some pics of what I have done so far. (I have elected to paint as I go)


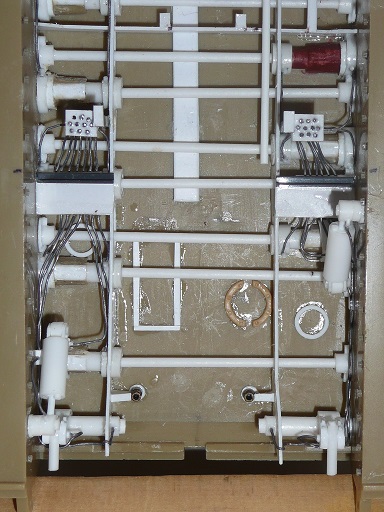
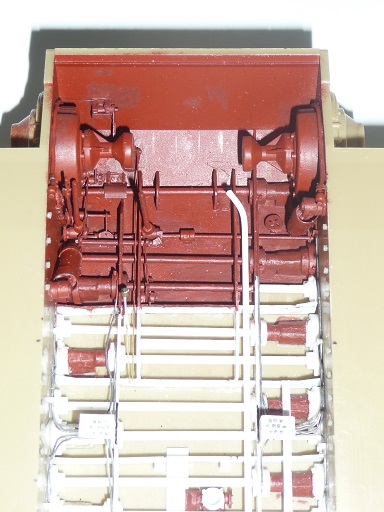
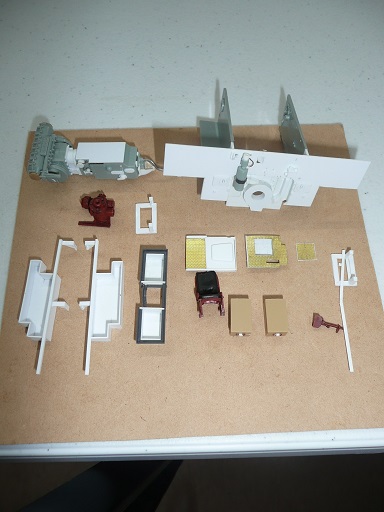
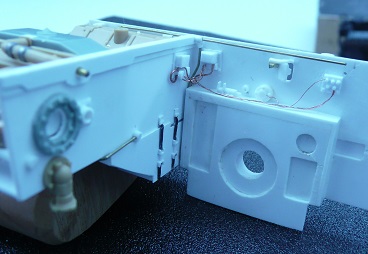
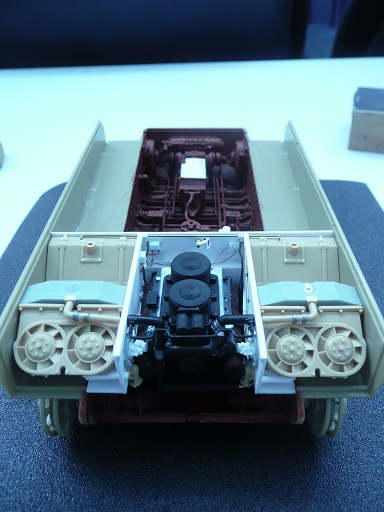
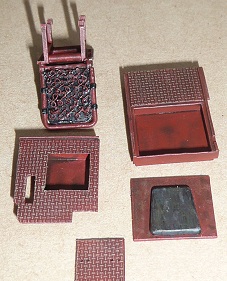
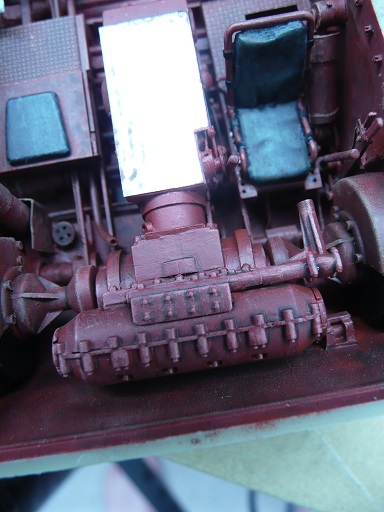
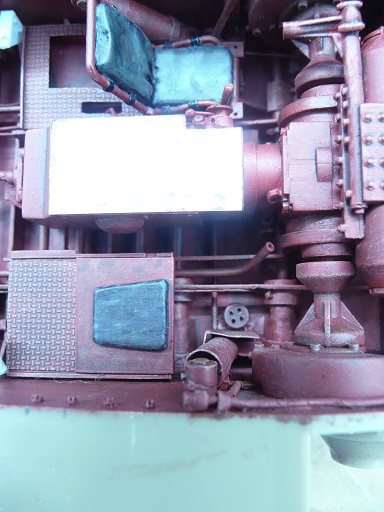
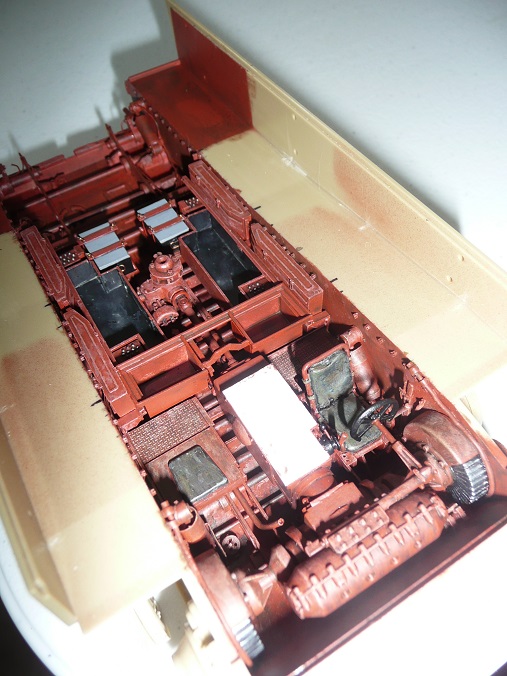
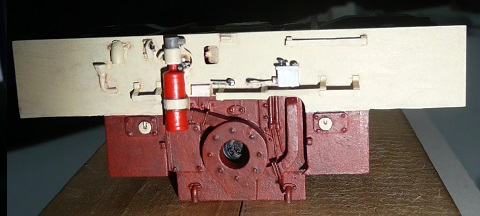
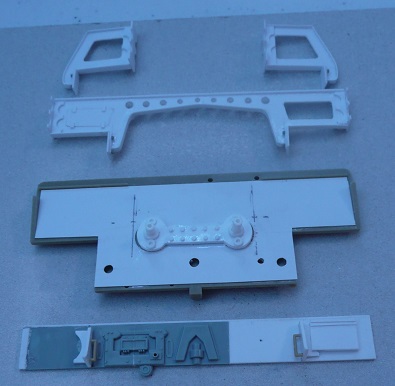
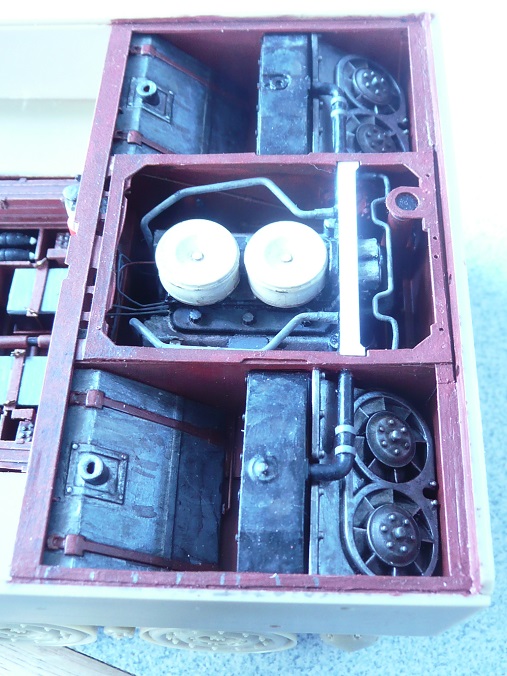
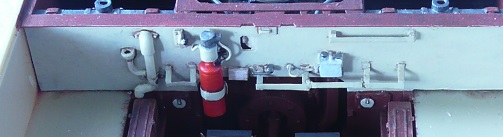
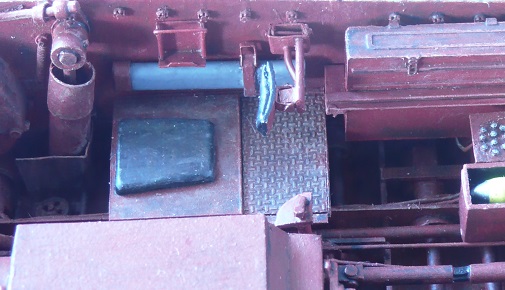
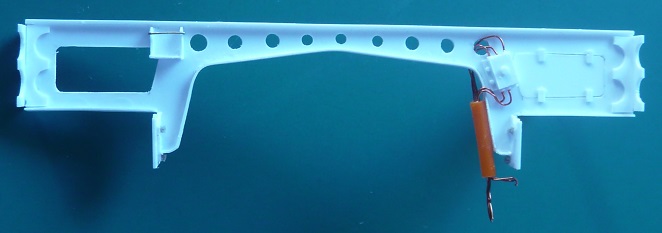
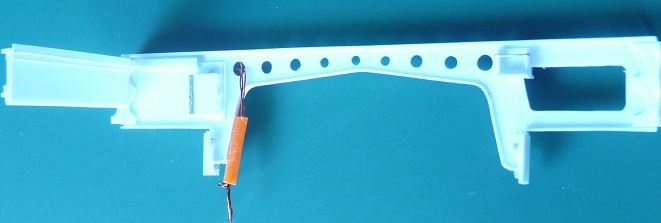
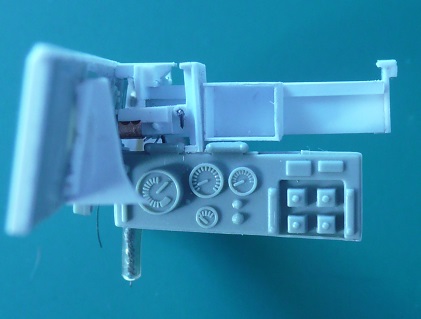
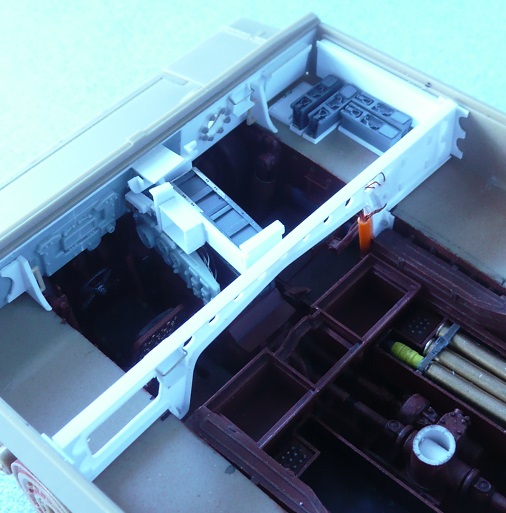
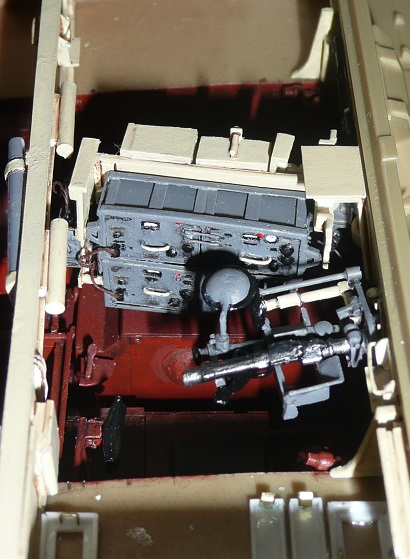
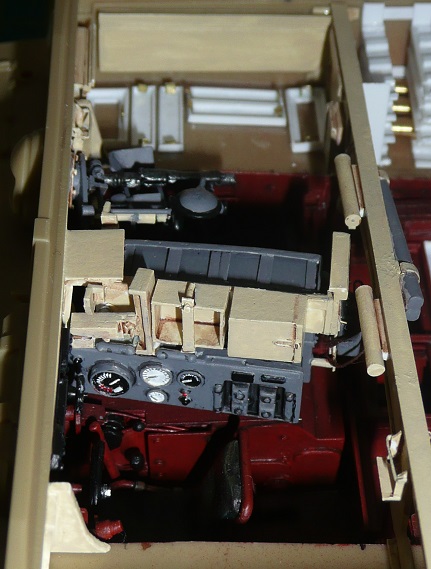
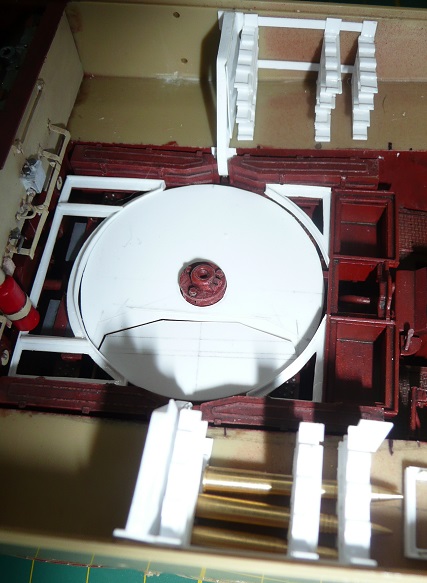
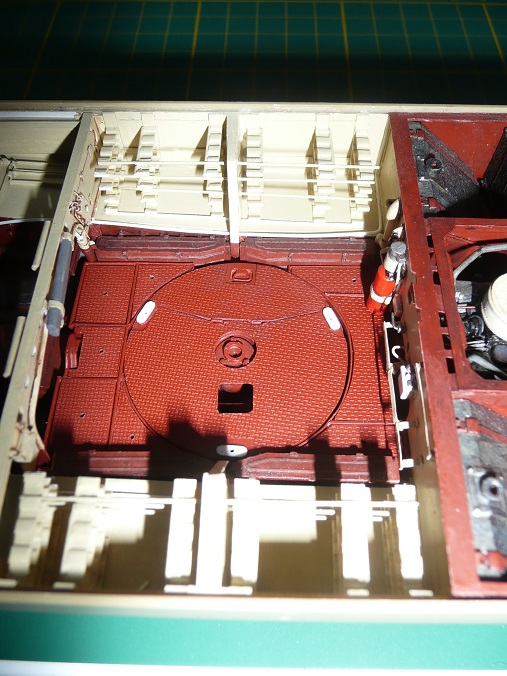
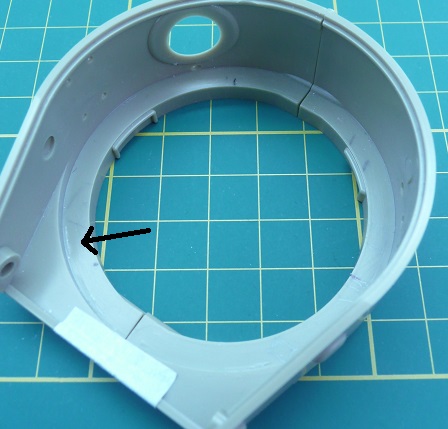
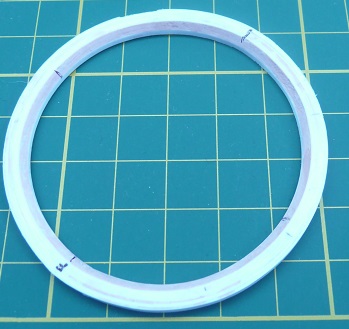
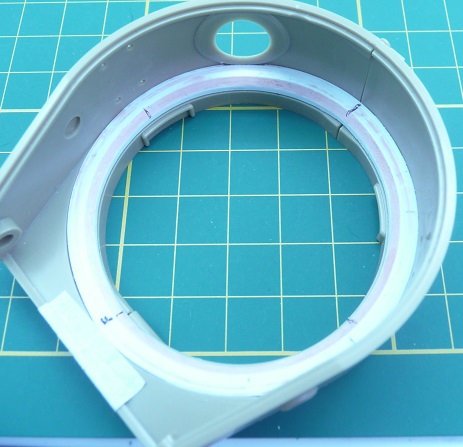
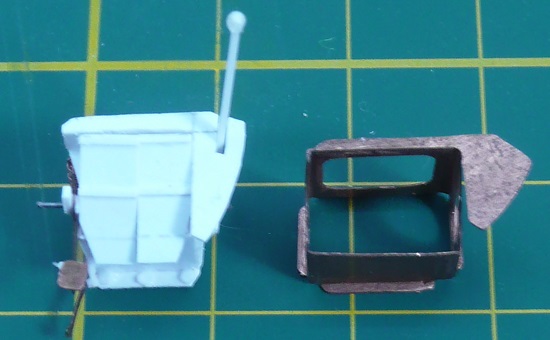
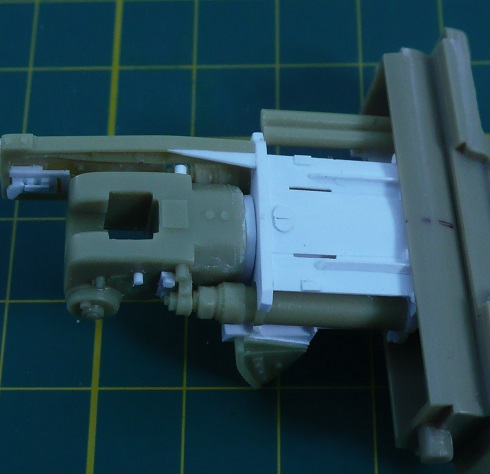
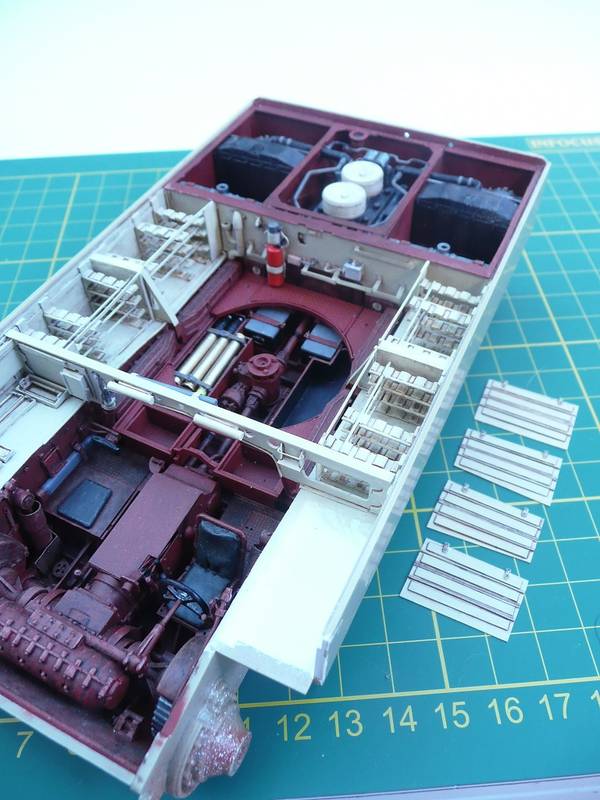
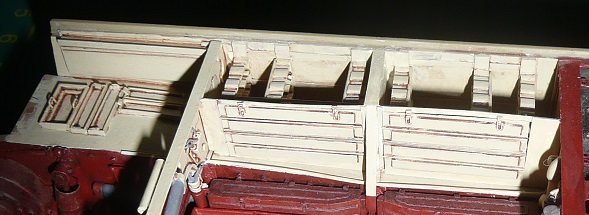
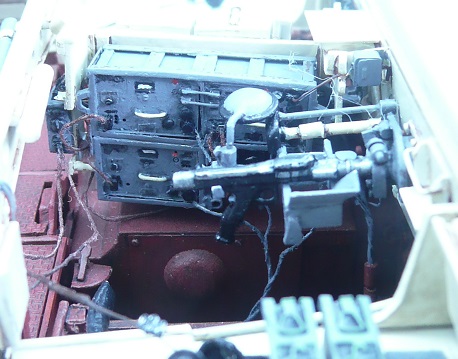
I decided to use as much of the Tamiya kit, substituting parts from the Academy as needed (such as turret, as the Tamiya one is the old symmetrical one). The Tamiya kit has no interior molding, so I scratch built all the torsion bars and their mounts first followed by the supporting struts.

Then

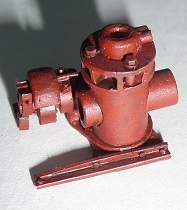
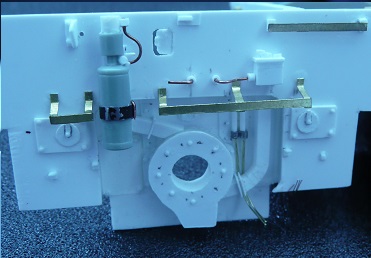
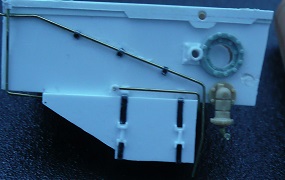
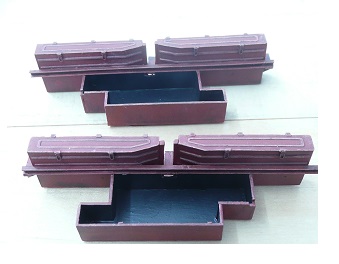
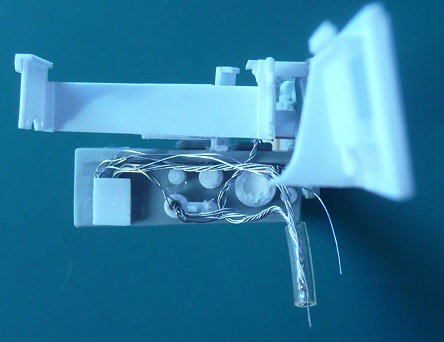
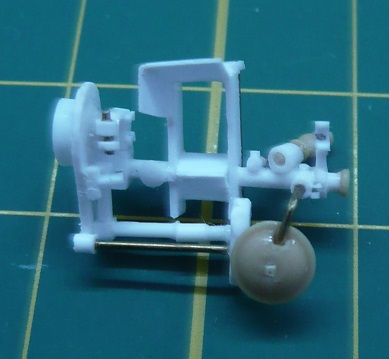
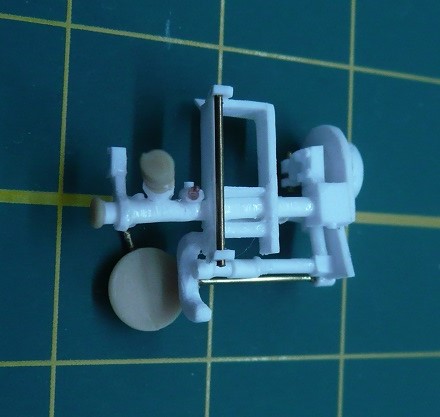
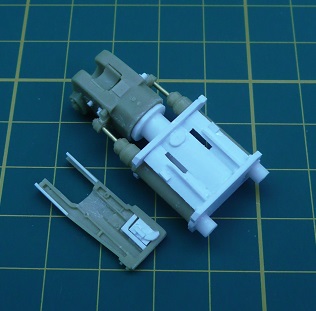
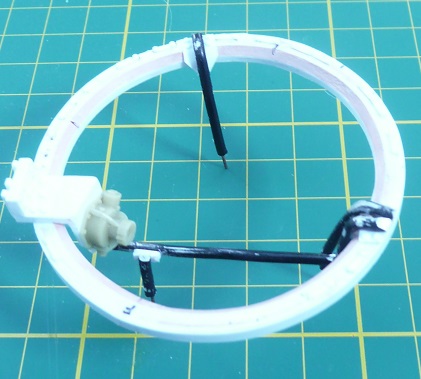
1. scratch built the slip ring transfer unit, as the Academy kit one was very basic, all shock absorbers, idler wheel adjusters, transmission mount and air line, engine bay, lower fuel tanks and fuel piping, electrical on rear of firewall
2. lengthened the Academy transmission, bits added
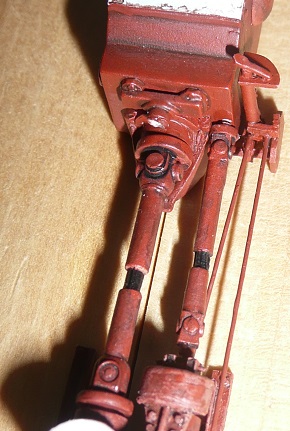
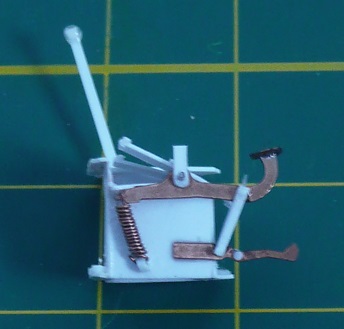
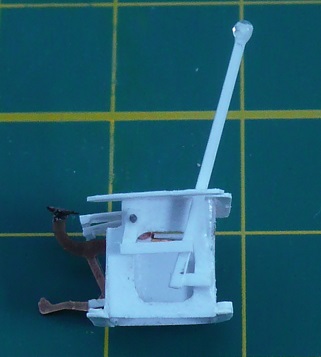
3. drivers pedals and linkages for for pedals and manual steering
4. lubrication system (were the hell does the 10th one go on the back right)

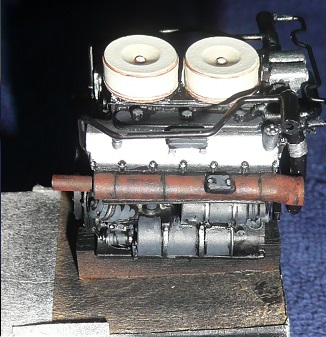
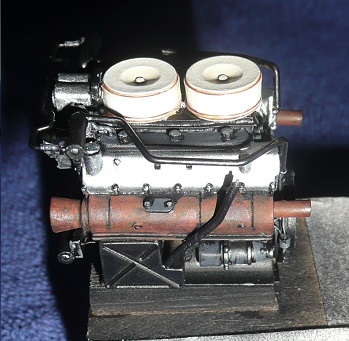
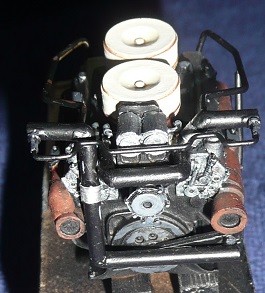
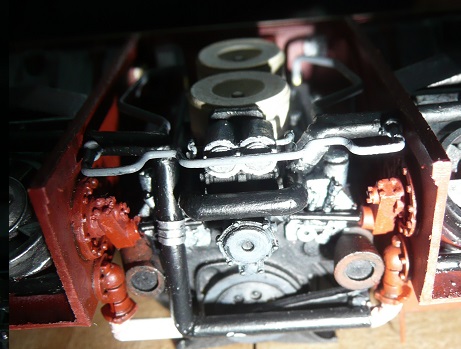
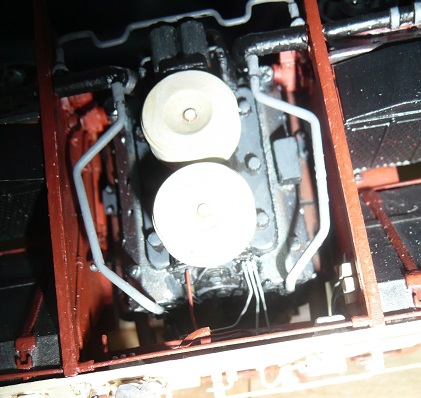
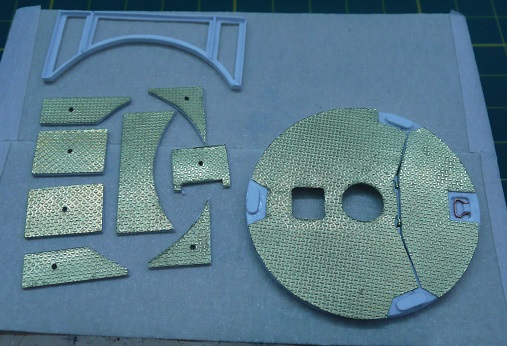
and now i have started on the old Verlinden engine.

Given that there are already some excellent build logs already done and I am just a beginner, I will probably just post the odd interim picture as I go, unless people want more.

I have mainly posted this to show my genuine attempt and any assistance in the project would be greatly appreciated.
SDavies
Visit this Community
England - South East, United Kingdom
Joined: January 09, 2010
KitMaker: 979 posts
Armorama: 959 posts
Posted: Sunday, February 15, 2015 - 08:21 PM UTC
Well what a cracking start you have made. I know how much work you have done to get it to this stage

One comment is be very careful with the use of Superglue, it dries transparent and you might have a hard time eliminating the excess from the floor after you have primed it

You may have also painted the hull red a little soon and you may have to do it when the hull build is completed

Other than that I am very impressed.
SlayerWal
Visit this Community
Australian Capital Territory, Australia
Joined: February 15, 2015
KitMaker: 24 posts
Armorama: 24 posts
Posted: Monday, February 16, 2015 - 03:51 AM UTC
Thanks for your kind words Steven.

I try to be careful with all glues, but good old Murphy. This is a picture of the area after spraying and first wash. There are a few hot spots which prob will not be seen, but I will try and hide with further painting.


With my prior experience, I developed a technique of building and painting by layers and subgroups. I hope this works with my Kit building.

Anyway some more photo's of bits, some sprayed and first wash


The pedals and manual controls. Note : the dog hair in the middle has been removed (it was not painted in ..... )


The scratch built slip ring


The heavily modified Academy transmission. The white area is unpainted cause I knew I would be glueing additional stuff on.

And lastly 3 images of the firewall im currently working on.


No matter how hard I tried I could not make the Academy wall and extensions work. Lengths, positions of holes for piping etc were all in the wrong places using the old Verlinden engine. So after much fiddling I decided I may as well scratch build it, so that I can get the engine to fit and look at least partially like it was meant to be there rather than being some mad god's afterthought.

And the result (i've even built rough fan gearboxes)


reasonably pleasing
edmund
Visit this Community
United States
Joined: November 10, 2014
KitMaker: 668 posts
Armorama: 456 posts
Posted: Monday, February 16, 2015 - 04:08 AM UTC

Quoted Text

Well what a cracking start you have made. I know how much work you have done to get it to this stage

One comment is be very careful with the use of Superglue, it dries transparent and you might have a hard time eliminating the excess from the floor after you have primed it

You may have also painted the hull red a little soon and you may have to do it when the hull build is completed

Other than that I am very impressed.


Have a q tip ready when you apply the superglue , the excess that spills out can be wicked into the tip . Leaves hardly any residue .
SlayerWal
Visit this Community
Australian Capital Territory, Australia
Joined: February 15, 2015
KitMaker: 24 posts
Armorama: 24 posts
Posted: Thursday, February 19, 2015 - 10:21 AM UTC
Hi all,

I would appreciate some help from the Tiger 1 guru's out there.

Firstly, how does the Radio Operator's head rest connect to the wall? This photo seems to imply that it is fixed, or some sort of sliding plate.


Secondly, given that I am building a Feb 1944 Tiger 1, would the bilge pump under the slip ring unit and piping on the firewall be present? I vaguely remember reading somewhere that it was phased out by then?

Where does the 10th lubrication lead go? 7 thru the firewall, 2 to the torsion bar directly under the firewall lube points. Last one?


Lastly, some photos of some more bits that I have done. The drivers seat is a a modified Verlinden Resin one (shown also in photo). I think it is a bit large. Also shown are the floors all scratch built from styrene and photoetch plating.


And the test fitting


As you can see, i am aiming for that "lived in" look in the interior.

P.S. I am not sure of the policy of showing photo's that I have found on other sites so if I have breached some rule, my sincerest apologies.
ericadeane
Visit this Community
Michigan, United States
Joined: October 28, 2002
KitMaker: 4,021 posts
Armorama: 3,947 posts
Posted: Thursday, February 19, 2015 - 06:52 PM UTC
Peter: Cool progress! May I offer one suggestion? I’m sure many of the components were from subcontractors. You could vary the look of the interior by having some parts in other colors. Specifically, I’m thinking about the driver’s seat back and the transmission. Just a thought. Keep up the good work
SlayerWal
Visit this Community
Australian Capital Territory, Australia
Joined: February 15, 2015
KitMaker: 24 posts
Armorama: 24 posts
Posted: Friday, February 20, 2015 - 03:12 AM UTC
Roy, you actually stated something that I had thought myself. Which leads me to a another question.

Given the cases of some factories not adopting changes in manufacture quickly, stockpiles of items, etc would there be the option of having components internally that were red oxide, and others blue-grey? Are there cases of it?
SlayerWal
Visit this Community
Australian Capital Territory, Australia
Joined: February 15, 2015
KitMaker: 24 posts
Armorama: 24 posts
Posted: Monday, March 02, 2015 - 10:30 AM UTC
Been plodding along working on various things.

The lower ammunition bins were interesting. The Academy ones are 2 different size, and the Verlinden ones sized to sit on the floor. So out came the white plastic again with the following result (the detail clasps are Aber).


I have also done some work on the engine (remembering it is a 25year old Verlinden single cast). A few wires some hoses and paint.


I think if you were hungover, walking thru a dark alley and bumped into it you may mistake it for a Maybach HL230 p45

And lastly a simple shot of some of the painting and test fitting of "bits".


The batteries are scratch built (my puppy enjoyed chewing up the Academy ones).
disorderly
Visit this Community
Ireland
Joined: June 07, 2014
KitMaker: 125 posts
Armorama: 114 posts
Posted: Monday, March 02, 2015 - 12:39 PM UTC
The level of detail in this build is truly staggering.
Simply inspirational.
Byrden
Visit this Community
Wien, Austria
Joined: July 12, 2005
KitMaker: 2,233 posts
Armorama: 2,221 posts
Posted: Monday, March 02, 2015 - 01:24 PM UTC
Remember, the left-hand bin under the turret does not hold ammunition. It doesn't have racks or holders.

David
SlayerWal
Visit this Community
Australian Capital Territory, Australia
Joined: February 15, 2015
KitMaker: 24 posts
Armorama: 24 posts
Posted: Monday, March 09, 2015 - 10:37 AM UTC
Hi all,

Thanks for your comment Patrick. Every time I do a bit of research, I find more things to add. I have also received Panzerbasic's Saumur Tiger DVD's of photos, so I now also have a lot more detailed photo's.

One of those weeks a bit where there was two steps forward, and 1 step back. Some things broke off, others didn't fit, bits had to be remade etc etc etc.... you all know the drill i'd imagine, or I might just be modelling challenged

Lots of fiddly bits in the engine compartment, cabling and lines I wanted to install tested the old patience and tolerance. Fortunately my "spit the dummy" days are well behind me, so I persisted. Besides, "if at first it doesn't fit, use a bigger hammer" Slapped some paint on, a couple of washes, and voila I can pretend it's an engine bay.


Painted up a few rounds for the lower bin and made some straps for them. (thks David for the reminder)


Installed a bilge pump control onto the slip ring assembly.


Did some work on the fighting compartment firewall (as well as some initial painting).


I have cut up the Tamiya upper hull, so that I can use the Academy internal visor area as a basis for the internal front section of the tank. As usual I found to my dismay that the academy part was out of sync with reality. The visor was very wide, and the air vent off centre. So it ended up being cut up, a section cut out of the visor, and white plastic to remake it. Also some work on roof supports and the rear of the engine bay.


Lots done and lots to go
SlayerWal
Visit this Community
Australian Capital Territory, Australia
Joined: February 15, 2015
KitMaker: 24 posts
Armorama: 24 posts
Posted: Thursday, March 26, 2015 - 11:20 AM UTC
Lots of little bits done since the last update.

Engine compartment complete (I think.....) lot of hidden detail ....
Support frame for engine and rear covers.


Firewall bilge tube.


Radio operator's area
Spare MG barrel holder
Moveable radio operators rest
Periscope holder
Sponson detail (storage trays and ammo racks)


As part of my Tiger, I decided to use the Aber PE Fu2/Fu5 Tank Radio.

I'm no pro when it comes to PE, but my skills are improving the more I fiddle. I am finding this set very challenging thou. I have no difficulty with the major parts, the boxes and frames etc, but when it comes to doing the front of the radios themselves .... that's a different story.

Basically how do you deal with parts that are smaller than 0.5mm square. I am wearing reading glasses and also a head magnifier and STILL having difficulty seeing some of them. When working with them, even my finest tweezers are too large, so I have to resort to 2 scalpels, one to hold (or a razor blade edge) and one to trim. Filing them is pure fantasy. And I often hear the "twing" as a bit goes skyrocketing into the nether from under the scalpel tip, knowing full well that I have a better chance of getting a date with Elle Macpherson, than I have of finding that bit ....

Also there is the film. Again, minute areas that need to be cut off and somehow positioned on the front plate. Now I don't consider myself detail challenged, I paint the eyes on a 15mm figure, but there are some parts of this kit I know I hve no hope in completing. I also find it interesting that I can find no pics on the web.

Any suggestions would be most appreciated and I'd really love to see a completed and painted one.

Also been working on lots of other areas. Roof support, Internal front plate detail, Radio mount (using Bovington and Saumur reference, not the Aber), Drivers console and some fake wiring.


Lucky I don't have OCD ......
SlayerWal
Visit this Community
Australian Capital Territory, Australia
Joined: February 15, 2015
KitMaker: 24 posts
Armorama: 24 posts
Posted: Sunday, April 12, 2015 - 04:57 AM UTC
I am often surprised when I look at the clock and find several hours have passed and there is only a couple of small constructed bits sitting on my cutting board. It's lucky that I don't get paid an hourly rate, or someone would be very poor

I have spent quite a deal of time trying to scratch build a ball MG34 mount. It was fun to say the least given that the whole thing is the size of my thumbnail. I'll let others be the judge of my impression. I'm happy with it.


The FU2/FU5 I am not 100% happy with. It has an immense amount of tiny detail, but I have neither young enough eyes, thin enough fingers or precision enough tools to be able to do it justice. I don't think I would try it again.

Some painting of the Driver and Radio area.


And some work on the ammunition bins. Unfortunately, no matter how I tried to build them, there is just not enough height in the sponson for the front racks to be able to cleanly mount 4*4. (Measuring with both the Tamiya and RB Model brass rounds). Length and width are fine, height is 2mm short.

I have started on the turret floor. I am aware that the turret underwent major changes in 1943, but can find nothing about the underside of the floor. So i'm assuming the ribbing and cutouts remained the same.

Mar-74
Visit this Community
Western Australia, Australia
Joined: May 04, 2003
KitMaker: 679 posts
Armorama: 409 posts
Posted: Sunday, April 12, 2015 - 06:14 AM UTC
Just a beginner he says!!

This is AMAZING work. If thid is you starting out I cant wait to see what yiur capable of building later!

Thanks for sharing!
Fenbeiduo
Visit this Community
Jiangsu, China / 简体
Joined: April 05, 2014
KitMaker: 103 posts
Armorama: 90 posts
Posted: Sunday, April 12, 2015 - 06:55 AM UTC
sophisticated! meticulous!
SlayerWal
Visit this Community
Australian Capital Territory, Australia
Joined: February 15, 2015
KitMaker: 24 posts
Armorama: 24 posts
Posted: Saturday, May 02, 2015 - 06:39 AM UTC
Thank you both for your positive comments. They always provide a boost

I wouldn't consider myself a beginner, even though I have built very few plastic models in the last 25 years. Many skills are transferable into modelling, and my figure painting and terrain construction have given me many skills that I find I need in plastic kits. A steady hand, lots of patience, experimenting and to not be put off in trying new things make it so much easier. And I have the most important resource ... time (i'm retired).

Because of my "experimenting" progress recently has been slow. The floor has been made, and even though I initially included the hinges for the turret floor cover over the ammo bin, I decided in the end to glue it up.


I have made several attempts at the sponson ammo bins to try and come up with something reasonable that will actually fit the ammunition. Still some work to be done on them.


A start on the main gun. I have made it so that it moves.
Again, it will need to be modified and augmented.


What I am finding is that the further I go the less parts I use out of the box. This is in no way a criticism of the kits, just my obsessiveness towards making it reasonably accurate. I can imagine the nightmare the kit designers have choosing between accuracy and easy fit.

Both kit turrets have no ring cowling (in effect a dip where the turret mechanism and cowling cover would be). This means that anything connected to the turret interior (such as the "box") is too low and/or shorter (such as the legs). To make an improvement I used long thin pieces of 0.5mm styrene bent round in consecutive rings the last 3 making each one 0.5mm less in height (to simulate the angled cowling). Then some filling and sanding, and the result ... a turret ring and cowling.


Next will be work on the turret floor, legs, beam and box. More on the sponson ammo bins, and Im sure I'll find something to fix on the stuff I have already done.
SlayerWal
Visit this Community
Australian Capital Territory, Australia
Joined: February 15, 2015
KitMaker: 24 posts
Armorama: 24 posts
Posted: Thursday, May 21, 2015 - 12:36 PM UTC
It's been a bit like "herding cats" lately. Every time I try something with the turret construction something else needs to be done, which requires 2 more things etc etc. The consequence being many attempts, corrections and diversions .....

Simplified, I needed to have made the Turret Gearbox, Gunners Pedals and some of the Gun before I could get the Beam and Box and Turret legs reasonably correct.

I used the Verlinden Gearbox (though it is a bit large) and added a few "frills" to it (using photos of the Saumur tiger). I used several layers of White Glue "dolleps" to simulate the gear knobs.


However the PE for the Gunners Pedals was too large for the space I had available on the floor, so I made an attempt at one from styrene and some of the PE bits.


The Gun and Mantlet are a ongoing construction. I did enough so that I could position the elevation teeth. I could then position the mechanism on the Box that controls elevation. The resin part was about 4mm too long so out with the scalpel and sandpaper ....


The legs are made with 2mm Bonsai Wire (soft aluminium, quite pliable) with pins so that it can be slotted in and out of the floor while I fiddle. It will eventually be glued. Getting angles reasonably accurate was necessary so that the short leg didn't have to be bent much, and the beam will not cover the pedals.

And finally the Sponson Ammo Bins. I gave up ..... What I have will be close enough. They are very fiddly, and cramped so I'll pretend I did a good job and squint when I look at them I still have some touch up painting and weathering to do on them.


Have also been fiddling with other bits and pieces, but I'll save them for the next installment
SlayerWal
Visit this Community
Australian Capital Territory, Australia
Joined: February 15, 2015
KitMaker: 24 posts
Armorama: 24 posts
Posted: Thursday, May 28, 2015 - 05:14 AM UTC
Hi all,

Been pottering around doing bits and pieces here and there, some painting, some weathering, finished the wiring (power and headsets) for the radio and did the radio operators sponson "bits".

Also spent quite a bit of time working on the Modelkasten tracks. Who said trimming and putting together hundreds of individual links isn't fun .....

I havent decided yet what to do with the Headsets and Throat Mikes, so for the moment they sit on the sponsons.

Anyway, some photo's to show what it currently looks like (I hate how closeups make your paintjob appear rubbish).


KevPak
Visit this Community
United States
Joined: June 04, 2014
KitMaker: 137 posts
Armorama: 128 posts
Posted: Thursday, May 28, 2015 - 05:28 AM UTC
Awesome interior work - I think your figure painting skills have come in handy in painting all the little dials and gauges! Will be an avid follower of this build.
pzandt
Visit this Community
United States
Joined: January 02, 2013
KitMaker: 68 posts
Armorama: 57 posts
Posted: Thursday, May 28, 2015 - 05:51 AM UTC
Outstanding! Hats off to you for your effort.
easyco69
Visit this Community
Ontario, Canada
Joined: November 03, 2012
KitMaker: 2,275 posts
Armorama: 2,233 posts
Posted: Thursday, May 28, 2015 - 09:20 AM UTC
awesome!
mpeplinski
Visit this Community
Michigan, United States
Joined: January 17, 2006
KitMaker: 487 posts
Armorama: 182 posts
Posted: Thursday, May 28, 2015 - 10:26 AM UTC
Absolutely amazing! I can hardly wait to see the turret come together.

Mike
Hwa-Rang
Visit this Community
Kobenhavn, Denmark
Joined: June 29, 2004
KitMaker: 6,760 posts
Armorama: 1,339 posts
Posted: Thursday, May 28, 2015 - 11:44 AM UTC
Awesome detailing.
oldbean
Visit this Community
Virginia, United States
Joined: July 05, 2004
KitMaker: 769 posts
Armorama: 461 posts
Posted: Thursday, May 28, 2015 - 06:14 PM UTC
Peter, incredible work and detailing. One thing though, and I may be wrong on this, I thought there was an ammo bin in the front sponson next to the driver? Or was that removed with late Tigers?

Jesse
Cantstopbuyingkits
Visit this Community
European Union
Joined: January 28, 2015
KitMaker: 2,099 posts
Armorama: 1,920 posts
Posted: Thursday, May 28, 2015 - 08:03 PM UTC
Fantastic work.
 _GOTOTOP