M1A2SEP Comparison Build Tamiya / Dragon
New York, United States
Joined: May 02, 2013
KitMaker: 4,403 posts
Armorama: 4,078 posts
Posted: Monday, February 23, 2015 - 03:05 PM UTC
Quoted Text
It is always better to list the shop price as it is a stable price unlike Ebay where you never know what the price is going to be.
No argument, there. I just thought Donald was paying retail for all of his stuff, so I suggested ebay because I can usually get what I want for what I personally feel is a fair price. If I don't see what I want, for what I think IS a fair price, I WAIT until I do...
It may take me YEARS to get what I want- I waited 4 years to buy a brass HO New York, Ontario & Western Y-2 Class 4-8-2 Steam Locomotive, ($450.00 + shipping) and I waited since 2007 to buy a brass HO New York Central NE-2G Class 2-6-6-2 Articulated "Pusher" Steam Locomotive, ($825.00 + shipping) last November- Something like that usually brings upwards of $1200.00 to $1500.00 at auction, so I guess I did pretty good... Don't get me wrong, I don't make a habit out of buying stuff in those price ranges!!!

United States
Joined: October 14, 2012
KitMaker: 2,663 posts
Armorama: 2,649 posts
Posted: Monday, February 23, 2015 - 10:55 PM UTC
Now we roll on to the Wheels.
Below are the front and back views of both sets.
As you can see the Dragon ones have clear center hubs while the Tamiya don't.
The next 2 Pics. are of the Drive Sprockets, I drilled out oval holes in the Tamiya Sprocket as they are missing there.
I think I'll thin out the edge of the holes.
United States
Joined: October 14, 2012
KitMaker: 2,663 posts
Armorama: 2,649 posts
Posted: Monday, February 23, 2015 - 11:03 PM UTC
The Dragon Wheels Front & Back.
The Tamiya Wheels Front & Back.
The Tamiya Wheels have a large bulge on the back to hold the poly cap bushing.
The Tamiya Tires are narrower in width than the Dragon ones.
Both sets are the same size in Diameter & outside width.
That's all for now.
Donald
Georgia, United States
Joined: May 09, 2014
KitMaker: 273 posts
Armorama: 270 posts
Posted: Monday, February 23, 2015 - 11:19 PM UTC
Donald, thank you so much for doing a comparison, it's great to be able to see the specifics of each kit up close! Also, I noticed the anti-slip coating is missing in some areas on the tamiya kit, are you going to add it or keep it as is for the comparison?
United States
Joined: October 14, 2012
KitMaker: 2,663 posts
Armorama: 2,649 posts
Posted: Tuesday, February 24, 2015 - 10:38 PM UTC
Quoted Text
Donald, thank you so much for doing a comparison, it's great to be able to see the specifics of each kit up close! Also, I noticed the anti-slip coating is missing in some areas on the tamiya kit, are you going to add it or keep it as is for the comparison?
I'm going to leave it as is, anything that I add would look way out of scale.
Donald
United States
Joined: October 14, 2012
KitMaker: 2,663 posts
Armorama: 2,649 posts
Posted: Tuesday, February 24, 2015 - 10:42 PM UTC
I have the side skirts finished.
First are the Dragon skirts, there are a lot of Photo-etch to add to the top edges. I'll install them on the hull after the lower hull is painted.
I installed the skirts of the Tamiya kit with the reactive armor to the top of the hull, it all lifts up from the lower hull.
This is the TUSK II configuration, you can make it a TUSK I configuration by leaving the curved tiles off.
The brackets holding the tiles seem a little heavy, I don't know if this is correct.
I'll be working on the gun next.
Donald
Florida, United States
Joined: May 16, 2002
KitMaker: 17,694 posts
Armorama: 13,742 posts
Posted: Tuesday, February 24, 2015 - 10:56 PM UTC
Quoted Text
I'm going to leave it as is, anything that I add would look way out of scale.
Not so. Adding scale anti-slip texture is pretty easy.
See here.
Field Artillery --- The KING of BATTLE!!!
"People sleep peaceably in their beds at night only because rough men stand ready to do violence on their behalf." -- George Orwell
Showcase
United States
Joined: October 14, 2012
KitMaker: 2,663 posts
Armorama: 2,649 posts
Posted: Wednesday, February 25, 2015 - 07:40 PM UTC
Quoted Text
Quoted Text
I'm going to leave it as is, anything that I add would look way out of scale.
Not so. Adding scale anti-slip texture is pretty easy. See here.
I have found some texture paint at the Lows Home improvement store.
I will be experimenting with it before using it on the Abrams.
Donald
It comes in multiple colors from sand to dark grey.
United States
Joined: October 14, 2012
KitMaker: 2,663 posts
Armorama: 2,649 posts
Posted: Wednesday, February 25, 2015 - 07:48 PM UTC
Here are the Gun Barrels comparison.
Measuring from the pointy front of the mantlet, the Dragon Gun Barrel is 100 mm long the Tamiya one is 97 mm long I don't know which is right.
United States
Joined: October 14, 2012
KitMaker: 2,663 posts
Armorama: 2,649 posts
Posted: Wednesday, February 25, 2015 - 07:54 PM UTC
The muzzle reference parts must be angled slightly.
The armor sleeve on the coaxle Mg. is 1 mm longer on the Dragon kit.
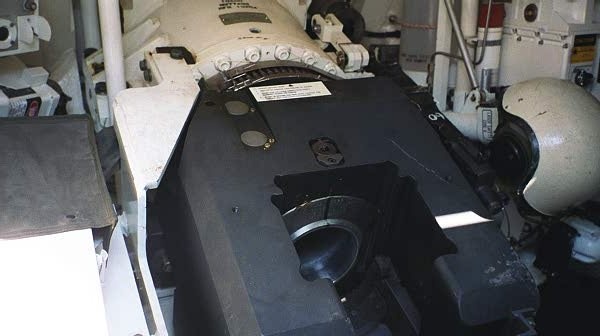
Don't ask me what these are, they are suposed to be the breech blocks?
That's all for now.
Donald

#192
Kentucky, United States
Joined: November 25, 2009
KitMaker: 1,383 posts
Armorama: 1,281 posts
Posted: Wednesday, February 25, 2015 - 08:44 PM UTC
Following your excellent posts closely. Good stuff and great build photos.
I found this on the web "M1A2_Abrams_120mm_Breech_by_M1A2Tanker". Not an area visible on the finished kit, but a reference
Please keep up the wonderful work here! Cheers
Pennsylvania, United States
Joined: May 09, 2009
KitMaker: 561 posts
Armorama: 553 posts
Posted: Wednesday, February 25, 2015 - 10:47 PM UTC
Hi Donald,
the tray on the Dragon breech block deflects the stub case to the turret basket floor. I'm surprised to see the size difference in the breeches.
Sean
Texas, United States
Joined: December 22, 2001
KitMaker: 3,586 posts
Armorama: 2,556 posts
Posted: Thursday, February 26, 2015 - 05:23 AM UTC
Pete Becerra, Jr. SGT(RET)
HHC, 71st BfSB - TEXAS
HHB, 36th ID DIVARTY -TEXAS
B Co.(-), 949 FSB, 56th BCT, 36th ID - TEXAS
B Co., 324th FSB, 3rd Brigade, 24th INF DIV(MECH)
563rd ORD Co. - GERMANY
Pennsylvania, United States
Joined: May 09, 2009
KitMaker: 561 posts
Armorama: 553 posts
Posted: Thursday, February 26, 2015 - 07:53 PM UTC
Pete,
thanks for posting this information, it shows how seriously Pawel approached this project. Now if my math is correct the full length of the gun from the pointy front of the mantlet
(as Donald says)is 336.6 cm which scales down to 9.62 cm or 96.2 mm. Its difficult to tell from Donald's photo where the extra length is, maybe in the bore evacuator ? I'll check my kit.
Sean
United States
Joined: October 14, 2012
KitMaker: 2,663 posts
Armorama: 2,649 posts
Posted: Thursday, February 26, 2015 - 08:56 PM UTC
Quoted Text
Quoted Text
Quoted Text
I'm going to leave it as is, anything that I add would look way out of scale.
Not so. Adding scale anti-slip texture is pretty easy. See here.
I have found some texture paint at the Lows Home improvement store.
I will be experimenting with it before using it on the Abrams.
Donald
It comes in multiple colors from sand to dark grey.
I tried it on an old 1/16th. scale King Tiger turret shell.
Below is it , the side to the left was masked with the Blue masking tape & the right with clear plastic mending tape.
Here is a close up , the blue tape leaves a clean line if removed before the paint dries.
Here is the natural color sprayed on a sheet of Bare Metal Foil. Ithas a verry nice texture.
A close up of the part painted with Model Master Armor Sand.
I tried both Tamiya & Model Master Paints over the texture paint , both covered the texture without any problems.
I think that I'm going to leave the Tamiya Abrams without the non slip, It'll be a real pain in the backside masking arround all the installed fittings.
Donald
Warszawa, Poland
Joined: March 26, 2003
KitMaker: 4,342 posts
Armorama: 3,938 posts
Posted: Friday, February 27, 2015 - 01:23 AM UTC
Quoted Text
Pete,
thanks for posting this information, it shows how seriously Pawel approached this project. Now if my math is correct the full length of the gun from the pointy front of the mantlet
(as Donald says)is 336.6 cm which scales down to 9.62 cm or 96.2 mm. Its difficult to tell from Donald's photo where the extra length is, maybe in the bore evacuator ? I'll check my kit.
Sean
That's correct. 96.2mm is right.
I don't know how Donald measured the barrel that he got 100mm, but if measured as indicated in my drawings posted by Pete, the length of the kit barrel is approx. 97mm (at least in the built AIM I have here). It should be - it was designed exactly according to Pete's measurements. Tamiya barrel is slightly too short.
Pawel "Vodnik" Krupowicz
Professional Certified Rivet Counter.
United States
Joined: October 14, 2012
KitMaker: 2,663 posts
Armorama: 2,649 posts
Posted: Friday, February 27, 2015 - 03:49 AM UTC
I just measured the Dragon M1A1 that I built previously it measures at 97 mm. on the nose.
I re measured both the Dragon and the Tamiya guns on this build as you can see in the photos below the Dragon gun comes out a hair over 99 mm. and the tamiya a hair over 97 mm.
The Tamiya Gun is fixed in position.
The Dragon Gun is different from their previous kits, It is made to slide in and out (say- RECOIL) I have it fully extended with the inner most step on the barrel even with the pointy part.
If I moved the barrel to 97 mm. the innermost step on the barrel will be recessed into the mantlet.
Donald
Colorado, United States
Joined: January 20, 2005
KitMaker: 7,219 posts
Armorama: 6,097 posts
Posted: Friday, February 27, 2015 - 04:37 AM UTC
Quoted Text
...this information...shows how seriously Pawel approached this project.
Hopefully it also shows everyone you can't just wish a new product into existance. There's far more to it than a simple cyber recon.
A strong man stands up for himself; A stronger man stands up for others.
Admit nothing. Deny everything. Make counter-accusations.
He is not Khan who calls himself Khan. Afghan proverb
Warszawa, Poland
Joined: March 26, 2003
KitMaker: 4,342 posts
Armorama: 3,938 posts
Posted: Friday, February 27, 2015 - 11:53 AM UTC
Quoted Text
I just measured the Dragon M1A1 that I built previously it measures at 97 mm. on the nose.
I re measured both the Dragon and the Tamiya guns on this build as you can see in the photos below the Dragon gun comes out a hair over 99 mm. and the tamiya a hair over 97 mm
So Tamiya barrel seems to be more or less correct after all, but something is wrong with your Dragon barrel assembly... It shouldn't be this long. I don't know exactly what is the cause, but I know that these parts were designed to be approx 96 -97 mm long after assembly.
I don't blame you: it's possible that after 10 years the parts don't come out of the mold exactly the same as they did initially...
Pawel "Vodnik" Krupowicz
Professional Certified Rivet Counter.
Queensland, Australia
Joined: December 23, 2003
KitMaker: 1,016 posts
Armorama: 745 posts
Posted: Friday, February 27, 2015 - 12:43 PM UTC
I have just finished building the #3556 kit, an yes, the moulds from the old SEP #3536 kit are getting a bit worn out.
Also, in the instructions, Step 16, parts a4, a9, and a3, the Smoke Grenade Box, a3 is shown upside down.
Arms Corps Models is closed.
United States
Joined: October 14, 2012
KitMaker: 2,663 posts
Armorama: 2,649 posts
Posted: Friday, February 27, 2015 - 06:41 PM UTC
I couldn't get the turret top to fit over the Gun Mantlet (see below)on the Dragon Turret
A close up.
Here is how I finally got it installed.
Then fit the turret bottom being careful that the pins on the Gun Trunion fit into the circular indentions on the bottom part.
Alberta, Canada
Joined: February 18, 2003
KitMaker: 1,728 posts
Armorama: 1,629 posts
Posted: Friday, February 27, 2015 - 06:45 PM UTC
Something's definitely up, I don't recall having that kind of problem with the assembly. Edit - I just noticed there appears to be a different color of plastic with the barrel assembly? Did Dragon change something in the kit I wonder?
Jim
"Fire all weapons and open a hailing frequency for my victory yodel" - Zapp Brannigan
Arkansas, United States
Joined: June 29, 2009
KitMaker: 11,610 posts
Armorama: 7,843 posts
Posted: Friday, February 27, 2015 - 06:47 PM UTC
A little late, but it does not seem that the Dragon barrel sections fit flush, with each other. This may account for a 1-2mm discrepancy.
Ideals are peaceful. History is violent.
United States
Joined: October 14, 2012
KitMaker: 2,663 posts
Armorama: 2,649 posts
Posted: Friday, February 27, 2015 - 06:55 PM UTC
The Tamiya Turret went together without any problems, Just I screwed up and forgot to drill out the holes for the small parts, I'm sure I'll find a way arround this.
Besure not to install the small flap that goes on the rear top of the mantlet, I had to remove it to get the gun to fit.
Here are the turrets ready for the small parts.
Donald
United States
Joined: October 14, 2012
KitMaker: 2,663 posts
Armorama: 2,649 posts
Posted: Friday, February 27, 2015 - 07:26 PM UTC
Quoted Text
Quoted Text
I just measured the Dragon M1A1 that I built previously it measures at 97 mm. on the nose.
I re measured both the Dragon and the Tamiya guns on this build as you can see in the photos below the Dragon gun comes out a hair over 99 mm. and the tamiya a hair over 97 mm
So Tamiya barrel seems to be more or less correct after all, but something is wrong with your Dragon barrel assembly... It shouldn't be this long. I don't know exactly what is the cause, but I know that these parts were designed to be approx 96 -97 mm long after assembly.
I don't blame you: it's possible that after 10 years the parts don't come out of the mold exactly the same as they did initially...
I don't know how old these molds are, here is a Pic. of the assembly instructions.