Desert Storm TOW missile launcher
Colorado, United States
Joined: February 24, 2014
KitMaker: 3,033 posts
Armorama: 2,492 posts
Posted: Tuesday, April 07, 2015 - 06:36 AM UTC
Hi Jerry, Somehow the hollowed-out pistol grip slipped by me ... wow! And I have been paying attention in class too.

Very cool details as always!
mike
Graywolf
 Senior Editor
Izmir, Turkey / Türkçe
Joined: December 01, 2001
KitMaker: 6,405 posts
Armorama: 1,850 posts
Posted: Tuesday, April 07, 2015 - 10:40 AM UTC
Another great progress. I appreciate your attention to details. I am waiting to see the whole scene. Nice job as always my friend.

Pennsylvania, United States
Joined: April 10, 2011
KitMaker: 7,941 posts
Armorama: 7,934 posts
Posted: Tuesday, April 07, 2015 - 06:15 PM UTC
Jim,Pat Mike,Engin,
Thanks for checking in guys. Small update I know but at least I have made some progress.
Aside from a few tweeks I see that need tending to after seeing the blown up pics here,all that remains is putting down some dirt on the base and then affixing everything to it.
Sometimes these projects seem endless but I am starting to see that proverbial light!!
Now,,,,which tunnel was that?
J
West-Vlaaderen, Belgium
Joined: August 22, 2009
KitMaker: 1,491 posts
Armorama: 997 posts
Posted: Tuesday, April 07, 2015 - 09:33 PM UTC
Hi Jerry ,
i echo the others , very splendid work so far .
Take your time !

Cheers
Kurt
California, United States
Joined: December 24, 2002
KitMaker: 4,105 posts
Armorama: 2,492 posts
Posted: Tuesday, April 07, 2015 - 10:23 PM UTC
I really like what you did with the gunstraps. Those are some of the most realistic 1/35 gunstraps I've seen. Did you just superglue the ends of the straps' knots to the M-16A2s? What did you use to make the straps?
Pennsylvania, United States
Joined: April 10, 2011
KitMaker: 7,941 posts
Armorama: 7,934 posts
Posted: Tuesday, April 07, 2015 - 10:45 PM UTC
@Kurt-thanks old buddy. Good to see you back here.
@Peter-the straps were made from lead foil from a wine bottle top cut into strips. The buckles came from a German PE set along with the sling swivels that attach the sling to the weapon.
Thanks for looking in guys!!
J

#362
California, United States
Joined: December 01, 2013
KitMaker: 1,661 posts
Armorama: 1,202 posts
Posted: Wednesday, April 15, 2015 - 06:21 PM UTC
Hey Jerry -
I know you're a busy guy 😀 building a few right now - have you started a base for this yet? In looking back at your pics, it seems you could (obviously!) make these guys as stand alone on a simple base, but then I wondered how they might look on some topo? Next to a ditch? Low wall? Etc? I know, "thanks very much peanut gallery!!!" That said, these guys could make up a pretty cool scene - sorry if in your text you already tell us what you're up to - the first cup of coffee just kicked in!
Cheers
Nick
Pennsylvania, United States
Joined: April 10, 2011
KitMaker: 7,941 posts
Armorama: 7,934 posts
Posted: Wednesday, April 15, 2015 - 06:55 PM UTC
Thanks for looking in man. I do have a plan and I have started working on the groundwork. I have a key part that I am still figuring out how to do. It has to do with a specific mission our company was training for when we first arrived in the "Kingdom" and were pretty much all that stood in the way of Sadams' Army.
I know what you mean about coffee!
J
Pennsylvania, United States
Joined: April 10, 2011
KitMaker: 7,941 posts
Armorama: 7,934 posts
Posted: Saturday, April 18, 2015 - 11:36 PM UTC
Florida, United States
Joined: May 16, 2002
KitMaker: 17,694 posts
Armorama: 13,742 posts
Posted: Sunday, April 19, 2015 - 12:24 AM UTC
Very nice. The whole scene came out very nicely. I like the pipeline too. Great job.
Field Artillery --- The KING of BATTLE!!!
"People sleep peaceably in their beds at night only because rough men stand ready to do violence on their behalf." -- George Orwell
Showcase
Ireland
Joined: June 07, 2014
KitMaker: 125 posts
Armorama: 114 posts
Posted: Sunday, April 19, 2015 - 12:24 AM UTC
Thats a beauty, Jerry. The camo looks great.
Your eye for all the little details is what really makes this stand out.
Colorado, United States
Joined: February 24, 2014
KitMaker: 3,033 posts
Armorama: 2,492 posts
Posted: Sunday, April 19, 2015 - 01:29 AM UTC
This looks really great Jerry!


Much respect for your outstanding attention to detail easy to see that you love what you're doing!
Thanks again for sharing the progress shots and narratives!
mike
West-Vlaaderen, Belgium
Joined: August 22, 2009
KitMaker: 1,491 posts
Armorama: 997 posts
Posted: Sunday, April 19, 2015 - 01:40 AM UTC
Congratulations with this beauty Jerry !
these figures are top notch , very well painted indeed sir !
Kurt
California, United States
Joined: December 24, 2002
KitMaker: 4,105 posts
Armorama: 2,492 posts
Posted: Sunday, April 19, 2015 - 05:47 AM UTC
Very nice build on an old DML kit. Alas, sigh, I do hope and wish DML could produce more 1/35 modern figures someday. I mean modelers still buy and build these old DML modern figure kits.
Texas, United States
Joined: June 07, 2006
KitMaker: 726 posts
Armorama: 687 posts
Posted: Sunday, April 19, 2015 - 06:30 AM UTC
Outstanding job, Jerry! I really like this diorama mainly because of all of the small details you put into it based on your having experienced this event. From the retention straps on the backs of the helmets to the small details of the TOW system that you had to build on your own. You really put life into that old DML/Dragon TOW team and made it look great.
Again, outstanding job!
Cheers,
James

#284
Northern Ireland, United Kingdom
Joined: October 04, 2006
KitMaker: 3,094 posts
Armorama: 2,942 posts
Posted: Sunday, April 19, 2015 - 03:20 PM UTC
You've really brought this set of figures to life Jerry- the scene staging really suits them. As Gino pointed out- the pipeline is a well observed addition and the groundwork is top notch too. As always- your attention to detail really pays off and I again have to compliment you on the camo uniforms- they are great.
On The Bench:
Ethiopian BMP-1 (Trumpeter 1/35)
AMX-13/75 (Takom 1/35)
matt
 Campaigns Administrator
New York, United States
Joined: February 28, 2002
KitMaker: 5,957 posts
Armorama: 2,956 posts
Posted: Sunday, April 19, 2015 - 04:44 PM UTC
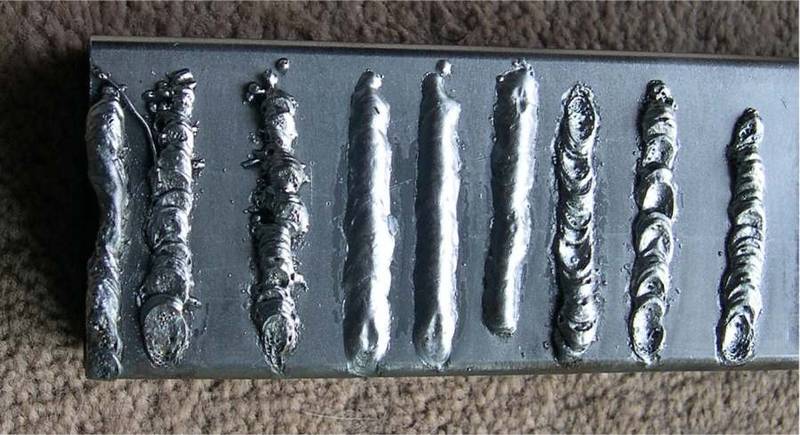
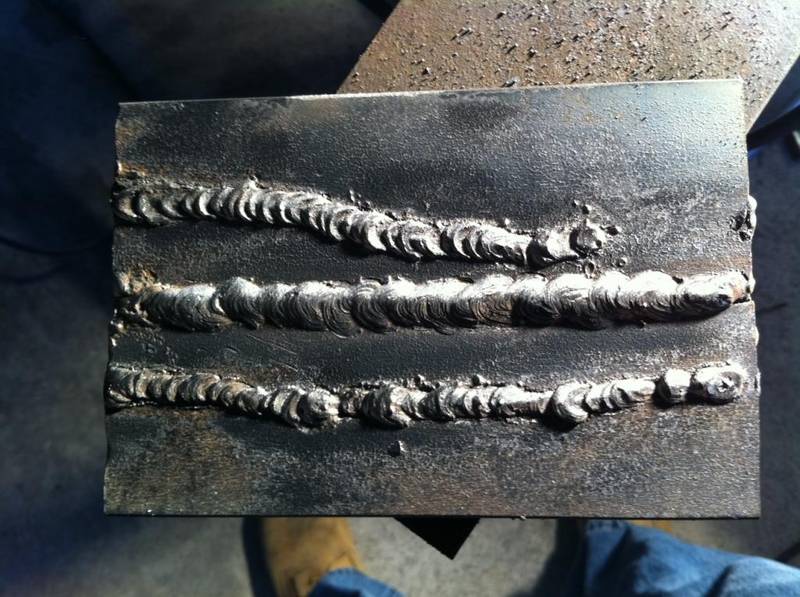
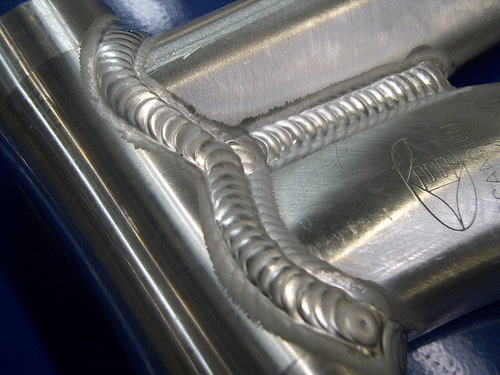
Very AWESOME. my only Critique is the welds on the pipe... they look out of scale, and sloppy. Pipe welds are always very neat, and barely come over the pipe (And typically a really narrow band relative to the diameter of the pipe.)
Tools & Supplies Forum Moderator

#192
Kentucky, United States
Joined: November 25, 2009
KitMaker: 1,383 posts
Armorama: 1,281 posts
Posted: Sunday, April 19, 2015 - 05:31 PM UTC
Pennsylvania, United States
Joined: April 10, 2011
KitMaker: 7,941 posts
Armorama: 7,934 posts
Posted: Sunday, April 19, 2015 - 06:51 PM UTC
@Gino-thanks for the comments buddy!
@Patrick-appreciate you looking in
ma@Mike-thanks for staying with this thread for soooo lon @Kurt-thanks my old friend for checking in!
@Peter-I agree we need more modern figgies from all countries even-dare I say it-more Marines!! Hahaha (stepping back from the computer)
Pennsylvania, United States
Joined: April 10, 2011
KitMaker: 7,941 posts
Armorama: 7,934 posts
Posted: Sunday, April 19, 2015 - 06:58 PM UTC
@James-thanks for the kind words buddy
@Karl-thanks as alway for the remarks and the always inciteful comments man
@Matt and Amoz-thanks for the kind words and and the observations about the weld beads. This was exactly the very last thing I built on this project and I knew I was hurrying. Always a problem when you are modeling.
I did not consult any reference on weld beads and just waded in as the pipe was a last minute brain storm. I will know better next time I build a pipeline!!
Thanks guys. So...aside from the weld thing I guess the consensus was pretty good! So if you take some time with these older sets you can get them "shining like a diamond in a donkeys' butt". Takes a lot more time but it is cheaper that's for sure.
Thanks for all the excellent support along the way and at the finish!!
Now,all I have left is Normandy,Stoumont,Ramcke and casualty evac! Hahaha
J
Graywolf
 Senior Editor
Izmir, Turkey / Türkçe
Joined: December 01, 2001
KitMaker: 6,405 posts
Armorama: 1,850 posts
Posted: Sunday, April 19, 2015 - 07:44 PM UTC
Watching every step of this built was so helpful and final is a great scene. Congrats and thanks my friend.
Pennsylvania, United States
Joined: April 10, 2011
KitMaker: 7,941 posts
Armorama: 7,934 posts
Posted: Sunday, April 19, 2015 - 08:16 PM UTC
Thanks Engin,for the looking in and the kind remarks.
J
Texas, United States
Joined: December 22, 2001
KitMaker: 3,586 posts
Armorama: 2,556 posts
Posted: Monday, April 20, 2015 - 09:32 AM UTC
Awesome job. Next one you do, let me know and I could send you some Echelon subdued patches and ranks, I have extra.
Just one little thing sir and I only noticed it because that is what I worked on in my 20 years in the Army. The post amplifier on top of the night sight is wired wrong. As you can see, the post amplifier cable is wrapped around the TU. The connector near the trigger should be the one connected there.

The cable you have attached to the post amplifier should be attached to the rear of the night sight under the cooler next to the on off switch.

Pete Becerra, Jr. SGT(RET)
HHC, 71st BfSB - TEXAS
HHB, 36th ID DIVARTY -TEXAS
B Co.(-), 949 FSB, 56th BCT, 36th ID - TEXAS
B Co., 324th FSB, 3rd Brigade, 24th INF DIV(MECH)
563rd ORD Co. - GERMANY
Pennsylvania, United States
Joined: April 10, 2011
KitMaker: 7,941 posts
Armorama: 7,934 posts
Posted: Monday, April 20, 2015 - 06:37 PM UTC
Very nice info. A bit late for my purposes but nice.
Was the set up always like this? I was in from 77 to 94 and on the TOW for almost all of that time. It wasn't till later in my career that we got the night sight and I don't recall the cable that went from the MGS to the night sight at all. Could this be a later version?
After being away from this for over 20 years now I find myself forgetting things that used to be second nature. I spoke with my old fellow Platoon Sergeant buddy yesterday and he is in the same fix.
This dio is of his platoon BTW.
Thanks for your post.
J
Texas, United States
Joined: December 22, 2001
KitMaker: 3,586 posts
Armorama: 2,556 posts
Posted: Monday, April 20, 2015 - 06:58 PM UTC
I know exactly what your talking about Jerry, I'm surprised I still remember some things.
Your correct about the cable from the MGS to the TU, it was only one cable. Nothing from the MGS went to the night sight. What's on the TOW you modeled is most likely an AN/TAS-4C and the one you mentioned you messed with was most likely a AN/TAS-4 or 4A with no post amplifier on it.
It's still a beautiful dio and if it wasn't for me and you knowing what we are talking about, no one else would know the difference.


Pete Becerra, Jr. SGT(RET)
HHC, 71st BfSB - TEXAS
HHB, 36th ID DIVARTY -TEXAS
B Co.(-), 949 FSB, 56th BCT, 36th ID - TEXAS
B Co., 324th FSB, 3rd Brigade, 24th INF DIV(MECH)
563rd ORD Co. - GERMANY


