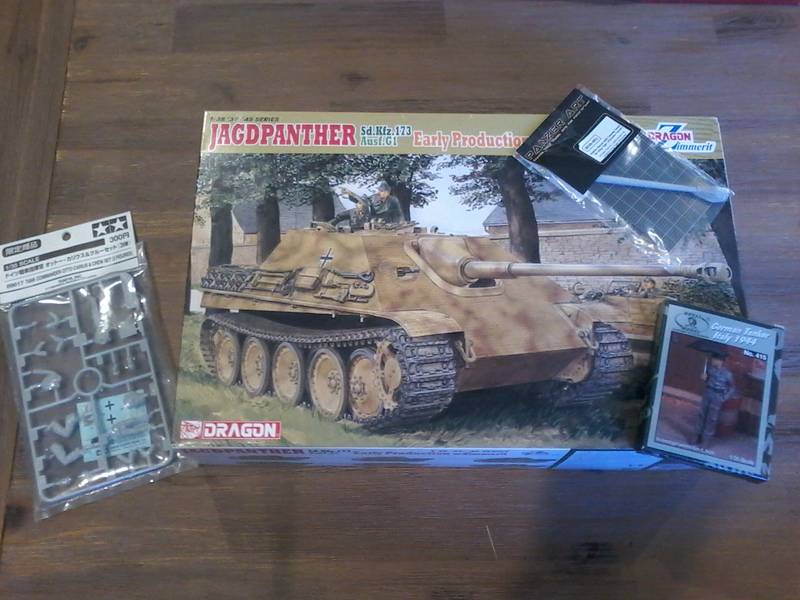
Next project: Dragon's jagdpanther
South Australia, Australia
Joined: July 09, 2014
KitMaker: 327 posts
Armorama: 283 posts
Posted: Saturday, June 20, 2015 - 06:46 AM UTC
After completing dragons m48a3 ive decided to take on another dml kit and try to create the image below.
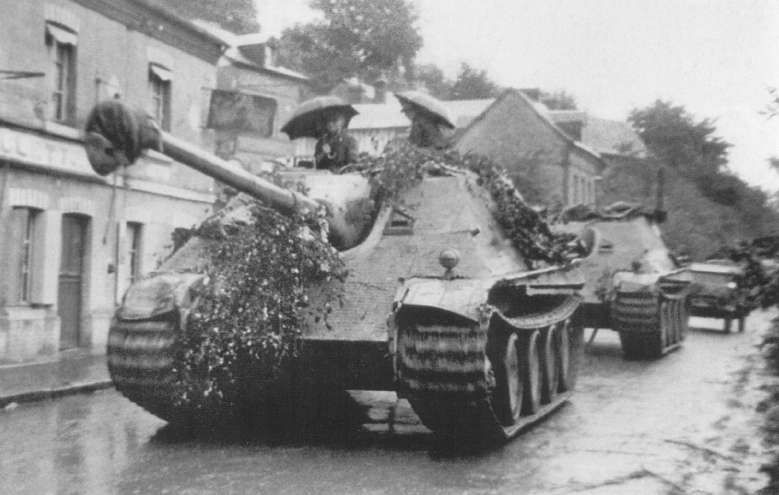
Here are the goodies i have for it so far. Might need to source some photoetch fenders.
England - North West, United Kingdom
Joined: April 20, 2004
KitMaker: 2,439 posts
Armorama: 1,980 posts
Posted: Saturday, June 20, 2015 - 09:31 AM UTC
It is an excellent kit and must say it's Dragons best attempt on the molded on zimmerit.The only thing that lets the kit down is the DS tracks I ordered a set of Friuls.
Don't forget to relocate the tools as this vehicle belong to pz.jg.abt.654.
Looking forward to some progress photos

Never in the field of scale modelling was so much owed by so many to so few.
South Australia, Australia
Joined: July 09, 2014
KitMaker: 327 posts
Armorama: 283 posts
Posted: Saturday, June 20, 2015 - 10:49 AM UTC
Quoted Text
It is an excellent kit and must say it's Dragons best attempt on the molded on zimmerit.The only thing that lets the kit down is the DS tracks I ordered a set of Friuls.
Don't forget to relocate the tools as this vehicle belong to pz.jg.abt.654.
Looking forward to some progress photos
Hi karl, do u have any references of where the tools should be relocated to? Any help would be greatly appreciated. Cheers, Nick
Ukraine / Україна
Joined: January 26, 2010
KitMaker: 570 posts
Armorama: 553 posts
Posted: Saturday, June 20, 2015 - 11:12 AM UTC
Here is a link to a very comprehensive guide on the vehicle. The article itself is in Russian, but there is plenty of chronologically set up images, drawings and sketches that should be sufficient.
http://www.dishmodels.ru/gshow.htm?p=4973Cheers!!!
South Australia, Australia
Joined: July 09, 2014
KitMaker: 327 posts
Armorama: 283 posts
Posted: Saturday, June 20, 2015 - 12:39 PM UTC
Quoted Text
Here is a link to a very comprehensive guide on the vehicle. The article itself is in Russian, but there is plenty of chronologically set up images, drawings and sketches that should be sufficient.
http://www.dishmodels.ru/gshow.htm?p=4973
Cheers!!!
Hi Paul, that is a fantastic reference.thanks so much, just translated it to english. I have some light reading to do now.
England - North West, United Kingdom
Joined: April 20, 2004
KitMaker: 2,439 posts
Armorama: 1,980 posts
Posted: Saturday, June 20, 2015 - 01:55 PM UTC
I have relocated them from some photos and where other modellers have placed them.
That site Paul posted is very good,I have a side view photo of Jadgpanther 112 and on that site there is a photo of 112 of the rear and noticed I have to remove the exhaust shields.
Cheers
Karl
Never in the field of scale modelling was so much owed by so many to so few.
Ontario, Canada
Joined: November 03, 2012
KitMaker: 2,275 posts
Armorama: 2,233 posts
Posted: Saturday, June 20, 2015 - 04:50 PM UTC
very nice kit. Dragon has made a whole slew of zim kits..gonna collect them all.
Nice progress pix.
England - North West, United Kingdom
Joined: April 20, 2004
KitMaker: 2,439 posts
Armorama: 1,980 posts
Posted: Saturday, June 20, 2015 - 05:09 PM UTC
Quoted Text
very nice kit. Dragon has made a whole slew of zim kits..gonna collect them all.
Nice progress pix.
David there not Nicks progress pictures,I just posted my build to show him where I located the tools.
Never in the field of scale modelling was so much owed by so many to so few.
South Australia, Australia
Joined: July 09, 2014
KitMaker: 327 posts
Armorama: 283 posts
Posted: Wednesday, June 24, 2015 - 07:55 AM UTC
South Australia, Australia
Joined: July 09, 2014
KitMaker: 327 posts
Armorama: 283 posts
Posted: Wednesday, June 24, 2015 - 11:01 AM UTC
Have just ordered aber front photoetch fenders to replicate the damage as seen in the original pic....
Queensland, Australia
Joined: October 02, 2008
KitMaker: 658 posts
Armorama: 629 posts
Posted: Wednesday, June 24, 2015 - 03:31 PM UTC
Nick
Having made that same kit, I would recommend drilling out the ends of the exhaust pipes to give them thinner sides and replacing the blocking bar with a piece of stretched sprue - looks much better.
Regards
Rob
South Australia, Australia
Joined: July 09, 2014
KitMaker: 327 posts
Armorama: 283 posts
Posted: Thursday, June 25, 2015 - 02:24 AM UTC
Quoted Text
Nick
Having made that same kit, I would recommend drilling out the ends of the exhaust pipes to give them thinner sides and replacing the blocking bar with a piece of stretched sprue - looks much better.
Regards
Rob
Hi rob, yeah great idea.I will be doing that

bit of an oversight on my behalf. I'm unsure whether to add the exhaust covers as I've seen some with and without from 654.
South Australia, Australia
Joined: July 09, 2014
KitMaker: 327 posts
Armorama: 283 posts
Posted: Tuesday, July 28, 2015 - 01:03 PM UTC
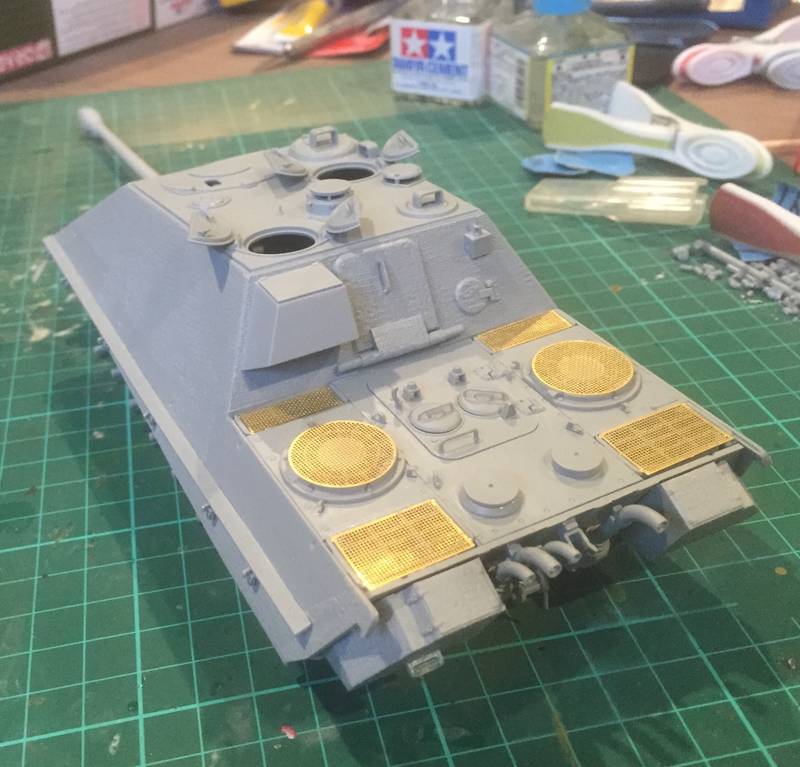
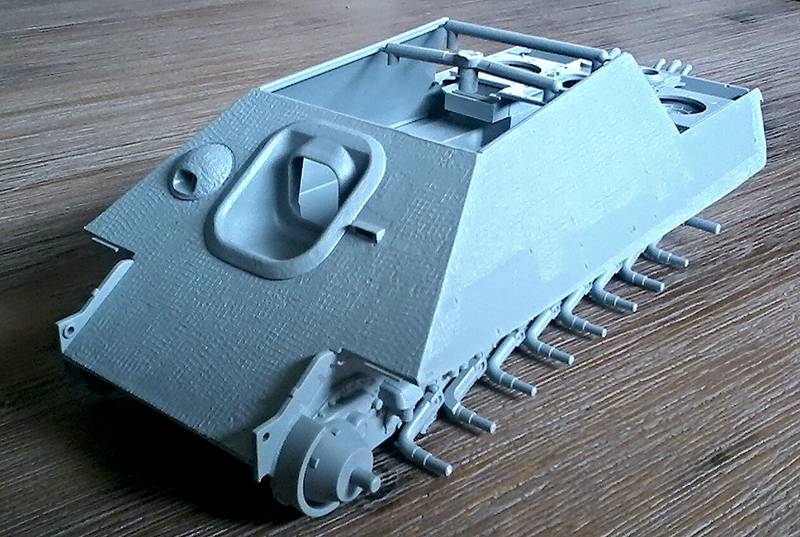
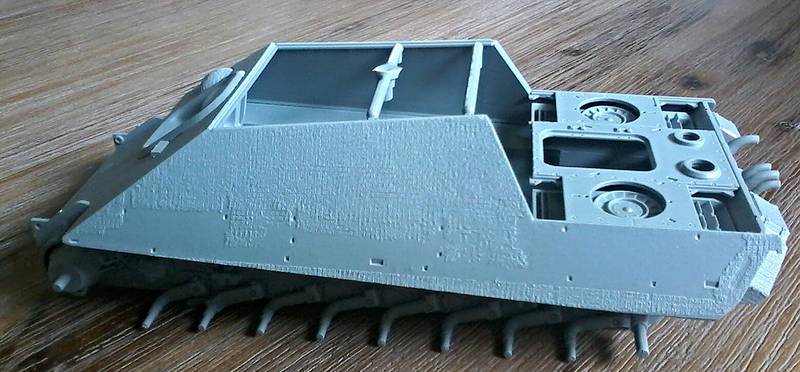
Bit of an update, I have made quite a bit of progress in the last few weeks, not as much as I'd like but so be it. I have prepped the saukopf with the resin barrel with cover, installed the Pe mesh grill covers, added various storage bins and the hull roof. Still need to get aber Pe fenders and also maybe another Pe kit for the tools and various other items
South Australia, Australia
Joined: July 09, 2014
KitMaker: 327 posts
Armorama: 283 posts
Posted: Monday, October 12, 2015 - 12:57 PM UTC
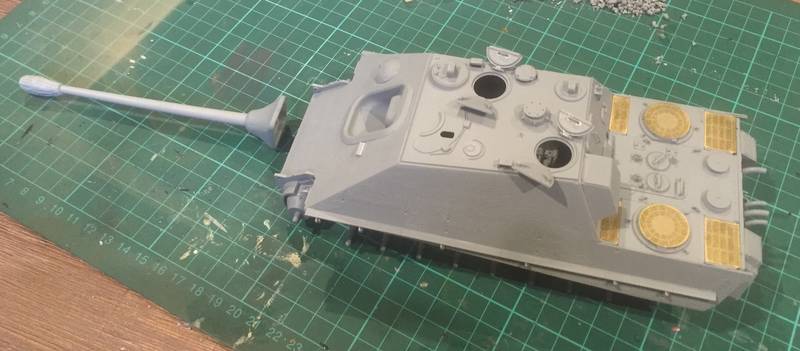
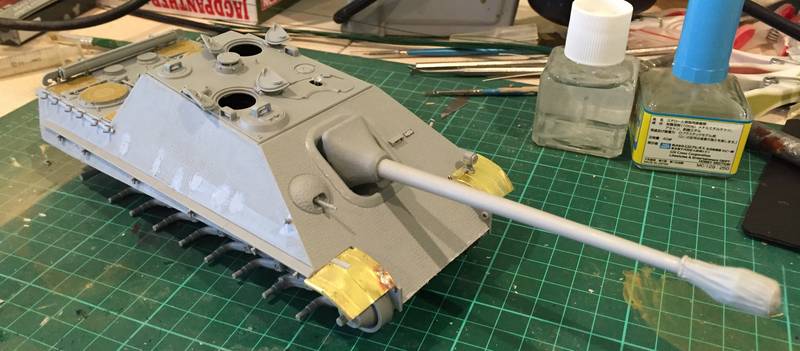
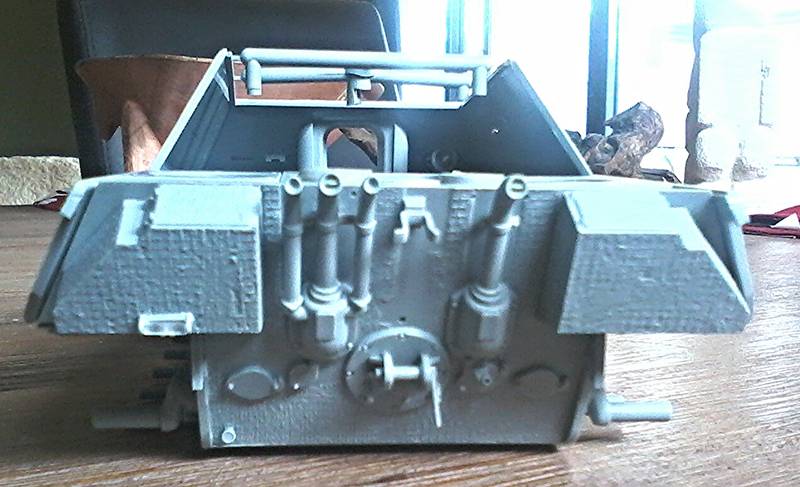
Have picked this project up again after a short break to get a few models finished before the SAPMA model expo. I have glued the mantlet and barrel to the gun and have glued it in position as per my main reference.
I have started adding the tools to the engine deck as per my references and hope to have them all on over the weekend.
Ontario, Canada
Joined: November 03, 2012
KitMaker: 2,275 posts
Armorama: 2,233 posts
Posted: Monday, October 12, 2015 - 02:44 PM UTC
Quoted Text
After completing dragons m48a3 ive decided to take on another dml kit and try to create the image below.
Here are the goodies i have for it so far. Might need to source some photoetch fenders.
Oh my, I love that kit! Ace.
Michigan, United States
Joined: November 24, 2013
KitMaker: 40 posts
Armorama: 39 posts
Posted: Monday, October 12, 2015 - 06:34 PM UTC
One of my favorite kits, nicely done so far Nick. Watching this one.
Terry
North Carolina, United States
Joined: June 06, 2006
KitMaker: 4,691 posts
Armorama: 3,509 posts
Posted: Monday, October 12, 2015 - 07:25 PM UTC
Great looking build,I did this one myself.Looking forward to seeing the commander with the umbrella.
Ontario, Canada
Joined: November 03, 2012
KitMaker: 2,275 posts
Armorama: 2,233 posts
Posted: Monday, October 12, 2015 - 09:33 PM UTC
that'll look cool when your done! I like the figure with the umbrella.
South Australia, Australia
Joined: July 09, 2014
KitMaker: 327 posts
Armorama: 283 posts
Posted: Tuesday, October 13, 2015 - 12:19 AM UTC
Terry, Anthony and David- thanks for your comments. I hope I can do the kit justice and replicate the photo as closely as possible with my skills. I have just got some Aber photo etch fenders so soldering them will be my next challenge
South Australia, Australia
Joined: July 09, 2014
KitMaker: 327 posts
Armorama: 283 posts
Posted: Wednesday, October 14, 2015 - 01:42 PM UTC
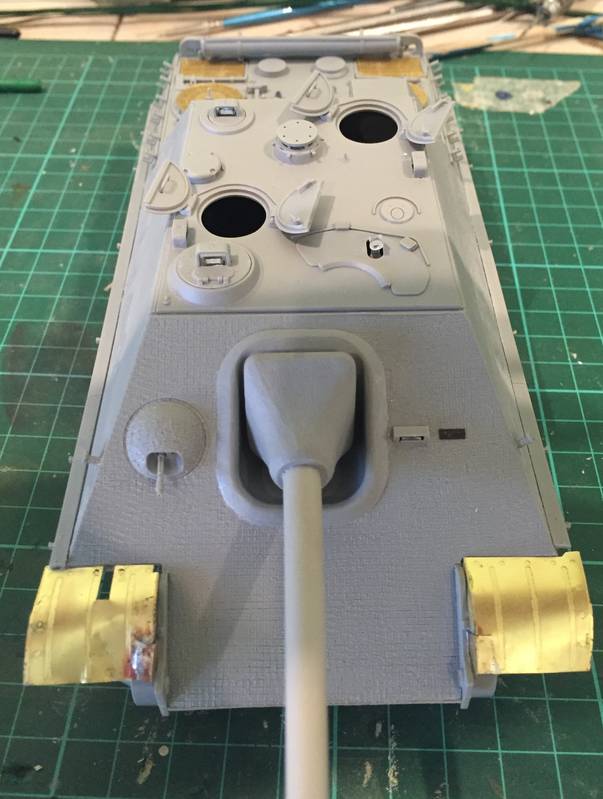
Making progress slowly,I have added the mg to the front, glued the upper and lower hulls together, quite easy thanks to a great fit. I have also just glued the cleaning rod container to the rear deck as per my references. Will try to get the tools sorted next, then look at the Pe front fenders
Rheinland-Pfalz, Germany
Joined: November 27, 2005
KitMaker: 182 posts
Armorama: 180 posts
Posted: Wednesday, October 14, 2015 - 04:18 PM UTC
Hello Nick,
I really enjoyed building some of the new Dragon-Panthers. The kit you have chosen is one which I wanted to have for a long time. Some day it will hit my shelve as well, I guess....

Your build looks nice so far. Dragon did, imho, a marvelous job on the Zimmerit. I have the Panther G with Zimmerit and it is very nicely done aswell.
You could try to get some more light on your model while making the photos. Thisnshould lead to clearer pics.
If you start soldering the ABER-fenders you might want to try to anneal the fenders with a lighter. This will make them much more easy to bend.
Good luck with your build.
I will follow your post.
Best Regards
Dennis
South Australia, Australia
Joined: July 09, 2014
KitMaker: 327 posts
Armorama: 283 posts
Posted: Wednesday, October 14, 2015 - 05:15 PM UTC
Quoted Text
Hello Nick,
I really enjoyed building some of the new Dragon-Panthers. The kit you have chosen is one which I wanted to have for a long time. Some day it will hit my shelve as well, I guess....
Your build looks nice so far. Dragon did, imho, a marvelous job on the Zimmerit. I have the Panther G with Zimmerit and it is very nicely done aswell.
You could try to get some more light on your model while making the photos. Thisnshould lead to clearer pics.
If you start soldering the ABER-fenders you might want to try to anneal the fenders with a lighter. This will make them much more easy to bend.
Good luck with your build.
I will follow your post.
Best Regards
Dennis
Yeah I would have to agree Dennis, while I build a bit of everything, not just German armour I would have to agree the zimmerit is to scale and not too chunky. Yeah I have a new phone now and the spring weather is here in Aus there is a lot more natural light to take better photos.
I have tonight added most of the tools, will try to post a pic or two tomoz. Great idea about annealing the Aber fenders, I am thinking I will glue the fenders first with cyanoacrylate glue, then solder and anneal. I can't say I've ever soldered P.E before
South Australia, Australia
Joined: July 09, 2014
KitMaker: 327 posts
Armorama: 283 posts
Posted: Friday, October 16, 2015 - 12:15 PM UTC
A few update shots
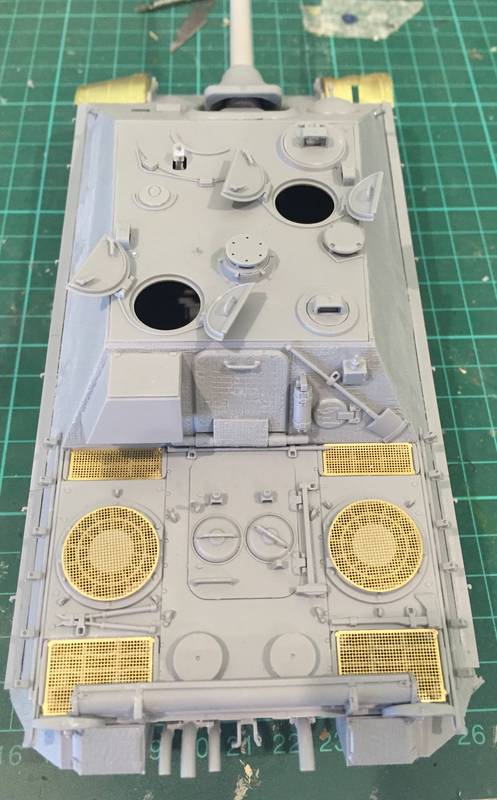
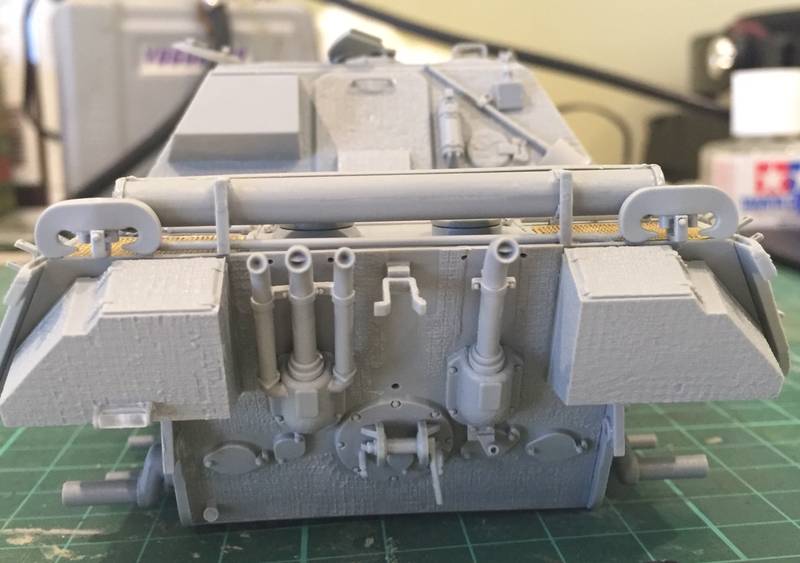
The only concern is that on the Aber PE fenders they have put the light on the wrong side which I will have to fix up
Oklahoma, United States
Joined: September 30, 2015
KitMaker: 2,493 posts
Armorama: 2,344 posts
Posted: Friday, October 16, 2015 - 06:39 PM UTC
"Only the dead have seen the end of war." - Plato
South Australia, Australia
Joined: July 09, 2014
KitMaker: 327 posts
Armorama: 283 posts
Posted: Sunday, October 18, 2015 - 11:51 AM UTC
So I have progressed a little more and attracted the jagdpanther with some putty to fill the locating holes where the tool racks etc would have been stored, also the hole in the PE fender, still yet to sand everything.
Once everything is sanded and cleaned up it will receive a coat of tamiya surface primer from the can.
Also can anyone tell me the exact number of this the tank from my first post, I've narrowed it down to 302 or 332 thanks to some online references.


