California, United States
Joined: December 06, 2004
KitMaker: 3,694 posts
Armorama: 2,693 posts
Posted: Saturday, June 18, 2016 - 04:37 AM UTC
Two minor hiccups have cropped up. First is the fit between the upper and lower hull. The walls of the hull lean in. Lining up the two pieces on the right side leaves this along the left.


I might add scrap sprues to fix the spacing in the lower hull, or I might just get it to fit (it's quite a struggle) and glue it together.
The other hiccup is the lack of the starboard view of the MERDC camouflage. There is only 1 view of that on the cover. Since no one coming to my apartment even knows what MERDC is (or even what a LVTP7A1 is), I think I can wing it. I will just replace the brown in that view with white.
The paints should arrive in the next few days.

#431
Florida, United States
Joined: February 20, 2014
KitMaker: 376 posts
Armorama: 311 posts
Posted: Saturday, June 18, 2016 - 08:34 AM UTC
No huge amount of progress but I did get some work done. I think I have one more session of sanding on the cab before I attach the forward plate/windows and blend that in. I plan on cutting out and opening the two top hatches. Since Iím putting a full interior I want to be able to show it off.

I hope this is helpful for your LVTP7A1 MERDC scheme. It is from AAVP-7A1 LVTP-7A1 Full Detail.

Slow is smooth and smooth is fast
Charlie on time!
California, United States
Joined: December 06, 2004
KitMaker: 3,694 posts
Armorama: 2,693 posts
Posted: Saturday, June 18, 2016 - 11:50 AM UTC
Thanks. I will see if it matches the Tamiya (for laughs) and wil probably use what you provided. The paints arrived today.
tatbaqui
 News Writer
#040
Metro Manila, Philippines
Joined: May 06, 2007
KitMaker: 2,713 posts
Armorama: 2,451 posts
Posted: Friday, June 24, 2016 - 06:28 PM UTC
Hello,
Sprayed on the base coat from a rattle can -- Tamiya Light Sand.
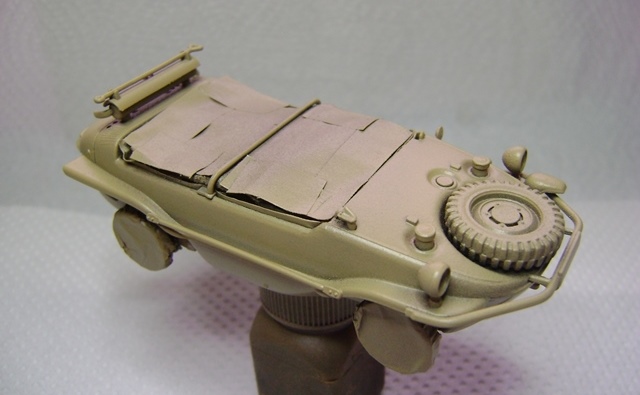
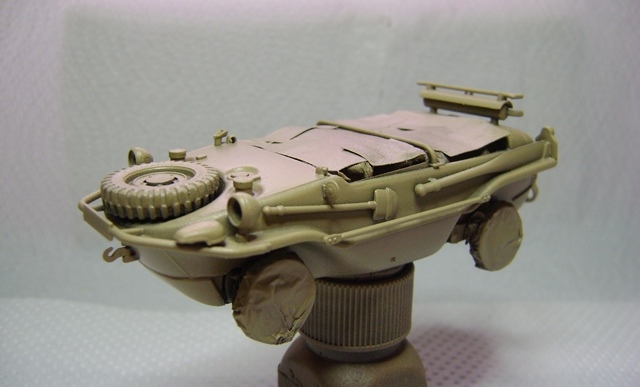

California, United States
Joined: December 06, 2004
KitMaker: 3,694 posts
Armorama: 2,693 posts
Posted: Monday, June 27, 2016 - 02:34 PM UTC
Removed the suspension arms from the sprues and cleaned them up. I dry-fit one of the water propulsion units to the lower hull. It was harder than I thought. At one point I thought I had it but had put the shutter inside the crew compartment rather then outside the hull. I think I have it right now but we shall see.
I came across one more anomaly with this kit. The vision blocks are solid for the driver and vehicle commander but the turret has them cut out with no clear parts provided. I assume there was a bit of screaming at Tamiya when they noticed. I'll probably add some sheet styrene and give it the same treatment as the driver's and commander's cupolas.
I hope to actually glue some parts together in a day or two and take some pictures.

#513
Alabama, United States
Joined: March 28, 2006
KitMaker: 554 posts
Armorama: 172 posts
Posted: Monday, June 27, 2016 - 08:35 PM UTC
Gary and Tat,
Looks like you're making good progress. Keep it up guys.
I've just about completed my weasel. I'm trying to resurrect the yellowed decals by trying the trick of placing them in a sunny window for a few days. Apparently the UV from the sunlight will counteract the yellowing. Doesn't hurt to try. I can't believe it but I have very few spare US decals in my stash right now. I'll get some pictures of my progress up soon.
Thanks guys
John
California, United States
Joined: December 06, 2004
KitMaker: 3,694 posts
Armorama: 2,693 posts
Posted: Monday, June 27, 2016 - 10:06 PM UTC
I have fond memories of that Monogram Weasel kit. I built it many decades ago before I started painting models.
tatbaqui
 News Writer
#040
Metro Manila, Philippines
Joined: May 06, 2007
KitMaker: 2,713 posts
Armorama: 2,451 posts
Posted: Tuesday, June 28, 2016 - 12:25 PM UTC
Quoted Text
Gary and Tat,
Looks like you're making good progress. Keep it up guys.
I've just about completed my weasel. I'm trying to resurrect the yellowed decals by trying the trick of placing them in a sunny window for a few days. Apparently the UV from the sunlight will counteract the yellowing. Doesn't hurt to try. I can't believe it but I have very few spare US decals in my stash right now. I'll get some pictures of my progress up soon.
Thanks guys
John
Thanks John. Read about that UV treatment too, so hopefully that gets to fix it.
I planned to do thin, squiggly green and brown lines as camo for my schwimm, so I sprayed on some paint yesterday. Well, having a basic AB didn't do any good, so I had to redo the base coat again. Will do some masks after it gets completely dry.
Cheers,
Tat
Wojewodztwo Slaskie, Poland
Joined: October 21, 2003
KitMaker: 529 posts
Armorama: 500 posts
Posted: Tuesday, June 28, 2016 - 10:44 PM UTC
Hi everyone,
It's my entry. I start work on my model.


#513
Alabama, United States
Joined: March 28, 2006
KitMaker: 554 posts
Armorama: 172 posts
Posted: Tuesday, June 28, 2016 - 11:50 PM UTC
Hi Pawel,
Welcome to the campaign. That Ford GPA is a fun little kit. Looking forward to seeing how you do with it.
John
California, United States
Joined: December 06, 2004
KitMaker: 3,694 posts
Armorama: 2,693 posts
Posted: Wednesday, June 29, 2016 - 12:09 PM UTC
Finally attach some pieces. I added the suspension arms and both A20 (steps? Filler caps?) to the lower hull. I also put the rear ramp together.
Also noticed another boo boo on the turret. The gunner's sight looks like it is a scoop; no clear part provided.

#011
Jerusalem, Israel
Joined: February 06, 2009
KitMaker: 1,507 posts
Armorama: 1,304 posts
Posted: Wednesday, June 29, 2016 - 06:20 PM UTC
im glad to see people are progressing with their kit. we are closing on the 1 month left mark, so if anybody think they might need an extension, please PM me so i can deal with it in a timely manner (with consulting with the rest of the participants, ofc).
George: "If we do happen to step on a mine, Sir, what do we do ?"
Blackadder: "Normal procedure, Lieutenant, is to jump 200 feet in the air and scatter oneself over a wide area."
tatbaqui
 News Writer
#040
Metro Manila, Philippines
Joined: May 06, 2007
KitMaker: 2,713 posts
Armorama: 2,451 posts
Posted: Sunday, July 03, 2016 - 08:03 AM UTC
Hello,
Been tossing back and forth on whether to have the top down or not. I've finally decided to use the kit-provided canvas top as there's not much in terms of interior. Put in a length of styrene for the support frame from actual vehicle pics I've seen.
Update pics from last week's paint sessions:
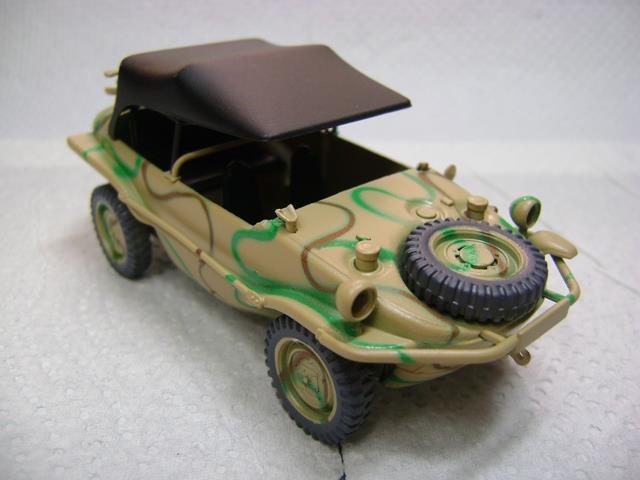
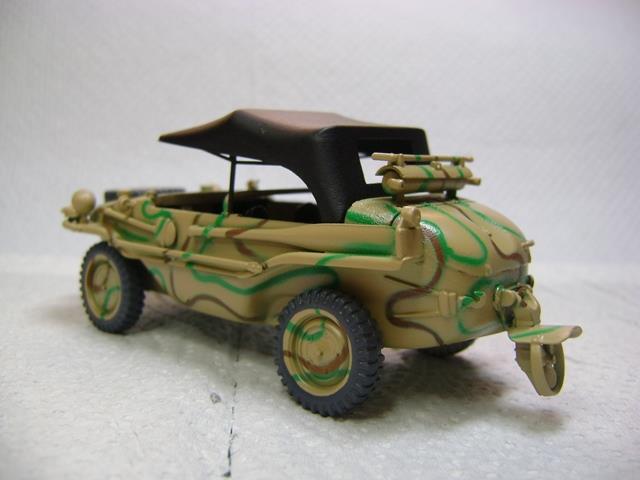
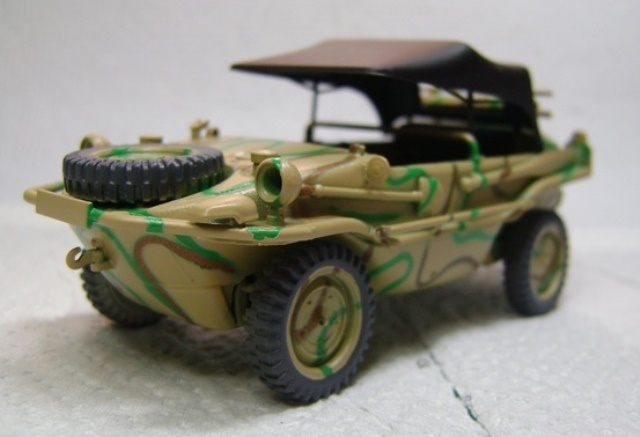
The instructions call for a monotone dark grey scheme. I thought of doing otherwise -- the camo's just something I came up with. Initially tried doing squiggly lines free hand. But as my basic AB is not up to the task I settled to masking it using Blue Tac.
Still a bit more work to get this across the line.
Cheers,
Tat

#513
Alabama, United States
Joined: March 28, 2006
KitMaker: 554 posts
Armorama: 172 posts
Posted: Sunday, July 03, 2016 - 08:45 AM UTC
Tat,
Your schwimmwagen is really coming together. I like the look of your canvas top. I know you're still working on it so I wanted to ask if you planned on any rusting on the muffler. I don't think the paint would hold up under operating temperatures. I like the paint scheme. Not having an airbrush any camo I do is freehand so I really like your camo scheme. Keep it up.
John
tatbaqui
 News Writer
#040
Metro Manila, Philippines
Joined: May 06, 2007
KitMaker: 2,713 posts
Armorama: 2,451 posts
Posted: Sunday, July 03, 2016 - 09:41 AM UTC
Thanks for your comments John! The canvas top is still on black primer -- maybe I'll put something like a field gray color on it. Yes, the muffler will definitely get its rust treatment. Cheers, Tat
New York, United States
Joined: March 08, 2010
KitMaker: 3,662 posts
Armorama: 3,078 posts
Posted: Sunday, July 03, 2016 - 10:58 PM UTC
Active Campaigns on the bench:
Operation Fall Gelb - Pz.Kpfw. IV Ausf. C
Engineering the Future - M-26 Recovery Vehicle
115 Campaigns completed

#431
Florida, United States
Joined: February 20, 2014
KitMaker: 376 posts
Armorama: 311 posts
Posted: Monday, July 04, 2016 - 02:17 AM UTC
Quoted Text
im glad to see people are progressing with their kit. we are closing on the 1 month left mark, so if anybody think they might need an extension, please PM me so i can deal with it in a timely manner (with consulting with the rest of the participants, ofc).
Iíll be giving it a good go however, doubt I will finish this by the deadline.
Some progress this weekend. I got the side of the sponson fabricated and attached. Although the pictures do not show, I achieved precisely the effect I was after. The bulkheads are prominent features and now leave slight depressions in the empty areas between the bulkheads.
More progress on the interior, although I will need to add height so it meets the overhead of the cab Ė no hiding major flaws with the large windows that will be in front.
Finally, I managed to arrive at the color I was after Ė as seen on the side of the vehicle. It is Haze Gray and under way! It is a mix of Haze Gray 5H, Sky Line Blue and Matt White.


Slow is smooth and smooth is fast
Charlie on time!

#513
Alabama, United States
Joined: March 28, 2006
KitMaker: 554 posts
Armorama: 172 posts
Posted: Thursday, July 07, 2016 - 06:36 AM UTC
Hi folks,
Hereís my latest status on my weasel. Iím calling the construction and basic painting complete. This is definitely not competition caliber but Iíve had fun with this so far. I was going to build it simply OOB but when I saw the part that was supposed to represent the muffler and screen I knew I had to do something. Luckily I found some aluminum micromesh in my parts stash. I think itís intended to represent 1/72 scale chain link fencing but I thought it would fit the bill nicely for the muffler screen. The muffler itself is made of stretched sprue from the kit. The boat hook was also malformed so I made one from some stiff wire. The eyebolts I liberated from the harness of a German field kitchen.
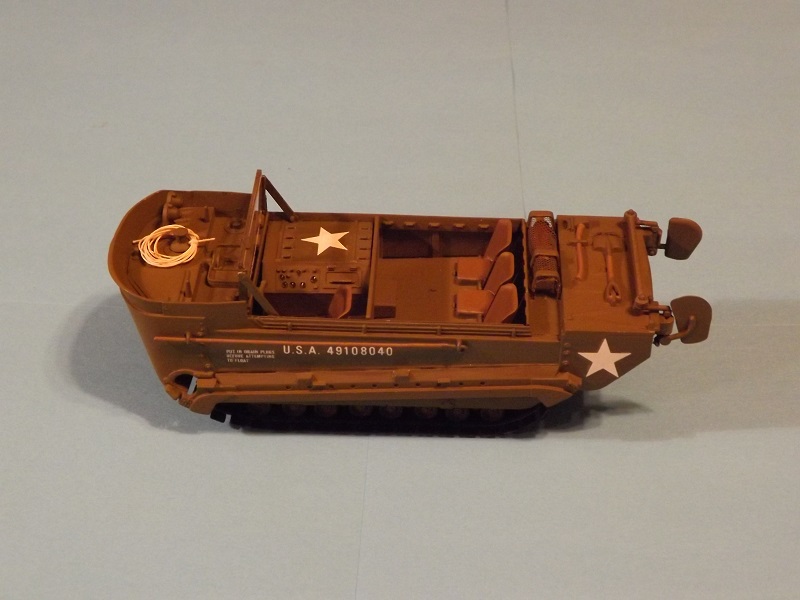
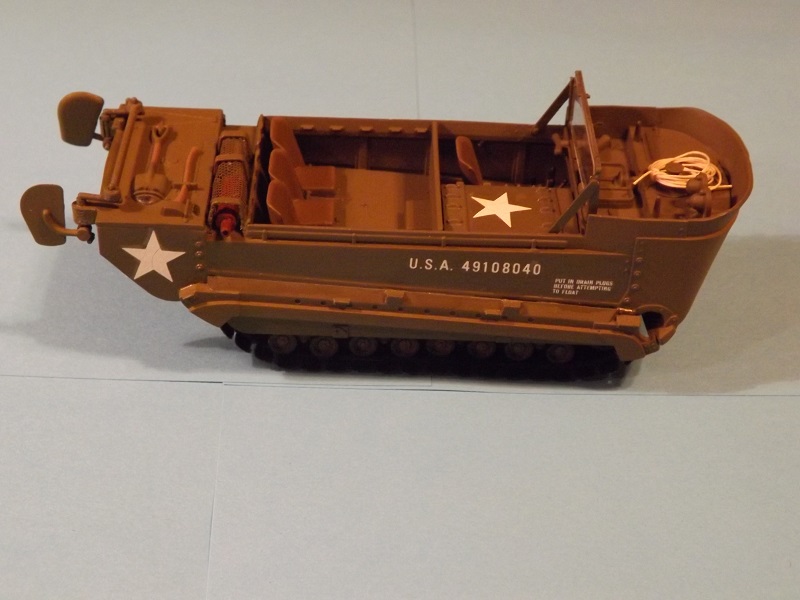
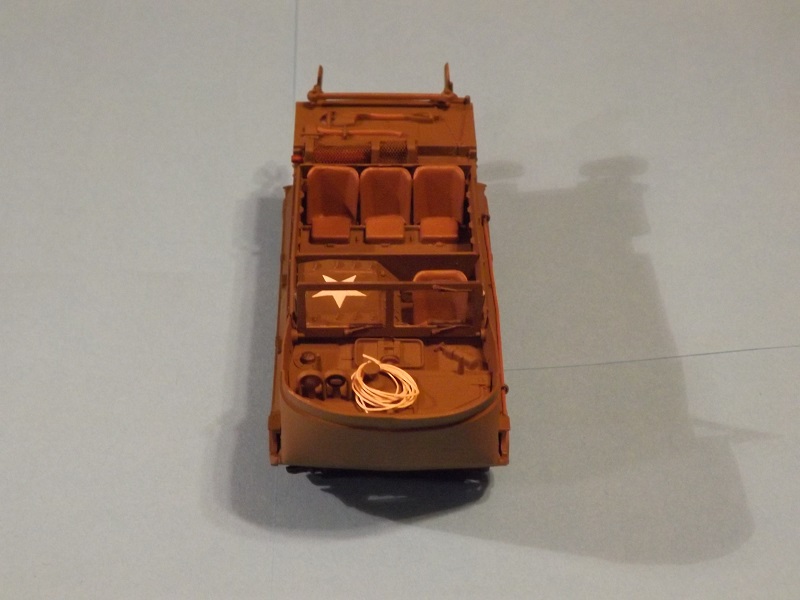
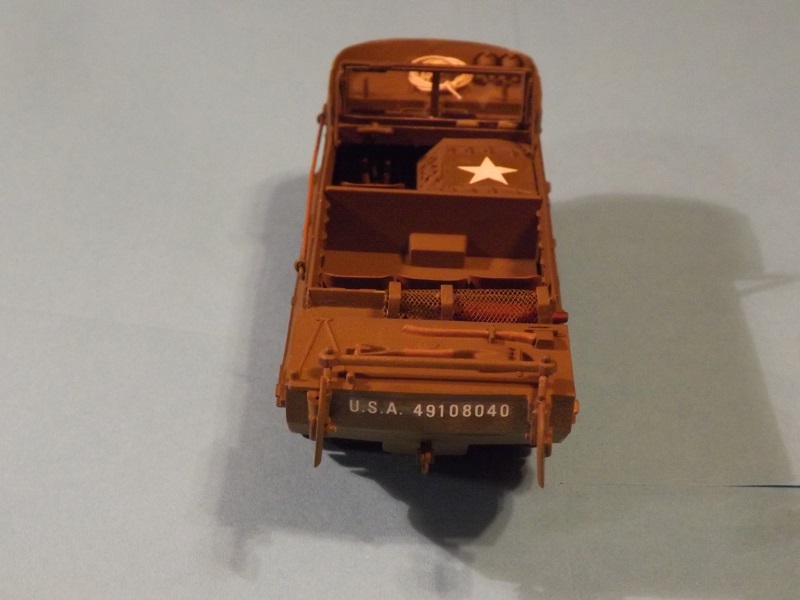
The decals gave me a challenge. Not finding anything in my stash to replace them with I decided to try and resurrect them. This is the 1972 boxing of this kit and the parts were not bagged, simply wrapped in cellophane by a previous owner. I gently flattened them out and secured them to a piece of wood and set them in a sunny window to counteract the yellowing. It took a week but did the trick. They started to split as I was trying to apply them. The registry numbers are okay but you can make out cracks in the stars. The first star crumbled so there is no star on the front. All in all I am happy with the result.
I have the washes and weathering left to do. The decals were pretty thick. But they were so brittle I couldnít trim so there is a little silvering visible even though I applied them over a layer of future and three coasts of setting solution followed by another coat of future. Iím going to hide the worst of it with weathering. Overall Iím going to keep the weathering kind of light as I intend to use this vehicle in a diorama but I havenít decided yet if it will be northern Europe or Okinawa. Iíve never done a Pacific dio so Iím kind of leaning in that direction. Iím also having all sorts of trouble finding figures to fit. Iím really hoping not to have to use the kit figures. The seated figures legs will need to be stretched out almost straight as opposed to bent so Iím in for some major modifications. If you have any figure recommendations I would appreciate hearing from you.
Keep up the progress!
John
New York, United States
Joined: March 08, 2010
KitMaker: 3,662 posts
Armorama: 3,078 posts
Posted: Saturday, July 09, 2016 - 09:27 PM UTC
Active Campaigns on the bench:
Operation Fall Gelb - Pz.Kpfw. IV Ausf. C
Engineering the Future - M-26 Recovery Vehicle
115 Campaigns completed
tatbaqui
 News Writer
#040
Metro Manila, Philippines
Joined: May 06, 2007
KitMaker: 2,713 posts
Armorama: 2,451 posts
Posted: Sunday, July 10, 2016 - 04:22 AM UTC
Thanks Sal! -- the rains have been a killjoy these past few days, hope to get back on track soon.


#298
Hong Kong S.A.R. / 繁體
Joined: August 08, 2002
KitMaker: 1,182 posts
Armorama: 665 posts
Posted: Thursday, July 14, 2016 - 11:02 AM UTC
Western Australia, Australia
Joined: March 21, 2016
KitMaker: 247 posts
Armorama: 126 posts
Posted: Saturday, July 16, 2016 - 11:34 AM UTC
Late start but am starting with the Hobby Boss Land Wasser Schlepper


California, United States
Joined: December 06, 2004
KitMaker: 3,694 posts
Armorama: 2,693 posts
Posted: Saturday, July 16, 2016 - 12:19 PM UTC
And I thought I was starting at the last minute!
I finally got the nerve to do some hand painting of the water propulsion units. There were places I didn't think the airbrush would reach. I've put the first coat on but I can see where the paint was too thick and didn't cover well. After that, I will be adding them to the lower hull and getting prepped for attaching the deck to the lower hull.
New York, United States
Joined: March 08, 2010
KitMaker: 3,662 posts
Armorama: 3,078 posts
Posted: Saturday, July 16, 2016 - 06:50 PM UTC
Active Campaigns on the bench:
Operation Fall Gelb - Pz.Kpfw. IV Ausf. C
Engineering the Future - M-26 Recovery Vehicle
115 Campaigns completed
Western Australia, Australia
Joined: March 21, 2016
KitMaker: 247 posts
Armorama: 126 posts
Posted: Sunday, July 17, 2016 - 11:06 AM UTC
Quoted Text
And I thought I was starting at the last minute!
Slight wrinkle dinkle. Went to use my airbrush and it seems a mysterious someone bent the tip of my needle


