tatbaqui
 News Writer
#040
Metro Manila, Philippines
Joined: May 06, 2007
KitMaker: 2,713 posts
Armorama: 2,451 posts
Posted: Friday, October 14, 2016 - 05:11 AM UTC
Thanks Colin, Dustin!
I was looking at it while preparing to put on a gloss coat for the wash. The detail on the grill or air vent at the back of the turret wasn't too good look at. So I cut some mesh and strips of plastic to fashion what can pass on as some sort of cover. It surely won't get the nod of any contest judge in either accuracy nor quality -- but I guess its good enough for me


We're expecting a typhoon this weekend so I went out early and did the gloss coat. Hope to get on to the washes by tomorrow.
Cheers,
Tat
Canelones, Uruguay
Joined: December 27, 2006
KitMaker: 773 posts
Armorama: 765 posts
Posted: Friday, October 14, 2016 - 05:35 AM UTC
Hi, finishing the last photoetched details


Hope I can paint all this week end
Regards from the south
Alvaro
New South Wales, Australia
Joined: February 06, 2012
KitMaker: 138 posts
Armorama: 133 posts
Posted: Sunday, October 16, 2016 - 05:13 PM UTC
With less than 2 weeks left until the deadline for this campaign, I might give it a shot. Short time, I know, but I thought: why the hell not?!
I recently got my hands on a Tamiya Type 82 Kubelwagen and the accompanying Tamiya engine maintenance set that I will take a crack at. Aside from the addition of the engine set, this will be OOTB.
My attempt wont be as nice as Alewar's version shown above. Great work on that, by the way, Alvaro. Bravo, my friend! The PE kit really makes it pop.
I am having some problems uploading the starting pics, but will endeavour to get these up ASAP.
United Kingdom
Joined: September 17, 2012
KitMaker: 462 posts
Armorama: 417 posts
Posted: Sunday, October 16, 2016 - 07:48 PM UTC
Tamiya T54 model 1949 (various AM conversion bits, turret, etc) done!


And here is the 49 turret in all its shot-trap glory...

Now to upload one to the campaign gallery
Cheers
Matthew
Lisboa, Portugal
Joined: March 04, 2008
KitMaker: 5,386 posts
Armorama: 4,727 posts
Posted: Sunday, October 16, 2016 - 09:24 PM UTC
Active Builds: 0
Active Campaigns: 0
#460
California, United States
Joined: September 16, 2014
KitMaker: 1,156 posts
Armorama: 1,024 posts
Posted: Sunday, October 16, 2016 - 10:11 PM UTC
Quoted Text
I typically stretch the rubber bands prior to mounting, but I guess I got a bit far on one of the runs this time. Staple wires to the rescue, only to have another issue on the connection points where the ends meet. Glued the tracks on the idler -- it has held on so far. 
Are good aftermarket tracks available for these Stuarts? I always worry the Fruils would sag which would not look right on the US tanks that featured the "live" tracks. I have in mind doing one of the Academy Stuarts in Marine Green sometime next year.
Vintage Paul
I'd happily live in the past but for air conditioning, the internet, mobile phones, modern medicine & dentistry and, and, and . . .
Canelones, Uruguay
Joined: December 27, 2006
KitMaker: 773 posts
Armorama: 765 posts
Posted: Sunday, October 16, 2016 - 11:32 PM UTC
Jason, thanks for yours words!.
Yes, the metal details and scratch add ons, really make the difference. Good luck with your kit.
I still need to add some details, as the headlights and DEF wheels.
The weather are better now, so maybe with some luck, I reach the timeline!
Regards from the south
Alvaro
Dragon's Notek have much better detail

Trying to "how to" with solder

Maybe its a waste of "time" now


tatbaqui
News Writer #040
Metro Manila, Philippines
Joined: May 06, 2007
KitMaker: 2,713 posts
Armorama: 2,451 posts
Posted: Tuesday, October 18, 2016 - 09:28 AM UTC
Quoted Text
Quoted Text
I typically stretch the rubber bands prior to mounting, but I guess I got a bit far on one of the runs this time. Staple wires to the rescue, only to have another issue on the connection points where the ends meet. Glued the tracks on the idler -- it has held on so far.
Are good aftermarket tracks available for these Stuarts? I always worry the Fruils would sag which would not look right on the US tanks that featured the "live" tracks. I have in mind doing one of the Academy Stuarts in Marine Green sometime next year.
Paul, I read that Bronco T16 Workable Track Links (AB3553) works for this kit; also with other manufacturers' Stuarts (M3 / M5) like Academy and AFV Club. I was considering to order one, but held off on it since I was able to do a workaround.
As an update -- I am done with the washes, and decals. I've sealed this with a flat clear from a rattle can -- though am not convinced it really got to the finish that I am used to with the Future + Tamiya Flat Base combo.


Will be doing the oils next, and push to get this done before the deadline.
Cheers,
Tat
Canelones, Uruguay
Joined: December 27, 2006
KitMaker: 773 posts
Armorama: 765 posts
Posted: Wednesday, October 19, 2016 - 05:41 AM UTC
Canelones, Uruguay
Joined: December 27, 2006
KitMaker: 773 posts
Armorama: 765 posts
Posted: Thursday, October 20, 2016 - 05:29 AM UTC
Canelones, Uruguay
Joined: December 27, 2006
KitMaker: 773 posts
Armorama: 765 posts
Posted: Saturday, October 22, 2016 - 08:57 AM UTC
Hi, this week end camo paint.
Saturday

Def wheels


#041
Kobenhavn, Denmark
Joined: July 20, 2006
KitMaker: 10,069 posts
Armorama: 4,677 posts
Posted: Saturday, October 22, 2016 - 09:28 AM UTC
Nice details on the Kubel, Alvaro.
Looking forward to see it with some paint on.

Campaign'oholic - 252+ campaigns completed
United States
Joined: August 28, 2015
KitMaker: 319 posts
Armorama: 308 posts
Posted: Sunday, October 23, 2016 - 01:53 AM UTC
Good work on that T-54 Northern Lad. All that resin came out nice. I am yet to dive that deep into resin. One of these days
Warszawa, Poland
Joined: March 12, 2013
KitMaker: 125 posts
Armorama: 36 posts
Posted: Sunday, October 23, 2016 - 01:54 AM UTC
Hi lads,
first of all I have noticed that my previous update pics might have been unavailable for all those who don't use Chrome or google accounts... Unfortunately Google changed something to way the pics on G+ were accessibile. As I cannot update my older posts, I'll link the "viewable" versions below update.
But first, my struggle seems to close to the finish.
I closed the body (not fully sealed yet, but it reached point where I can no longer dismount main parts). Unfortunately nothing seems to be running smooth with this build

. Now the windows clogged a little from inside. It was probably caused by some CA glue vapours as they did not dissapear after 2-3 days ... So my all effort to make a good interior was in vain.
Here are some pics showing current state of the build. Should be finished by end of campaign


And pics from previos updates:


Cheers,
Radek
PS. I hope all is fine with pics now...
On the bench: some armour ... and a plane... Oh and you would probably find some unfinished ships somewhere around the mancave ;)
Canelones, Uruguay
Joined: December 27, 2006
KitMaker: 773 posts
Armorama: 765 posts
Posted: Monday, October 24, 2016 - 07:01 PM UTC
Hi
Jesper, thanks!. Some pics of the camo, I choose the Pk one.
I need to correct the overspray a bit....
Regards from the south
Álvaro


Warszawa, Poland
Joined: March 12, 2013
KitMaker: 125 posts
Armorama: 36 posts
Posted: Monday, October 24, 2016 - 11:52 PM UTC
Gentlemen,
I'm calling my entry for Tamiya Campaign build finished.
Although it's far from calling it good build but cars proved they're not my friends in my modelling story ...
So no "out of comfort zone" experiments next time ... After this struggle I really admire all of you guys, who can give a car kit this shine and perfect look..
Nevertheless, it was great experience and tought me patience and many good lessons.
Thank you for running the campaign and letting me experience another great adventure
Here are pics of finished kit:


Cheers,
Radek
PS. I've uploaded some photos into campaign's gallery.
On the bench: some armour ... and a plane... Oh and you would probably find some unfinished ships somewhere around the mancave ;)
Canelones, Uruguay
Joined: December 27, 2006
KitMaker: 773 posts
Armorama: 765 posts
Posted: Tuesday, October 25, 2016 - 12:02 AM UTC
Nice job Radek, hope I can reach the timeline too.
Regards from the south
Álvaro
Warszawa, Poland
Joined: March 12, 2013
KitMaker: 125 posts
Armorama: 36 posts
Posted: Tuesday, October 25, 2016 - 03:37 AM UTC
Quoted Text
Nice job Radek, hope I can reach the timeline too.
Regards from the south
Álvaro
Thanks Alvaro, still few days left, so you'll definitely make it

Cheers,
Radek
On the bench: some armour ... and a plane... Oh and you would probably find some unfinished ships somewhere around the mancave ;)
tatbaqui
News Writer #040
Metro Manila, Philippines
Joined: May 06, 2007
KitMaker: 2,713 posts
Armorama: 2,451 posts
Posted: Wednesday, October 26, 2016 - 08:57 AM UTC
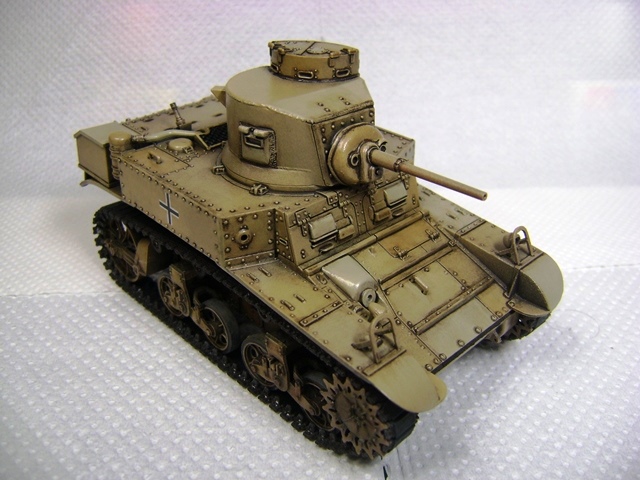
Hello,
I'm calling my beute M3 Stuart done:


Congrats to all participants. Thanks to G.Houle for leading and having me in this campaign!
Looking forward to Round 3!
Cheers,
Tat
Canelones, Uruguay
Joined: December 27, 2006
KitMaker: 773 posts
Armorama: 765 posts
Posted: Friday, October 28, 2016 - 12:58 AM UTC
Tat, nice work!
Well maybe I can do it!


Regards from the South
Álvaro
Namabiiru
Associate Editor #399
Rhode Island, United States
Joined: March 05, 2014
KitMaker: 2,888 posts
Armorama: 1,920 posts
Posted: Friday, October 28, 2016 - 01:31 AM UTC
Nice-looking work, Tat and Alvaro.

tatbaqui
News Writer #040
Metro Manila, Philippines
Joined: May 06, 2007
KitMaker: 2,713 posts
Armorama: 2,451 posts
Posted: Friday, October 28, 2016 - 03:20 AM UTC
Thanks Mark, Alvaro!
Still a couple more days Alvaro, go for it!
Cheers,
Tat
#041
Kobenhavn, Denmark
Joined: July 20, 2006
KitMaker: 10,069 posts
Armorama: 4,677 posts
Posted: Friday, October 28, 2016 - 11:02 AM UTC
Great build, Tat! Love the subtle blended in weathering.
Radek, nice finish!
You can do it, Alvaro. Looks great so far.
Campaign'oholic - 252+ campaigns completed
Rimini, Italy
Joined: March 18, 2007
KitMaker: 91 posts
Armorama: 88 posts
Posted: Saturday, October 29, 2016 - 02:54 AM UTC
tatbaqui
News Writer #040
Metro Manila, Philippines
Joined: May 06, 2007
KitMaker: 2,713 posts
Armorama: 2,451 posts
Posted: Saturday, October 29, 2016 - 03:17 AM UTC
Thanks Kevin! I now find that weathering with oils really does improve the look.
I like the used look of your Opel Antonio, what shade of yellow did you use?
Cheers,
Tat