


Campaigns
Where Armorama group builds can be discussed, organized, and updates posted.
Where Armorama group builds can be discussed, organized, and updates posted.
Hosted by Darren Baker, Richard S.
Tamiya Campaign

pablo_g

Joined: October 21, 2003
KitMaker: 529 posts
Armorama: 500 posts

Posted: Wednesday, August 31, 2016 - 12:26 AM UTC
Thanks for kind words, gentlemen.
SGTJKJ

#041

Joined: July 20, 2006
KitMaker: 10,069 posts
Armorama: 4,677 posts

Posted: Wednesday, August 31, 2016 - 04:32 PM UTC
Thanks for the insights, Pawel. I will see if I can replicate the effect.


cacciacarri

Joined: March 18, 2007
KitMaker: 91 posts
Armorama: 88 posts
Posted: Saturday, September 03, 2016 - 12:19 AM UTC
Hi Guys,
Here is my project, an Opel Blitz truck.I'll try to do it in a civilian vehicle.
Some photos:


I hope you like it.Any corrections and suggestions are welcome.
Best
Antonio Caserta
Here is my project, an Opel Blitz truck.I'll try to do it in a civilian vehicle.
Some photos:


I hope you like it.Any corrections and suggestions are welcome.
Best
Antonio Caserta

metooshelah
#011

Joined: February 06, 2009
KitMaker: 1,507 posts
Armorama: 1,304 posts

Posted: Saturday, September 03, 2016 - 04:23 AM UTC
Is it possible to get a month (or two even) delay in the deadline? I fear that I won't even be starting with painting by the time the campaign ends

tatbaqui
#040

Joined: May 06, 2007
KitMaker: 2,713 posts
Armorama: 2,451 posts

Posted: Saturday, September 03, 2016 - 05:14 AM UTC
Quoted Text
Is it possible to get a month (or two even) delay in the deadline? I fear that I won't even be starting with painting by the time the campaign ends
I wouldn't run against that. Any extension is most welcome.

Chapman

Joined: November 20, 2012
KitMaker: 203 posts
Armorama: 198 posts
Posted: Saturday, September 03, 2016 - 06:35 AM UTC
Excellent weathering Pawel! I hope I can do half as good a job on my Char B. 
pablo_g
Joined: October 21, 2003
KitMaker: 529 posts
Armorama: 500 posts
Posted: Saturday, September 03, 2016 - 10:01 PM UTC
Thanks Chris.
Antonio great looking Blitz, I love it.
Antonio great looking Blitz, I love it.

Nito74

Joined: March 04, 2008
KitMaker: 5,386 posts
Armorama: 4,727 posts
Posted: Saturday, September 03, 2016 - 10:13 PM UTC
Quoted Text
Quoted TextIs it possible to get a month (or two even) delay in the deadline? I fear that I won't even be starting with painting by the time the campaign ends
I wouldn't run against that. Any extension is most welcome.
Ok !
Extension granted, ENDS: October 31st, 2016

tatbaqui
#040
Joined: May 06, 2007
KitMaker: 2,713 posts
Armorama: 2,451 posts
Posted: Sunday, September 04, 2016 - 04:00 AM UTC
Great -- thanks John!
cacciacarri
Joined: March 18, 2007
KitMaker: 91 posts
Armorama: 88 posts
Posted: Sunday, September 04, 2016 - 09:45 PM UTC
Thank you Pawel

alewar

Joined: December 27, 2006
KitMaker: 773 posts
Armorama: 765 posts
Posted: Sunday, September 04, 2016 - 10:11 PM UTC
Thanks!
Álvaro
Álvaro

andromeda673
Joined: July 30, 2013
KitMaker: 584 posts
Armorama: 525 posts
Posted: Sunday, September 04, 2016 - 11:24 PM UTC
well I'm back at it!!!!! I finally was able to get all of the assembly done, and have finished all of the pre shading and painting.
I should be able to get the brown and green down later today! Stay tuned, and I'll leave you guys with this, building 1/48 armor really kicks ass!!!!!


Now I just have to get the base started!
I should be able to get the brown and green down later today! Stay tuned, and I'll leave you guys with this, building 1/48 armor really kicks ass!!!!!


Now I just have to get the base started!

ltb073
Joined: March 08, 2010
KitMaker: 3,662 posts
Armorama: 3,078 posts
Posted: Monday, September 05, 2016 - 03:06 AM UTC
Hi Folks Im back from Vacation a little jet lagged but made some progress today


Bluestab
Joined: December 03, 2009
KitMaker: 2,160 posts
Armorama: 1,906 posts
Posted: Monday, September 05, 2016 - 10:17 PM UTC
Onward with the SU-76m.
The fighting compartment assembled and any pre-painting done.

Fighting compartment walls added to the vehicle. Fit was great.

A better view of the exhaust and what I assume is an air intake. I left off the exhaust pipes from the engine until after the vehicle is painted.
Also, time to get started on the gun.

Before I got on the gun I added "mud" and dirt to the lower hull and fender undersides. The mud was Elmer's Wood Glue. It's thicker than the white glue. I wasn't looking for a huge amount of build-up, just enough to be noticed. I used good ole Tamiya XF-52 Flat Earth for the paint.

I decided to go for the tracks as opposed to the gun. Tamiya goes with mostly indie track links, but offers a premolded run for the bottoms. Tamiya includes a pair of jigs for the top runs to simulate sag. Tamiya didn't take into account that the two sides of the suspension are slightly offset from each other so the two sets of track won't be exactly alike.
The tracks went together well. They did require some cleanup. Given their size, I used a pair of hemostats to hold each link.

Tracks assembled and ready for paint. Lately I've been using Rustoleum rattle can dark gray auto primer for my base coats for tracks. It gives them a solid base coat and a textured appearance. I think it also holds weathering pigments alot better....but more on that later. The downside is it smells horrible and takes a couple of days to lose the odor.

Back "on target" with the gun. This isn't Tamiya's old 75mm Pak. Some of the parts are a bit fiddly to work with. Alot good bit of the gun mechanism will be covered by armor.


Tracks on and painted. I painted them red-brown, then drybrushed them german gray, then drybrushed them steel.

Mounted fenders and gun. I masked off the tracks and running gear with plastic wrap and started painting.


I made a big of a goof. I got on a roll and didn't take any pictures. I did a very basic weathering job...light wash with light drybrushing. I used the alternative unidentified unit decals from the kit. Tools were added. I heavily weathered it with sandy shaded dust pigments.
And here she is.


I'm calling this one done. It was joy to build. Tamiya's usual expectations were met. I didn't use the kit supplied figures. I do plan on using this vehicle as part of a future diorama.
The fighting compartment assembled and any pre-painting done.
Fighting compartment walls added to the vehicle. Fit was great.
A better view of the exhaust and what I assume is an air intake. I left off the exhaust pipes from the engine until after the vehicle is painted.
Also, time to get started on the gun.
Before I got on the gun I added "mud" and dirt to the lower hull and fender undersides. The mud was Elmer's Wood Glue. It's thicker than the white glue. I wasn't looking for a huge amount of build-up, just enough to be noticed. I used good ole Tamiya XF-52 Flat Earth for the paint.
I decided to go for the tracks as opposed to the gun. Tamiya goes with mostly indie track links, but offers a premolded run for the bottoms. Tamiya includes a pair of jigs for the top runs to simulate sag. Tamiya didn't take into account that the two sides of the suspension are slightly offset from each other so the two sets of track won't be exactly alike.
The tracks went together well. They did require some cleanup. Given their size, I used a pair of hemostats to hold each link.
Tracks assembled and ready for paint. Lately I've been using Rustoleum rattle can dark gray auto primer for my base coats for tracks. It gives them a solid base coat and a textured appearance. I think it also holds weathering pigments alot better....but more on that later. The downside is it smells horrible and takes a couple of days to lose the odor.
Back "on target" with the gun. This isn't Tamiya's old 75mm Pak. Some of the parts are a bit fiddly to work with. Alot good bit of the gun mechanism will be covered by armor.
Tracks on and painted. I painted them red-brown, then drybrushed them german gray, then drybrushed them steel.
Mounted fenders and gun. I masked off the tracks and running gear with plastic wrap and started painting.
I made a big of a goof. I got on a roll and didn't take any pictures. I did a very basic weathering job...light wash with light drybrushing. I used the alternative unidentified unit decals from the kit. Tools were added. I heavily weathered it with sandy shaded dust pigments.
And here she is.
I'm calling this one done. It was joy to build. Tamiya's usual expectations were met. I didn't use the kit supplied figures. I do plan on using this vehicle as part of a future diorama.

Hudson29

#460
Joined: September 16, 2014
KitMaker: 1,156 posts
Armorama: 1,024 posts
Posted: Tuesday, September 06, 2016 - 02:36 AM UTC
Antonio - What a great idea to convert the Blitz truck to peace time use just as many of the originals must have been. I have one of the ICM Renault trucks that has been tempting me the same way . . .
Hudson29
#460
Joined: September 16, 2014
KitMaker: 1,156 posts
Armorama: 1,024 posts
Posted: Tuesday, September 06, 2016 - 02:38 AM UTC
Alex - Your SU-76 came out very well. What a great idea to use Elmer's Wood Glue to make mud. I have plenty of that out in the shop. Have you tried getting texture in it after it is partly dry?
Bluestab
Joined: December 03, 2009
KitMaker: 2,160 posts
Armorama: 1,906 posts
Posted: Tuesday, September 06, 2016 - 06:45 AM UTC
Quoted Text
Alex - Your SU-76 came out very well. What a great idea to use Elmer's Wood Glue to make mud. I have plenty of that out in the shop. Have you tried getting texture in it after it is partly dry?
That's exactly what I did. I put a few dabs on the lower hull and as it set up I squished it around with my finger. The wood glue begins to set up really quick and it dries harder.

iflytb20

#501

Joined: August 25, 2009
KitMaker: 292 posts
Armorama: 91 posts

Posted: Wednesday, September 07, 2016 - 01:40 AM UTC
And i'm done


You can see the full build here
Thanks a ton for a great GB. I had lots of fun building my Tiger and learned a lot from all the talented members.
Cheers
You can see the full build here
Thanks a ton for a great GB. I had lots of fun building my Tiger and learned a lot from all the talented members.
Cheers

Hudson29
#460
Joined: September 16, 2014
KitMaker: 1,156 posts
Armorama: 1,024 posts
Posted: Wednesday, September 07, 2016 - 02:45 AM UTC
Alex - A simple and effective way to muddy up a hull. I'll give it a try.
Raj - I love the colors on your Tiger. Where would it have served with that paint?
I have made more progress on the Churchill. This is such an odd looking and interesting tank that I feel it worth spend extra time with it. Here are a couple of progress shots:
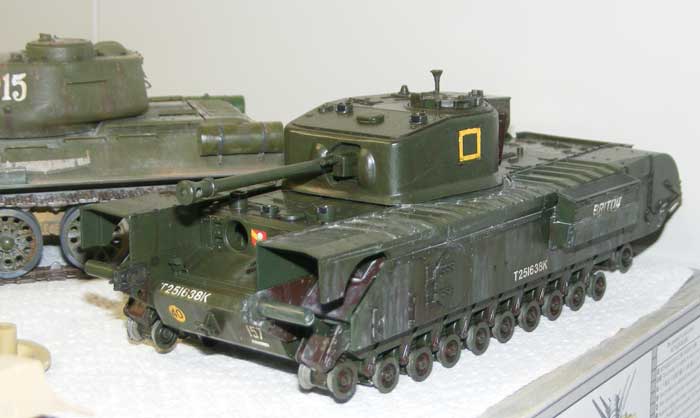
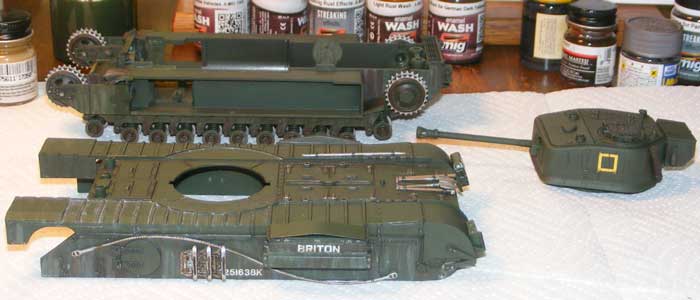
This one is getting close to being ready for pigments.
Raj - I love the colors on your Tiger. Where would it have served with that paint?
I have made more progress on the Churchill. This is such an odd looking and interesting tank that I feel it worth spend extra time with it. Here are a couple of progress shots:
This one is getting close to being ready for pigments.
SGTJKJ
#041
Joined: July 20, 2006
KitMaker: 10,069 posts
Armorama: 4,677 posts
Posted: Wednesday, September 07, 2016 - 11:28 AM UTC
Raj, beautiful job on the Tiger. Looks very nice.
Paul, I believe it is an Eastern front Tiger. I cannot remember the name of the abteilung, but remember seeing pictures of this Tiger and believe it was the Eastern front.
Paul, very nice progress on the Churchill. Indeed it is an interesting looking tank.
Paul, I believe it is an Eastern front Tiger. I cannot remember the name of the abteilung, but remember seeing pictures of this Tiger and believe it was the Eastern front.
Paul, very nice progress on the Churchill. Indeed it is an interesting looking tank.

Thirian24
Joined: September 30, 2015
KitMaker: 2,493 posts
Armorama: 2,344 posts
Posted: Thursday, September 08, 2016 - 12:13 AM UTC
Raj great work!

RadekZ
Joined: March 12, 2013
KitMaker: 125 posts
Armorama: 36 posts
Posted: Friday, September 09, 2016 - 01:42 AM UTC
Hi guys,
a lot of fantastic kits already finished in campaign. Congrats to all who already finished and it's great to see your amazing skills in action!
Now it's time to move the Mazda a little forward. Hard subject to me as cars are furthermost from my comfy zone.
I've started from where I failed in my first attempts - painting the colour on the body.
Generally I started with spraying the Surfacer 1000 from airbrush as the primer.
After letting it dry for few days I sanded it a little bit with 3600 & 6000 grit sandpaper.
Finally I applied the [X-6]Lemon Yellow in like trillions of light coats
Now it's drying.
Next step is to sand delicately the surface with same grit papers to prepare surface for buffing with tamiya set of polishing compounds.
A kind request here for anyone experienced in polishing car models - what cloth should I use when polishing the model with mentioned paste(s)? Any reference (pics especially) will be greatly appreciated.
And some pics of current status (please let me know if they're visible as I'm using Google's services to share pics):

ShermiesRule
Joined: December 11, 2003
KitMaker: 5,409 posts
Armorama: 3,777 posts
Posted: Saturday, September 10, 2016 - 04:09 AM UTC
Here is my entry. More pics in the Campaign Gallery


Thirian24
Joined: September 30, 2015
KitMaker: 2,493 posts
Armorama: 2,344 posts
Posted: Saturday, September 10, 2016 - 08:29 AM UTC
That's real nice.
andromeda673
Joined: July 30, 2013
KitMaker: 584 posts
Armorama: 525 posts
Posted: Saturday, September 10, 2016 - 08:04 PM UTC
well made some more progress over the week, I'm headed back down today to redo the camo, and touch up some spots I'm just not happy with.
I did some re-painting today, and re-worked the came, I also finished up the machine gun for the turret, and once the final coats dry, I'll get the gloss coat down, then decal, then dull coat, then wash.
I haven't decided if I'm going to build a base for this one or not, but I'm leaning towards it.

To those that have already finished your builds I say CONGRATS AND CRACKING WORK!!!!!!
 |

WEB HOSTING BY


Copyright ©2021 Armorama and Kitmaker Network, a subsidiary of Silver Star Enterprises
All Rights Reserved. Please read our Conditions of Use and Privacy Policy.
All Rights Reserved. Please read our Conditions of Use and Privacy Policy.