

Hi Folks,
I have a few modelling projects on the go at the moment (Revell's 1/32 Spitfire MKII, Trumpeter's Sd.Kfz 7/1 Flakvierling 38 and now the 56th FG group build) but I wanted to take a stab at re-doing a Sherman V I did a few years back after my little cousin decided to take it off the credenza in my home office and play with it. Needless to say she innocently broke the tracks off, the bogies and turret hatches. I put it aside about a year ago and intended to fix it but had not gotten around to fixing the model. So, over the Christmas holidays I pulled it out and began a redux.
The nice thing about this makeover is I have improved my skill set since then and I am benefiting from all the new information that has become available on the net and through the publishing of the Son of Sherman book which I have.
I wanted to post some in progress pictures of the redux to give you folks a sense of where I am at. I will post a more complete list of the many changes I made with the model but essentially I made this Sherman more representative of a Canadian Sherman V that served in Italy around the time of the Battle of Ortona. It`s my 43` Sherman V so to speak. Major changes include removal of the stowage and tool boxes from the kit. These were more represenative of a North West European Canadian/British Sherman V. A complete re-finishing of the rear plate and addition of padded lift rings.
For markings the previous model represented a Calgary Regiment tank but this time I am marking it out as as an Ontario Regiment Tank because well I am from Ontario. Both Regiments were part of the 1st Canadian Armoured Brigade along with the three rivers regiment in Italy.
Constructive Feedback
For in-progress or completed build photos. Give and get contructive feedback!
For in-progress or completed build photos. Give and get contructive feedback!
Hosted by Darren Baker, Dave O'Meara
Sherman V (M4A4) Redux

Totalize

Joined: February 04, 2009
KitMaker: 743 posts
Armorama: 549 posts
Posted: Monday, January 18, 2016 - 01:33 AM UTC
Totalize
Joined: February 04, 2009
KitMaker: 743 posts
Armorama: 549 posts
Posted: Monday, January 18, 2016 - 01:36 AM UTC
Here's a pic of the original model. Still pretty happy with how the figures turned out.

This particular Sherman is being re-done as a 1943 Sherman V. My idea is to have it configured as one that was received by the 1st Canadian Armoured Brigade some time just before the battle of Ortona in October 1943. In order to do this I made the following changes.
1. Removed the Tool box and stowage bins. These were later add-ons for Normandy type Shermans.
2. Added padded lift rings using epoxy sculpt.
3. Removed all the bogies and re-positioned them to be more in line with the correct spacing for a Sherman V. I originally glued them on according to the instruction not knowing at the time that this 6000 series Dragon kit was incorrect (and Still is) in terms of hull length and so was the spacing on the bogies.
4.Re-did the Co-ax MG and added the bottom lip to the MG Shield which was not present on the resin part I used.
5. Re-did the back plate by adding bolts in their correct position and also added the mounts for the exhaust shield.
6. Added the track tool to the rear plate but also added the sledge as well. Sherman V's during this period shipped from Chrysler with the sledge on the rear decking but I moved it to the rear plate as I have seen a number of Canadian Shermans with the Sledge moved to this position. This was probably done so that they could stow more stuff on the rear deck and not have to remove everything to get at it.
7. Added the siren and wire to the front left fender. The siren is a 3D printed part.
8. Added some casting marks to the glacis and re-did the weld seams below and between the dirvers hoods.
9. Added welds to the front side of the tank where the glacis meets the hull.
10. Removed the periscope guards. These tanks didn't have them.
11. Removed the fire extinguishers on the rear hull area which are again more representative of a Normandy Sherman.
Speaking of glacis it does not fit perfectly with the final drive housing but I was not going to rip this apart and re-do it. I am going to leave it as is and add stowage to the area.
Totalize
Joined: February 04, 2009
KitMaker: 743 posts
Armorama: 549 posts
Posted: Monday, January 18, 2016 - 01:42 AM UTC
And here is the current effort.
Canadian Sherman V's in Italy usually had Large Squadron markings on their turrets with the troop number indicated inside the Squadron marking. There are no decals available AFAIK of these larger Squadron signs so I painted them on myself. The troop number is a decal. This tank is from B Squadron, 2nd troop or in American Nomenclature, B Company 2nd platoon. The Italian red/white theatre marking was also painted on myself with my airbrush. I used Tamiya Flat white and for the red I used Mr. Color Insignia Red.
The Regimental and brigade markings come from Decalomanics. I am not overly pleased with them as they have this white border along the top of the decals which is not appropriate and must be a flaw in the printing process. You can see the white in the pictues. I am hoping to paint these out as I go along.
Totalize
Joined: February 04, 2009
KitMaker: 743 posts
Armorama: 549 posts
Posted: Monday, January 18, 2016 - 02:17 AM UTC
Unit ID's fixed and camo net added to the rear deck.
You can see the fix on Co-ax gun shield in one of the below pictures.


You can see the fix on Co-ax gun shield in one of the below pictures.
Totalize
Joined: February 04, 2009
KitMaker: 743 posts
Armorama: 549 posts
Posted: Monday, January 18, 2016 - 02:19 AM UTC
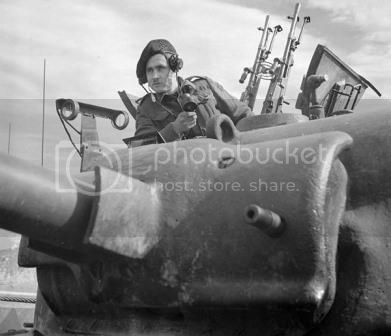
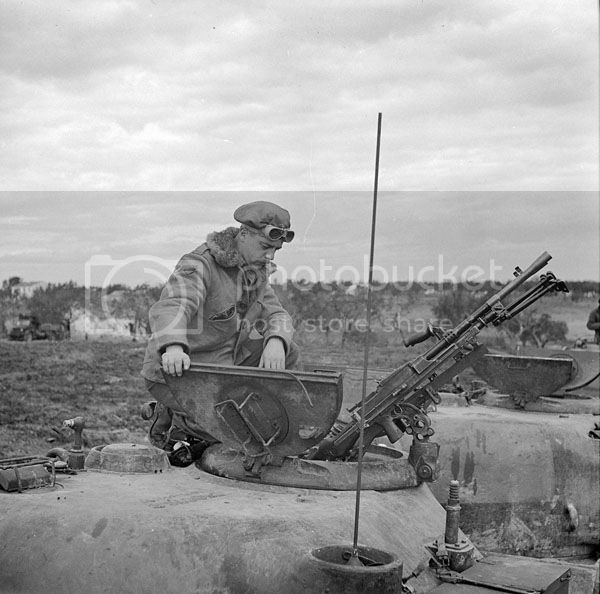
To make this model somewhat unique I decided to scratchbuild an AA mount using twin Bren guns. I used the below pics as a reference. The guns are resin, the bipod legs from a Tamiya set, the mount is from Academy's MG set, the Sight is from a PE German MG set and of course the rest is just plastic card. As you can see I built a bracket for the Sight to sit in then pin drilled a hole through them and added a retaining pin and chain. Once painted up this should add some nice visual interest to the model.

 [/URL]
[/URL]Totalize
Joined: February 04, 2009
KitMaker: 743 posts
Armorama: 549 posts
Posted: Monday, January 18, 2016 - 02:26 AM UTC
And the Brens painted up weathered and ready to be mounted.


Next I will add the smoke launchers to the right side of the turret.
Cheers for now.
David.
Next I will add the smoke launchers to the right side of the turret.
Cheers for now.
David.
Totalize
Joined: February 04, 2009
KitMaker: 743 posts
Armorama: 549 posts
Posted: Friday, February 12, 2016 - 09:23 PM UTC
Just in case any of you are following this redux, I did some further work on my Sherman V.
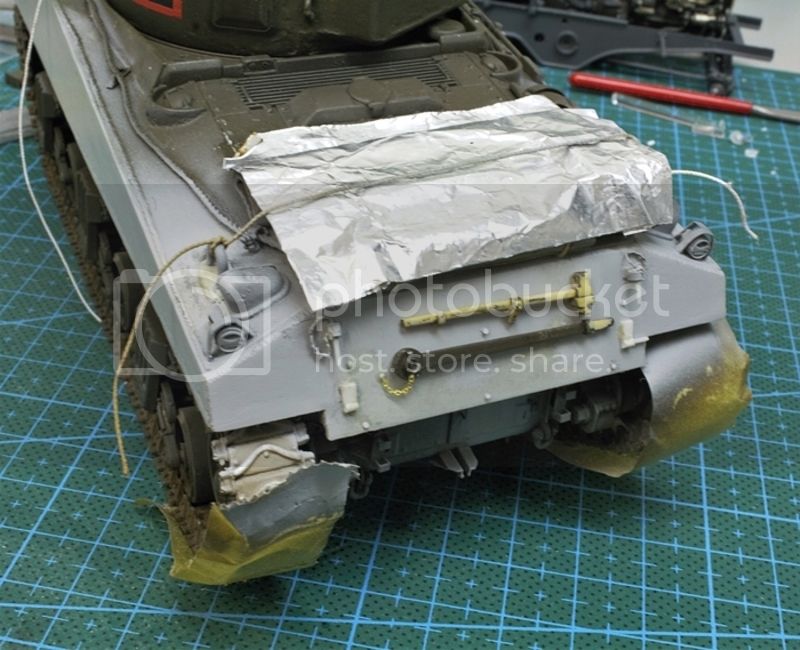
Did some recent work on the Sherman V. I completed the smoke launchers using a set from my Tasca Sherman V kit and some brass wire. I also added the serial numbers and tonnage indicator on the front hull. The serial number puts this tank in a group of 1943 Sherman V builds by Chrysler that were sent to the Canadians in Italy. Finally, I re-painted some of the stowage that was on the original model and added a water can as well. BTW the last picture shows the lip I added to the co-ax gun shield with some plastic card. Next up will be some weathering.


Did some recent work on the Sherman V. I completed the smoke launchers using a set from my Tasca Sherman V kit and some brass wire. I also added the serial numbers and tonnage indicator on the front hull. The serial number puts this tank in a group of 1943 Sherman V builds by Chrysler that were sent to the Canadians in Italy. Finally, I re-painted some of the stowage that was on the original model and added a water can as well. BTW the last picture shows the lip I added to the co-ax gun shield with some plastic card. Next up will be some weathering.
Totalize
Joined: February 04, 2009
KitMaker: 743 posts
Armorama: 549 posts
Posted: Friday, February 12, 2016 - 09:36 PM UTC
So, physical changes to date for a 1943 Sherman V in Italy.
1. Removed tool box and storage bins on turret and hull.
2. Added rivets and exhaust deflector hookups on rear plate.
3. Added tools to the rear plate including sledge hammer which was normally added to the rear deck in production but the Canadians often moved this to a better spot on the rear plate.
4. Removed all periscope guards on the tank. These tanks didn't have em.
5. Re-positioned the bogies by spacing them out more accurately.
6. Removed the sands shield strips.
7. Added lip to bottom of co-ax MG shield.
8. Re-did weld lines on glacis, added casting marks.
9. Added siren to the front left fender with wire connection.
10. Removed antenna frame (and antenna which I will add back) for antenna on rear turret bustle area. This was a later feature
11. Added pads the hull lift rings.
12. Added weld seams to front sides of hull where the glacis meets the hull.
13. Added PE Chain to search light cap.
More to come...

210cav

Joined: February 05, 2002
KitMaker: 6,149 posts
Armorama: 4,573 posts
Posted: Saturday, February 13, 2016 - 02:49 AM UTC
Dave-- impressive! Superb job and description
Very well done
DJ
Very well done
DJ

easyco69
Joined: November 03, 2012
KitMaker: 2,275 posts
Armorama: 2,233 posts
Posted: Saturday, February 13, 2016 - 05:19 AM UTC
very nice work.

sounder
Joined: May 30, 2005
KitMaker: 92 posts
Armorama: 36 posts
Posted: Sunday, February 14, 2016 - 02:33 AM UTC
looks really good love the scratch bren aa unit
Totalize
Joined: February 04, 2009
KitMaker: 743 posts
Armorama: 549 posts
Posted: Sunday, February 14, 2016 - 11:02 PM UTC
Thanks Guys,
I have a base for this one too. I completed it a few years ago but i never took any pics of my armour subjects on this base. I will post some pics soon.
David.
I have a base for this one too. I completed it a few years ago but i never took any pics of my armour subjects on this base. I will post some pics soon.
David.
Totalize
Joined: February 04, 2009
KitMaker: 743 posts
Armorama: 549 posts
Posted: Friday, March 11, 2016 - 11:12 PM UTC
Okay. I haven't been on the bench for the last few weeks but trying to get some bench time in this weekend.
Here's a shot of My Sherman V with the turret hatches added back in, the Brens mounted and the Crew commander in place. I still have to finish off the sighting parts on the turret. As you can see I added a piece of lead foil taken from a wine bottle to the sighting vane which broke off during the redux work.

Here's a shot of My Sherman V with the turret hatches added back in, the Brens mounted and the Crew commander in place. I still have to finish off the sighting parts on the turret. As you can see I added a piece of lead foil taken from a wine bottle to the sighting vane which broke off during the redux work.
Armorsmith
Joined: April 09, 2015
KitMaker: 1,063 posts
Armorama: 1,000 posts
Posted: Friday, March 11, 2016 - 11:43 PM UTC
Yet another example how careful painting and other techniques can make an older vintage kit shine. Anxious for the next update. To what extent, if any, do you plan to weather your Sherman?
Totalize
Joined: February 04, 2009
KitMaker: 743 posts
Armorama: 549 posts
Posted: Saturday, March 12, 2016 - 06:55 PM UTC
Sherman's in Italy I think tended to be more dusty than muddy so I am thinking I will go this route. Any suggestions?

ColinEdm

Joined: October 15, 2013
KitMaker: 1,355 posts
Armorama: 1,229 posts
Posted: Saturday, March 12, 2016 - 07:39 PM UTC
Dave, absolutely beautiful work, I think you should consider a photo feature for that one when it is complete.
Armorsmith
Joined: April 09, 2015
KitMaker: 1,063 posts
Armorama: 1,000 posts
Posted: Saturday, March 12, 2016 - 08:27 PM UTC
Quoted Text
Sherman's in Italy I think tended to be more dusty than muddy so I am thinking I will go this route. Any suggestions?
I like Tamiya buff or deck tan for dust. I use my airbrush and mist it on using a heavily thinned mixture building it up slowly. Heavier along the running gear and lower hull of course. This is sometimes supplemented with pastels/pigments in the same regions to a add a bit of texture, especially on the bogies and running gear. Hope this helps. Good luck.
Totalize
Joined: February 04, 2009
KitMaker: 743 posts
Armorama: 549 posts
Posted: Friday, April 29, 2016 - 05:55 AM UTC
Quoted Text
Dave, absolutely beautiful work, I think you should consider a photo feature for that one when it is complete.
Hi Colin,
My apologies, have not been around for a while but hope to get back at it soon.
Regarding the photo feature, Sure thing. I will plan to do this. I have a base that I want to add to the model. Nothing special but might add some visual interest to the build.
Totalize
Joined: February 04, 2009
KitMaker: 743 posts
Armorama: 549 posts
Posted: Friday, April 29, 2016 - 05:57 AM UTC
Quoted Text
Quoted TextSherman's in Italy I think tended to be more dusty than muddy so I am thinking I will go this route. Any suggestions?
I like Tamiya buff or deck tan for dust. I use my airbrush and mist it on using a heavily thinned mixture building it up slowly. Heavier along the running gear and lower hull of course. This is sometimes supplemented with pastels/pigments in the same regions to a add a bit of texture, especially on the bogies and running gear. Hope this helps. Good luck.
Great suggestions. I believe I used some of these techniques on the first go around but not the pigments. Have to look at this approach.
Thanks for the input!
David.

PzDave
Joined: November 28, 2012
KitMaker: 319 posts
Armorama: 285 posts
Posted: Friday, April 29, 2016 - 06:13 AM UTC
Is your cousin still alive?
Totalize
Joined: February 04, 2009
KitMaker: 743 posts
Armorama: 549 posts
Posted: Friday, April 29, 2016 - 07:58 PM UTC
Quoted Text
Is your cousin still alive?
???????

PanzerEd

Joined: January 14, 2006
KitMaker: 432 posts
Armorama: 402 posts

Posted: Saturday, August 20, 2016 - 12:22 PM UTC
Fantastic looking Sherman there buddy.
I've got one in the stash too so you've set a high benchmark for me
I've got one in the stash too so you've set a high benchmark for me
 |

WEB HOSTING BY


Copyright ©2021 Armorama and Kitmaker Network, a subsidiary of Silver Star Enterprises
All Rights Reserved. Please read our Conditions of Use and Privacy Policy.
All Rights Reserved. Please read our Conditions of Use and Privacy Policy.