

The BMP I will be building had an unditching log fitted during it's combat ops in Chechnya. I can't find any pics that show how the log was secured to the aft deck. Does anyone have any info they could share?
Thanks in advance guys!
Яusso-Soviэt Forum: Cold War Soviet Armor
For discussions related to cold war era Russo-Soviet armor.
For discussions related to cold war era Russo-Soviet armor.
Hosted by Jacques Duquette
Trumpy BMP-1

exgrunt

Joined: December 17, 2013
KitMaker: 301 posts
Armorama: 301 posts
Posted: Monday, June 20, 2016 - 04:52 AM UTC

MLD
Joined: July 21, 2002
KitMaker: 3,569 posts
Armorama: 2,070 posts
Posted: Monday, June 20, 2016 - 05:07 AM UTC
Quoted Text
The BMP I will be building had an unditching log fitted during it's combat ops in Chechnya. I can't find any pics that show how the log was secured to the aft deck. Does anyone have any info they could share?
Thanks in advance guys!
Go take a look at http://www.eduard.com/store/out/media/35560.pdf
It is the instructions for the Eduard set for the BMP 2 but I think the mounting pieces are the same for the 1 and -2
Parts #51 and #5's at the bottom of page 1
Let me see what I can dig up in the photo archives.
Batpatchedscout

Joined: April 02, 2015
KitMaker: 32 posts
Armorama: 32 posts
Posted: Monday, June 20, 2016 - 12:44 PM UTC
I hope that this scheme and the picture tell the story... 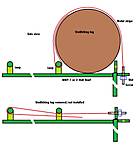

seanmcandrews
Joined: May 09, 2009
KitMaker: 561 posts
Armorama: 553 posts
Posted: Monday, June 20, 2016 - 06:28 PM UTC
Zdenek,
very nice diagram, thanks for that.
Sean
very nice diagram, thanks for that.
Sean
exgrunt
Joined: December 17, 2013
KitMaker: 301 posts
Armorama: 301 posts
Posted: Tuesday, June 21, 2016 - 06:29 AM UTC
Thanks guys, that was exactly what I needed.
John
John
exgrunt
Joined: December 17, 2013
KitMaker: 301 posts
Armorama: 301 posts
Posted: Friday, June 24, 2016 - 09:15 PM UTC
Have a bit of progress to share - I started looking at pics of the aft deck of the BMP and noted that there are a good many details that Trumpeter missed. Here is what I added:
- Tubular receptacle, clamp w/ wingnut and backing plate for a pry-bar, all on the left side roof, outboard of the troop hatches. The receptacle was simply a piece of plastic rod, cut to size and then hollowed out on one end with the point of an x-acto knife. I'm not sure about the size of this, might be a bit over-scale, if so, I'll correct it down the road. The rest of the bits were just scrap PE and some plastic rod for the hinge and wingnut.
- On either side of the deck, there is a flat clamp and brackets for the towing cables. The clamp was made from a tiny piece of scrap PE (I added a very slight "v" shape to it), with various diameters of sprue / plastic rod for the nut and bolt assembly. The brackets were just scrape PE, folded to shape and glued. In looking at the pics, I might replace one of these.
Also added a very small plug that goes directly in front of the antenna base.
Still have more to do in this area. Also, I plan to leave off the prybar, shovel and cables. Three reasons - The parts don't come with the kit (another miss by Trumpeter), I don't feel like scratchbuilding them and my BMP is going to be a combat vet and in combat, troops have a habit of stealing anything off another vehicle that isn't locked down. So all my brackets will remain empty. Some pics.


Also took a shot of the inside of the headlight assembly so you can see some of the details I added:

Lastly, I fabricated an unditching beam from a new substance I just read about, called wood. I'm pretty happy with the results, just need to do a bit of sanding. Not sure if I'll leave it as is or try to darken it further. Need to check out some pics of the real thing.

Sorry again for the crappy pictures but I hope this build at least serves as a guide for other folks who are interested in super-detailing this kit.
Regards,
John
exgrunt
Joined: December 17, 2013
KitMaker: 301 posts
Armorama: 301 posts
Posted: Friday, July 08, 2016 - 05:15 AM UTC
The hull and turret are 95% complete, just need to add the clear parts and some small bits. Will add the turret mounted AT-5 anti-tank missile (also a nice bit of resin from SP) and the unditching beam at the end.
I've got the basic paint work on her. I think I'm going for one of the plain green vehicles shown on the Archer sheet. Not sure which one yet but there's something attractive about good old Soviet armor green.
I started out with a base coat of dark green (I actually used Testor's RLM82). Over that, I laid down a pretty heavy overcoat of the base paint, with approx 30% OD green. Lastly, I added more OD green, some Sky Type S and thinned it a bit heavier than normal. I then highlighted the various surfaces. Note that I don't believe in using any one color from the bottle. The real thing is pretty variable depending on weathering, etc. The BMP's I've seen pictures of from that unit seemed to be pretty faded, possibly sitting in an open motor pool for a few years until called up for duty in Chechnya?
I'll fade things out further when I begin the weathering phase. Note that I've never had much luck coming up with a realistic overall green finish, so any tips or feedback is most welcome.
Some pics:


easyco69

Joined: November 03, 2012
KitMaker: 2,275 posts
Armorama: 2,233 posts
Posted: Friday, July 08, 2016 - 06:42 AM UTC
I don't know about it being superior..I think I would have to see it with my own eyes.(the turret)
Looks good all painted up though..kewl.
Looks good all painted up though..kewl.
pgb3476
Joined: March 11, 2007
KitMaker: 977 posts
Armorama: 976 posts

Posted: Friday, July 08, 2016 - 07:47 AM UTC
Color looks spot on to me.
exgrunt
Joined: December 17, 2013
KitMaker: 301 posts
Armorama: 301 posts
Posted: Saturday, July 09, 2016 - 04:50 AM UTC
Quoted Text
I don't know about it being superior..I think I would have to see it with my own eyes.(the turret).
You would have to see it up close (and not through my crappy pics). It does represent an improvement over the kit part. Plus, in my case, I had no choice, I purchased the early version BMP-1 model and the only way I was going to end up with the anti-radiation cladding and smoke grenade launchers was to either purchase a new kit or go with the SP resin turret. Honestly, given the low cost and the other bits you get in the package, it's hard to go wrong with SP. Also, for those building a standard turret (not one with anti-radiation panels), SP is the only one that correctly represents the overlapping side panels.
Regards,
John
Jacques
Joined: March 04, 2003
KitMaker: 4,630 posts
Armorama: 4,498 posts

Posted: Saturday, July 09, 2016 - 09:31 PM UTC
The other part that makes the SP Designs parts better is that the Trumpeter turret with the cladding is too...uniform. The real cladding is rougher in appearance and in outlines. But, it is only SUPERIOR if you care about such things. Not everyone needs rough looking cladding to be happy with their model. 


JimboHUN

Joined: May 07, 2009
KitMaker: 461 posts
Armorama: 443 posts

Posted: Saturday, July 09, 2016 - 09:51 PM UTC
Great job John, I think I will order one of these sets as well.
Don't you want to add the periscopes before the rest of the paintjob? I think you will need a slight filling/sanding with those...? If I remember well, I do not have the kit at hand right now.
Cheers,
Adam
Don't you want to add the periscopes before the rest of the paintjob? I think you will need a slight filling/sanding with those...? If I remember well, I do not have the kit at hand right now.
Cheers,
Adam
exgrunt
Joined: December 17, 2013
KitMaker: 301 posts
Armorama: 301 posts
Posted: Saturday, July 09, 2016 - 10:01 PM UTC
Quoted Text
Great job John, I think I will order one of these sets as well.
Don't you want to add the periscopes before the rest of the paintjob? I think you will need a slight filling/sanding with those...? If I remember well, I do not have the kit at hand right now.
Cheers,
Adam
Hi Adam,
I didn't want to go to the trouble of masking all those clear parts prior to painting. I figured once I'm done with the basic paintwork (pretty much right now), I'll add them. I'll have to handpaint the covers, etc but I don't think it will be that time consuming. Plus I'm just looking for small things to work on before I have to suck it up and deal with my least favorite part of AFB building - the assembly and painting of the tracks.
exgrunt
Joined: December 17, 2013
KitMaker: 301 posts
Armorama: 301 posts
Posted: Saturday, July 09, 2016 - 10:09 PM UTC
Markings are applied. I hit the general area with a couple of coats of future to get them nice and glossy. Then applied the Echelon decals.
Nice decals and a good choice of subjects but I've already had one decal fall off. I brushed on a layer of future and put it back in place. Fingers crossed that it stays put. Anyone else ever have problems with Echelon decals?
Once everything was dry, I sealed the decals with a light coat of future and once that dried, I overcoated the glossy areas with Testor's lacquer flat.


All the BMP's from this unit (101st BN of the MVD) seem to have been drawn from other units and hastily painted with unit ID numbers prior to going into combat, hence the somewhat rough applications. In one case, the crews just painted on the new number over an older, faded unit number. The MVD markings are a bit bright but they'll look great under some weathering, plus I kind of like a bit of color compared to the usual overall green and a 3-digit number.
exgrunt
Joined: December 17, 2013
KitMaker: 301 posts
Armorama: 301 posts
Posted: Tuesday, July 12, 2016 - 04:59 AM UTC
Did a bit of paintwork. Painted the smoke grenade launcher covers a greyish black, rust for the screened section of the engine air intake behind the turret (another very nice SP resin part), lightly airbrushed on some dust on the upper surfaces and lower hull, lastly added some fuel spills using thinned brown/black paint around the roof top fuel cap. Next step is to add the periscopes, do some additional detail painting and start the wheels and tracks.


exgrunt
Joined: December 17, 2013
KitMaker: 301 posts
Armorama: 301 posts
Posted: Tuesday, July 19, 2016 - 05:53 PM UTC
I've heard that the running gear and tracks on this kit are a bit problematic. Anyone have any specifics on what the issues are and/or hints on how to make the construction go smoothly?
For that matter, anyone know how many track links go on each side? The directions don't provide this info.
Thanks!
John
For that matter, anyone know how many track links go on each side? The directions don't provide this info.
Thanks!
John
pgb3476
Joined: March 11, 2007
KitMaker: 977 posts
Armorama: 976 posts
Posted: Tuesday, July 19, 2016 - 06:53 PM UTC
The tracks did fight me some on my kit.
Batpatchedscout
Joined: April 02, 2015
KitMaker: 32 posts
Armorama: 32 posts
Posted: Tuesday, July 19, 2016 - 09:20 PM UTC
I have to say you can encounter two problems during final assembly of running gear and tracks.
Roadwheels are pretty tight on the swinging arm pins so they are hard to turn and to align - I suggest to make the holes in them a bit wider and use "rulers" (I always enjoy borrowing my son's Lego bricks) to align them and make both sides parallel...
It might happen you will have to apply some gentle force to move swinging arms with wheels to align them... Be very careful, those swinging arms are bl..dy brittle and they tend to break...
Original plastic tracks are pretty loose when clicked together and they tend to disconnect at every attempt to stretch them around drive and idler wheels.
I made solving that problem pretty easy and replaced them with metal indy link tracks made by Masterclub. They are easy to assemble and nice drive wheels are part of the set.
That brown plastic tracks will need some liquid glue to secure straight runs together and only links of those segments to be bent around idler and drive wheels should be kept movable till the certain moment.
I suggest to make final assembly connection on the drive wheels, that will be well hidden behind the side skirts.
Another way is to keep tensioners movable and glue them at the moment when proper tesion of tracks has been reached..., but I can see this advice coming too late for you... Soory.
Keep in mind the sag of tracks is given as 3-5 mm on real vehicle so this must be invisible in 1:35...
The number of links in the track of real vehicle is 84 or 85 as far as I can remember. Keep in mind that orientation of tracks is given as "V teeth of tracklink down when observed from front"...
John, there seems to be one detail missing on the left of the commander's cupola - there should be small plate of armour welded to cover drainage of ballrace of commander's cupola and I hope it's not too late to add that.
HTH
exgrunt
Joined: December 17, 2013
KitMaker: 301 posts
Armorama: 301 posts
Posted: Thursday, July 21, 2016 - 07:44 AM UTC
Quoted Text
John, there seems to be one detail missing on the left of the commander's cupola - there should be small plate of armour welded to cover drainage of ballrace of commander's cupola and I hope it's not too late to add that.
HTH
Thanks for the good info on the running gear and tracks. Thanks also for the catch on that armor plate. I had no idea what it was and thought it might be only present on some BMP's but after looking at my references, it does appear to be a regular fixture on all of these vehicles. I'll add it from scrap plastic card. Won't be that big of a deal. Thanks again for catching that.
John
exgrunt
Joined: December 17, 2013
KitMaker: 301 posts
Armorama: 301 posts
Posted: Sunday, September 04, 2016 - 09:36 PM UTC
Haven't made much progress this summer. Now that it's almost over, I got a bit done today. Added the small bit of armor plate on the side the commander's cupola as noted above (thanks for the catch), also added the folding armor glass cover of the gunner's primary sight. On the real thing, it's a hinged section of relatively poor quality armor glass. When in place, it restricts the optical clarity of the sight so therefore, it's hinged so when not needed, it can be folded up and out of the way. For some bizarre reason, Trumpeter decided to replicate this part from regular grey plastic instead of making it clear.
I ended up carving out the piece and replaced it with a bit of clear plastic. Did the basic paintwork but still will be returning to touch it up a bit.
That's it for now, hope to make some real progress this fall and finally get this thing finished.
Regards!

I ended up carving out the piece and replaced it with a bit of clear plastic. Did the basic paintwork but still will be returning to touch it up a bit.
That's it for now, hope to make some real progress this fall and finally get this thing finished.
Regards!


Lonewolf7usa
Joined: March 24, 2009
KitMaker: 312 posts
Armorama: 296 posts

Posted: Sunday, September 11, 2016 - 04:50 PM UTC
Nice paint job! I have had no problems with trumpeter track but I'm not sure about this kit. The BMP 3 kit tracks went together smoothly. By the way, great work with the scratch built bits.
exgrunt
Joined: December 17, 2013
KitMaker: 301 posts
Armorama: 301 posts
Posted: Sunday, December 04, 2016 - 02:56 AM UTC
Finally got the tracks done. Took forever because I just don't have the motivation to deal with all those parts. That being said, the tracks are really nice, they click together and are a real improvement over rubber band type tracks.
Also added some additional parts and updated the weathering.


SP Designs AT-5 (a very nice resin upgrade)

Also added some additional parts and updated the weathering.


SP Designs AT-5 (a very nice resin upgrade)

mariointer

Joined: April 01, 2012
KitMaker: 65 posts
Armorama: 57 posts
Posted: Monday, December 05, 2016 - 03:42 AM UTC
Hi John, many congratulations for your work...its fine indeed to see your working progress....i like so much too, becouse i want buy one bmp1 to will use with the new PARACEL model tank riders of arab syryan war, and read same where that this tank could be perfect for the use i need...then i love so much the SP DESIGN kit that you used, the turret in particular ad i ll use it for sure too.....!!! A question: the metal barrel of which firm is? And at the end, which type of truck you mounted? The original trumpeter???'
Congratulations again.
Mario from Italy.
Congratulations again.
Mario from Italy.

acebatau
Joined: February 10, 2008
KitMaker: 730 posts
Armorama: 616 posts
Posted: Monday, December 05, 2016 - 06:07 AM UTC
Nice built, love it, may be someday I'll get my hands on my BMP-1
exgrunt
Joined: December 17, 2013
KitMaker: 301 posts
Armorama: 301 posts
Posted: Monday, December 05, 2016 - 08:07 PM UTC
Thanks guys!
Mario - The steel barrel is the kit piece. It's quite nice. Same with the tracks, they come with the kit. They are very well detailed and click together. I didn't use glue until I had them on the wheels, they ran a light amount of liquid glue on the inner edges to help secure them from rough handling. For some reason, Trumpeter decided not to include these with the BMP-2 kit.
Mario - The steel barrel is the kit piece. It's quite nice. Same with the tracks, they come with the kit. They are very well detailed and click together. I didn't use glue until I had them on the wheels, they ran a light amount of liquid glue on the inner edges to help secure them from rough handling. For some reason, Trumpeter decided not to include these with the BMP-2 kit.
 |

WEB HOSTING BY


Copyright ©2021 Armorama and Kitmaker Network, a subsidiary of Silver Star Enterprises
All Rights Reserved. Please read our Conditions of Use and Privacy Policy.
All Rights Reserved. Please read our Conditions of Use and Privacy Policy.