North Carolina, United States
Joined: September 16, 2004
KitMaker: 1,281 posts
Armorama: 1,222 posts
Posted: Saturday, September 09, 2017 - 09:38 PM UTC
Quoted Text
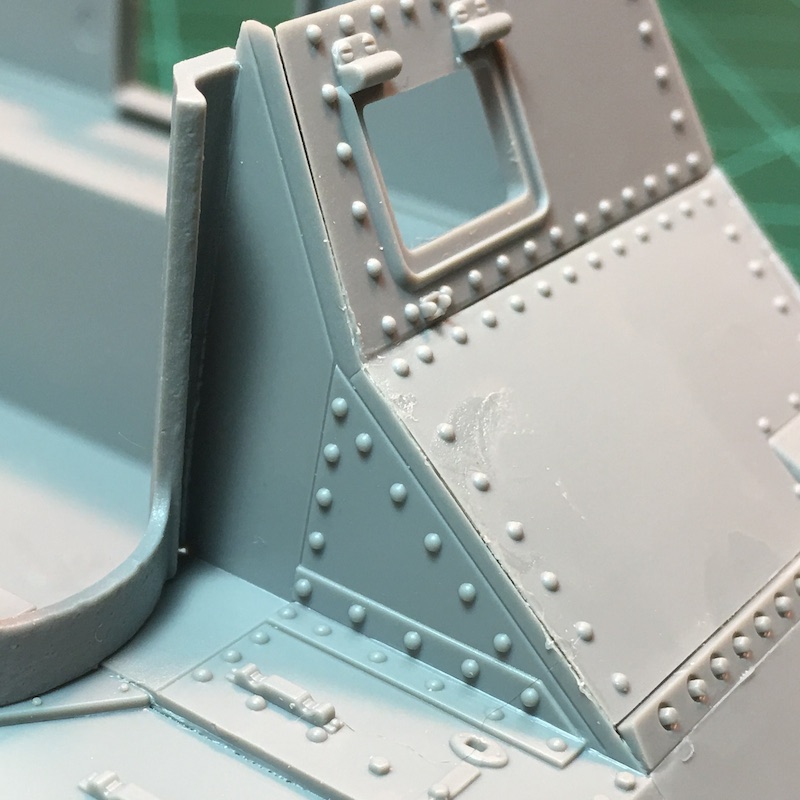
Some very poor engineering by Takom in how parts build-up in glacis and upper hull...
Why beveled edges on flat plates that in reality simply lie against with each other in a natural panel line?
Why creating seams and fit problems, when copying the real arrangement would work perfectly?
Like shown in this pic from Chris:

The minor gaps are my doing and not taking the time to adequately clean the joins. The AMPS site on facebook posted a build of this kit today and the joins are flawless.
As for me I have to go a different route....


think I got them all. Will check again after hitting it with a primer coat

North Carolina, United States
Joined: September 16, 2004
KitMaker: 1,281 posts
Armorama: 1,222 posts
Posted: Saturday, September 09, 2017 - 09:43 PM UTC
and few more pics
the mufflers

the rear extension, engine access door and other detail parts

remaining parts added to the three part FDA

Spain / España
Joined: February 29, 2016
KitMaker: 189 posts
Armorama: 186 posts
Posted: Saturday, September 09, 2017 - 11:21 PM UTC
Nice Chris you filed the gaps, great.
But it's not your fault, they shouldn't be there in first place. Better engineering from Takom (and other companies) should have avoided these.
Old school modelling (real modelling, in fact), of course can and will handle all these issues. But with all that hype on sliding moulds, 3D tech, supermegadetail and all and all, model companies should squeeze their brains just a bit more to give a real quality product, specially so when the solution lies in the real thing!
www.dieselwerk.blogspot.com
North Carolina, United States
Joined: September 16, 2004
KitMaker: 1,281 posts
Armorama: 1,222 posts
Posted: Sunday, September 10, 2017 - 12:31 AM UTC

just looked at the final pic and see I missed another gap. The camera closeup is a cruel mistress. Time to break out the Perfect Putty.

#521
Kentucky, United States
Joined: April 13, 2011
KitMaker: 9,465 posts
Armorama: 8,695 posts
Posted: Sunday, September 10, 2017 - 12:52 AM UTC
Dan, absolutely outstanding reference on the Delaware VFW photos. Wow!
Oklahoma, United States
Joined: February 11, 2013
KitMaker: 294 posts
Armorama: 196 posts
Posted: Sunday, September 10, 2017 - 01:03 AM UTC
I have been thinking about building a Lee/Grant for a bit now. Your build is really inspiring me. I'll be following this and might have to even pick one up myself.

On the bench:
The Night Shift Campaign: GWH P-61 "The Last Shoot Down". 1/48
Spanish Civil War Campaign: Dragon Pz I Ausf B 1/35
Revell B-17 1/48 with lots of add ons.
Complete rehab and repaint of Dragon Pz III J. 1/35
North Carolina, United States
Joined: September 16, 2004
KitMaker: 1,281 posts
Armorama: 1,222 posts
Posted: Sunday, September 10, 2017 - 02:06 AM UTC
Quoted Text
Dan, absolutely outstanding reference on the Delaware VFW photos. Wow!
Ditto that!!! Wish we had something that well preserved near us. Thanks for sharing those.
Ontario, Canada
Joined: November 03, 2012
KitMaker: 2,275 posts
Armorama: 2,233 posts
Posted: Sunday, September 10, 2017 - 05:28 AM UTC
Oklahoma, United States
Joined: November 08, 2006
KitMaker: 217 posts
Armorama: 117 posts
Posted: Sunday, September 10, 2017 - 08:14 AM UTC
I love that putty. You can clean it up with a Q-tip and water.
North Carolina, United States
Joined: September 16, 2004
KitMaker: 1,281 posts
Armorama: 1,222 posts
Posted: Sunday, September 10, 2017 - 09:06 AM UTC
Queensland, Australia
Joined: August 06, 2005
KitMaker: 3,353 posts
Armorama: 3,121 posts
Posted: Sunday, September 10, 2017 - 01:59 PM UTC
Looking good Chris.
Just one thing, and I am not sure if it is just the close up pic or an effect of the resizing program or not, but it looks like the front of the cupola has some flash on the front and the circumference:

On the Bench:
Dust, styrene scraps, paint splotches and tears.
North Carolina, United States
Joined: September 16, 2004
KitMaker: 1,281 posts
Armorama: 1,222 posts
Posted: Sunday, September 10, 2017 - 10:11 PM UTC
Quoted Text
Looking good Chris.
Just one thing, and I am not sure if it is just the close up pic or an effect of the resizing program or not, but it looks like the front of the cupola has some flash on the front and the circumference:

Thanks for catching that. Somewhat better now.

Queensland, Australia
Joined: August 06, 2005
KitMaker: 3,353 posts
Armorama: 3,121 posts
Posted: Monday, September 11, 2017 - 12:07 AM UTC
Cool. Glad you could fix it before it was primed. I usually find my misses after primer AND base coat.

On the Bench:
Dust, styrene scraps, paint splotches and tears.
Auckland, New Zealand
Joined: February 03, 2014
KitMaker: 1,042 posts
Armorama: 871 posts
Posted: Monday, September 11, 2017 - 12:57 AM UTC
Don't forget the mould seam around the pistol port too.
Gary
North Carolina, United States
Joined: September 16, 2004
KitMaker: 1,281 posts
Armorama: 1,222 posts
Posted: Monday, September 11, 2017 - 02:02 AM UTC
Quoted Text
Don't forget the mould seam around the pistol port too.
Gary
I have to keep referring back to the photographs because to the naked eye it doesn't show. Give it a quick swipe with some sand paper and see what happens.
New Jersey, United States
Joined: March 15, 2002
KitMaker: 1,745 posts
Armorama: 1,483 posts
Posted: Monday, September 11, 2017 - 06:03 PM UTC
Quoted Text
Some very poor engineering by Takom in how parts build-up in glacis and upper hull...
Why beveled edges on flat plates that in reality simply lie against with each other in a natural panel line?
Why creating seams and fit problems, when copying the real arrangement would work perfectly?
Like shown in this pic from Chris:

This is partly due to the slight toe down that the sponson sides of the hull have. You can see it here:

Look at the mating line on the rear hull plate with sponson sides...there is a gap
I'm working on two of these kits and the fit isn't that bad. I bent the second kit's sponson up to see if that helps when I start building that.
North Carolina, United States
Joined: September 16, 2004
KitMaker: 1,281 posts
Armorama: 1,222 posts
Posted: Monday, September 11, 2017 - 09:58 PM UTC
Quoted Text
Quoted Text
Some very poor engineering by Takom in how parts build-up in glacis and upper hull...
Why beveled edges on flat plates that in reality simply lie against with each other in a natural panel line?
Why creating seams and fit problems, when copying the real arrangement would work perfectly?
Like shown in this pic from Chris:

This is partly due to the slight toe down that the sponson sides of the hull have. You can see it here:

Look at the mating line on the rear hull plate with sponson sides...there is a gap
I'm working on two of these kits and the fit isn't that bad. I bent the second kit's sponson up to see if that helps when I start building that.
I'll pay closer attention to that when I start my Grant and see if that improves the overall fit - not that the fit is horrible - just could be a bit better.
New Jersey, United States
Joined: March 15, 2002
KitMaker: 1,745 posts
Armorama: 1,483 posts
Posted: Monday, September 11, 2017 - 11:34 PM UTC
Quoted Text
Quoted Text
Quoted Text
Some very poor engineering by Takom in how parts build-up in glacis and upper hull...
Why beveled edges on flat plates that in reality simply lie against with each other in a natural panel line?
Why creating seams and fit problems, when copying the real arrangement would work perfectly?
Like shown in this pic from Chris:

This is partly due to the slight toe down that the sponson sides of the hull have. You can see it here:

Look at the mating line on the rear hull plate with sponson sides...there is a gap
I'm working on two of these kits and the fit isn't that bad. I bent the second kit's sponson up to see if that helps when I start building that.
I'll pay closer attention to that when I start my Grant and see if that improves the overall fit - not that the fit is horrible - just could be a bit better.
I'm building my Grant as a M3 with the quickfix stuff on it.

#521
Kentucky, United States
Joined: April 13, 2011
KitMaker: 9,465 posts
Armorama: 8,695 posts
Posted: Tuesday, September 12, 2017 - 01:01 AM UTC
My two cents worth . . . .
#1 Designing the kit plates to meet in the same way as the actual tank drastically increases the chance for glue to squeeze out between the plates.
#2 It is unusual for a finely done kit these days to have parts that would match the scale thickness of the armor plates????
Just my thoughts . . . worth what you paid for them.
North Carolina, United States
Joined: September 16, 2004
KitMaker: 1,281 posts
Armorama: 1,222 posts
Posted: Friday, September 15, 2017 - 01:52 AM UTC
Antwerpen, Belgium
Joined: August 07, 2016
KitMaker: 191 posts
Armorama: 120 posts
Posted: Friday, September 15, 2017 - 01:56 AM UTC
It's coming together nicely Chris

I'm looking forward to your paintwork
Kind regards
Steven
Queensland, Australia
Joined: August 06, 2005
KitMaker: 3,353 posts
Armorama: 3,121 posts
Posted: Friday, September 15, 2017 - 03:47 PM UTC
Coming along very nicely Chris.
I hope the Bronco tracks fit your sprockets. Their Diehl 640 tracks (labelled for AS90 but same track as Leopard 1) don't fit the Takom Gepard sprockets. At least you didn't spill glue on the grant ones and you have a plan B.
On the Bench:
Dust, styrene scraps, paint splotches and tears.
ColinEdm
 Associate Editor
Alberta, Canada
Joined: October 15, 2013
KitMaker: 1,355 posts
Armorama: 1,229 posts
Posted: Friday, September 15, 2017 - 07:25 PM UTC
Looking good Chris! I remember building Tamiya's dog 35+ years ago, although back then it wasn't a dog

The voices are back.....excellent....
North Carolina, United States
Joined: September 16, 2004
KitMaker: 1,281 posts
Armorama: 1,222 posts
Posted: Friday, September 15, 2017 - 09:07 PM UTC

#439
Washington, United States
Joined: November 05, 2005
KitMaker: 4,950 posts
Armorama: 289 posts
Posted: Friday, September 15, 2017 - 09:32 PM UTC
Wow, I'm normally into wingy thingys, but this is inspiring. Great work Chris!

Hanger Queens in Waiting:
Monogram 1/72 F8F-1
Corsair the Sky Pirate - 1/72 Ace A-7D
Century Series - Airfix 1/72 F-105G
Anti Shipping - Academy 1/72 PBJ-1D
Academy 1/72 F-84E


