


Яusso-Soviэt Forum: Cold War Soviet Armor
For discussions related to cold war era Russo-Soviet armor.
For discussions related to cold war era Russo-Soviet armor.
Hosted by Jacques Duquette
T-34/76 Mod 1941 build up

PvtParts

Joined: June 18, 2003
KitMaker: 1,876 posts
Armorama: 1,120 posts
Posted: Wednesday, July 07, 2004 - 02:54 PM UTC
Thanks for the post..It sounds easy enough

didiumus
Joined: March 18, 2003
KitMaker: 564 posts
Armorama: 312 posts
Posted: Thursday, July 08, 2004 - 01:17 AM UTC
Hey, here is a question: Were the T-34 road wheels with tires made from natural rubber or synthetic rubber?
Natural rubber seems to make more sense to me, but I am not sure.
Scott Gentry

Natural rubber seems to make more sense to me, but I am not sure.
Scott Gentry
TankCarl
Joined: May 10, 2002
KitMaker: 3,581 posts
Armorama: 2,782 posts
Posted: Thursday, July 08, 2004 - 01:39 AM UTC
Had to be natural vulcanized rubber.Think,Soviet Union,serfdom,etc...

Alpenflage
Joined: May 21, 2003
KitMaker: 1,120 posts
Armorama: 1,002 posts

Posted: Thursday, July 08, 2004 - 01:42 AM UTC
Scott Gentry: just click on my banner on my post. Otherwise just PM me here for more info on ordering.
Scott Dimmick: I have the Dragon T-34/76 M1941 kits in stock. No need to wait for VLS Just let me know if you want to order one.
Cheers !
Alpen
Scott Dimmick: I have the Dragon T-34/76 M1941 kits in stock. No need to wait for VLS
Just let me know if you want to order one.Cheers !
Alpen
didiumus
Joined: March 18, 2003
KitMaker: 564 posts
Armorama: 312 posts
Posted: Thursday, July 08, 2004 - 06:38 AM UTC
Hey Alpen,
Do you have the Finemolds 1/16 T-34 barrel? I didn't see it listed. I am in Utah, so I would want to order several items to lower postage.
PS Guys, I am sorry, but I wussed out. I went to Great Models and got Friul tracks today...
Scott
Do you have the Finemolds 1/16 T-34 barrel? I didn't see it listed. I am in Utah, so I would want to order several items to lower postage.
PS Guys, I am sorry, but I wussed out. I went to Great Models and got Friul tracks today...
Scott

Sekas

KitMaker: 4 posts
Armorama: 0 posts
Posted: Thursday, July 08, 2004 - 07:57 AM UTC
[email protected]
Hi Carl,
Enjoying the photos of your build up of the T-34/76! I bought a Jordi barrel (TG-07) for an old Tamiya T-34 and was wondering if this is the one you used? If so, the Jordi barrel's diameter is slightly too large. Did you bore out the DML mantlet or did you use a different barrel? Thanks for your help and looking forward to your progress!!
John.
TankCarl
Joined: May 10, 2002
KitMaker: 3,581 posts
Armorama: 2,782 posts
Posted: Thursday, July 08, 2004 - 11:41 AM UTC
The barrel I used was a slide in.No filing or anything,I believe it was the TG 07
I just look on the back of the package where there are cute little pictures of the tanks it can be used on
Tonight will be track how to,at least How I do the track on this family of tank.
My minor improvement,is to have the idler loose in its mount,so I can adjust the slack.
Well,off to my work area...
TankCarl
Joined: May 10, 2002
KitMaker: 3,581 posts
Armorama: 2,782 posts
Posted: Thursday, July 08, 2004 - 01:16 PM UTC
Ok,as promised,here is my track assembly sequence.
The links just slide into each other,no tightness at all,so the runs will be straight.
here is the darker green I made.

Here is how I remove the links from the sprue,I nip them first.

Then I clean up the end with a knife,this is faster than a file.

I check for my first set,that I have enough to go from roadwheel to roadwheel.

Then I apply a drop of glue along the joint,allowing cappilary action to fill it in.I turn them end for end,and place the freshly glued section,under that file,and glue the other 1/2 joint.

Hope this illustrated guide to DML links is of some help.
The links just slide into each other,no tightness at all,so the runs will be straight.
here is the darker green I made.
Here is how I remove the links from the sprue,I nip them first.
Then I clean up the end with a knife,this is faster than a file.
I check for my first set,that I have enough to go from roadwheel to roadwheel.
Then I apply a drop of glue along the joint,allowing cappilary action to fill it in.I turn them end for end,and place the freshly glued section,under that file,and glue the other 1/2 joint.
Hope this illustrated guide to DML links is of some help.
didiumus
Joined: March 18, 2003
KitMaker: 564 posts
Armorama: 312 posts
Posted: Thursday, July 08, 2004 - 05:45 PM UTC
Well, I am sold. I have several sets of Friul tracks in my possession, but I have never used a set until now.
WOW! What an easy, detailed way to go. Expensive, (more than the kit was) but very nice....
By the way, two inexpensive add ons that I got that made a HUGE difference:
MV lenses for the headlights, # L185, 2 each, cost me $.80 per, and they look amazing!!!
Moskit hollow metal exhaust pipes, cost me $7. They look perfect, they are preweathered, hollow, and even have the correct seam on them.
Saturday I paint the dark and light shades, then blend, decal, and dullcoat. In the meantime, I have 22 tires to paint. (natural rubber)
Scott Gentry
didiumus
Joined: March 18, 2003
KitMaker: 564 posts
Armorama: 312 posts
Posted: Saturday, July 10, 2004 - 06:20 PM UTC
WHEW! I am exhausted... 
Worked on the Friuls until 4 am last night then after sleeping in to make up for it, worked on the tires today and got them all painted. Had a great idea that worked on the Friul metal tracks. I cleaned them all in vinegar and soap and water, then I immersed them in a model railroad product called "Blacken-it." It is essentially a rail blackener, sort of a low grade black oxide type thing. Well, it worked great! The tracks aren't black at all, they are that rusted metal, tank track color that would have taken me 20 hours of drybrushing and washes to get right. Took me about 15 minutes twice, once for all of the links, and once for each completed set of tracks....
Since the consensus from you Russian tank experts is that natural rubber tires were the way to go, I painted the tires a "rubber color." I airbrush with enamels, so I use thinned acrylics for tires. I made a mixture of roughly 5 parts Tamiya Flat Brown, and 3 parts Tamiya Black, and 2 parts Tamiya thinner. This looks great!!! It isn't black, it actually looks like rubber. Once I get the flat coat on the wheels should look really terrific. The process basically involved making 5 "cuts" with the paint brush. 2 cuts each side of both inside wheels and outside wheels to flow the rubber paint up to the rim of each wheel, then a final cut on the wear surface of each tire to blend and complete the paint work.
Next up - some airbrush weathering, drybrushing, decals, washes, etc...
Scott Gentry
Worked on the Friuls until 4 am last night
then after sleeping in to make up for it, worked on the tires today and got them all painted. Had a great idea that worked on the Friul metal tracks. I cleaned them all in vinegar and soap and water, then I immersed them in a model railroad product called "Blacken-it." It is essentially a rail blackener, sort of a low grade black oxide type thing. Well, it worked great! The tracks aren't black at all, they are that rusted metal, tank track color that would have taken me 20 hours of drybrushing and washes to get right. Took me about 15 minutes twice, once for all of the links, and once for each completed set of tracks....Since the consensus from you Russian tank experts is that natural rubber tires were the way to go, I painted the tires a "rubber color." I airbrush with enamels, so I use thinned acrylics for tires. I made a mixture of roughly 5 parts Tamiya Flat Brown, and 3 parts Tamiya Black, and 2 parts Tamiya thinner. This looks great!!! It isn't black, it actually looks like rubber. Once I get the flat coat on the wheels should look really terrific. The process basically involved making 5 "cuts" with the paint brush. 2 cuts each side of both inside wheels and outside wheels to flow the rubber paint up to the rim of each wheel, then a final cut on the wear surface of each tire to blend and complete the paint work.
Next up - some airbrush weathering, drybrushing, decals, washes, etc...
Scott Gentry
TankCarl
Joined: May 10, 2002
KitMaker: 3,581 posts
Armorama: 2,782 posts
Posted: Monday, July 12, 2004 - 01:17 PM UTC
Well, Scott,
I used the kit track.After making the complete unit,I stuffed toilet tissue to induce sag.
The idler and sprocket are not glued in,so removing the sections will be easy for painting.

And removing the tissue= saggy.

Nearly done,I added the straps for the ice cleats,and am preparing to paint the track.
I used the kit track.After making the complete unit,I stuffed toilet tissue to induce sag.
The idler and sprocket are not glued in,so removing the sections will be easy for painting.
And removing the tissue= saggy.
Nearly done,I added the straps for the ice cleats,and am preparing to paint the track.
PvtParts
Joined: June 18, 2003
KitMaker: 1,876 posts
Armorama: 1,120 posts
Posted: Monday, July 12, 2004 - 02:54 PM UTC
Both of you pulled away from me..but the pics and thoughts are great..thanks, John
PvtParts
Joined: June 18, 2003
KitMaker: 1,876 posts
Armorama: 1,120 posts
Posted: Tuesday, July 13, 2004 - 09:22 AM UTC
I went ahead and ordered up some MV lenses for this baby. Still havnt decided on which paint scheme yet.
didiumus
Joined: March 18, 2003
KitMaker: 564 posts
Armorama: 312 posts
Posted: Tuesday, July 13, 2004 - 10:10 AM UTC
Quoted Text
I went ahead and ordered up some MV lenses for this baby. Still havnt decided on which paint scheme yet.
This is my first (not last) T-34, so of course I had to go for the classic all over green paint. I kinda wished I would have gone for the green/brown camo paint, but it is all good.
Trust me, the MV lenses look super. I have never used any, but I am a fan now. Get the Moskit exhausts as well...
Scott
TankCarl
Joined: May 10, 2002
KitMaker: 3,581 posts
Armorama: 2,782 posts
Posted: Tuesday, July 13, 2004 - 11:50 AM UTC
I have installed the straps for the ice cleats.On my mod 40 I used MV lenses,but I want to try chrome silver in the bezel,and stock clear parts over.There are neat ridges on the stock parts,and MV's are smooth.Though,MV;'s are my lens of choice.How about pictuires from other builders.
(++)
(++) PvtParts
Joined: June 18, 2003
KitMaker: 1,876 posts
Armorama: 1,120 posts
Posted: Tuesday, July 13, 2004 - 12:30 PM UTC
When I get a few more sub assemblies done I'll start photos! :-)
didiumus
Joined: March 18, 2003
KitMaker: 564 posts
Armorama: 312 posts
Posted: Wednesday, July 14, 2004 - 05:41 AM UTC
I will add some pictures early next week, my digital camera is on vacation with my wife and kids. Hey, is that why I am getting so much modeling done? LOL!!! :-) :-)
I have started weathering, and so far it looks great! I used a cockpit green (yellowish and much lighter than the base green) to drybrush on the tank, it gives a very nice first level highlight. Very subtle but pleasing to the eye. More to come.
Tonight I will gloss coat the turret to prepare for decals, then do more weathering.
Scott Gentry
PvtParts
Joined: June 18, 2003
KitMaker: 1,876 posts
Armorama: 1,120 posts
Posted: Wednesday, July 14, 2004 - 09:46 AM UTC
Looks like I hit the paint station tommorrow and get the primer on..then base and some photos! :-)
PvtParts
Joined: June 18, 2003
KitMaker: 1,876 posts
Armorama: 1,120 posts
Posted: Thursday, July 15, 2004 - 10:08 AM UTC
As promised I hit the paint station and decided on a color. Since both builds here are in Russian Green I decided to try the Winter White they show in the directions. This is something I've never tried so it should be interesting (to say the least) I'm going to make it up as I go..can you say Artistic Freedom? As far as the decals that go with it ..not sure. The turret would be easy enough The rest could be a bear. I still have the indys to do..they are started though and yet another first for me...Man you guys are a bad influence  Without further B.S. here is primed and the Off White I chose!!
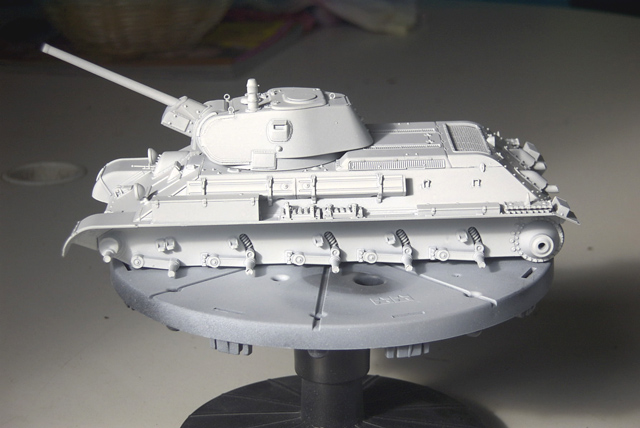
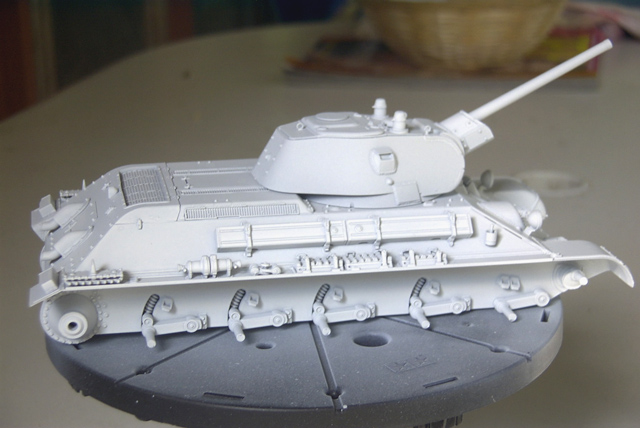
The rest could be a bear. I still have the indys to do..they are started though and yet another first for me...Man you guys are a bad influence Without further B.S. here is primed and the Off White I chose!! TankCarl
Joined: May 10, 2002
KitMaker: 3,581 posts
Armorama: 2,782 posts
Posted: Thursday, July 15, 2004 - 11:44 AM UTC
John I was toying with doing the winter camo,I figure,apply the decals first,and edge the paint back to the decal.
My track is painted,and tonight I do the wear on the centerguides,and ground contact.I will post pictures soon.
My track is painted,and tonight I do the wear on the centerguides,and ground contact.I will post pictures soon.
TankCarl
Joined: May 10, 2002
KitMaker: 3,581 posts
Armorama: 2,782 posts
Posted: Thursday, July 15, 2004 - 01:50 PM UTC
As promised,the tracks are on.

I actually had to remove 2 links(1 of each type) on this side,and rebend them to go around the idler,but I was able to swing the idler up just so to close a gap.
I actually had to remove 2 links(1 of each type) on this side,and rebend them to go around the idler,but I was able to swing the idler up just so to close a gap.
PvtParts
Joined: June 18, 2003
KitMaker: 1,876 posts
Armorama: 1,120 posts
Posted: Thursday, July 15, 2004 - 02:01 PM UTC
Carl, She's coming along nicely. Enjoying and soaking up all the info that has been posted. Thanks go to you and Scott!
didiumus
Joined: March 18, 2003
KitMaker: 564 posts
Armorama: 312 posts
Posted: Thursday, July 15, 2004 - 06:18 PM UTC
Man you guys, I am so bummed I don't have my digital camera!!! She came to life tonight. Just like Young Frankenstein, ..."She's Alive!!!!!!" 

Here is where I am at...
The tank is completely painted, and most of the weathering is done. I have done three different subtle drybrushes, followed by decals, (dancing bears??) dullcoats, and then a wash in burnt umber oil paints. I think I have once again passed Carl, but then again we are taking different paths to the same destination. My ice cleats, cables, extra links, machine gun, etc... still aren't installed. The Moskit exhaust pipes are and they look sooooo good! I can't wait to superglue the MV lenses in place, they look great as well.
Man, the oils really bring the depth of the model to life, along with the subtle highlights. It looks like a real model now, not so toylike and one dimensional.
All wheels assemblies are perfect and installed and weathered. As I mentioned before, I did not paint my tracks as they are the Friul metal ones, I etched them to a nice rusty color. I did do a raw umber wash in order to give them some more depth and shadow. Here is a neat trick: I used a pencil eraser and gently buffed the rusty surface on both sides of the guide horns on the inside of the tracks to simulate rubber marking the inside of the rubber tracks. I did it very lightly and it looks really cool!!!!
Tomorrow or Saturday I will install the idlers, drive wheels, and tracks, then pin them and finish the weathering. Once that is done I will add the final small details and then call this a model! What a great kit. Look for some pictures Sunday or Monday...
Scott
Here is where I am at...
The tank is completely painted, and most of the weathering is done. I have done three different subtle drybrushes, followed by decals, (dancing bears??) dullcoats, and then a wash in burnt umber oil paints.
I think I have once again passed Carl, but then again we are taking different paths to the same destination. My ice cleats, cables, extra links, machine gun, etc... still aren't installed. The Moskit exhaust pipes are and they look sooooo good! I can't wait to superglue the MV lenses in place, they look great as well.Man, the oils really bring the depth of the model to life, along with the subtle highlights. It looks like a real model now, not so toylike and one dimensional.
All wheels assemblies are perfect and installed and weathered. As I mentioned before, I did not paint my tracks as they are the Friul metal ones, I etched them to a nice rusty color. I did do a raw umber wash in order to give them some more depth and shadow. Here is a neat trick: I used a pencil eraser and gently buffed the rusty surface on both sides of the guide horns on the inside of the tracks to simulate rubber marking the inside of the rubber tracks. I did it very lightly and it looks really cool!!!!
Tomorrow or Saturday I will install the idlers, drive wheels, and tracks, then pin them and finish the weathering. Once that is done I will add the final small details and then call this a model! What a great kit. Look for some pictures Sunday or Monday...
Scott
didiumus
Joined: March 18, 2003
KitMaker: 564 posts
Armorama: 312 posts
Posted: Thursday, July 15, 2004 - 06:19 PM UTC
Quoted Text
As promised I hit the paint station and decided on a color. Since both builds here are in Russian Green I decided to try the Winter White they show in the directions. This is something I've never tried so it should be interesting (to say the least) I'm going to make it up as I go..can you say Artistic Freedom? As far as the decals that go with it ..not sure. The turret would be easy enough
I really like the white. Are you going to have it wearing through to the green anywhere? Can't wait to see it done, you are catching up pretty fast...
Scott
PvtParts
Joined: June 18, 2003
KitMaker: 1,876 posts
Armorama: 1,120 posts
Posted: Friday, July 16, 2004 - 04:17 AM UTC
Hi Scott, I'm not sure yet on the green wearing through. That will depend on how well the white comes out. :-) Going to start putting the tracks together tonite..should get most done.
 |

WEB HOSTING BY


Copyright ©2021 Armorama and Kitmaker Network, a subsidiary of Silver Star Enterprises
All Rights Reserved. Please read our Conditions of Use and Privacy Policy.
All Rights Reserved. Please read our Conditions of Use and Privacy Policy.