T-34/76 Mod 1941 build up
Utah, United States
Joined: March 18, 2003
KitMaker: 564 posts
Armorama: 312 posts
Posted: Friday, July 16, 2004 - 08:53 AM UTC

[img]https://gallery.kitmaker.net/data/500/2282T-34_76_1941_009.jpg[img]
[img]https://gallery.kitmaker.net/data/500/2282T-34_76_1941_021.jpg[img]
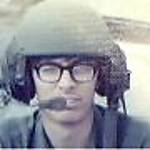
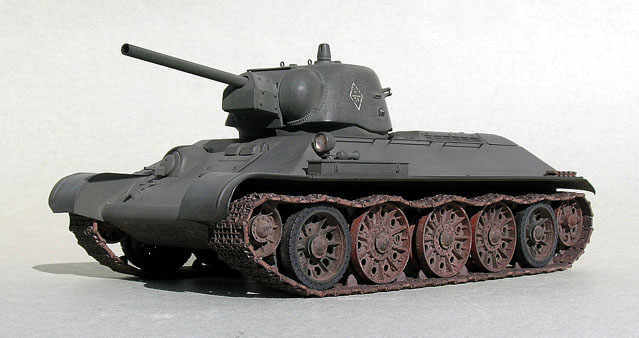
Here are some shots of where I am at. Hope the pics work... Needs more weathering work, but coming along.
Scott
Looks like the post can only handle one shot. Guess the shots are too high of quality. Cut and paste the links to see the other shots... Sorry!


...the right of the people to keep and bear arms shall not be infringed...
Utah, United States
Joined: March 18, 2003
KitMaker: 564 posts
Armorama: 312 posts
Posted: Friday, July 16, 2004 - 08:56 AM UTC

Here are the Friul tracks that I rusted in Blacken-it, a model RR rail blackening agent. No paint other than an oil wash to bring out shadows. Nothing like rusted metal to model rusted metal, right?
I like how they turned out...
Scott
...the right of the people to keep and bear arms shall not be infringed...
Utah, United States
Joined: March 18, 2003
KitMaker: 564 posts
Armorama: 312 posts
Posted: Friday, July 16, 2004 - 08:59 AM UTC

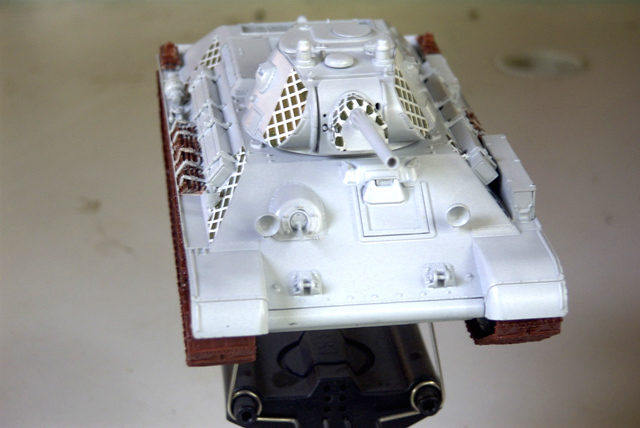
Here is another view of the Friul tracks. Note the subtle wear pattern I added with a pencil eraser to simulate the marking of the tracks by the rubber road wheels.
My gallery is didiumus if you would like to see the rest of the pics. Hope they are helpful.
Scott
...the right of the people to keep and bear arms shall not be infringed...
New Jersey, United States
Joined: June 18, 2003
KitMaker: 1,876 posts
Armorama: 1,120 posts
Posted: Friday, July 16, 2004 - 09:33 AM UTC
Scott, Must say looking very nice.Those fruils are always a great addition. The MV"s look very nice also..I've got a set of them coming. Keep up the great work..nice builds going on here!

Why not make the whole plane out of the same material the blackbox is made from?
Ohio, United States
Joined: February 12, 2003
KitMaker: 1,315 posts
Armorama: 0 posts
Posted: Friday, July 16, 2004 - 07:22 PM UTC
Hi Really super work guys on all of your vehicles.
didimus: See by yoru tracks that I'm definitely going to have to give this Blacken-It a try. Those tracks of yours look like the real thing there. And the pencil eraser treatment definitely gives that 'wear' effect to them. I know others will disagree, but to me, there's nothing that can beat a set of those Fruilmodel tracks.
Take care, Sgirty
Utah, United States
Joined: March 18, 2003
KitMaker: 564 posts
Armorama: 312 posts
Posted: Friday, July 16, 2004 - 10:38 PM UTC


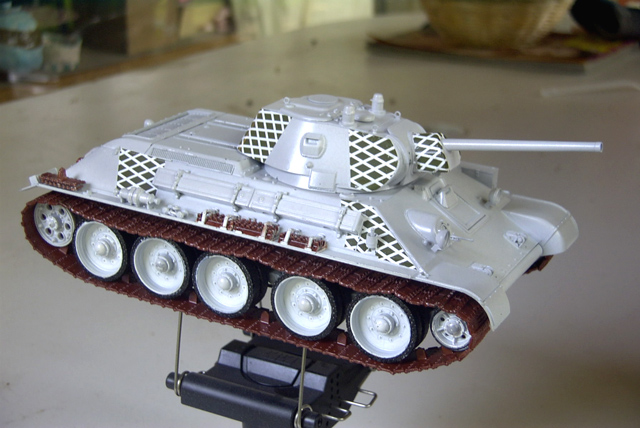
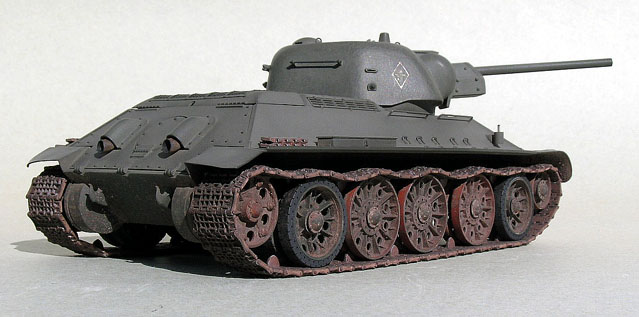
Here are some further shots after another 8 hours of weathering and assembly. Having a hard time getting the digital camera to reflect what the model looks like to the eye.
Comments and suggestions are welcome. I am getting frustrated with the look I am getting on the green. It is too blah. It looks better in person than in the pics, but the drybrushing and washes are only helping a little bit.
Scott Gentry
...the right of the people to keep and bear arms shall not be infringed...
Utah, United States
Joined: March 18, 2003
KitMaker: 564 posts
Armorama: 312 posts
Posted: Friday, July 16, 2004 - 10:40 PM UTC
...the right of the people to keep and bear arms shall not be infringed...
Rhode Island, United States
Joined: May 10, 2002
KitMaker: 3,581 posts
Armorama: 2,782 posts
Posted: Saturday, July 17, 2004 - 12:45 AM UTC
Exellent trackwork,Scott.Good idea on the roadwheel moving area too.I guess you weren't in love with the icecleats?They really help fill the aides there.At least add some unconnected straps to show something "should" be there...
Oregon, United States
Joined: April 03, 2004
KitMaker: 414 posts
Armorama: 1 posts
Posted: Saturday, July 17, 2004 - 09:32 AM UTC
Scott,
Very nice model. The tracks look fabulous. What did you do for rust? How did you rust them? Chemically? Dragon's T-34 looks like it should be added to my kit collection.
This old Tamiya T-34/76 uses the original Fruilmodellismo 'crimp' type tracks. That Blacken-It technique will be used on my next set of Fruilies.
Thanks for sharing,
Cody
Utah, United States
Joined: March 18, 2003
KitMaker: 564 posts
Armorama: 312 posts
Posted: Saturday, July 17, 2004 - 10:13 AM UTC
Quoted Text
Exellent trackwork,Scott.Good idea on the roadwheel moving area too.I guess you weren't in love with the icecleats?They really help fill the aides there.At least add some unconnected straps to show something "should" be there...
Carl,
Oh yeah, should have mentioned, I still need to add the Ice cleats, extra links, machine gun barrel to the hull, etc... Still haven't done that.
Thanks for the comments... How is yours coming? I can't wait to see it... Any suggestions for me on the weathering? I am going to go after the wheels more aggresively, then add pastel dust to the wheels and tracks, maybe add a black oil wash to the tracks and cables. Also will hit the high spots of some track links with steel wool or sandpaper to rub down to bare metal...
Scott
...the right of the people to keep and bear arms shall not be infringed...
Utah, United States
Joined: March 18, 2003
KitMaker: 564 posts
Armorama: 312 posts
Posted: Saturday, July 17, 2004 - 10:19 AM UTC
Yeah, I simply cleaned the friul track links in vinegar and alchohol, then soaked them in Blacken-it for 15 -20 minutes. It rusted them as you see them. I did add an umber oil wash to add some shadow to them, but other than that what you see is what you get.
Thanks for the comments, it is a real compliment coming from you. I am waiting to see more of the fabulous work you are doing on that big Tiger. Did you get a big T-34 to go with it?

THATS the one you should add to your collection...
Scott
...the right of the people to keep and bear arms shall not be infringed...
Rhode Island, United States
Joined: May 10, 2002
KitMaker: 3,581 posts
Armorama: 2,782 posts
Posted: Saturday, July 17, 2004 - 11:01 PM UTC
Rhode Island, United States
Joined: May 10, 2002
KitMaker: 3,581 posts
Armorama: 2,782 posts
Posted: Sunday, July 18, 2004 - 09:19 AM UTC
ALL DONE!I did the final overspray of Raw sienna,and added a wash to bring out the panels.


Total build time,July 3rd to 18th.
New Jersey, United States
Joined: June 18, 2003
KitMaker: 1,876 posts
Armorama: 1,120 posts
Posted: Sunday, July 18, 2004 - 09:36 AM UTC
Carl, Very nice build. I have enjoyed following the progress and that is what got me going on mine. I will have to keep this thread going with updates. At this point putting the indys together..My first try , so, its a bit slow going with trial and error. More photos soon. Thanks so much for all of your's , and Scotts , tips!
Why not make the whole plane out of the same material the blackbox is made from?
Utah, United States
Joined: March 18, 2003
KitMaker: 564 posts
Armorama: 312 posts
Posted: Sunday, July 18, 2004 - 10:54 AM UTC
Carl,
Looks great!!!! Hope you had as much fun as I have had. I still have a ways to go, I added the machine gun but still need cleats and extra track links. I am still not happy with the weathering, thinking of trying out some of those modeling powders.
Scott Gentry
...the right of the people to keep and bear arms shall not be infringed...
Rhode Island, United States
Joined: May 10, 2002
KitMaker: 3,581 posts
Armorama: 2,782 posts
Posted: Monday, July 19, 2004 - 12:24 AM UTC
New Jersey, United States
Joined: June 18, 2003
KitMaker: 1,876 posts
Armorama: 1,120 posts
Posted: Wednesday, July 21, 2004 - 12:28 AM UTC
Why not make the whole plane out of the same material the blackbox is made from?
Florida, United States
Joined: December 27, 2001
KitMaker: 4,268 posts
Armorama: 2,804 posts
Posted: Wednesday, July 21, 2004 - 06:23 AM UTC
Dude, what in tarnation is that scheme?!
Is that for real? I have never seen anything like that, but my lack of Russian armor knowledge might have something to do with it.
In any event, it looks pretty good. I want to see how you are going to weather her up. Waiting...

I will not grease the monkey bars. I will not grease the monkey bars. ...
Bart's chalkboard amercement
Utah, United States
Joined: March 18, 2003
KitMaker: 564 posts
Armorama: 312 posts
Posted: Wednesday, July 21, 2004 - 11:19 AM UTC
John,
Looking good. You are much quicker than I am!!! :-) :-)
Mine is still not done, someday I will finish it but I am focusing on a DUKW build right now.
Scott
...the right of the people to keep and bear arms shall not be infringed...
New Jersey, United States
Joined: June 18, 2003
KitMaker: 1,876 posts
Armorama: 1,120 posts
Posted: Wednesday, July 21, 2004 - 06:59 PM UTC
Ken, I know what you mean, but is was used and I found a couple of shots on the web with the same pattern. I finished the first wash and it really tones it down a bit a the detail jumps ou ( I'll try to post some photos later)
Scott, No rush! I still have a long way to go. Would love to see your's finished though :-)
Why not make the whole plane out of the same material the blackbox is made from?
Rhode Island, United States
Joined: May 10, 2002
KitMaker: 3,581 posts
Armorama: 2,782 posts
Posted: Thursday, July 22, 2004 - 02:09 AM UTC
Ken,
there is an actual picture in a concord book of a T-34 with that scheme.
Nice job on the decals.its the blending the edge to the paint that would bug me.I hope you will "wear" the white near edges to make it worn looking. (++)
California, United States
Joined: May 21, 2004
KitMaker: 22 posts
Armorama: 14 posts
Posted: Saturday, July 31, 2004 - 03:43 AM UTC
Are the straps that hold the cleats on the febder of the T-34/76 40 an 41 models leather or thin metal (on the real tanks). I same a picture the other day that looked as if they were soft and flrxable. However the models show them as ridged.
I was thinking of using some copper or putter sheet material to model a leather strap
John
Rhode Island, United States
Joined: May 10, 2002
KitMaker: 3,581 posts
Armorama: 2,782 posts
Posted: Saturday, July 31, 2004 - 04:22 AM UTC
I think they were leather.That early in the war,there wouldnt be shortages .