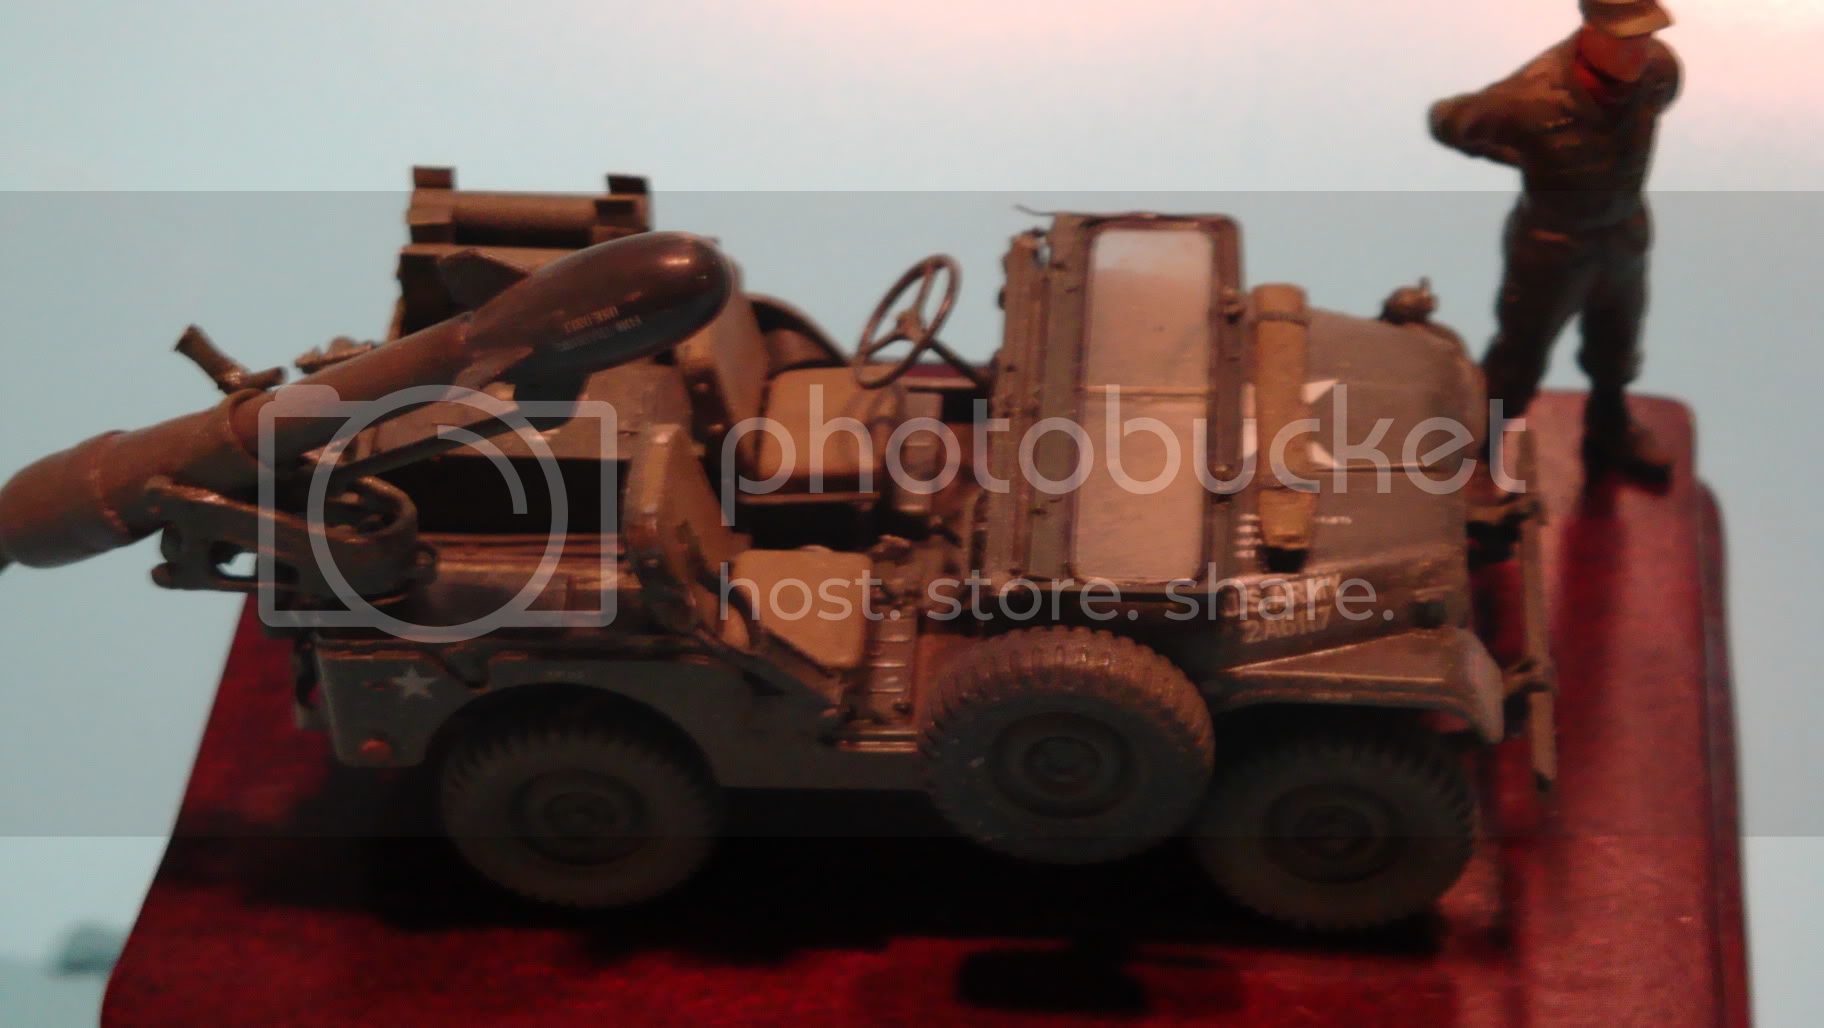
Very interesting Ron, in particular the camo type MERDC Gray Desert (or is it Red Desert?).
Hope to see some more soon.
Campaigns
Where Armorama group builds can be discussed, organized, and updates posted.
Hosted by Darren Baker, Richard S.
NATO - 60th Anniversary
Jupiterblitz
Joined: December 30, 2007
KitMaker: 885 posts
Armorama: 796 posts
KitMaker: 885 posts
Armorama: 796 posts
Posted: Thursday, July 16, 2009 - 05:56 AM UTC
mecanix
Kerry, Ireland
Joined: March 03, 2003
KitMaker: 201 posts
Armorama: 189 posts
Joined: March 03, 2003
KitMaker: 201 posts
Armorama: 189 posts
Posted: Thursday, July 30, 2009 - 09:57 AM UTC
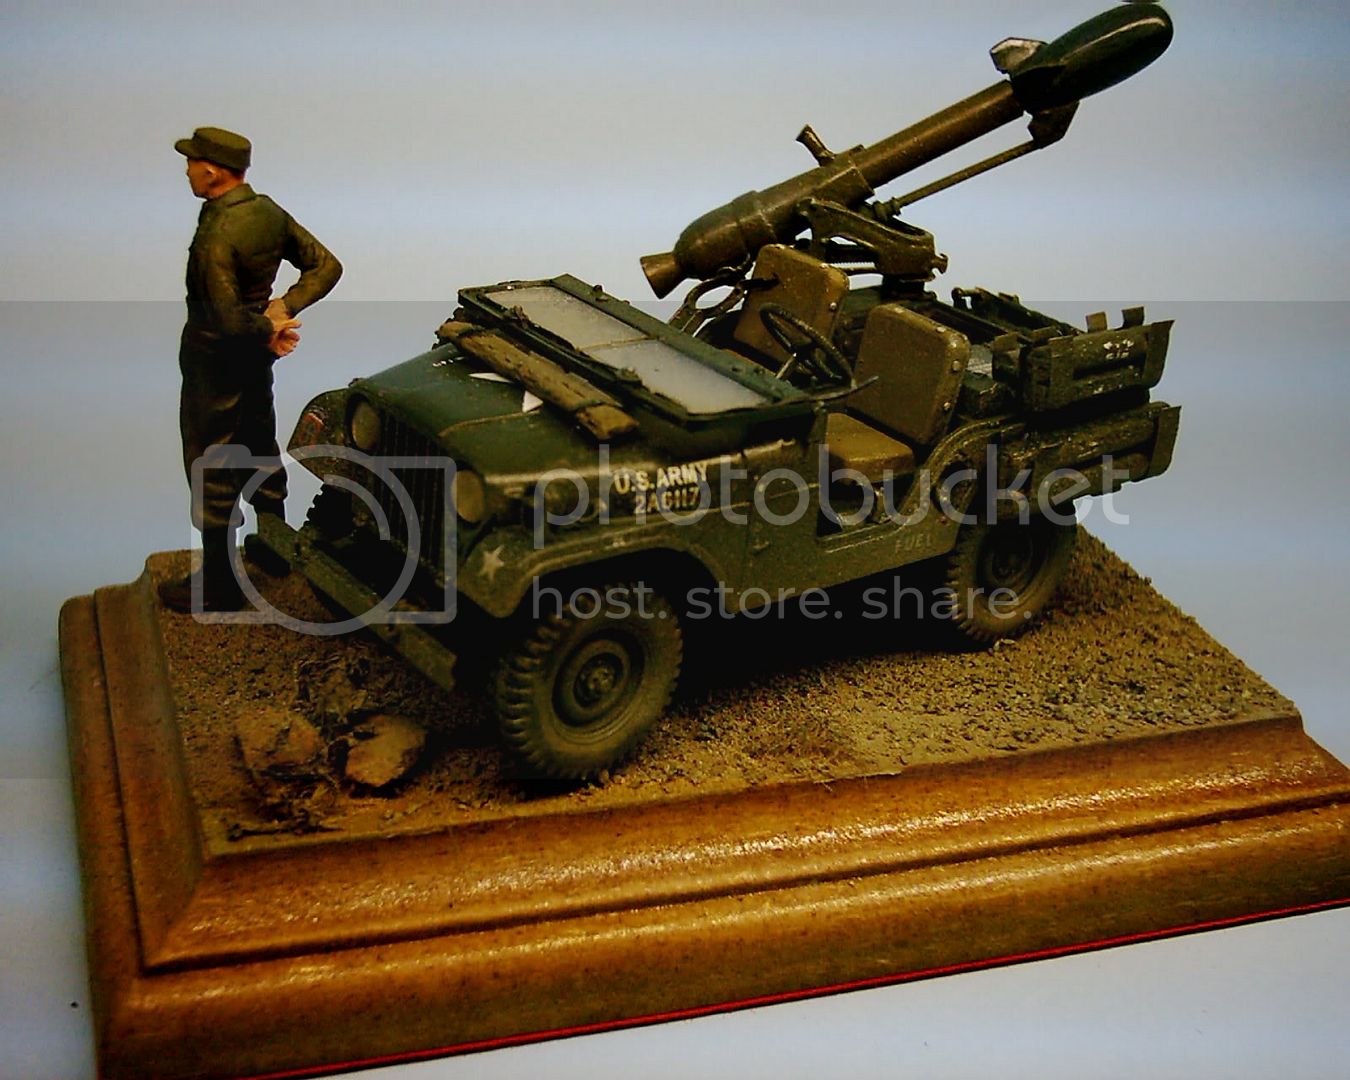
When this(Skybow) kit came out, I went out and bought a couple intending to attempt an M38A1 fitted with an M388 Davy Crockett nuclear recoilless rifle. This is my second attempt at this, the first foundered on making the tube mounting frame with the correct shape but after winning another kit at a show raffle recently I had a cunning plan to overcome that drawback.
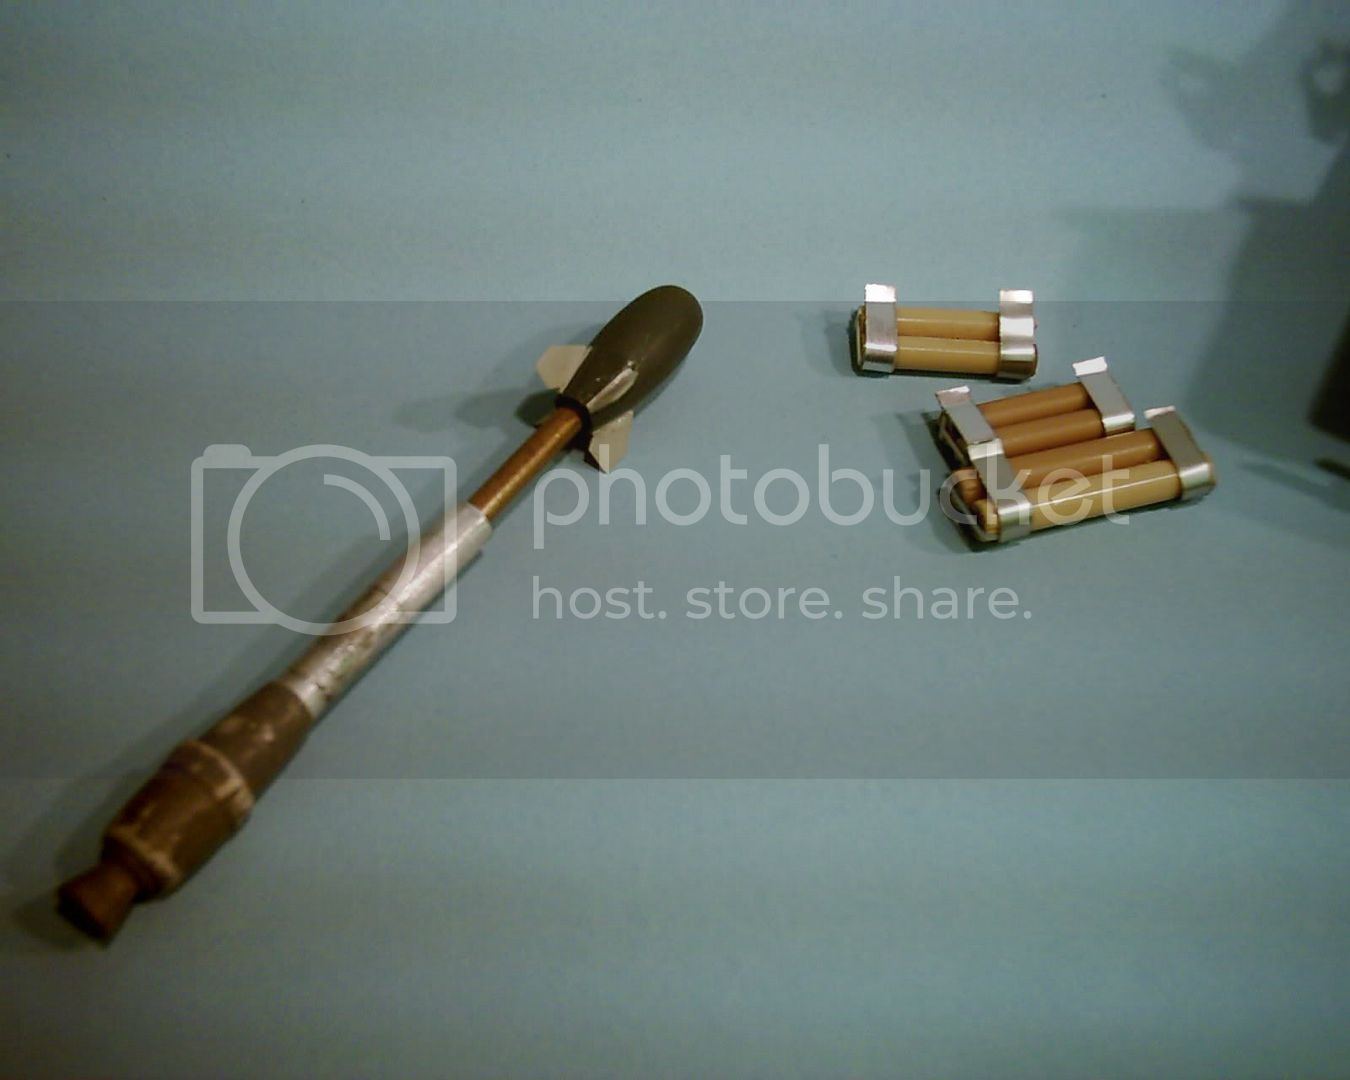
The tube breech and exaust is various lengths of plastic tube slotted together and put into the chuck of an hobby drill, spun at low speed and carefully run over with a plastic nail-file. The main tube is aluminium.The spiggot is brass rod and the device/round is the cut-down1/72nd drop tank from a P51( which proves aeroplane kits have their uses) with plasticard fins.
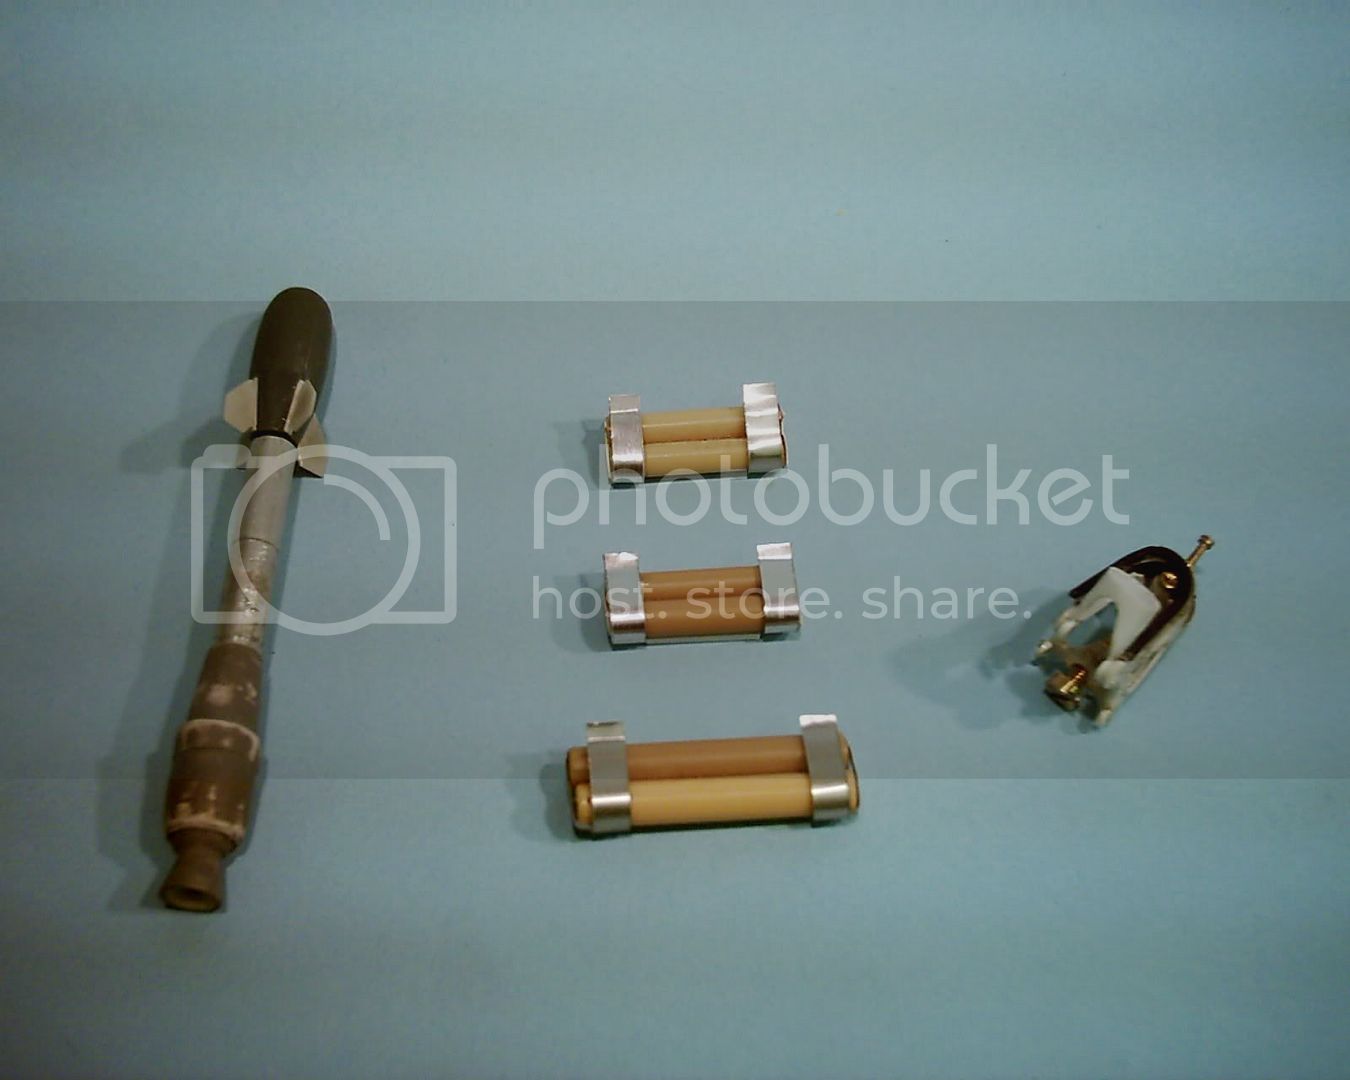
The spiggot and explosive launcher containers are cut down resin ammunition tubes from the spares box wrapped in bent strips of lithoplate
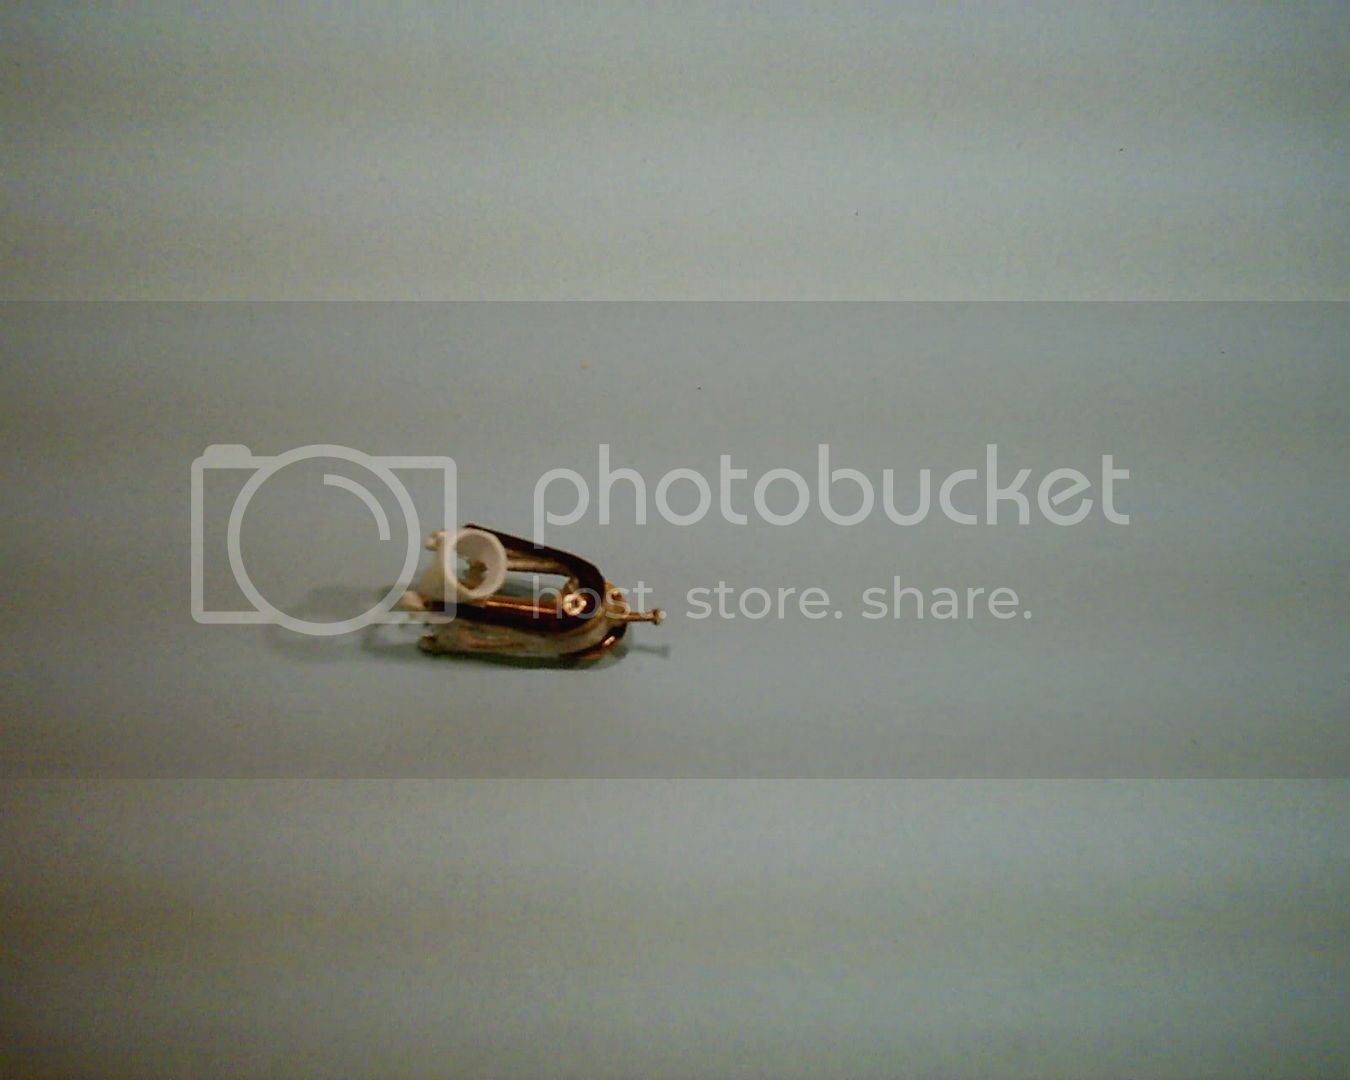
The mounting frame is basically "U" shaped,wider at the open end.Last time I cut the lightening holes in sheet/strip card and attempted to bend with various applied heats. It always either warped or fractured and thicker card required more heat, applied more accurately, something I conspiciously failed to do.
This time I took oval plastic covered aluminium tube,used for curtain rails cut a small section from the end(sadly this leaves just under 2 meters spare but hey..)cut off the end quarter, drilled the lightening holes and fitted the rims to top and bottom and the lightening hole with plastic strip. The adjustment screw is from the spares box again and the tube ring is Evergreen
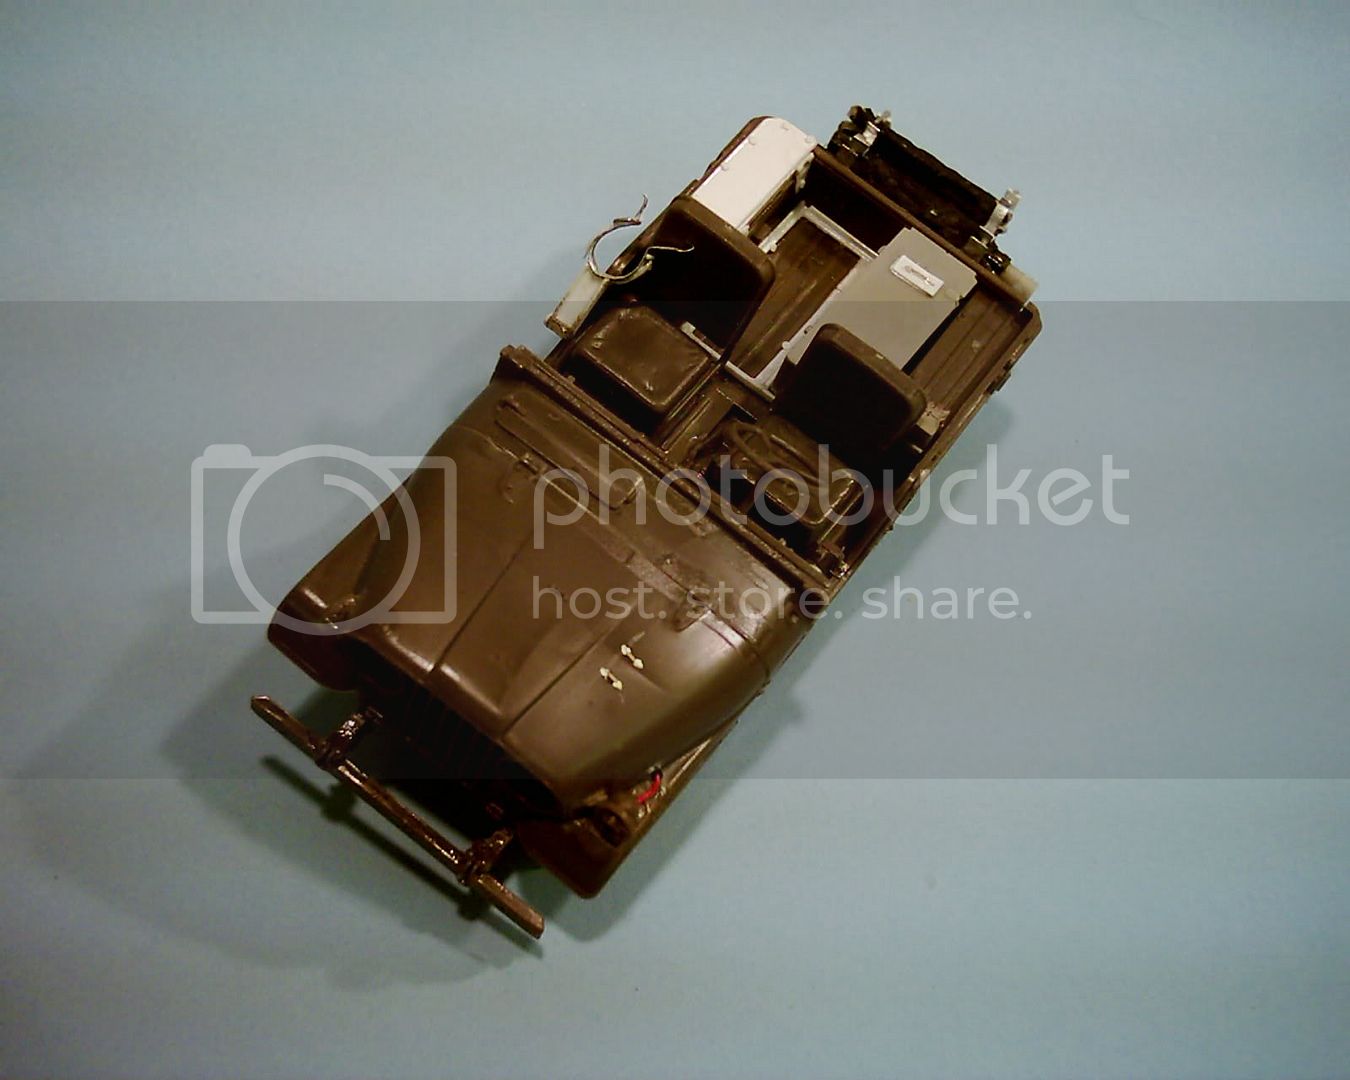
The fittings round containers,brackets, survey/sighting equipment and barrel retaining bracket are all Plastruct/Evergreen
IMG]http://i220.photobucket.com/albums/dd1/GenghisMcCann/Davy%20Crockett/Littlejohn5.jpg[/IMG]
Roughly positioned with the universal soldier for scale
R
This was fun and despite doubts about the crew safety was employed in Europe and Korea,apparently to break up large tank concentrations, for a number of years.
I believe that both the British and Canadian Armies ordered several thousand but cancelled. Wether because of safety concerns or as I have heard in the British case the idea of giving a junior NCO a nuclear device was a difficult one to accept I do not know. I do know that it was a nice conversion to do.
The tube breech and exaust is various lengths of plastic tube slotted together and put into the chuck of an hobby drill, spun at low speed and carefully run over with a plastic nail-file. The main tube is aluminium.The spiggot is brass rod and the device/round is the cut-down1/72nd drop tank from a P51( which proves aeroplane kits have their uses) with plasticard fins.
The spiggot and explosive launcher containers are cut down resin ammunition tubes from the spares box wrapped in bent strips of lithoplate
The mounting frame is basically "U" shaped,wider at the open end.Last time I cut the lightening holes in sheet/strip card and attempted to bend with various applied heats. It always either warped or fractured and thicker card required more heat, applied more accurately, something I conspiciously failed to do.
This time I took oval plastic covered aluminium tube,used for curtain rails cut a small section from the end(sadly this leaves just under 2 meters spare but hey..)cut off the end quarter, drilled the lightening holes and fitted the rims to top and bottom and the lightening hole with plastic strip. The adjustment screw is from the spares box again and the tube ring is Evergreen
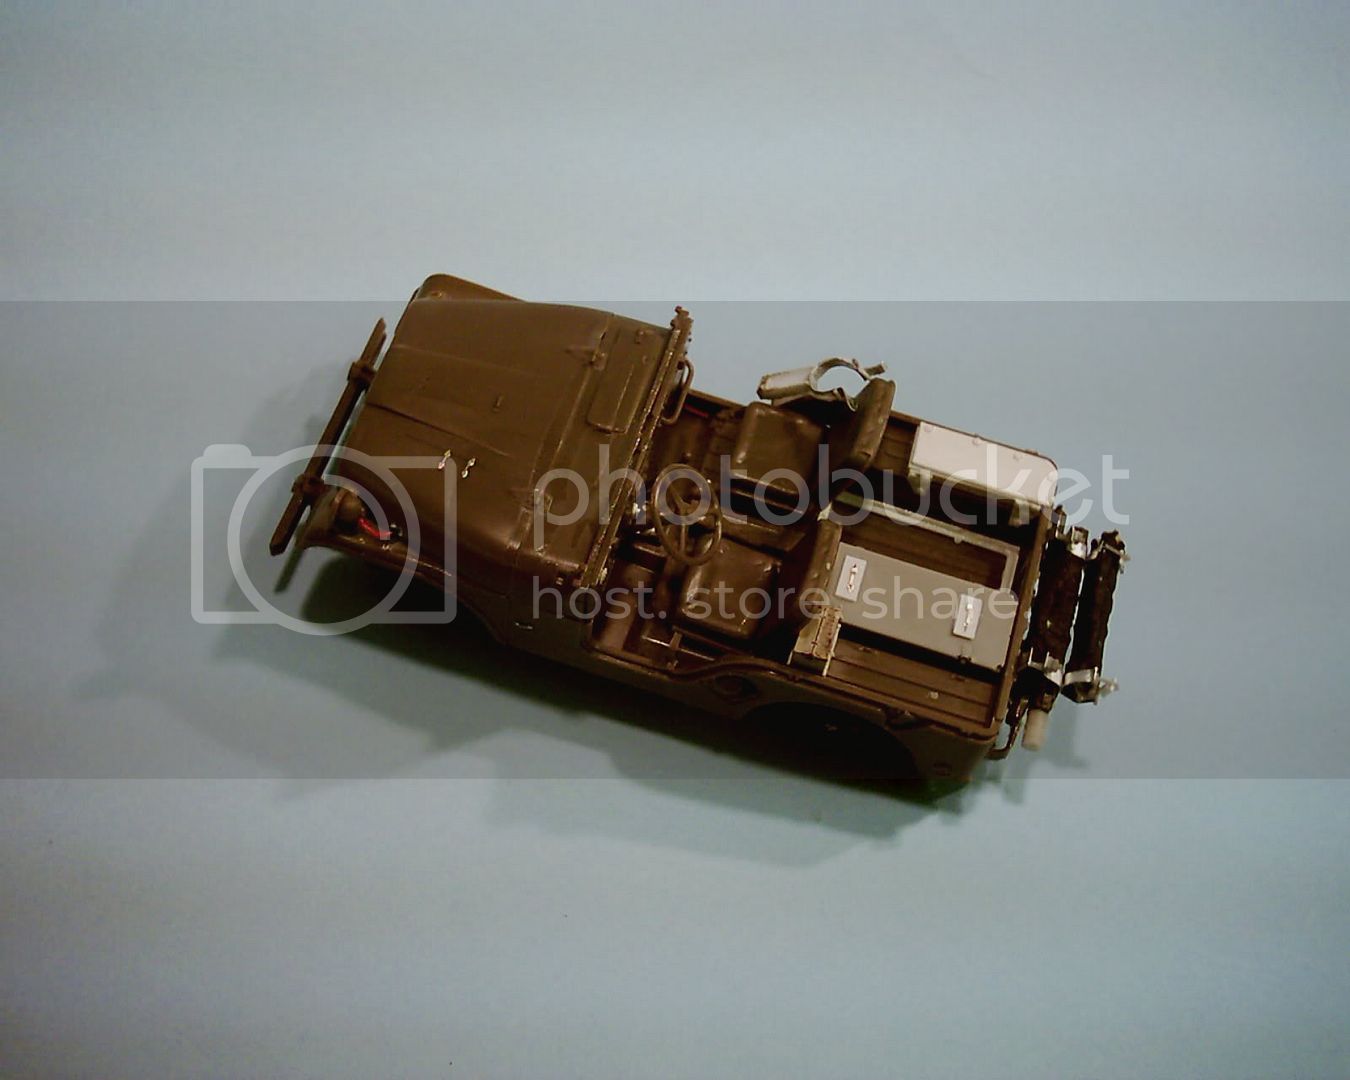
The fittings round containers,brackets, survey/sighting equipment and barrel retaining bracket are all Plastruct/Evergreen
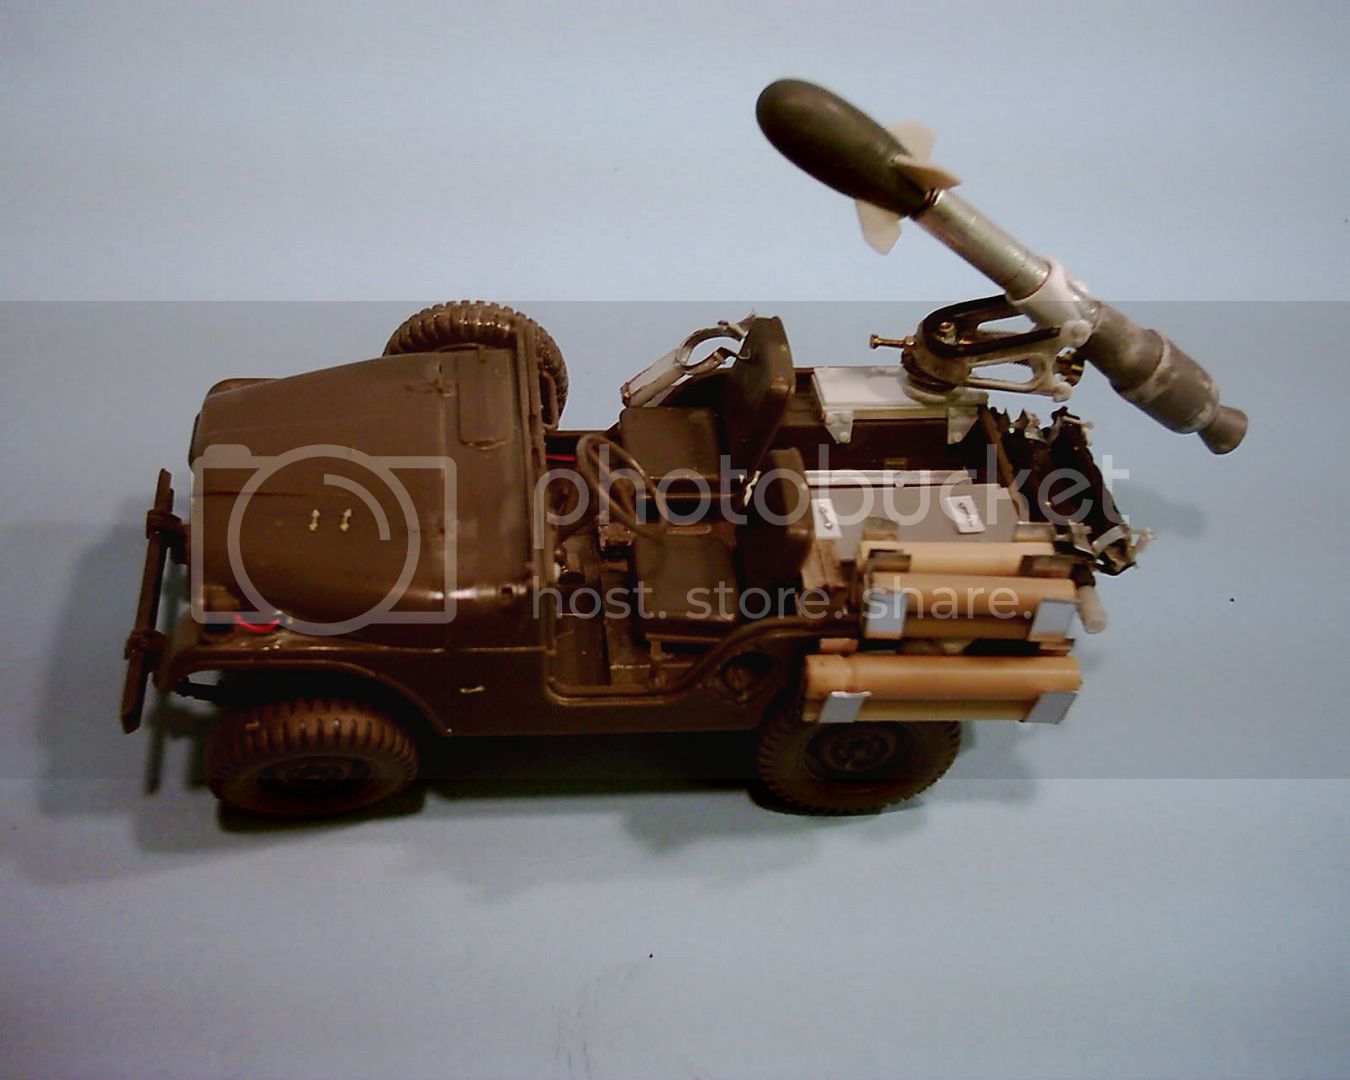
IMG]http://i220.photobucket.com/albums/dd1/GenghisMcCann/Davy%20Crockett/Littlejohn5.jpg[/IMG]
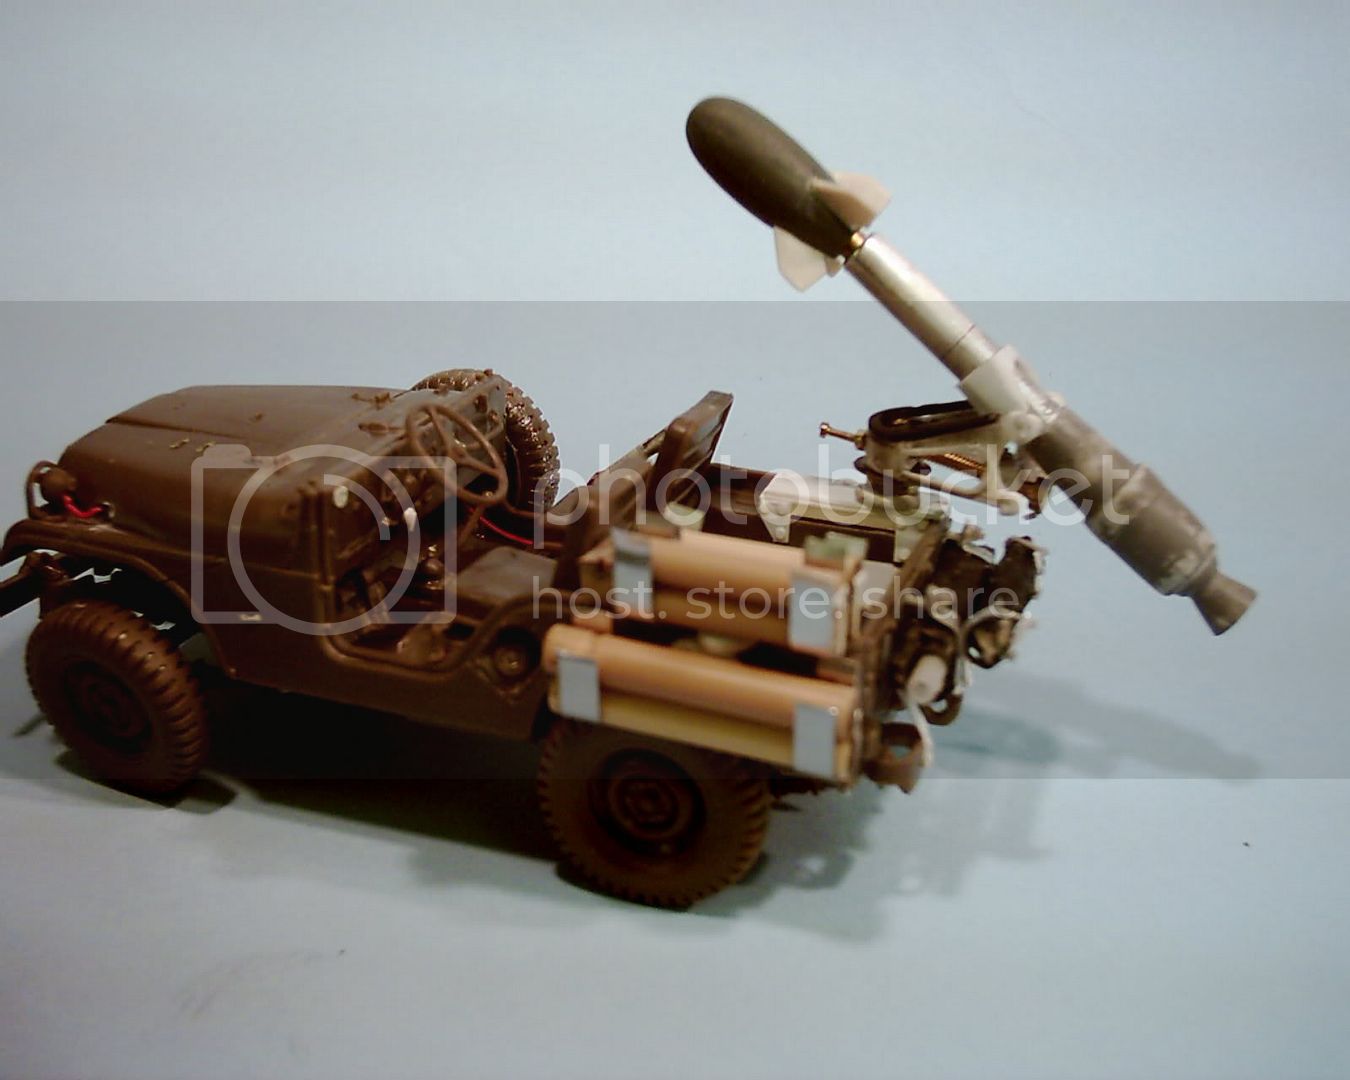
Roughly positioned with the universal soldier for scale
R
This was fun and despite doubts about the crew safety was employed in Europe and Korea,apparently to break up large tank concentrations, for a number of years.
I believe that both the British and Canadian Armies ordered several thousand but cancelled. Wether because of safety concerns or as I have heard in the British case the idea of giving a junior NCO a nuclear device was a difficult one to accept I do not know. I do know that it was a nice conversion to do.
Jupiterblitz
Joined: December 30, 2007
KitMaker: 885 posts
Armorama: 796 posts
KitMaker: 885 posts
Armorama: 796 posts
Posted: Thursday, July 30, 2009 - 12:03 PM UTC
Mission accomplished.
Congratulation Paddy.
Very nice entry with an impressive and inspiring scratch build.
Award on December 1st, 2009.
Congratulation Paddy.
Very nice entry with an impressive and inspiring scratch build.
Award on December 1st, 2009.
Posted: Thursday, July 30, 2009 - 01:45 PM UTC
is the stryker reconnaissance eligible for this event?
i'm thinking on going with this kit: http://www.luckymodel.com/scale.aspx?item_no=TP00395
Jupiterblitz
Joined: December 30, 2007
KitMaker: 885 posts
Armorama: 796 posts
KitMaker: 885 posts
Armorama: 796 posts
Posted: Thursday, July 30, 2009 - 02:05 PM UTC
Jawohl Matan, it is.
Looking forward to your registration.
Posted: Friday, July 31, 2009 - 03:40 AM UTC
I won't register just yet - I'll wait for the kit to arrive.
I'm afraid I'm becoming a "stasher" - I have a dragon panther D and a merkava 4 which I didn't even open....
Hey, my name is Matan, and I'm stasher
I'm afraid I'm becoming a "stasher" - I have a dragon panther D and a merkava 4 which I didn't even open....
Hey, my name is Matan, and I'm stasher
Jupiterblitz
Joined: December 30, 2007
KitMaker: 885 posts
Armorama: 796 posts
KitMaker: 885 posts
Armorama: 796 posts
Posted: Friday, July 31, 2009 - 01:19 PM UTC
MichalBT
Województwo Kieleckie, Poland
Joined: July 03, 2002
KitMaker: 326 posts
Armorama: 275 posts
Joined: July 03, 2002
KitMaker: 326 posts
Armorama: 275 posts
Posted: Sunday, August 02, 2009 - 12:40 AM UTC
Hi,
I decided to participate with 2 beasts:
1/ Canadian Leopard C2 (Revell's Leo 1A5 and Maple Leaf's C2 conversion)
2/ Polish Leopard 2A4 (combination of Tamiya's Leo 2A5 and Revell's Leo 2A4)
Hope it meets campaign's requitrements.
Greetings from sunny Poland
Michal
I decided to participate with 2 beasts:
1/ Canadian Leopard C2 (Revell's Leo 1A5 and Maple Leaf's C2 conversion)
2/ Polish Leopard 2A4 (combination of Tamiya's Leo 2A5 and Revell's Leo 2A4)
Hope it meets campaign's requitrements.
Greetings from sunny Poland
Michal
Posted: Sunday, August 02, 2009 - 02:01 AM UTC
just registered - stryker ordered
Jupiterblitz
Joined: December 30, 2007
KitMaker: 885 posts
Armorama: 796 posts
KitMaker: 885 posts
Armorama: 796 posts
Posted: Sunday, August 02, 2009 - 02:06 AM UTC
That's great, Matan.
Welcome aboard.
Welcome aboard.
TheDiggs
Illinois, United States
Joined: April 25, 2008
KitMaker: 338 posts
Armorama: 75 posts
Joined: April 25, 2008
KitMaker: 338 posts
Armorama: 75 posts
Posted: Monday, August 03, 2009 - 11:41 PM UTC
I have completed my entry a US Ohio class SSBN. I have never had to use putty on a sub before but this baby had some gaps to fill.
Jupiterblitz
Joined: December 30, 2007
KitMaker: 885 posts
Armorama: 796 posts
KitMaker: 885 posts
Armorama: 796 posts
Posted: Tuesday, August 04, 2009 - 06:40 AM UTC
Mission accomplished.
Congratulation David.
Cool submarine - have you got some more images?
Award on December 1st, 2009.
Congratulation David.
Cool submarine - have you got some more images?
Award on December 1st, 2009.
bulivyf
Vendor
Praha, Czech Republic
Joined: April 03, 2006
KitMaker: 2,450 posts
Armorama: 2,409 posts
Joined: April 03, 2006
KitMaker: 2,450 posts
Armorama: 2,409 posts
Posted: Tuesday, August 04, 2009 - 11:02 AM UTC
Marco,
excellent work. Beautiful model and superb finish.
Miloslav
excellent work. Beautiful model and superb finish.
Miloslav
TheDiggs
Illinois, United States
Joined: April 25, 2008
KitMaker: 338 posts
Armorama: 75 posts
Joined: April 25, 2008
KitMaker: 338 posts
Armorama: 75 posts
Posted: Tuesday, August 04, 2009 - 12:01 PM UTC
Quoted Text
Cool submarine - have you got some more images?
Thanks,
I have some comparison photos but that is about it. Subs are pretty simple looking. I wish I could've found some decals for this one, the ones in the kit were decrepit and I couldn't find anyone who makes 1/700 sub decals.
Here she is with the USS Miami CL-89 and the USS Ingraham FFG-61
Here she is again with a Russian Typhoon and a Russian Oscar II
warreni
South Australia, Australia
Joined: August 14, 2007
KitMaker: 5,926 posts
Armorama: 712 posts
Joined: August 14, 2007
KitMaker: 5,926 posts
Armorama: 712 posts
Posted: Tuesday, August 04, 2009 - 09:41 PM UTC
Greetings All!
Here is a sneak peek at my Panzerhaubitze 2000 ready for paint..
Click on the images for larger piccies.
Gee those tracks look bright!! They will tone down no problem.
This is the 1/35 Revell kit that comes with the aluminium barrel, which surprised me. Fit is good. Only problems I had were self-induced..
Jupiterblitz
Joined: December 30, 2007
KitMaker: 885 posts
Armorama: 796 posts
KitMaker: 885 posts
Armorama: 796 posts
Posted: Tuesday, August 04, 2009 - 10:21 PM UTC
Hi Miloslav,
thanks for your kind comment - very appreciated.
David,
I have to say that these Ohio class subs are really huge monsters as are the Typhoons...really impressive.
Warren,
half of the rent is paid, now good luck and a cool hand for your paint job - and in particular the hard edged camo pattern...
thanks for your kind comment - very appreciated.
David,
I have to say that these Ohio class subs are really huge monsters as are the Typhoons...really impressive.
Warren,
half of the rent is paid, now good luck and a cool hand for your paint job - and in particular the hard edged camo pattern...
Sudzonic
Scotland, United Kingdom
Joined: December 07, 2007
KitMaker: 2,096 posts
Armorama: 1,983 posts
Joined: December 07, 2007
KitMaker: 2,096 posts
Armorama: 1,983 posts
Posted: Wednesday, August 05, 2009 - 05:08 AM UTC
Hay all here is my contribution a 1/72 warrior finished in U.N markings the kit is OBB and is about 90% finished just a few bit and bobs to do and stick the tracks on.
Jupiterblitz
Joined: December 30, 2007
KitMaker: 885 posts
Armorama: 796 posts
KitMaker: 885 posts
Armorama: 796 posts
Posted: Wednesday, August 05, 2009 - 06:02 AM UTC
Scott,
nice to see another braille scale vehicle, especially in UN-markings.
Good luck with your finish.
nice to see another braille scale vehicle, especially in UN-markings.
Good luck with your finish.
mmeier
Nordrhein-Westfalen, Germany
Joined: October 22, 2008
KitMaker: 1,280 posts
Armorama: 1,015 posts
Joined: October 22, 2008
KitMaker: 1,280 posts
Armorama: 1,015 posts
Posted: Wednesday, August 05, 2009 - 11:34 AM UTC
Great looking 1/72 scale models. I admire people who can work with that small parts.
But one question: Are british fire extinguishers still green?
Silantra
Putrajaya, Malaysia
Joined: March 04, 2004
KitMaker: 2,511 posts
Armorama: 913 posts
Joined: March 04, 2004
KitMaker: 2,511 posts
Armorama: 913 posts
Posted: Wednesday, August 05, 2009 - 01:35 PM UTC
Hi mate,
i decided to enroll yesterday. I got a Tamiya M1 Abrams in my stash and i already assembled moons ago..after i complete my V-150 and the Schnellboot, i will continue with the abrams with the NATO cammo...
warreni
South Australia, Australia
Joined: August 14, 2007
KitMaker: 5,926 posts
Armorama: 712 posts
Joined: August 14, 2007
KitMaker: 5,926 posts
Armorama: 712 posts
Posted: Wednesday, August 05, 2009 - 10:01 PM UTC
Quoted Text
Warren,
half of the rent is paid, now good luck and a cool hand for your paint job - and in particular the hard edged camo pattern...
Hi MArco!
Hard edged camo pattern eh?? Coming right up!!
(Click on the piccies for larger ones.)
First of all you paint it in a base colour. In this case I chose Tamiya NATO Green..
Then, when it has dried for a few hours you make up your own masks..
.. and apply the second colour, Tamiya NATO Brown..
.. and then when they have had a few hours to dry you apply the NATO Black..
And there is your hard edged camo scheme!
I have made my own masks for a while now using a ruler, Photoshop CS3, the kit instructions and a No11 Xacto knife. If anyone would like a tutorial on how I do it just drop me a line.
:)
Jupiterblitz
Joined: December 30, 2007
KitMaker: 885 posts
Armorama: 796 posts
KitMaker: 885 posts
Armorama: 796 posts
Posted: Wednesday, August 05, 2009 - 10:40 PM UTC
Zaidi,
I think a three-tone Abrams might be a welcome change to all the desertised vehicles.
Warren,
a successful camo job.
Me too am working currently on a three tone tank, but due to the many filigrane PEs my model got, I am worried that they could be damaged, removed, bended etc. by using any kind of masking agents (like the small chains of the smoke grenades).
So I have decided for myself to paint free hand - you have no idea how much weight you are loosing during such a paint session...
Instead of a tutorial limited to a thread only, I suggest that you submit a feature.
Subjects like painting camo pattern belong to the FAQ and will be always an evergreen.
warreni
South Australia, Australia
Joined: August 14, 2007
KitMaker: 5,926 posts
Armorama: 712 posts
Joined: August 14, 2007
KitMaker: 5,926 posts
Armorama: 712 posts
Posted: Thursday, August 06, 2009 - 11:46 AM UTC
Hi All.
Well after a few little touch ups here is my Pzh2000. Only a bit of weathering on the tracks and road wheels as most photos I have seen of these monsters show a pretty clean looking SPG. This is the biggest gun I have on any of my AFVs. The Revell kit came with an Aluminium barrel which is good as I hate filling the seams oyu get with two piece guns.
I would recommend this kit to anyone wanting a big tank with a big gun! And the three colour camo is easy to airbrush if you do it using masks, which are easy to make yourself!
Till next time!
Jupiterblitz
Joined: December 30, 2007
KitMaker: 885 posts
Armorama: 796 posts
KitMaker: 885 posts
Armorama: 796 posts
Posted: Thursday, August 06, 2009 - 06:05 PM UTC
Mission accomplished.
Congratulation Warren.
A Bundeswehr Panzerhaubitze with original NATO camo scheme - that's something you can be really proud of: There are only a few models painted so...even in German forums...
Award on December 1st, 2009.
Congratulation Warren.
A Bundeswehr Panzerhaubitze with original NATO camo scheme - that's something you can be really proud of: There are only a few models painted so...even in German forums...
Award on December 1st, 2009.
Silantra
Putrajaya, Malaysia
Joined: March 04, 2004
KitMaker: 2,511 posts
Armorama: 913 posts
Joined: March 04, 2004
KitMaker: 2,511 posts
Armorama: 913 posts
Posted: Thursday, August 06, 2009 - 08:05 PM UTC
Quoted Text
Hi All.
Well after a few little touch ups here is my Pzh2000. Only a bit of weathering on the tracks and road wheels as most photos I have seen of these monsters show a pretty clean looking SPG. This is the biggest gun I have on any of my AFVs. The Revell kit came with an Aluminium barrel which is good as I hate filling the seams oyu get with two piece guns.
I would recommend this kit to anyone wanting a big tank with a big gun! And the three colour camo is easy to airbrush if you do it using masks, which are easy to make yourself!
Till next time!
Nice one warren.,,
are the colors tamiya??
I had the NATO colors set........