
Campaigns
Where Armorama group builds can be discussed, organized, and updates posted.
Where Armorama group builds can be discussed, organized, and updates posted.
Hosted by Darren Baker, Richard S.
NATO - 60th Anniversary

Tigerbait

Joined: September 28, 2005
KitMaker: 347 posts
Armorama: 141 posts

Posted: Friday, October 23, 2009 - 10:24 AM UTC
Am ALMOST done with my UN LeClerc ... putting finishing touches to it this weekend ... hope to be completed by mid next week!!! 

GaryKato

Joined: December 06, 2004
KitMaker: 3,694 posts
Armorama: 2,693 posts

Posted: Friday, October 23, 2009 - 08:05 PM UTC
There should now be a campaign photo gallery for this campaign.
http://gallery.kitmaker.net/showgallery.php/cat/24969
http://gallery.kitmaker.net/showgallery.php/cat/24969
JMartine

Joined: October 18, 2007
KitMaker: 1,698 posts
Armorama: 45 posts

Posted: Saturday, October 24, 2009 - 01:23 AM UTC
Todd - Looks very nice, always liked the lines of that tank! look forward to the paint
JMartine

Joined: October 18, 2007
KitMaker: 1,698 posts
Armorama: 45 posts

Posted: Saturday, October 24, 2009 - 01:32 AM UTC
Greetings - late entry here... I had started a cold war destroyer for the Cold War Tin cans GB in ModelShipWrights, but did not get very far. Marco was kind enough to let me change dry docks and let me finish it here...
Here is my WIP blog, the latest work has been appended at the end. Cheers
USS Charles Adams – DDG 2
Guided missile destroyer, part of the Cuban blockade during the missile crisis: "Following commissioning Charles F. Adams took part in recovery operations for Walter M. Schirra's Mercury 8 mission. While engaged in this operation the Cuban Missile Crisis developed and Adams moved to the Caribbean Sea as part of the quarantine forces around the Island of Cuba."
Kit – 1/700 Dragon Premium edition

Assembly starts!

The instructions call for the building of structures by subunits, some of which “slide” against/into others, creating the superstructure. The whole assembly can then be “dropped” onto the main hull component. The problem with this assembly sequence is that any deviation or error can result in the superstructure not fitting onto the hull. Since most sub-units are made of 3 pieces (L,R, center) and mate with other, it is practically impossible to dry-fit the whole assembly with only two hands. If I encounter this build sequence again, I will build from the hull upwards, irrespective of instructions, ensuring a good fit between the hull and superstructure.
Bow piece; I scrapped off the molded anchor chains and sanded the area:

I also drilled (with the point of my Xcto knife since I don’t have drill bits that small) holes for the anchor chains to slide into the hull:

I then added some PE chains, leftover from a 1/72 scale armor piece… not fully accurate (on the small side) but looks better:

Major structural components in place:


Some gaps between levels. The next step was detailing the gun turrets. I added some PE doors, one of them in “open” position:

Gun radar … not fully accurate, the TMM Adams class PE fret is better. You could fix this one with more time by cutting several small pieces of wire, give them a 1/16” inch bend, and CA-glue to the tips of the array. If I have the time, I will see if I can accomplish that task. In the meantime, will have to stay as is.

Some super-structure in place, starting to look like a ship! My third attempt at small gap filling was using ZapA Gap and accelerator.This combination works pretty well, as long as I start sanding/shaving immediately after application of the accelerant. The filler stays malleable for a couple minutes, enough time to shave/sand flush. Here is the status of the super-structure:

The main sensor farm; few options of sensors are available, depending on the specific ship and/or deployment time. The Dragon Adams kit includes markings for vessels from 4 different countries. However, it is up to the builder to research and determine which set of sensors is specific for the particular ship being built. My choices were based on available pics from the 60s (time of the Cuban missile crisis, in which this ship performed sub picket duty), but my choices are probably not completely accurate.
The larger radar (SPS ?) was molded in solid plastic; I used the tip of a new blade to carve up the openings. Needs a bit of cleanup; not sure if I was successful in making the radar look better or at least better than solid throughout – opinions?

This is how the build stands as of now, …. To finish on time I will have to probably cut some corners,
Any comments or suggestions are welcome, either of the accuracy or construction type. Thanks for looking, cheers!
Here is my WIP blog, the latest work has been appended at the end. Cheers
USS Charles Adams – DDG 2
Guided missile destroyer, part of the Cuban blockade during the missile crisis: "Following commissioning Charles F. Adams took part in recovery operations for Walter M. Schirra's Mercury 8 mission. While engaged in this operation the Cuban Missile Crisis developed and Adams moved to the Caribbean Sea as part of the quarantine forces around the Island of Cuba."
Kit – 1/700 Dragon Premium edition

Assembly starts!

The instructions call for the building of structures by subunits, some of which “slide” against/into others, creating the superstructure. The whole assembly can then be “dropped” onto the main hull component. The problem with this assembly sequence is that any deviation or error can result in the superstructure not fitting onto the hull. Since most sub-units are made of 3 pieces (L,R, center) and mate with other, it is practically impossible to dry-fit the whole assembly with only two hands. If I encounter this build sequence again, I will build from the hull upwards, irrespective of instructions, ensuring a good fit between the hull and superstructure.
Bow piece; I scrapped off the molded anchor chains and sanded the area:

I also drilled (with the point of my Xcto knife since I don’t have drill bits that small) holes for the anchor chains to slide into the hull:

I then added some PE chains, leftover from a 1/72 scale armor piece… not fully accurate (on the small side) but looks better:

Major structural components in place:


Some gaps between levels. The next step was detailing the gun turrets. I added some PE doors, one of them in “open” position:

Gun radar … not fully accurate, the TMM Adams class PE fret is better. You could fix this one with more time by cutting several small pieces of wire, give them a 1/16” inch bend, and CA-glue to the tips of the array. If I have the time, I will see if I can accomplish that task. In the meantime, will have to stay as is.

Some super-structure in place, starting to look like a ship! My third attempt at small gap filling was using ZapA Gap and accelerator.This combination works pretty well, as long as I start sanding/shaving immediately after application of the accelerant. The filler stays malleable for a couple minutes, enough time to shave/sand flush. Here is the status of the super-structure:

The main sensor farm; few options of sensors are available, depending on the specific ship and/or deployment time. The Dragon Adams kit includes markings for vessels from 4 different countries. However, it is up to the builder to research and determine which set of sensors is specific for the particular ship being built. My choices were based on available pics from the 60s (time of the Cuban missile crisis, in which this ship performed sub picket duty), but my choices are probably not completely accurate.
The larger radar (SPS ?) was molded in solid plastic; I used the tip of a new blade to carve up the openings. Needs a bit of cleanup; not sure if I was successful in making the radar look better or at least better than solid throughout – opinions?

This is how the build stands as of now, …. To finish on time I will have to probably cut some corners,
Any comments or suggestions are welcome, either of the accuracy or construction type. Thanks for looking, cheers!
mmeier

Joined: October 22, 2008
KitMaker: 1,280 posts
Armorama: 1,015 posts

Posted: Saturday, October 24, 2009 - 08:39 AM UTC
Finally got my Camera back. So here come some pictures of the BW-Duck. Imagine a fall maneuver back in the 1970s, a column of KaJaPa has just raced down a secondary road somewhere in the rural parts of germany with an elder man looking at/after them


Still needs some final add-ons like camo netting, finish of the "old man" and a green flag (End of column) for the tank etc.


Still needs some final add-ons like camo netting, finish of the "old man" and a green flag (End of column) for the tank etc.

Tigerbait

Joined: September 28, 2005
KitMaker: 347 posts
Armorama: 141 posts

Posted: Saturday, October 24, 2009 - 11:26 AM UTC
Here it is ... UN marked LeClerc


retiredyank

Joined: June 29, 2009
KitMaker: 11,610 posts
Armorama: 7,843 posts

Posted: Sunday, October 25, 2009 - 04:38 AM UTC
Can I submit? I traded for a Marder 11 and got a Marder 1A2, instead. Since its production, in 1970, the APC has been used by both Germany and NATO. Do I need to build the NATO version instead of the German one? Oh, I have already finished 1/3 of it within 8 days.
Here are some pics:


TIA
Matt N.
Here are some pics:


TIA
Matt N.
mmeier

Joined: October 22, 2008
KitMaker: 1,280 posts
Armorama: 1,015 posts

Posted: Sunday, October 25, 2009 - 05:08 AM UTC
There is no NATO version of the old "Bagger". Within NATO Marder IFV is ONLY used by the German Bundeswehr. The Argentinian Army is using a variant of the Marder (VCTP).
Obtw: Picture of a Marder engine (Same engine in all german Marders since the current Marder1A3 / A5 all began live as a Marder 1 in the 1970s)
Some more and Tankograd also has a book on the Marder with quite a few photos of all versions including prototypes and special variants (Roland SAM-carrier, Mortar carrier)

retiredyank

Joined: June 29, 2009
KitMaker: 11,610 posts
Armorama: 7,843 posts

Posted: Saturday, October 31, 2009 - 01:36 PM UTC
I use Wiki, too. Some very nice pictures there, but have little to do with the Marder 1A2. I should have the model finished by tommorrow or as soon as I find a fitting base. Now to beg the question: Is a Marder 1A2 acceptable to join?


Quoted Text
There is no NATO version of the old "Bagger". Within NATO Marder IFV is ONLY used by the German Bundeswehr. The Argentinian Army is using a variant of the Marder (VCTP).
Obtw: Picture of a Marder engine (Same engine in all german Marders since the current Marder1A3 / A5 all began live as a Marder 1 in the 1970s)
Some more and Tankograd also has a book on the Marder with quite a few photos of all versions including prototypes and special variants (Roland SAM-carrier, Mortar carrier)


GaryKato

Joined: December 06, 2004
KitMaker: 3,694 posts
Armorama: 2,693 posts

Posted: Saturday, October 31, 2009 - 02:01 PM UTC
Since Germany is a NATO nation, your Marder 1A2 should be fine.
trucker

Joined: January 01, 2005
KitMaker: 60 posts
Armorama: 54 posts

Posted: Sunday, November 01, 2009 - 08:50 AM UTC
Hello added my photos to the gallery of a centurion mk6 i think i'm not to sure 
 I hope you like the model comments are welcome


mmeier

Joined: October 22, 2008
KitMaker: 1,280 posts
Armorama: 1,015 posts

Posted: Sunday, November 01, 2009 - 11:22 PM UTC
The differences between an Marder 1A2 and 1A3 are often quite small. Basically they added more armor plating and side stowage boxes but kept most of the rest. This includes the colors and camo pattern between late 1A2 and the A3 (early 1A2 where one-color "Gelboliv") Tracks, Gun, Sight devices etc. are all the same. So most references to a 1A3 can be used for a 1A2 when it comes to color etc. They didn't change the interior either nor change colors.
Basically you loose the hatch behind the driver, get the rear hatches re-arranged and the side boxes/armor when you switch to A3 (From a modelers point of view)
Basically you loose the hatch behind the driver, get the rear hatches re-arranged and the side boxes/armor when you switch to A3 (From a modelers point of view)

canuck100a

Joined: September 13, 2005
KitMaker: 96 posts
Armorama: 96 posts

Posted: Friday, November 06, 2009 - 01:04 PM UTC
Folks,
If it is not too late to join, I would like to enter with A M48A2GA2.
Thanks
Eric

If it is not too late to join, I would like to enter with A M48A2GA2.
Thanks
Eric

GaryKato

Joined: December 06, 2004
KitMaker: 3,694 posts
Armorama: 2,693 posts

Posted: Friday, November 06, 2009 - 02:54 PM UTC
Hope you build fast. The campaign ends at the end of this month.

canuck100a

Joined: September 13, 2005
KitMaker: 96 posts
Armorama: 96 posts

Posted: Saturday, November 07, 2009 - 06:51 AM UTC
haha.............
Yep I am off the next 2 weeks.
Eric
Yep I am off the next 2 weeks.
Eric
Removed by original poster on 11/08/09 - 13:33:30 (GMT).
kathoon

Joined: January 14, 2003
KitMaker: 71 posts
Armorama: 55 posts

Posted: Sunday, November 08, 2009 - 01:39 AM UTC
Goodday,
I'm sorry but I deleted my first post, because I'm having some problems with uploading photos.
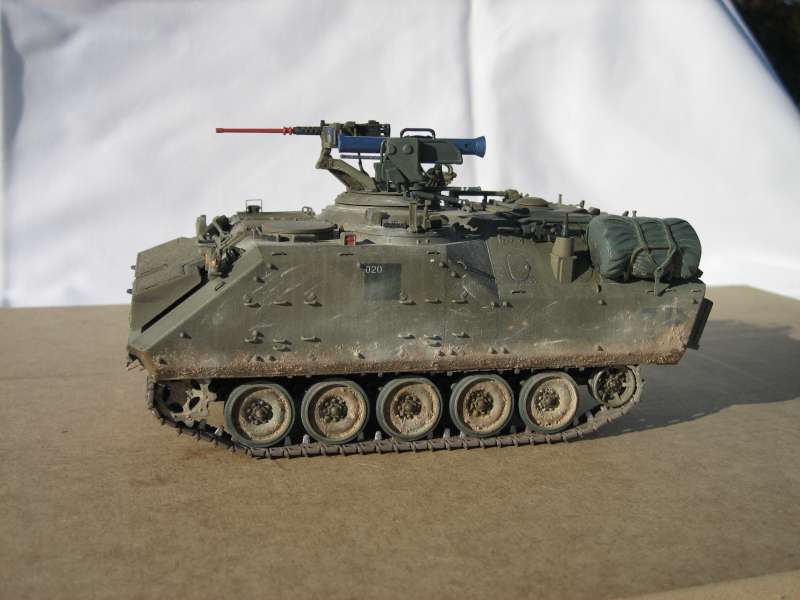
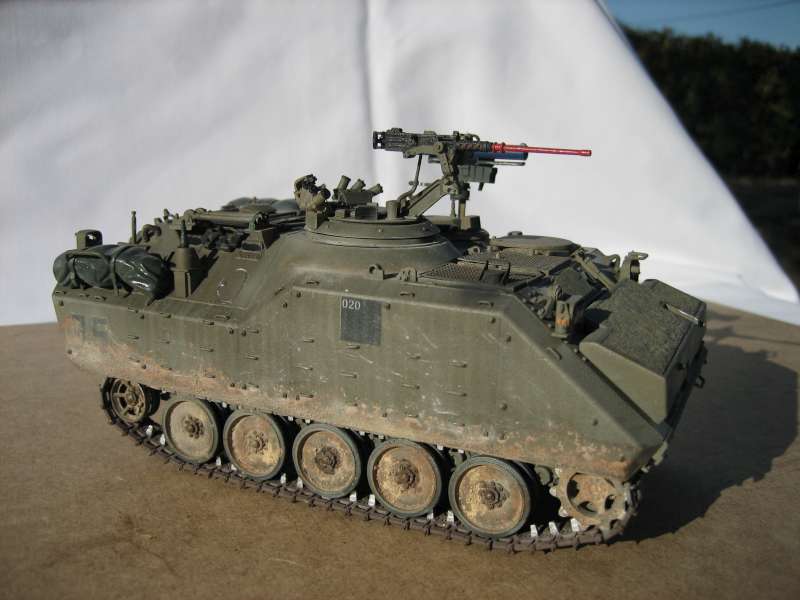
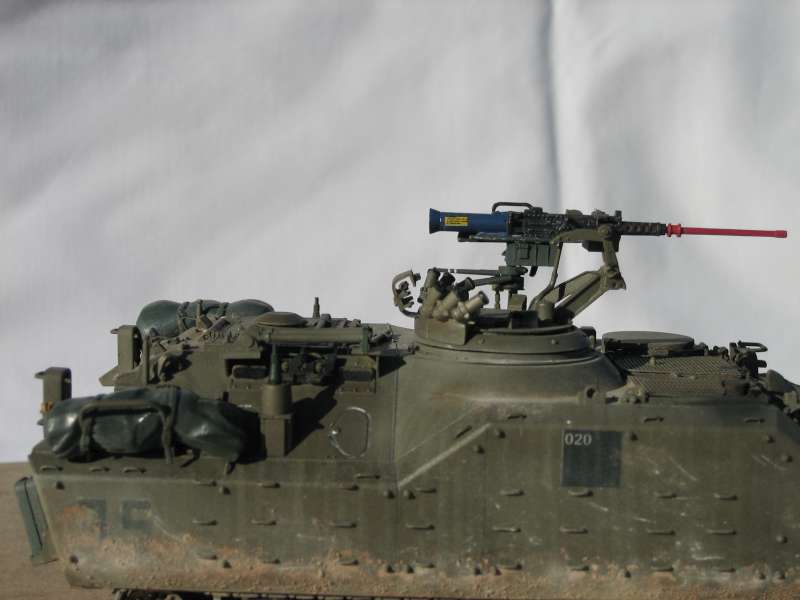
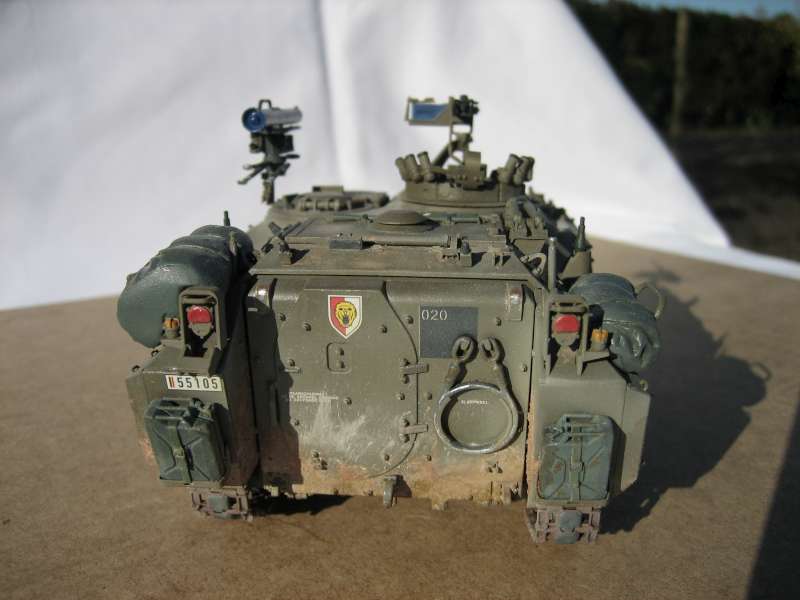
I was just ending my build of the afv-club kit, when I found this Nato-campaign build. Here are some pictures of a Belgian AIFV-B Milan kit. It is the AFV kit with resin parts added. The Milan pedastel comes from a revell kit, the .50 from skybow and hobby fan stowage. The tie-downs on the sides were rebuild. It depicts a vehicle during training mission (red barrell, blue ammo box and blue Milan tube)


Jupiterblitz
Joined: December 30, 2007
KitMaker: 885 posts
Armorama: 796 posts
KitMaker: 885 posts
Armorama: 796 posts

Posted: Sunday, November 08, 2009 - 08:31 AM UTC
Hello,
sorry, that I have not taken care of this campaign during the past weeks.
Miloslav,
mission accomplished Professional look as usual. A real enhancement for this campaign.
Lawrence,
mission accomplished Excellent paint job of the details. The pigments break open successfully the monocromatic camo scheme.
Herr Meier,
mission accomplished Nice to see a Bundeswehr-Jagdpanzer. Schöne Detailbemalung z. B. beim Werkzeug.
Todd,
mission accomplished A superb white Leclerc...très magnifique.
Keith,
mission accomplished A very vivid Centurion, very nice model.
Jan,
mission accomplished Carefull built and painted, nice details - a vehicle with a very realistic look.
Good luck to all the others
(Gary, thanks for the setup of a campaign gallery.)
sorry, that I have not taken care of this campaign during the past weeks.
Miloslav,
mission accomplished
 Professional look as usual. A real enhancement for this campaign.
Lawrence,
mission accomplished
 Excellent paint job of the details. The pigments break open successfully the monocromatic camo scheme.
Herr Meier,
mission accomplished
 Nice to see a Bundeswehr-Jagdpanzer. Schöne Detailbemalung z. B. beim Werkzeug.
Todd,
mission accomplished
 A superb white Leclerc...très magnifique.
Keith,
mission accomplished
 A very vivid Centurion, very nice model.
Jan,
mission accomplished
 Carefull built and painted, nice details - a vehicle with a very realistic look.
 Good luck to all the others

(Gary, thanks for the setup of a campaign gallery.)
Ruffus

Joined: April 12, 2005
KitMaker: 343 posts
Armorama: 223 posts

Posted: Friday, November 13, 2009 - 01:41 PM UTC
Where is the campaign gallery?
Byron
Byron

Jupiterblitz
Joined: December 30, 2007
KitMaker: 885 posts
Armorama: 796 posts
KitMaker: 885 posts
Armorama: 796 posts

Posted: Friday, November 13, 2009 - 02:01 PM UTC
mike0000

Joined: May 13, 2008
KitMaker: 29 posts
Armorama: 23 posts

Posted: Tuesday, November 17, 2009 - 11:57 AM UTC

Jupiterblitz
Joined: December 30, 2007
KitMaker: 885 posts
Armorama: 796 posts
KitMaker: 885 posts
Armorama: 796 posts

Posted: Tuesday, November 17, 2009 - 06:56 PM UTC
Michael,
mission accomplished .
.
"My first model in over 20 years"
Welcome to our fascinating hobby.
And congratulation: You have mastered successfully the first and most important lesson of modeling...you have finished! a model
Additonally you have dared to paint an M1 in NATO scheme, which is always hard to apply, and you have even dusted your Abrams with pigments.
Well done, Michael.
mission accomplished
 .
."My first model in over 20 years"
Welcome to our fascinating hobby.
And congratulation: You have mastered successfully the first and most important lesson of modeling...you have finished! a model

Additonally you have dared to paint an M1 in NATO scheme, which is always hard to apply, and you have even dusted your Abrams with pigments.
Well done, Michael.
WARLORD

Joined: April 23, 2003
KitMaker: 1,923 posts
Armorama: 868 posts

Posted: Wednesday, November 18, 2009 - 09:39 PM UTC
Marco, I think I may not be able to finish my M-26 Pershing (built but not even primed yet) by the deadline so I need to ask for about two weeks extension. I hope it wouldn't be problem.


Jupiterblitz
Joined: December 30, 2007
KitMaker: 885 posts
Armorama: 796 posts
KitMaker: 885 posts
Armorama: 796 posts

Posted: Thursday, November 19, 2009 - 07:32 AM UTC
Hello Marcin,
the campaign is extended to December 31st.
This extension is designed as a waiting period only.
The ribbon will be still awarded on December 1st.
Please regard this as a kind of soft closing which is directed to stragglers who are already listed.
Good luck.

the campaign is extended to December 31st.
This extension is designed as a waiting period only.
The ribbon will be still awarded on December 1st.
Please regard this as a kind of soft closing which is directed to stragglers who are already listed.
Good luck.

gbkirsch

Joined: June 04, 2005
KitMaker: 627 posts
Armorama: 455 posts

Posted: Sunday, November 22, 2009 - 08:51 AM UTC
My build, German Leopard 2A4...
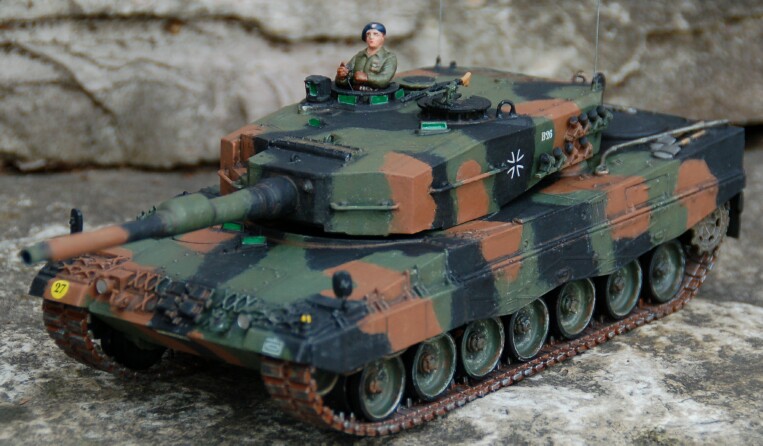
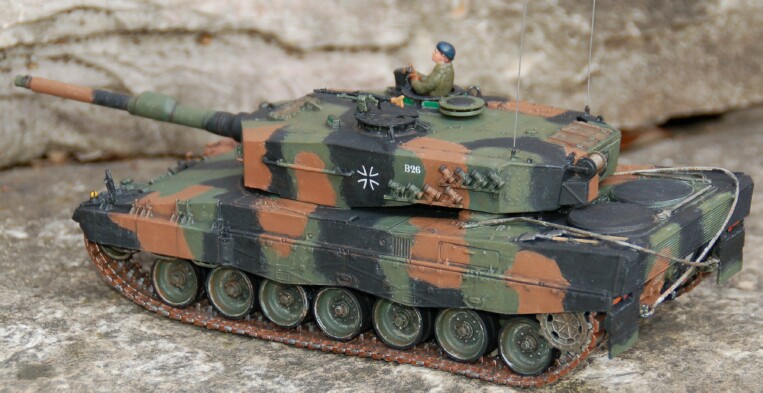
Cheers,
Gary


Cheers,
Gary

 |


