Campaigns
Where Armorama group builds can be discussed, organized, and updates posted.
Matchbox Nostalgia Campaign
tread_geek
Visit this Community
Ontario, Canada
Joined: March 23, 2008
KitMaker: 2,847 posts
Armorama: 2,667 posts
Posted: Monday, February 01, 2010 - 07:09 AM UTC
@AJB and Smartin - I still haven't started my kit yet so I can't comment on how it might go together. As you two mention, these are rather old kits. Perhaps our expectations have increased with time and/or maybe we just weren't as fastidious and picky in the past.

@AJB - I can see that it looks like you had a problem with the inner front idler wheel and it appears that you scratch built a replacement. Is that what you meant when you mentioned breaking a road wheel? I can also see in the pictures that it appears that you had some trouble with the right side of the turret. However, on a positive note, the hull is looking pretty good and you managed to take some nice pictures. Please keep us informed of what you run into as this could help others in their builds.

Cheers,
Jan
SGTJKJ
#041
Visit this Community
Kobenhavn, Denmark
Joined: July 20, 2006
KitMaker: 10,069 posts
Armorama: 4,677 posts
Posted: Wednesday, February 03, 2010 - 11:30 PM UTC
Nice Chaffee, Andrews. A nice little gem.

I have started on my Puma. It was a quick build and only took one night in front of the TV to finish it. Apparently I have more luck with this kit than some of you. I cannot complain about the fit

The kit is very inaccurate - especially the size of the turret and the hugely overscale wheels. However, nothing beats the nostalgia of making this kit again.

More to follow soon.


tread_geek
Visit this Community
Ontario, Canada
Joined: March 23, 2008
KitMaker: 2,847 posts
Armorama: 2,667 posts
Posted: Thursday, February 04, 2010 - 06:52 AM UTC
Looks like you have a nice clean build, Jesper. I can't wait to see your Puma with some colour on it. It's also good to hear that someone has had no difficulty with a kit after some of the problems that have arisen for others. With any luck I hope to get a start on mine either today or tomorrow.

Cheers,
Jan


SGTJKJ
#041
Visit this Community
Kobenhavn, Denmark
Joined: July 20, 2006
KitMaker: 10,069 posts
Armorama: 4,677 posts
Posted: Thursday, February 04, 2010 - 07:51 PM UTC
A little more progress. The puma now has a basecoat and green camouflage. Brown will also be added to the camouflage scheme. I have decided to leave out the figures included in the kit, but will of course use the base - the Matchbox "signature".

More to follow soon....


sabredog
Visit this Community
Western Australia, Australia
Joined: July 22, 2007
KitMaker: 607 posts
Armorama: 599 posts
Posted: Friday, February 05, 2010 - 03:24 AM UTC
A non image status report. Got the chassis constructed and gaps filled. Gun and mount assembled.

A few more bits to add and then prime time
Dangeroo
#023
Visit this Community
Zurich, Switzerland
Joined: March 13, 2009
KitMaker: 2,058 posts
Armorama: 1,656 posts
Posted: Saturday, February 06, 2010 - 05:08 AM UTC
Howdy all!

Finally managed to get a pic of my built AVRE:


In the meantime I have preshaded and base painted. Detail paint next.

Cheated a little, added two small discs to the front "wire" attachments for ease of assembly. And I had to scratch a new headlamp because the kit one was eaten by the carpet monster (which is munching around even though I don't have a carpet...). Hope that's ok by the rules!

Cheers
Stef
tread_geek
Visit this Community
Ontario, Canada
Joined: March 23, 2008
KitMaker: 2,847 posts
Armorama: 2,667 posts
Posted: Saturday, February 06, 2010 - 05:33 AM UTC
@Jesper - The Puma is coming along very nicely. My hat is off to anyone who can spray camouflage on a 1/76 scale vehicle.

@Michael - Pictures, pictures, pictures, we want pictures! Your statement about gaps filled has made me nervous. Maybe I should do the M7.

@Stefan - Your build is looking very good. I am particularly impressed with the rigging for the bridge. Your need to create replacement parts for those gone missing or making small additions to ease or improve assembly are all legitimate actions under the rules. While OOB builds are encouraged the rules do allow a modest amount of improvisation/enhancement.

Cheers,
Jan
tread_geek
Visit this Community
Ontario, Canada
Joined: March 23, 2008
KitMaker: 2,847 posts
Armorama: 2,667 posts
Posted: Saturday, February 06, 2010 - 07:50 AM UTC
Okay, you people pressured me into it. I decided to start on the M40 GMC today. I've also taken some pictures and will most likely do a build review of the kit. One observation I have is that the Revell plastic is far more brittle than the old Matchbox stuff. As some of you have experienced it's not the easiest stuff to work with. Even with the little I have done I can definitely see that filler is definitely going to be required. The sprues aren't the worst I've ever seen but several of the round mouldings do have seem lines but there is no flash. The worst was removing the gun breech and cleaning it up. The sprue gates were absolutely the thickest I can ever remember seeing on a small scale model. Here's what's done so far.


Cheers,
Jan
sabredog
Visit this Community
Western Australia, Australia
Joined: July 22, 2007
KitMaker: 607 posts
Armorama: 599 posts
Posted: Sunday, February 07, 2010 - 10:10 AM UTC
Jan

If you want to display the model with the barrel not in the gunlock, you will need to shorten the actuator arms on the gun mount. I am faced with that as I glued the gunlock down.

Should be a simple fix, but one to watch for.

I thought I had removed the seams on the barrel, but priming revealed that was not so, so more work needed. A lot of work left to go....

THEN, I need to work the best way of painting the base which looks to be a cabbage or lettuce field....
CMOT70
Visit this Community
Victoria, Australia
Joined: August 23, 2007
KitMaker: 629 posts
Armorama: 26 posts
Posted: Sunday, February 07, 2010 - 07:28 PM UTC
I'm back already. I've started on the Firefly this week whilst waiting for subassemblies to set on my other project. Here it is in the bare plastic, i'm leaving off the bogeys, idlers and sprockets until after the base coat is painted...that way i'll still be able to get the tracks on under the guards.

Like others are noticing, these aren't as easy as i remember. I had less patience when i was 10, but that was balanced out by smaller fingers. And the Revell green plastic isn't the best.

Painting will happen during other gaps in my main projects.


Andrew
SGTJKJ
#041
Visit this Community
Kobenhavn, Denmark
Joined: July 20, 2006
KitMaker: 10,069 posts
Armorama: 4,677 posts
Posted: Monday, February 08, 2010 - 12:23 AM UTC

Quoted Text

@Jesper - The Puma is coming along very nicely. My hat is off to anyone who can spray camouflage on a 1/76 scale vehicle.
Cheers,
Jan


Thanks, Jan
I have even made it a three colour camouflage now. It takes more time to clean the airbrush than make the camouflage pattern
Next is some detail painting and then some weathering. A little work is also being done on the base.

Andrew, nice progress on the Sherman. A very cool and "dynamic" base. Looking forward to see more.


tread_geek
Visit this Community
Ontario, Canada
Joined: March 23, 2008
KitMaker: 2,847 posts
Armorama: 2,667 posts
Posted: Monday, February 08, 2010 - 08:32 AM UTC

Quoted Text


Like others are noticing, these aren't as easy as i remember. I had less patience when i was 10, but that was balanced out by smaller fingers. And the Revell green plastic isn't the best.


IT looks like these kits aren't going to be as simple as many of us originally thought. But at least you are making progress, Andrew.


Quoted Text


I have even made it a three colour camouflage now. It takes more time to clean the airbrush than make the camouflage pattern.


Jesper, I found that myself, when the airbrushing was working better, and is the main reason I switched to acrylic paints when I got the new airbrush.

@Michael - I do believe that we have some work cut out for us. My barrel wasn't even round, it was more of an oval shape and required copious sanding.

Here's some progress shots. After checking an M40 at prime portal I found that I had put the X cross beam of the spade on upside down. Luckilly the tube glue had not set so I was able to rectify the situation. Thankfully the side panels, floor and front plate fit together fairly nicely, although I could have used two extra hands to hold everything in place while the glue dried.


The grab handles on the back of the body are not very good at all. The right one in particular was filled and surrounded with flash and quite distorted. I'll most likely end up cutting them off and replacing them with brass wire.


I haven't looked at the actuators yet or decided on the gun lock. Options, options!

Cheers,
Jan
SGTJKJ
#041
Visit this Community
Kobenhavn, Denmark
Joined: July 20, 2006
KitMaker: 10,069 posts
Armorama: 4,677 posts
Posted: Wednesday, February 10, 2010 - 01:40 AM UTC
My Puma is now almost finished. Just a little final weathering and dusting to go and then it is done.

More to follow soon.


tread_geek
Visit this Community
Ontario, Canada
Joined: March 23, 2008
KitMaker: 2,847 posts
Armorama: 2,667 posts
Posted: Wednesday, February 10, 2010 - 04:55 AM UTC
Coming along very nicely, Jesper. Thanks for sharing the progress. In the first picture I at first took the lamp post for a grossly oversized antenna. My only excuse was that I had yet to have my morning coffee.

Cheers,
Jan
firstcircle
Visit this Community
England - South East, United Kingdom
Joined: November 19, 2008
KitMaker: 2,249 posts
Armorama: 2,007 posts
Posted: Wednesday, February 10, 2010 - 05:17 AM UTC
Jesper, is that the Panzer Lehr Division insignia on the front?
tread_geek
Visit this Community
Ontario, Canada
Joined: March 23, 2008
KitMaker: 2,847 posts
Armorama: 2,667 posts
Posted: Wednesday, February 10, 2010 - 06:30 AM UTC

Quoted Text

Jesper, is that the Panzer Lehr Division insignia on the front?


Matthew, I checked the Henk of Holland site and indeed Jesper did the Lehr unit. The other unit has a 333 turret number as opposed to the 142 on Jesper's.

Cheers,
Jan
SGTJKJ
#041
Visit this Community
Kobenhavn, Denmark
Joined: July 20, 2006
KitMaker: 10,069 posts
Armorama: 4,677 posts
Posted: Wednesday, February 10, 2010 - 09:30 PM UTC
Thanks for the comments.

Matthew, as Jan pointed out already I did the Panzer Lehr version. The Panzer Lehr division used them during the Normandy invasion in 1944.

My Puma is now finished. It is a nice kit, but not for the modeller that wants accuracy The turret is underscale and the wheels are massively overscale. But it is still a pleasure to build and comes with a nice base.

It is a joy to participate in such a well run campaign. I might find the time for a second entry into this campaign - this time something with wings


tread_geek
Visit this Community
Ontario, Canada
Joined: March 23, 2008
KitMaker: 2,847 posts
Armorama: 2,667 posts
Posted: Thursday, February 11, 2010 - 05:36 AM UTC
Congratulations Jesper for completing your very nice looking little Puma (despite it's inherent inaccuracies). That now makes two that have qualified for their ribbon. I have added a completion checkbox to the campaign chart to make things easier for the campaign leader(s) when the campaign has run it's course. As time permits I'd like to download some of your photos from this forum and see about creating a feature of this campaign. Besides the photo in the official campaign gallery I'd like each member after completion of their build to post at least two addition and different photos in this thread.


Quoted Text

I might find the time for a second entry into this campaign - this time something with wings


For all participants, just want to make sure that you all read rule number one as to what qualifies for the award.

"1. Either an original Matchbox kit or a Revell re-release of a former Matchbox vehicle kit are permissible. "

Cheers,
Jan

firstcircle
Visit this Community
England - South East, United Kingdom
Joined: November 19, 2008
KitMaker: 2,249 posts
Armorama: 2,007 posts
Posted: Thursday, February 11, 2010 - 11:42 AM UTC
To follow up Jesper's beautiful Puma (if that's an appropriate word for this pugnacious looking vehicle) here are some photos of my Puma virtually complete and replete in its original Matchbox two colour scheme. The dark grey / light grey is quite subtle and works quite well. Shame I suppose that they would all have been in dark yellow, but never mind - it kind of makes it look like a black and white photo.

The reason I was interested in the Panzer Lehr insignia is that the decals in the Matchbox kit don't include that; have they changed for the Revell version? Matchbox options are the SS Hohenstaufen number 1111 - a vehicle captured in Normandy I think and very commonly reproduced in photos, or XI Freiwilligen (?) Panzergrenadier Division number 125.

Following Jesper's comment on inaccuracies, I took some quick measurements, and my rough calcs made the length and width come out at about 1/75 or so, the turret came out more like 1/85, confirming what he said, although I have to say, I wouldn't have noticed just from looking at it! As for the wheels, I had them come out at 1/71, again confirming Jesper's comment.

In the Matchbox instructions they seem to show the exhaust mufflers being put on side ways, as I think Jesper has done; then in the side views for the paint scheme they show them the other way. with the curved edge top and bottom rather than sides. Anyway, looking at photos they are not the right shape in any case! The 1111 vehicle they may have based it on seems to have lost it mufflers, so maybe that didn't help.

Anyway, here are the pics, note the wheels and soldiers are all held up with BluTac, as I'm planning to paint the tyres separately, hence they look a bit wobbly.


SGTJKJ
#041
Visit this Community
Kobenhavn, Denmark
Joined: July 20, 2006
KitMaker: 10,069 posts
Armorama: 4,677 posts
Posted: Thursday, February 11, 2010 - 11:45 PM UTC
Jan, Thanks for pointing out it has to be a tank as a second entry. I missed that detail

Matthew, thanks for backing up my comments with hard data. I used the old mark 1 eyeball, but your way is a little better. Good start, it will be interesting to follow your build and see the final result.
Revell always makes their own decals for the kits they "loan" from other manufacturers based on my experience. At least that is the case with all Monogram, Hasegawa, and Matchbox models I have bought under the Revell label. If you need any specific markings, let me know and I will look in my stash.
Dangeroo
#023
Visit this Community
Zurich, Switzerland
Joined: March 13, 2009
KitMaker: 2,058 posts
Armorama: 1,656 posts
Posted: Sunday, February 14, 2010 - 08:48 AM UTC
Evenin' gentlemen (and women...)!

Nice builds going on here. More progress pics please!

Alright, mine got some paint and decals, weathering next. Evering going smoothly so far.


Got the T34 in the meantime, hillarious coloring: dark blue and white...

Cheers!
Stefan
CMOT70
Visit this Community
Victoria, Australia
Joined: August 23, 2007
KitMaker: 629 posts
Armorama: 26 posts
Posted: Sunday, February 14, 2010 - 03:11 PM UTC
Base coating all done on the Firefly. Decals/weathering and a lot of work to go on the base still.


Andrew
tread_geek
Visit this Community
Ontario, Canada
Joined: March 23, 2008
KitMaker: 2,847 posts
Armorama: 2,667 posts
Posted: Sunday, February 14, 2010 - 04:58 PM UTC

Quoted Text

Evenin' gentlemen (and women...)!

Nice builds going on here. More progress pics please!

Got the T34 in the meantime, hillarious coloring: dark blue and white...


Stefan, what a little gem you have created. At the posted picture resolution it would be difficult for all but the most initiated to say exactly what scale the AVRE is. You've got some really nice sharp detail there (love the rigging). As I also stated in a previous posting, WE NEED MORE in progress pictures to fawn over.


Quoted Text

Base coating all done on the Firefly. Decals/weathering and a lot of work to go on the base still.


Andrew, the Firefly appears to be taking shape fabulously. One can obviously see some preshading in the picture and this only makes one want to see more..and more...and more...

To all of you that are sharing in progress pictures I am sure that I speak for all in saying thank you for sharing. IMHO that is the spirit that can make a good campaign GREAT! With the results and quality that I am seeing of the builds this campaign may definitely cry out to become an outstanding feature here at Armorama. I only hope that my efforts can rise to the level already being set.

As for my M40, it still remains at the stage of the last update I posted. I had to finish and post a picture for a previous campaign I was in. The "bench" is pretty much clear now so I anticipate moving forward in the next few days.

Thanks and Cheers,
Jan
weathering_one
Visit this Community
Ontario, Canada
Joined: April 04, 2009
KitMaker: 458 posts
Armorama: 456 posts
Posted: Monday, February 15, 2010 - 06:52 AM UTC
Pressure, pressure pressure for photos. I am glad to see some nice progress that people are achieving and that some of you are having no problems. I am beginning to wonder if I just chose the wrong kit for my first campaign.

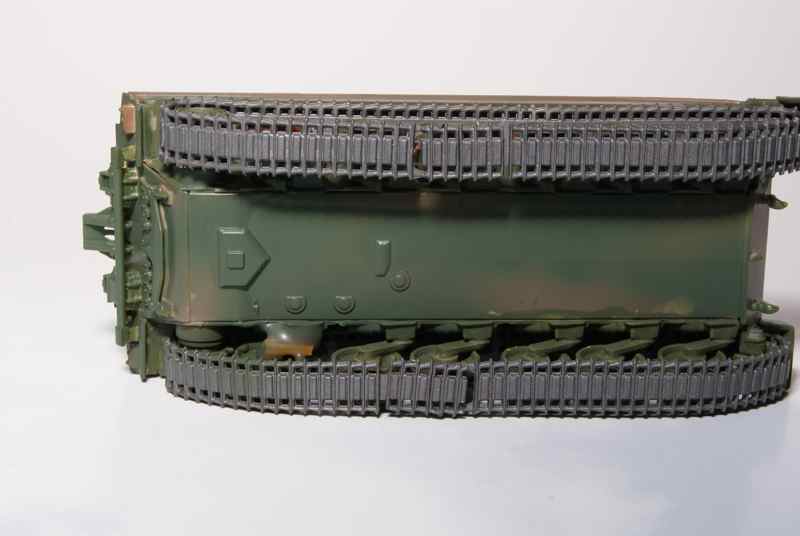
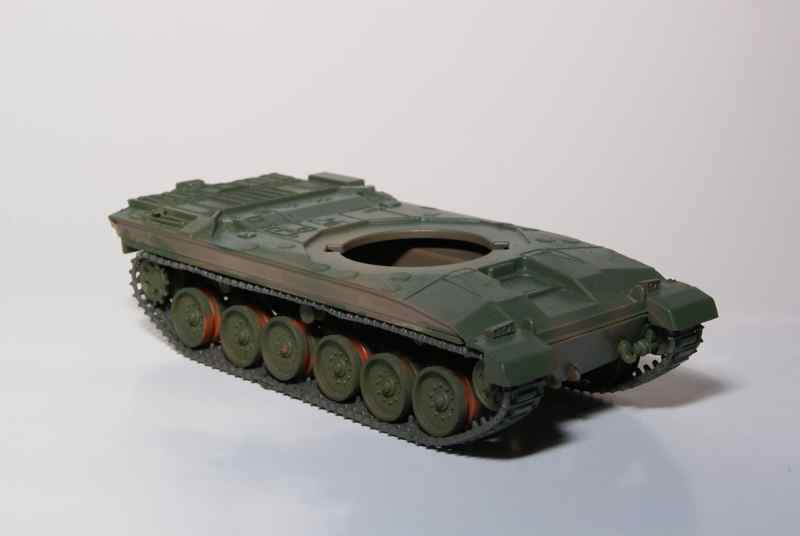
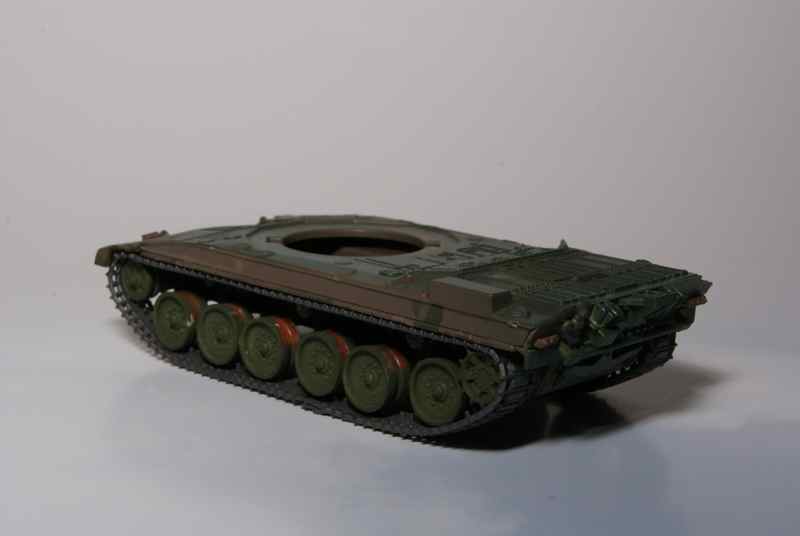
I had to disassemble the upper and lower body halves of the tank to try to get the tracks on. While attempting to get the tracks on the left rear larger wheel broke off. It wasn't in any way a clean break and all attempts to re-glue it ended up with it breaking again while trying to fit the tracks. Used epoxy putty to reattach the wheel. I should have thought out the assembly/finishing process better but I'm being still rather new to this. Also, the tracks would only fit on unjoined so the joint is at the bottom (I broke the wheel too many times trying to get them to fit as one piece). As the photos show I have added a few plastic parts and the next step is putty, putty and sanding. Don't know what I'll do about the gaps in the tracks yet. I wish I could have hid them behind the side skirts.


Am I having fun yet

AJ
firstcircle
Visit this Community
England - South East, United Kingdom
Joined: November 19, 2008
KitMaker: 2,249 posts
Armorama: 2,007 posts
Posted: Monday, February 15, 2010 - 10:07 AM UTC
I wouldn't say no problems at all - if it's any consolation one of the Puma's wheel mounts has broken off three times and been fixed back on again, and a couple of the others have definitely turned half way into hinges. I'm thinking that eventually the whole thing is going to be glued to the base by all eight wheels, so that should sort it out.

There was also a bit of filling to be done aroud the hull joins and something about the front fender wasn't right, resulting in some extra bits of plastic strip being added to the nose, and replacing the centre brackets with some longer rod. You know that thing where there's four mounting points, but the middle two only reach to some air. . . ? Then there was the exhaust pipes facing the wrong way. And the smoke dischargers looking like a bunch of mini bananas. And accidentally cutting that bit of bore liner off the end of the muzzle brake and having to replace it with curled plastic rod. And the mantlet not fitting far enough back on the ball joint. It's all part of the fun though, isn't it?