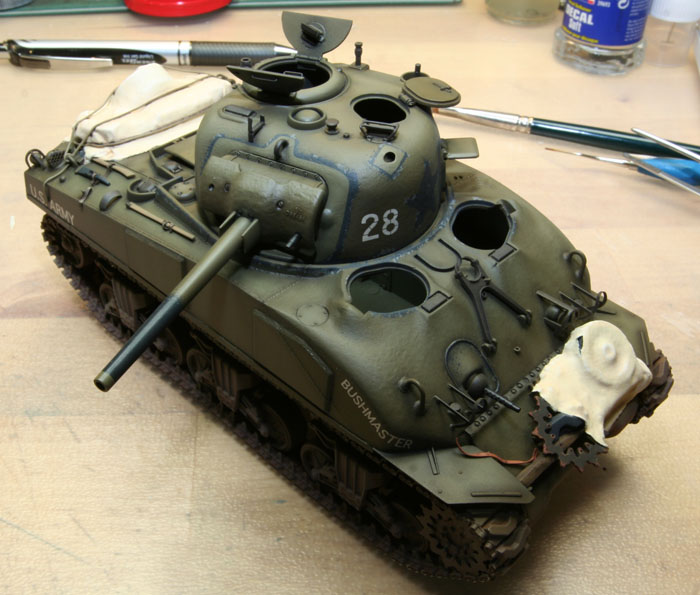
Leo your doing fantastic, stop worrying. Inside the line should be sharp edge, fabric was there.
Page out of the manual;
Keep up the great work,
Bob
Campaigns
Where Armorama group builds can be discussed, organized, and updates posted.
Hosted by Darren Baker, Richard S.
Campaign in the Pacific
BobCard
Florida, United States
Joined: August 09, 2006
KitMaker: 1,008 posts
Armorama: 847 posts
Joined: August 09, 2006
KitMaker: 1,008 posts
Armorama: 847 posts
Posted: Monday, June 21, 2010 - 10:11 AM UTC
Posted: Tuesday, June 22, 2010 - 04:15 AM UTC
Gee, thanks Bob. Keeps me going. On to some more Picasso...
Always fascinating for me what info you pros keep digging up btw. Sometimes looks like you raided some army history depot!
Just did some shopping: a figure (not the marine, so your set-up is safe from copying), some panzer aces paint and the filters michael so nicely pointed out to me.
Man. This is kind of frightening. First figure ever! Well, I'll just bug you guys if I'm stuck...
Ah, I still would love to know how you did those palm tree stems (not the foliage, bob, I don't even dream of managing that). Need to model one...
BobCard
Florida, United States
Joined: August 09, 2006
KitMaker: 1,008 posts
Armorama: 847 posts
Joined: August 09, 2006
KitMaker: 1,008 posts
Armorama: 847 posts
Posted: Tuesday, June 22, 2010 - 07:23 AM UTC
The leaves are simple, I buy them; Hartofthesouth
If you can stand blurry pictures;
I take a bamboo stick, or squire, and rap string around it first one way then turn it around and go back over it.
Tape down the end so it doesn’t unravel. Next I use liquid starch and paint the stick with it and start to roll it over toilet paper, you only want one to one and a half turns to cover the stick.
Then cut off the excess and paint it all down again with more starch.
Set it aside to dry, it will dry white, and then I paint it Tamiya dark yellow, after that dries I do a wash and then a dry brush just like a tank. That’s all there is to it. Of course I tried this a couple of times to get it right until I found out it really doesn’t matter, you are going to paint the entire thing so what if the toilet paper doesn’t cover the entire thing, so what if it might bunch up a bit in places, you’ll never notice it after it’s done. The longer ones are dowels, and to get the bends in the poles, soak them for an hour, put them over bricks and place them in the sun to dry, works like a champ.
Simple, and cheap,
Give it a try, when I make them I make enough trunks to make 5 dioramas,
Bob
mopnglo
United States
Joined: January 07, 2006
KitMaker: 452 posts
Armorama: 271 posts
Joined: January 07, 2006
KitMaker: 452 posts
Armorama: 271 posts
Posted: Tuesday, June 22, 2010 - 07:29 AM UTC
Bob C., your dio is really coming together nicely! I'm looking forward to seeing it when you're done. One quick question, it looks like you only apply a gloss coat to sections where a decal will be placed instead of an overall gloss coat. I've always wondered if that works well. Is that your method? Do you use Future and do you apply with a brush?
Leo, Bushmaster is also coming along nicely! As far as my palm, I used an old Verlinden resin/PE palm tree that I picked up in a trade. The PE is thick and the resin trunk was filled with air bubbles. It turned out a little better than I expected, but I probably wouldn't recommend the Verlinden palm to anyone. Bob C.'s palms are fantastic, though!
Thomo, great job on the camo pattern!
BobCard
Florida, United States
Joined: August 09, 2006
KitMaker: 1,008 posts
Armorama: 847 posts
Joined: August 09, 2006
KitMaker: 1,008 posts
Armorama: 847 posts
Posted: Tuesday, June 22, 2010 - 08:51 AM UTC
Michael,
The majority of my markings are rub on transfers. Without the future they have a tendency of not sticking so well. I also use future on the water slide to seal both sides of the decal. I never have done a complete future wash. I only use the decal solvents when I have to put them over uneven surfaces. My weathering consists of black pin wash for joints, attached items, over all brown wash for dirt, dry brush with armor sand to lighten the higher items and plenty of powders for whatever fits the bill on locations. In this case it will be mostly reddish mixes since the dirt in Guam is mostly reddish in color.
You get me started talking I just ramble on,
Hope I answered your question,
Bob
EDIT; I forgot, I use a brush and only where I think I'm appling markings.
I also use future as my mix with powders when I want them to look wet, like maybe oil or gas spill, and simulated water runs. Other wise I just use water after it drys it looks pretty dry, no touching after that.
Good example
Before weathering;
After weathering
tread_geek
Ontario, Canada
Joined: March 23, 2008
KitMaker: 2,847 posts
Armorama: 2,667 posts
Joined: March 23, 2008
KitMaker: 2,847 posts
Armorama: 2,667 posts
Posted: Tuesday, June 22, 2010 - 08:59 AM UTC
Quoted Text
One quick question, it looks like you only apply a gloss coat to sections where a decal will be placed instead of an overall gloss coat. I've always wondered if that works well. Is that your method? Do you use Future and do you apply with a brush?
I'd be curious in the answer also. I've tried applying gloss only where the decal goes and then coating over it but it always darkens the paint compared to the non gloss areas. Even after a dull coat the hues are still different.
Cheers,
Jan
BobCard
Florida, United States
Joined: August 09, 2006
KitMaker: 1,008 posts
Armorama: 847 posts
Joined: August 09, 2006
KitMaker: 1,008 posts
Armorama: 847 posts
Posted: Tuesday, June 22, 2010 - 09:04 AM UTC
Jan,
The over all brown wash useally evens out all the color of the main painting for me, and a lot of weathering.
Bob
:-H
The over all brown wash useally evens out all the color of the main painting for me, and a lot of weathering.
Bob
:-H
tread_geek
Ontario, Canada
Joined: March 23, 2008
KitMaker: 2,847 posts
Armorama: 2,667 posts
Joined: March 23, 2008
KitMaker: 2,847 posts
Armorama: 2,667 posts
Posted: Tuesday, June 22, 2010 - 09:10 AM UTC
Thanks Bob, I'll give it a try on something experimental. Still fumbling around with the air intake covering. The small scale definitely makes things interesting. Partial (forward) gloss coat is on and ready for some decals.
Cheers,
Jan
Cheers,
Jan
mopnglo
United States
Joined: January 07, 2006
KitMaker: 452 posts
Armorama: 271 posts
Joined: January 07, 2006
KitMaker: 452 posts
Armorama: 271 posts
Posted: Wednesday, June 23, 2010 - 08:48 AM UTC
Bob, if you're talking about techniques, I'm happy to hear you ramble all day! I'm especially glad to hear about using future before rub on transfers, because I've been debating buying a set to try out. In the photos you posted, the future coat definitely disappears after weathering. Good to know! I really enjoy seeing the process that other modelers use, it always helps me improve my own process. Thanks!
bpunchy
Western Australia, Australia
Joined: February 22, 2009
KitMaker: 366 posts
Armorama: 199 posts
Joined: February 22, 2009
KitMaker: 366 posts
Armorama: 199 posts
Posted: Wednesday, June 23, 2010 - 11:46 PM UTC
Hi Bob Card and mates , heres a picture of the turreted LVT that I saw at Puckapunya ,
And heres the rest of the photos of the Buffalo that I saw at Bandiana
I finished construction of the kit yesterday and blew on some aerosol primer this afternoon , I will post pictures later , now to go through the research .
And heres the rest of the photos of the Buffalo that I saw at Bandiana
I finished construction of the kit yesterday and blew on some aerosol primer this afternoon , I will post pictures later , now to go through the research .
BobCard
Florida, United States
Joined: August 09, 2006
KitMaker: 1,008 posts
Armorama: 847 posts
Joined: August 09, 2006
KitMaker: 1,008 posts
Armorama: 847 posts
Posted: Saturday, June 26, 2010 - 07:42 AM UTC
Brian,
Thanks for the photos. Sure would love to crawl all over that LVT (A) 4. Looking forward to seeing your photos.
Well here is my people farm;
And the first one I finished painting but not weathered;
I just had to give him a tattoo;
I see some thing I need to fix also, I think I need a stronger set of magnifiers. Thanks everyone for the painting tips, this is the part I just hate to do.
Bob
russamotto
Utah, United States
Joined: December 14, 2007
KitMaker: 3,389 posts
Armorama: 2,054 posts
Joined: December 14, 2007
KitMaker: 3,389 posts
Armorama: 2,054 posts
Posted: Saturday, June 26, 2010 - 08:18 AM UTC
Bob, I think he looks pretty good. Considering what his actual size is the details are very good. I still struggle with figures but they add so much to a scene that they can't be left out.
bpunchy
Western Australia, Australia
Joined: February 22, 2009
KitMaker: 366 posts
Armorama: 199 posts
Joined: February 22, 2009
KitMaker: 366 posts
Armorama: 199 posts
Posted: Sunday, June 27, 2010 - 12:03 AM UTC
Hi Bob Card and mates , heres a pic of my Buffalo finished and undercoated with automotive enamel primer which is all I can get from the poor hardware store in this outpost of civilisation that is Onslow ,Western Australia .
I'm beginning to look through reference and was thinking of a Marines Buffalo during the battle of Okinawa . I have yet to find a photo , but I am enjoying the reading .
ltb073
New York, United States
Joined: March 08, 2010
KitMaker: 3,662 posts
Armorama: 3,078 posts
Joined: March 08, 2010
KitMaker: 3,662 posts
Armorama: 3,078 posts
Posted: Sunday, June 27, 2010 - 01:46 AM UTC
Hi Guys,
@ BoB Figure looks great love the tattoo on the back
@ Brian, If you go to YouTube and type in the search what you want they had some color videos of the Marines in the Pacific. Also if you read through the page of this tread you will find many photo of the LVT's here, mostly black and white and a few links that I used as well. Good luck looking forward to seeing how it turns out.
BobCard
Florida, United States
Joined: August 09, 2006
KitMaker: 1,008 posts
Armorama: 847 posts
Joined: August 09, 2006
KitMaker: 1,008 posts
Armorama: 847 posts
Posted: Sunday, June 27, 2010 - 07:46 AM UTC
Russ and Sal,
Thanks for the comments, I’m trying to use the reference you gave me, operative word is trying.
Brian,
Nice color for an auto primer. Looks about as good as it gets. Looking forward to some close-ups. Any details added or just OOB? I have 3 or 4 good photos for Okinawa LVT 4’s, let me know if you need them.
I at least finished the figures, still need to do the weathering on all of them but I have to finish painting the stowage items first so I can do the entire Diorama together.
The clan;
The crew of “Dark Eyes”
The Crew of “Arsenic”
The Collectors;
Intell;
The Japanese;
More Tattoos;
Just some closer shots;
Not bad, I see errors I already listed that I need to go back and correct.
Thanks again guys and am looking forward to some updates;
Bob
ltb073
New York, United States
Joined: March 08, 2010
KitMaker: 3,662 posts
Armorama: 3,078 posts
Joined: March 08, 2010
KitMaker: 3,662 posts
Armorama: 3,078 posts
Posted: Sunday, June 27, 2010 - 08:19 AM UTC
Hi Bob,
Figures look great. I am by far not the person that should give advice on figure painting, but I have found that on my last few that if i use an Ivory color for the whites of the eyes they won't look as big and will blend easier with the skin color.
BobCard
Florida, United States
Joined: August 09, 2006
KitMaker: 1,008 posts
Armorama: 847 posts
Joined: August 09, 2006
KitMaker: 1,008 posts
Armorama: 847 posts
Posted: Monday, June 28, 2010 - 04:42 AM UTC
Sal,
I know some of them eyes are pretty sad. I'll try Ivory, might have to make one. The flat white took me 3 minutes to open and remix; I don't use white very often. Thanks for the tip; I will give it a try.
Bob
I know some of them eyes are pretty sad. I'll try Ivory, might have to make one. The flat white took me 3 minutes to open and remix; I don't use white very often. Thanks for the tip; I will give it a try.
Bob
mopnglo
United States
Joined: January 07, 2006
KitMaker: 452 posts
Armorama: 271 posts
Joined: January 07, 2006
KitMaker: 452 posts
Armorama: 271 posts
Posted: Monday, June 28, 2010 - 05:42 AM UTC
Bob, great work on the figures! That's a lot of painting! I really like the tattoos, who makes them? Are they dry transfer? About the eyes, I don't paint eyes well either, so I've been practicing the "less is more" technique that Steve Zaloga outlines in "Modeling US Armor of World War II." I think skin tones overall are very difficult to make realistic. Can't wait to see the finished figures in your dio!
Michael
Michael
BobCard
Florida, United States
Joined: August 09, 2006
KitMaker: 1,008 posts
Armorama: 847 posts
Joined: August 09, 2006
KitMaker: 1,008 posts
Armorama: 847 posts
Posted: Tuesday, June 29, 2010 - 02:12 AM UTC
Michael,
Thanks for the comments. They are water slide from a company calledHudson and Allen
They have some really good products.
My motto for figures are "no close ups".
Bob
Thanks for the comments. They are water slide from a company calledHudson and Allen
They have some really good products.
My motto for figures are "no close ups".
Bob
BobCard
Florida, United States
Joined: August 09, 2006
KitMaker: 1,008 posts
Armorama: 847 posts
Joined: August 09, 2006
KitMaker: 1,008 posts
Armorama: 847 posts
Posted: Thursday, July 01, 2010 - 03:59 AM UTC
For the July News report in the Pacific;
July
1 July 1945. Battle of Balikpapan The Australian 7th Division, composed of the 18th, 21st and 25th Infantry Brigades, with support troops, made an amphibious landing, codenamed Operation Oboe Two
July 5, 1945 - Liberation of Philippines declared.
July 8, 1943 - B-24 Liberators flying from Midway bomb Japanese on Wake Island.
July 8, 1944 - Japanese withdraw from Imphal.
July 10, 1945 - 1,000 bomber raids against Japan begin.
July 14, 1945 - The first U.S. Naval bombardment of Japanese home islands
July 16, 1945 - First Atomic Bomb is successfully tested in the U.S.
July 19, 1944 - U.S. Marines invade Guam in the Marianas.
July 21, 1942 - Japanese land troops near Gona on New Guinea.
July 24, 1944 - U.S. Marines invade Tinian.
July 26, 1945 - Components of the Atomic Bomb "Little Boy" are unloaded at Tinian Island in the South Pacific.
July 27, 1944 - American troops complete the liberation of Guam.
July 29, 1945 - A Japanese submarine sinks the Cruiser INDIANAPOLIS resulting in the loss of 881 crewmen. The ship sinks before a radio message can be sent out leaving survivors adrift for two days.
For a more detailed listing go to;
1942
1943
1944
Current status of the Campaign
46 Days to go
44 Total enlisted
So far the completion status
1st. David Carlson CALLSIGN: TheDiggs, USS SAMUEL B. ROBERTS (DE 413)
2nd. Thomas F. Sweeney, CALLSIGN: tsweeney, Diorama Tarawa Marines at the wall
3rd. Sal CALLSIGN: ltb073, LVT 4 Saipan
4th. Russ Callsign: russamotto, Margaret, Diorama Saipan and Hellcat, Pacific Operations
5th, Michael Armbrister: Callsign; mopnglo, Colorado Diorama, Tarawa
Close to completion;
Grant Voakes, CALLSIGN: GVoakes, to finish just pick one of the models submitted in the gallery and select the reference for it.
Hopefully there might be a few more posting their status,
Bob
russamotto
Utah, United States
Joined: December 14, 2007
KitMaker: 3,389 posts
Armorama: 2,054 posts
Joined: December 14, 2007
KitMaker: 3,389 posts
Armorama: 2,054 posts
Posted: Thursday, July 01, 2010 - 12:59 PM UTC
Bob, the figures look great. Late comment, but for the eyes I use Ivory as suggested above, or basic flesh. It looks pretty pasty white (like me) and when contrasted with darker skin tones comes out looking right. Those figures are a lot of work. Each one is a small kit.
Posted: Friday, July 02, 2010 - 12:05 PM UTC
Hi all.
Here's some updates. Bushmaster is ready to be dug in:
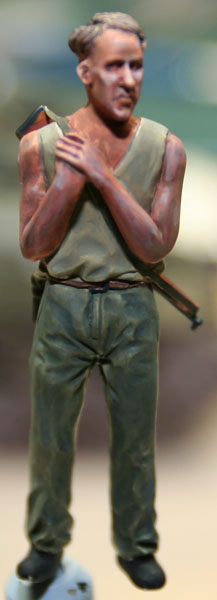
Also i found a figure to represent a tanker who's waiting for another sherm to pull his ride out of the mud after a dirty and fruitless fight to get unstuck without help:
It's the Mk35 'Civilian leaning on a rake' updated with an old grossly overscale Dragon-Tommy and a non standard hipflask from some Tamiya set.
Remember: this is my first Figure ever. I know he's grotesquely suntanned and the gun's more like an AK but hey... August is coming soon.
So. Coments welcome. Working on the base allready. Got some business with my trusty beltsander this weekend...
Posted: Sunday, July 04, 2010 - 08:39 AM UTC
Hi all
I'm working on an F4F-4 Wildcat for this campaign and here is what I have done so far..
the panel looks a little darker than it is because of shadows.
and here is a pic with my scratchbuilt seatbelts.. not
perfect, but I think not to bad.. I used brass wire and masking tape.
prob be all I get done for a while as we start vacation tomorrow.
BobCard
Florida, United States
Joined: August 09, 2006
KitMaker: 1,008 posts
Armorama: 847 posts
Joined: August 09, 2006
KitMaker: 1,008 posts
Armorama: 847 posts
Posted: Tuesday, July 06, 2010 - 10:05 AM UTC
Leo,
Looks perfect, really great job, figure is great also, should work well into the diorama. Looking forward to seeing all that mud.
Delbert great start, some nice details and nice scratch of the belts. Have a graet vactaion and looking forward to some more updates.
Thanks guys,
Bob
Looks perfect, really great job, figure is great also, should work well into the diorama. Looking forward to seeing all that mud.
Delbert great start, some nice details and nice scratch of the belts. Have a graet vactaion and looking forward to some more updates.
Thanks guys,
Bob
ppawlak1
Victoria, Australia
Joined: March 14, 2006
KitMaker: 1,973 posts
Armorama: 1,843 posts
Joined: March 14, 2006
KitMaker: 1,973 posts
Armorama: 1,843 posts
Posted: Tuesday, July 06, 2010 - 11:04 PM UTC
Hi Guys !
It's taken a while but I've finally got back into the LVT-4 now that the C2 Mexas is finished
Anyway the plan was to put the camo on the sides ready for the tracks and also finish off the tyres..
Now I was in the process of joining the crappy kit tracks together and the "joining pins" broke !
I'll see how I go putting them together, but if all else fails plan "B" is to use the Fruils I bought (they are beautiful but VERY complicated to put together).
The Legends Crew is done (ready to launch the machine into the sea ), they don't look happy though - I think they're sick of waiting
Here are a couple of progress pics :
LVT side view (sides painted ready for tyres to be done and tracks fitted). I'll touch up the Camo a little after the tracks are fitted...
LVT Crew - ready and waiting for action
The colors I'm using for the LVT are Tamiya Medium Blue XF-18, and Buff XF-57 (which looks lighter in the photos than it actually is - damn lighting !!!).
Cheers
Paul
It's taken a while but I've finally got back into the LVT-4 now that the C2 Mexas is finished
Anyway the plan was to put the camo on the sides ready for the tracks and also finish off the tyres..
Now I was in the process of joining the crappy kit tracks together and the "joining pins" broke !
I'll see how I go putting them together, but if all else fails plan "B" is to use the Fruils I bought (they are beautiful but VERY complicated to put together).
The Legends Crew is done (ready to launch the machine into the sea ), they don't look happy though - I think they're sick of waiting
Here are a couple of progress pics :
LVT side view (sides painted ready for tyres to be done and tracks fitted). I'll touch up the Camo a little after the tracks are fitted...
LVT Crew - ready and waiting for action
The colors I'm using for the LVT are Tamiya Medium Blue XF-18, and Buff XF-57 (which looks lighter in the photos than it actually is - damn lighting !!!).
Cheers
Paul