Sal,
I think your Sherman looks great and wouldn't be shocked when I see a few more from you by the end of the campaign! What brand kit did you use?
Sean
Campaigns
Where Armorama group builds can be discussed, organized, and updates posted.
Hosted by Darren Baker, Richard S.
Sherman Campaign
SonOfAVet
Illinois, United States
Joined: January 18, 2003
KitMaker: 547 posts
Armorama: 115 posts
Joined: January 18, 2003
KitMaker: 547 posts
Armorama: 115 posts
Posted: Thursday, July 08, 2010 - 04:10 AM UTC
ltb073
New York, United States
Joined: March 08, 2010
KitMaker: 3,662 posts
Armorama: 3,078 posts
Joined: March 08, 2010
KitMaker: 3,662 posts
Armorama: 3,078 posts
Posted: Thursday, July 08, 2010 - 04:24 AM UTC
Quoted Text
Sal,
I think your Sherman looks great and wouldn't be shocked when I see a few more from you by the end of the campaign! What brand kit did you use?Sean
Sean,
Its Tamiyas M4A3 Frontline Breakthough. Comes with 3 figures that I'm working on running along side and a ton of extra cargo. I only used half of it. The kit does have its faults. here is a review of it that I found after I made the purchase
http://www.usarmymodels.com/MANUFACTURERS/Tamiya/tamiya35250.html
Thanks for the complements
thebear
Quebec, Canada
Joined: November 15, 2002
KitMaker: 3,960 posts
Armorama: 3,579 posts
Joined: November 15, 2002
KitMaker: 3,960 posts
Armorama: 3,579 posts
Posted: Thursday, July 08, 2010 - 10:11 AM UTC
Hi Sal ..Congrats on being the first to finish ..I really hope you stick around, and like you said ..you might just build another!!
ppawlak1
Victoria, Australia
Joined: March 14, 2006
KitMaker: 1,973 posts
Armorama: 1,843 posts
Joined: March 14, 2006
KitMaker: 1,973 posts
Armorama: 1,843 posts
Posted: Thursday, July 08, 2010 - 12:17 PM UTC
Well done Sal,
now what will you be doing for your next Sherman ?
@ Sean - looking forward to those pics
@ Scott - thanks, it looks like a good kit goint by my experience with IC Hybrid.
Cheers
Paul
now what will you be doing for your next Sherman ?
@ Sean - looking forward to those pics
@ Scott - thanks, it looks like a good kit goint by my experience with IC Hybrid.
Cheers
Paul
Posted: Thursday, July 08, 2010 - 01:32 PM UTC
Hello everyone!!
I wanted to do a quick post here and say that the entries thus far have been quite good. If I may I would like to share my model philosophy that I use to guide me through my builds.
There are five simple rules;
-Number Five: Accuracy Is Overrated, If It Gets In The Way Of All The Other Rules.
-Number Four: Build For Yourself. You Are The Only One That Needs To Be Happy With The Results.
-Number Three: Challenge Yourself A Little With Every New Project, But Keep Realistic Goals.
-Number Two: Keep It Simple (KISs) Don’t Over Think The Current Model Project. (FYI...I’m not stupid and neither is anyone else.)
-Number One: Do What You Love, Love What You Do! Keep The Building Fun. This Is A Hobby After All, So Relax And Enjoy It!
Now I would like to make some constructive suggestions.
Ok Sal your first since you have made the most progress and seem quite eager for sights from other participants. Let me begin stating that I think you have done a great job and as Richard said…CONGRAT
1) I think you agree that the green is a bit to green. And as you noted Jeff recommends Tamiya FX-62 Olive Grab. I concur and will being using this as a base color during my build.
2) Figure painting is by far one of the most intimidating tasks for most model builders so keep at it and it will become easer over time. As for the suggestion…it’s the eyes!! A common issue is scale affect when it comes to eyes. Don’t try to paint the whites of the eye. If you look a person from 35 feet away, which you are doing when looking at a 35th scale model, you really can’t see the whites. Maybe instead use a different shade of brown and paint a line where the eye would be and then a small dot for the pupil. Now this will take a lot of trial and error to get it right, I’m still working on it myself, but in the end the result will be more life like.
3) Lastly… Mud, Mud and more Mud…heavy armor travels THROUGH terrain, not over it. For my Battlewagon E8 I plan to give it a heavy coat of glorious mud. Keeping watching this campaign as I plan to devote a little time to the technique I’ll be using.
The bottom-line to all these suggestions are the five rules listed above. I think you are off to a great start into a great hobby, so keep going!!!
To finish this rather not so quick post I would like to thank Paul for the all the time he is devoting to this campaign.
So Paul, Thanks!!
And Thanks for the YouTube links they are Kool!
Everyone keep up the great work and I can’t wait for what will be posted next.
ppawlak1
Victoria, Australia
Joined: March 14, 2006
KitMaker: 1,973 posts
Armorama: 1,843 posts
Joined: March 14, 2006
KitMaker: 1,973 posts
Armorama: 1,843 posts
Posted: Thursday, July 08, 2010 - 02:20 PM UTC
Quoted Text
Quoted TextHi all,
Great work so far to all those who have posted shots of their work, some speed builders indeed. One question I have been kicking around is what color green is "right" for a shermie? I know paints fade and what not, but what are some of the good starting points from the major paint brands?
Sean
Sean,
As you can tell my Shermie is very green But Jeff recommend Tamiya FX-62. a little late for me but other guy it may be in time.
I concur, Tamiya OD is the best color for US Shermans ! For scale affect I add about 30 % Tamiya Dark Yellow (also clear coats tend to make the color a little darker).
Now having said that, Commonwealth machines that have been repainted (especially Firefly's which had the new turrets etc added) are a different Olive Drab and less brown
My formula for those British / Commonwealth / Polish Shermies "SCC 15 Olive Drab" is:
XF-1 Black: 1 part
XF-26 Deep Green: 8 parts
XF-52 Flat Earth: 8 parts
Slightly greener, but in the end if it's REALLY dusty you can't really tell the difference
@ Eric - mate you have a brilliant philosophy towards this hobby ! Thanks foe your awesome post.
Great tips for the team too, thank you
I'll post pics in a few days - trying to finish off that LVT-4
Cheers all and keep those posts & pics coming
Paul
ltb073
New York, United States
Joined: March 08, 2010
KitMaker: 3,662 posts
Armorama: 3,078 posts
Joined: March 08, 2010
KitMaker: 3,662 posts
Armorama: 3,078 posts
Posted: Thursday, July 08, 2010 - 04:21 PM UTC
Eric,
I think that you have some great philosophy in your 5 rules there. And I very much appreciate the tips.
AS for the green, that was a 1st time try with an air brush and I will adjust that on future builds.
Still working on improving the figures and will try your suggestions on the next ones.
Mud, more mud will be added if I decide to put this on a base so that it matches the base. I have a few Mini-Art bases that I am considering putting the Sherman on.
Thanks for the suggestions, I'll take all the help I can get
Lately i sit at the bench about 6 to 8 hours a day or more so its practice, practice, read, practice.
I was looking for another Sherman this afternoon. Don't know what I'm gonna do when they send me back to work.
Thanks again,
Prost
mopnglo
United States
Joined: January 07, 2006
KitMaker: 452 posts
Armorama: 271 posts
Joined: January 07, 2006
KitMaker: 452 posts
Armorama: 271 posts
Posted: Friday, July 09, 2010 - 05:01 AM UTC
Sal, great job! I think you've done an even better job than you did on the LVT for the Pacific Campaign. I really like the result of the washes.
Eric, I also like your philosophy! I'm not a stickler for accuracy, but I'm starting to use reference photos as much as possible as a guide for weathering. I'm also happy to receive constructive comments, so once I get some photos posted, please feel free to help me out!
Speaking of photos, I was able to get a good amount of building done on Monday, but keep forgetting my camera so I can upload the photos. Hopefully in the next day or two. I had a major scare yesterday when I dropped one of the 1/72 periscopes on my grayish carpet. After about 30 minutes, I finally found it. Other than that scare, I'm really enjoying my first 1/72 build.
ltb073
New York, United States
Joined: March 08, 2010
KitMaker: 3,662 posts
Armorama: 3,078 posts
Joined: March 08, 2010
KitMaker: 3,662 posts
Armorama: 3,078 posts
Posted: Friday, July 09, 2010 - 05:30 AM UTC
Mike,
Thanks for the complements. It seems with each built I try something different that someone hear has suggested and it has help me to improve.
Watch those little pieces I lost 2 pieces to the Sherman and made new ones out of scrap plastic, the left front lifting point and the right rear bracket holding the rear shelf on
ppawlak1
Victoria, Australia
Joined: March 14, 2006
KitMaker: 1,973 posts
Armorama: 1,843 posts
Joined: March 14, 2006
KitMaker: 1,973 posts
Armorama: 1,843 posts
Posted: Friday, July 09, 2010 - 11:11 AM UTC
Quoted Text
Watch those little pieces I lost 2 pieces to the Sherman and made new ones out of scrap plastic, the left front lifting point and the right rear bracket holding the rear shelf on
The carpet monster is bad !!
Posted: Friday, July 09, 2010 - 02:56 PM UTC
Soldering Barrels
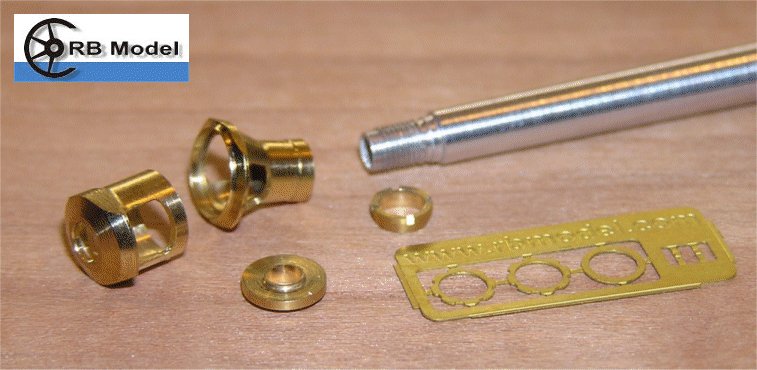
On my current build I plan on using an RB Models 76mm gun tube and brass muzzle brake.
Having never used one I’m wondering what is the best method to assessable the muzzle brake. The choices are from what I can tell are using an adhesive, super glue or epoxy, or soldering. I’m leaning toward soldering and was wondering which type of soldering is best, a soldering iron or a soldering torch?
Any suggestions and insights about these types of barrel kits are most welcome.
ppawlak1
Victoria, Australia
Joined: March 14, 2006
KitMaker: 1,973 posts
Armorama: 1,843 posts
Joined: March 14, 2006
KitMaker: 1,973 posts
Armorama: 1,843 posts
Posted: Friday, July 09, 2010 - 03:06 PM UTC
Quoted Text
Soldering Barrels
On my current build I plan on using an RB Models 76mm gun tube and brass muzzle brake.
Having never used one I’m wondering what is the best method to assessable the muzzle brake. The choices are from what I can tell are using an adhesive, super glue or epoxy, or soldering. I’m leaning toward soldering and was wondering which type of soldering is best, a soldering iron or a soldering torch?
Any suggestions and insights about these types of barrel kits are most welcome.
Hey Eric !
Another option is "Gator Glue".
I use this more often than not on my PE. It wipes off easy, plus it leans in water
Cheers
Paul
Posted: Friday, July 09, 2010 - 04:16 PM UTC
Thanks Paul!
I’m not familiar with “Gator Glue” so I’ll look into it as adhesive option.
This is the correct stuff?
http://www.gatorsmask.com/gatorglueorder.html
I’m not familiar with “Gator Glue” so I’ll look into it as adhesive option.
This is the correct stuff?
http://www.gatorsmask.com/gatorglueorder.html
ltb073
New York, United States
Joined: March 08, 2010
KitMaker: 3,662 posts
Armorama: 3,078 posts
Joined: March 08, 2010
KitMaker: 3,662 posts
Armorama: 3,078 posts
Posted: Friday, July 09, 2010 - 04:30 PM UTC
Eric,
I never used any PE barrels but if the barrel is aluminum and the muzzle is brass you may want try Loctite blue, I use it on real firearms scope mounts and other small screws that you dont want to come loose during recoil. It is specifically designed for tread adhesive.
Sal
I never used any PE barrels but if the barrel is aluminum and the muzzle is brass you may want try Loctite blue, I use it on real firearms scope mounts and other small screws that you dont want to come loose during recoil. It is specifically designed for tread adhesive.
Sal
ppawlak1
Victoria, Australia
Joined: March 14, 2006
KitMaker: 1,973 posts
Armorama: 1,843 posts
Joined: March 14, 2006
KitMaker: 1,973 posts
Armorama: 1,843 posts
Posted: Friday, July 09, 2010 - 04:58 PM UTC
Quoted Text
Thanks Paul!
I’m not familiar with “Gator Glue” so I’ll look into it as adhesive option.
This is the correct stuff?
http://www.gatorsmask.com/gatorglueorder.html
That's it Eric,
it doesnt' work on all PE applications, but I think it's be fine on the barrel. Give it a go and see how you like it.
It's cheap too
@ Sal - you're a legend ! I love the your experience of loctite use on the scope mounts, that's a great example of an application, well done Sal.
Cheers
Paul
ltb073
New York, United States
Joined: March 08, 2010
KitMaker: 3,662 posts
Armorama: 3,078 posts
Joined: March 08, 2010
KitMaker: 3,662 posts
Armorama: 3,078 posts
Posted: Saturday, July 10, 2010 - 01:47 AM UTC
Quoted Text
@ Sal - you're a legend ! I love the your experience of loctite use on the scope mounts, that's a great example of an application, well done Sal.
Cheers
Paul
Paul I don't know about me being a legend as much of a forensic firearms examiner, firearms collector and target shooter. I forgot that you are down under in Australia. Over here in the states, thanks to a group called the National Rifle Association, my government hasn't confiscated our firearms yet A couple of years ago I met a high ranking official from your governments forensic field. Lets just say we didn't see eye to eye on firearms rights My boss saw the way the conversation was going and quickly got her away from me.
ppawlak1
Victoria, Australia
Joined: March 14, 2006
KitMaker: 1,973 posts
Armorama: 1,843 posts
Joined: March 14, 2006
KitMaker: 1,973 posts
Armorama: 1,843 posts
Posted: Saturday, July 10, 2010 - 01:54 AM UTC
Quoted Text
Quoted Text@ Sal - you're a legend ! I love the your experience of loctite use on the scope mounts, that's a great example of an application, well done Sal.
Cheers
Paul
Paul I don't know about me being a legend as much of a forensic firearms examiner, firearms collector and target shooter. I forgot that you are down under in Australia. Over here in the states, thanks to a group called the National Rifle Association, my government hasn't confiscated our firearms yet A couple of years ago I met a high ranking official from your governments forensic field. Lets just say we didn't see eye to eye on firearms rights My boss saw the way the conversation was going and quickly got her away from me.
Hey Sal !
I didn't have any firearms so 'No skin' off my nose.
Hope to have some pics of the IC Hybrid up next week I think, still need to finish the LVT - which is close I hope
Cheers
Paul
Ruffus
Guatemala
Joined: April 12, 2005
KitMaker: 343 posts
Armorama: 223 posts
Joined: April 12, 2005
KitMaker: 343 posts
Armorama: 223 posts
Posted: Saturday, July 10, 2010 - 07:10 AM UTC
just notice how a tank that -for the most part- is just plain green can become so interesting and somehow controversial. I'm doing mine as a M-51 Super Sherman in Israeli service; Boy!!!, do I hate individual links.
Byron
Byron
SonOfAVet
Illinois, United States
Joined: January 18, 2003
KitMaker: 547 posts
Armorama: 115 posts
Joined: January 18, 2003
KitMaker: 547 posts
Armorama: 115 posts
Posted: Saturday, July 10, 2010 - 08:11 AM UTC
Hmm, I was hoping to submit some pics of my work in progress but my images are not showing up after I upload them to the KitMaker site. Any ideas?
Thanks,
Sean
Thanks,
Sean
ASSEMBLER
Georgia, United States
Joined: June 21, 2007
KitMaker: 24 posts
Armorama: 22 posts
Joined: June 21, 2007
KitMaker: 24 posts
Armorama: 22 posts
Posted: Saturday, July 10, 2010 - 08:12 AM UTC
Hello,
I am interested in getting in also. What is involved in entering? Do I have to say what Sherman I will be doing now?
Thanks in advance,
George
I am interested in getting in also. What is involved in entering? Do I have to say what Sherman I will be doing now?
Thanks in advance,
George
thebear
Quebec, Canada
Joined: November 15, 2002
KitMaker: 3,960 posts
Armorama: 3,579 posts
Joined: November 15, 2002
KitMaker: 3,960 posts
Armorama: 3,579 posts
Posted: Saturday, July 10, 2010 - 08:55 AM UTC
Hi George ...Welcome aboard all you need to do is sign up and then you can decide which one you want to build ..Not like you haven't got a choice of kits out there...I finally decided just before the campaign started but I have a feeling it won't be the only one...
Rufuss ..welcome as well and I think Dragon has brought out some DS Tracks that might work for your shermy...check on that before you drive yourself nuts with the indies..
Rick
Rufuss ..welcome as well and I think Dragon has brought out some DS Tracks that might work for your shermy...check on that before you drive yourself nuts with the indies..
Rick
cdharwins
New Jersey, United States
Joined: October 28, 2006
KitMaker: 491 posts
Armorama: 462 posts
Joined: October 28, 2006
KitMaker: 491 posts
Armorama: 462 posts
Posted: Saturday, July 10, 2010 - 11:00 AM UTC
I have a couple of questions for the experts...
What is this thing on the upper right on the turret:
...and does anyone know where I can get these roadwheels:
Thanks, Chris
What is this thing on the upper right on the turret:
...and does anyone know where I can get these roadwheels:
Thanks, Chris
ppawlak1
Victoria, Australia
Joined: March 14, 2006
KitMaker: 1,973 posts
Armorama: 1,843 posts
Joined: March 14, 2006
KitMaker: 1,973 posts
Armorama: 1,843 posts
Posted: Saturday, July 10, 2010 - 11:39 AM UTC
@ Byron - as Richard said, try some Dragon DS tracks, you can get them at CyberHobby or Dragon Online.
@ Sean - you will need to upload your pics to a Storage website such as Photobucket to post in this thread, otherwise you can upload to the Campaign Gallery directly from your Hard-drive.
See this great link from GaryKato on Newbies to Campaigns, it includes a 'How to upload pics to both' :
New to Campaigns ?
@ George - to 'join up' click on the 'Campaigns' Tab above, then select the "Sherman Campaign" on the right, you will have joined when you click "Enlist on the top right" after you've done that
George It'd help if you also 'throw out' some ideas on the type of Sherman derivative you'd like to do too, you may get some tips and help from your fellow Campaigners on choosing a nice version.
Cheers
Paul
SonOfAVet
Illinois, United States
Joined: January 18, 2003
KitMaker: 547 posts
Armorama: 115 posts
Joined: January 18, 2003
KitMaker: 547 posts
Armorama: 115 posts
Posted: Saturday, July 10, 2010 - 12:11 PM UTC
Paul,
I followed the steps in the 'how to' guide, I was hoping my pics were not too big-maybe that is the case. No photoshop on my computer thought to resize-DOH!
@Chris-
I was wondering the same thing from your first picture-maybe its something to sight the main gun with? I am curious about that myself!
Sean
ppawlak1
Victoria, Australia
Joined: March 14, 2006
KitMaker: 1,973 posts
Armorama: 1,843 posts
Joined: March 14, 2006
KitMaker: 1,973 posts
Armorama: 1,843 posts
Posted: Saturday, July 10, 2010 - 12:14 PM UTC
Quoted Text
Paul,
I followed the steps in the 'how to' guide, I was hoping my pics were not too big-maybe that is the case. No photoshop on my computer thought to resize-DOH!
Sean
Sean you an resize your pics in Microsoft Picture Manager if you have that.
Just seleet "Picture" in the toolbar and then "resize".