Campaigns
Where Armorama group builds can be discussed, organized, and updates posted.
Sherman Campaign
ppawlak1
Visit this Community
Victoria, Australia
Joined: March 14, 2006
KitMaker: 1,973 posts
Armorama: 1,843 posts
Posted: Friday, February 25, 2011 - 04:58 PM UTC
Good progress Guys !!

@ Axel - Nice work on the bogies, tracks looking good so far and the paint looks great !! Good work and congratulations on a very nice build and your posts - now you can start your next Shermie

@ Chad - the beast is coming along, sometimes I think builds with parts made from various materials look better than painted ones

@ Zaidi - Good start, looking forward to the DV being built, I haven't done one of those yet ...

@ Don - I really like your "sand bag" work !!

@ Bill - Mmmmmm, now for the next color in that Camo scheme Glad to see you're doing a Polish Sherman too .. I love the possibilities with the markings on the 2nd Corps Sherman III's.

Keep posting guys,

New members of this Campaign are most welcome too !!

Paul
Whitey
Visit this Community
Massachusetts, United States
Joined: September 20, 2010
KitMaker: 137 posts
Armorama: 100 posts
Posted: Saturday, February 26, 2011 - 05:28 AM UTC
@BradleyJ: Thank you. The base color is 5 parts Vallejo air OD (71043) to 1 part Vallejo air Dark Yellow (71025). I thought the OD alone was a bit too dark.

@Wayne Gray: Thanks for the info about the Gator glue. I haven't used it much, so I didn't realise it dried that hard.

@PaulP: This was my first Sherman; I learned a lot and had a lot of fun building it. I would build another if I didn't have more campaigns in progress and getting ready to start (and if I'm not mistaken, you are campaign leader on at least one of them ).
FirstMass
Visit this Community
Massachusetts, United States
Joined: August 15, 2004
KitMaker: 252 posts
Armorama: 146 posts
Posted: Saturday, February 26, 2011 - 11:37 AM UTC
Great job Axel.

I may have missed it in an earlier post, but could you please tell me what paint and color you used for your finish? It looks excellent.

Thanks.

Brian
ppawlak1
Visit this Community
Victoria, Australia
Joined: March 14, 2006
KitMaker: 1,973 posts
Armorama: 1,843 posts
Posted: Saturday, February 26, 2011 - 11:46 AM UTC

Quoted Text


@PaulP: This was my first Sherman; I learned a lot and had a lot of fun building it. I would build another if I didn't have more campaigns in progress and getting ready to start (and if I'm not mistaken, you are campaign leader on at least one of them ).


See you in the "Eastern European Steel" Campaign Axel

2 days to go where I live ... How on earth am I going to manage all of these builds ?

You've done well with your first Sherman, you will need to build more (some day)

Cheers Paul
Whitey
Visit this Community
Massachusetts, United States
Joined: September 20, 2010
KitMaker: 137 posts
Armorama: 100 posts
Posted: Saturday, February 26, 2011 - 01:41 PM UTC
@Brian: Thank you. The base coat is 5 parts Vallejo air OD (71043) to 1 part Vallejo air Dark Yellow (71025). After that I used various oils (notably Windsor and Newton Black and Raw umber) for the washes, and several different shades of artists pigments (from Natural Umber to Yellow Ochre) for the dust, dirt and dried mud. I ended up finding that the Yellow Ochre pigment was too light for Europe, so I ended up darkening them up with a light oil wash.

@PaulP: I'm breaking my BTR-70 out of the stash in preparation. See you there.
ProfessorP
Visit this Community
Minnesota, United States
Joined: February 20, 2007
KitMaker: 339 posts
Armorama: 325 posts
Posted: Saturday, February 26, 2011 - 08:24 PM UTC
Hi again guys. There is really some neat stuff going on in this campaign and I am learning a lot and having fun trading tips with everyone.

I have a question about small scale chain. I really like the PE chain used for replicating the chains that secured the fuel cap pins and other small caps and pins around the Sherman and I have a need for more in various places. Mine came as part of my Eduard M4A3 detail set but they only gave me 5 or 6 of them. Does anyone make a set of just small scale PE chains and if so, who? I can't seem to find them other than as part of the full detail kits. Any recommendations would be appreciated.

On a similar note, who makes resin or plastic .30 and .50 cal ammo boxes and 76mm shell crates? I'm going to be working on stowage next and I can't seem to find these although I've seen them used on other's models. Again, can anyone point me in the right direction?

Thanks!
AgentG
Visit this Community
Nevada, United States
Joined: December 21, 2008
KitMaker: 1,109 posts
Armorama: 1,095 posts
Posted: Sunday, February 27, 2011 - 03:27 AM UTC
Don I rarely use PE for chains so, if I may, here's my tip. I took two lengths of copper speaker wire, and twisted them together. After that I tapped them with a hammer on an old steel block I have as an anvil, to flatten them.

Here's a photo,


Verlinden has/had ? a resin set of ammo cans as does Legends.

G
BillGorm
Visit this Community
New Jersey, United States
Joined: November 02, 2009
KitMaker: 609 posts
Armorama: 433 posts
Posted: Sunday, February 27, 2011 - 07:13 AM UTC
Nice work everyone. This is my first campaign and I'm enjoying myself AND learning a lot following everyone's builds.

I applied the disruptive blue-black color to my Sherman Mk. III. I'm sure it's not a perfect match for the real color, but it suits my need for a dark color underneath the olive drab still to come. I used photos and line drawings from Polish Shermans Vol. 1 (Wydawnictwo Militaria 124) as my guide, but I couldn't find any top down views, so any thoughts on the application of camouflage to the engine deck would be appreciated.


errains
#045
Visit this Community
South Carolina, United States
Joined: September 23, 2005
KitMaker: 362 posts
Armorama: 350 posts
Posted: Sunday, February 27, 2011 - 07:55 AM UTC
Battlewagon M4A3E8 ETO: Update

Good Afternoon Everyone,

I was recently informed that my current job location would be changing this summer. Due to this my wife and I are in the process of house hunting and moving closer to my job. Since this is just beginning and I’m not sure how long the process will take. I may not be able to finish my build by the end date for this campaign. Because of this I have started a build log in the Constructive Feedback forum. Of course if I do finish in time I’ll post according to the guidelines to successfully complete the campaign.

Follow the link to the Build Log
thewrongguy
Visit this Community
Ontario, Canada
Joined: October 17, 2002
KitMaker: 448 posts
Armorama: 306 posts
Posted: Monday, February 28, 2011 - 09:31 AM UTC
Hi all,

1st build since Bill Clinton was around, and 1st time ever doing a campaign. I probably didn't take enough photos to qualify for my badge but oh well. I'm a little embarrassed to be posting this compared to a lot of the work already posted, but hopefully I'll get there too.

Tamiya 105mm Howitzer

Here is the initial priming

IMG_1407

After that I hit it with MM Olive drab dabbed on masking fluid after it had dried and over sprayed it with really thinned down MM flat white.

IMG_1578

Here it is after some more selective chipping and a wash.

IMG_1596

IMG_1599

IMG_1598

I'm calling it done, but will weather the suspension more thouroughly to match the base.

Thanks for looking


HONEYCUT
Visit this Community
Victoria, Australia
Joined: May 07, 2003
KitMaker: 4,002 posts
Armorama: 2,947 posts
Posted: Monday, February 28, 2011 - 07:46 PM UTC
Hey Jeff
She looks great mate!
I think you have done a very good job of the whitewash. That said, I probably would add some more wear around the edges of the hatch openings?


Quoted Text


1st build since Bill Clinton was around


Wow, so he just 'drops in'? Hmm he seems approachable

Brad
thewrongguy
Visit this Community
Ontario, Canada
Joined: October 17, 2002
KitMaker: 448 posts
Armorama: 306 posts
Posted: Tuesday, March 01, 2011 - 01:47 AM UTC
Thanks for the advice.

I only wish he would have dropped in less, he stole my date to the junior prom.
tylusfaust
Visit this Community
New Jersey, United States
Joined: December 18, 2005
KitMaker: 371 posts
Armorama: 217 posts
Posted: Tuesday, March 01, 2011 - 02:04 PM UTC
Wow, I go away for two weeks and miss all the fun. Unfortunately, I haven't been able to post cause my wife has me working on this new kit called my bathroom. I've been putting up drywall and tiles rather than styrene and painting.

More to the point, I have followed up on alot of the postings. I'm amazed by the level of work here. Don, I'm specifically looking at you with those sandbags. Bill, I also have to tell you that I thought about building a British Sherman and looking at yours I'm sorry I didn't. The camo looks great.

Last we left with my build I had a problem with a sheen. That was taken care of with a little painting and some matte spray. Some of you were also interested in the results of the painted pre-shading. So here are the results thus far. The pre-shading is only a little less visible than normal due to an extra coat of paint to kill the sheen I had.


The pictures are not of the greatest quality but you get the idea. Next up I'll get to weathering and adding all the loaded stuff as well as finish the commander. Finally, I'll get to the sandbags.
Dangeroo
#023
Visit this Community
Zurich, Switzerland
Joined: March 13, 2009
KitMaker: 2,058 posts
Armorama: 1,656 posts
Posted: Tuesday, March 01, 2011 - 07:45 PM UTC
This Campaign is simply amazing! A really great collection of Shermans! I hope there will be a feature at the end?

My Sherman has stalled, pending construction of an aircraft carrier... It is basically finished, the .50 cal is still missing and then I will add sandbags and stowage. The plan is to restart this weekend. Don, your sandbags look great, I hope mine will turn out at least half as good...

Cheers!
Stefan
Firefly74
Visit this Community
Queensland, Australia
Joined: April 15, 2010
KitMaker: 224 posts
Armorama: 205 posts
Posted: Tuesday, March 01, 2011 - 10:25 PM UTC
Hi all. So many great looking Shermans being built here! The level of detail is impressive to say the least,as is the great looking tank crews figures that have come with them.
I have been following the campaign with interest and finally made a start on my build in early Feb. but have been unable to post progress photos due to moving house.
This will be only the second Sherman I've ever built, the first being an Esci kit back when i was about 12!
I'am building the 1:76 Revell (old Matchbox kit) Sherman Firefly. Anyone who has ever seen or built the kit will be familiar with it's lack of detail,so i decided to see what i could do with it using the new skills i've picked up since joining Amorama last year.
Cheers,
Tim


BillGorm
Visit this Community
New Jersey, United States
Joined: November 02, 2009
KitMaker: 609 posts
Armorama: 433 posts
Posted: Wednesday, March 02, 2011 - 04:40 AM UTC
Raul - Nice work. I like the pose of the figure with one arm draped over the gun barrel ... and both figures really highlight how narrow the hatches were.

Even though I plan to cover the blue-black camouflage with olive drab, I have to admit I like the look, especially when you factor in the colorful markings that go over it. I picked DML 6231 because it was the correct kit for the vehicle I want to model and because Tasca doesn't make a welded hood Mk. III, but if I ever do a British Sherman I'll go with one that offers more options (e.g. DML 6313 or Tasca 35017).
Removed by original poster on 03/02/11 - 19:38:28 (GMT).
eoinryan
Visit this Community
Cork, Ireland
Joined: April 30, 2010
KitMaker: 232 posts
Armorama: 134 posts
Posted: Wednesday, March 02, 2011 - 12:34 PM UTC

Hi folks,

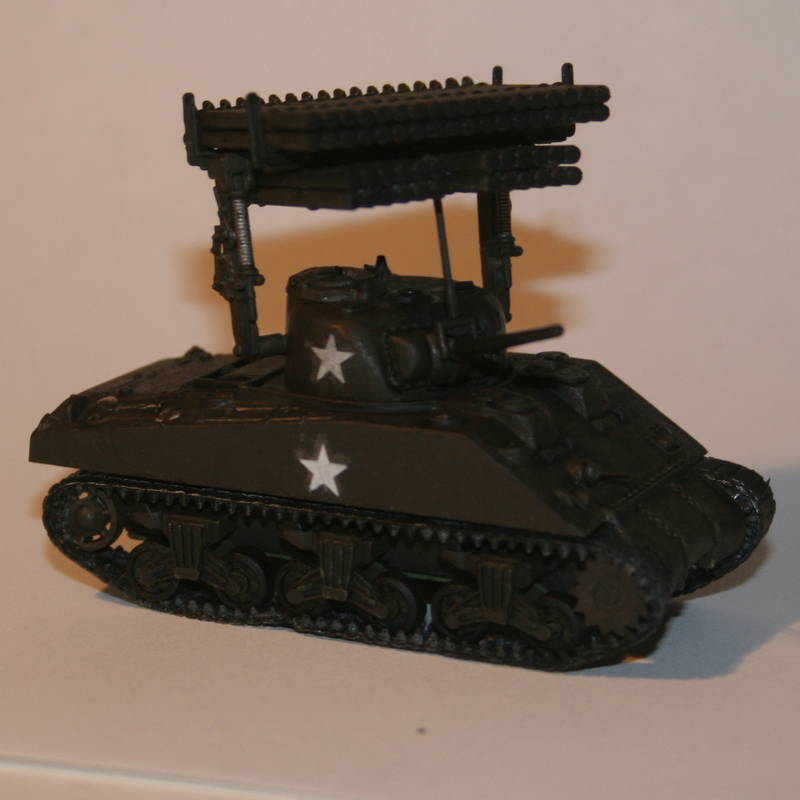
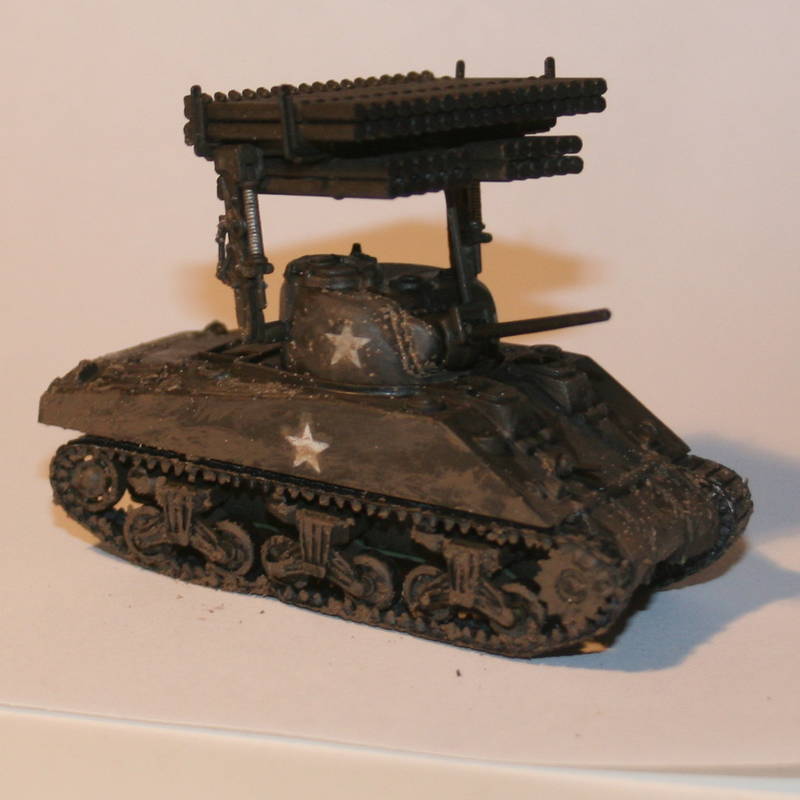
Here's my Airfix 1/76 Sherman Callilope. I probably did not post as many progress photos during this campaign as I usually do cos I'd only end up swearing. Suffice to say that I didn't feel very nostalgic about Airfix's re-issued 1970's models!

Anywho, here's my Callilope straight out of the factory:


(Aarrghh! Those dang decals! I'll cut closer next time)

Here's the Callilope after a week in the bocage:


It didn't dirty up too bad in the end.

Good luck with the rest of your builds!

Eoin
Firefly74
Visit this Community
Queensland, Australia
Joined: April 15, 2010
KitMaker: 224 posts
Armorama: 205 posts
Posted: Wednesday, March 02, 2011 - 08:32 PM UTC
Nice work on the Airfix Sherman Eoin,I have one of those in the stash i pulled out for this campaign,i put it straight back in the bottom of the pile! It's a terribly dated kit, and just plain woeful all round.
A couple of build photos.

On the front hull i shave of the original plastic "bumps" that were supposed to represent the lifting rings.I added two links of spare track and put some headlights on from the spares box,cut some scrap plastic to mount some brass rod lift rings onto and moved to a more accurate location than the original ones.

On the rear i added some latches to the tool box from plastic card, used some scrap plastic to make a first aid box (from reference photos i assume that's what they were?).I cut off the original "lift rings" again and added some from brass rod,i think as with the front rings i should have probably made them a bit higher?
Then removed the plastic "bumps" that represented the rear ventilators and replaced them with some spares from a Dragon kit i haven't started. They were a bit big being 1:72 scale so i sanded them down as much as i could.

Speaking of Dragon Shermans i now have 2 Fireflies and 4 Shermans in the stash since enlisting in this campaign,thank you all for inflicting me with "Shermanitis".
Cheers,
Tim ; )


Firefly74
Visit this Community
Queensland, Australia
Joined: April 15, 2010
KitMaker: 224 posts
Armorama: 205 posts
Posted: Friday, March 04, 2011 - 04:10 PM UTC
Hi. A build shot of the turret.
Replaced the kit barrel with a brass one. Drilled out the gunners sight and co-axial MG.Placed some plastic card in the gap between the gun mantlet and turret.Filled in the sink mark on the turret ventilator.

Covered the bottom of the hollow radio box with plastic card. Cut off the crude lift ring on the front of the turret,replaced it with brass rod and repositioned it closer to the gun mantlet.
Fitted the two lift rings on the rear sides from brass rod.
Fitted a spot lamp from the spares box. Put in two aerials.
Drilled out a hole for the 2in smoke launcher and made an external fitting for it from scrap plastic and putty.
Cheers,
Tim

barkingdigger
Staff MemberAssociate Editor
ARMORAMA
#013
Visit this Community
England - East Anglia, United Kingdom
Joined: June 20, 2008
KitMaker: 3,981 posts
Armorama: 3,403 posts
Posted: Friday, March 04, 2011 - 11:39 PM UTC
Hi gang,

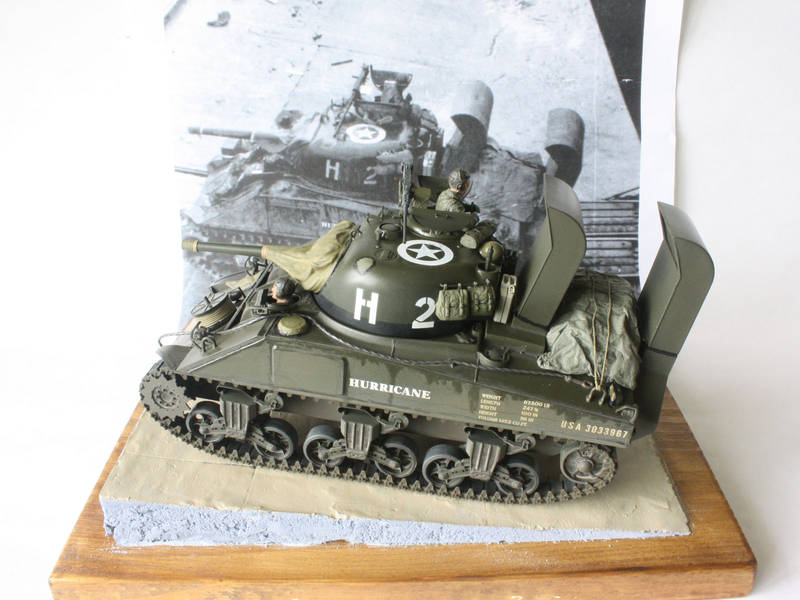
I finally completed a Sherman! Unfortunately it wasn't for this Campaign... Instead, it was for the Modeling a Photo campaign, and it looks like this:


Now I need to get back to my half-done Sherman III and actually qualify here before time runs out!

Tom
errains
#045
Visit this Community
South Carolina, United States
Joined: September 23, 2005
KitMaker: 362 posts
Armorama: 350 posts
Posted: Saturday, March 05, 2011 - 01:30 PM UTC
Battlewagon M4A3E8 ETO: Part 10-Rad-a-tat-tat….ka-boom

View the latest update at the following LINK

Thanks for looking!
ProfessorP
Visit this Community
Minnesota, United States
Joined: February 20, 2007
KitMaker: 339 posts
Armorama: 325 posts
Posted: Saturday, March 05, 2011 - 04:32 PM UTC
Update: I've come to the realization that if I spent half as much time modeling as I did surfing through Armorama, I'd actually get a lot more done!

Seriously though, some real nice work taking place here.

Wayne: thanks for the speaker wire tip...after more searching I actually did find out that Aber makes a set of PE chains and so does Royal Model. I'll give yours a try first and see if I have any luck with it.

Bill: Paint is looking good...keep at it!

Jeff: Nice job on the whitewash paint job and chipping. Only thing I would recommend is to dirty it up more on the lower extremities and paint the vision blocks on the commander's cupola black.

Raul: Really like your figures, especially the bow gunner. What figure is that and can I assume you used Archer transfers for the insignia?

Keep it up guys!

Firefly74
Visit this Community
Queensland, Australia
Joined: April 15, 2010
KitMaker: 224 posts
Armorama: 205 posts
Posted: Saturday, March 05, 2011 - 04:34 PM UTC
Tom:Very nice reproduction from the photo, a great looking sherman!
Eric: Really liked the jig idea for making handles, i will have to make one and make my life a little easier when making handles!
Some more build photos.
The Firefly ready for priming.
And primed using Tamiya Fine Surface Primer.
Tim

minas-ithil
#110
Visit this Community
Florida, United States
Joined: September 20, 2005
KitMaker: 248 posts
Armorama: 224 posts
Posted: Sunday, March 06, 2011 - 03:30 AM UTC
Tim - I really like the extra detail you have added to the Firefly - I have just finished one OOB for the Braille Battlefield. I am pleased with the results, but it will not compare to this once it is painted and weathered. BTW, where did you get the brass barrel from? I would have added one without a doubt had I been aware of it.

Thanks and keep up the good work.

Stephen