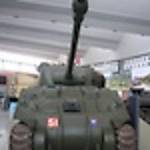
Heres my finished build for the Campaign.
1:76 Revell (Ex-Matchbox) Sherman Firefly.
3RTR, 11th Armoured Division, Normandy 1944.
Thanks for the comments Stephen, I'm doing a build log for it in the Braille Scale Forum with more details on the build if your interested.Old kits like this are great for trying out new things. Good luck with your build, i'll drop in and have a look at your Firefly. I did a couple of kits in the Braille Battlefield campaign,a lot of great models being built there!
The Brass barrell is from Milicast models in Scotland. www.Milicast.com
They mail out. You can also get aluminium barrells from JB Models. www.jbmodel.eu
Cheers,
Tim
Campaigns
Where Armorama group builds can be discussed, organized, and updates posted.
Hosted by Darren Baker, Richard S.
Sherman Campaign
Firefly74
Queensland, Australia
Joined: April 15, 2010
KitMaker: 224 posts
Armorama: 205 posts
Joined: April 15, 2010
KitMaker: 224 posts
Armorama: 205 posts
Posted: Sunday, March 06, 2011 - 09:10 PM UTC
Posted: Monday, March 07, 2011 - 07:47 AM UTC
Tom, great looking Shermie, and clean too...
Tim, that's definitely an improvement over the out of box Matchbox Firefly, nice work!
Here's where I'm standing:
My go at sandbag armor, not 100% satisfied but I think it looks okay. I added a welded on bar on the trannie cover as a guess on how the sanbags were held in place. The photo shows the bars welded on the sides so I figured they would have used the same method.
Added a tasca .50 cal, IMHO definitely the best item on the market:
Some stowage, trying to keep it simple but might add later:
Primed in Tamiya black now, OD next.
Cheers!
Stefan
Posted: Monday, March 07, 2011 - 12:20 PM UTC
Battlewagon M4A3E8 ETO: Part 11- Patton’s Aggravation
Just posted a big update on my BUILD LOG check it out!
Silantra
Putrajaya, Malaysia
Joined: March 04, 2004
KitMaker: 2,511 posts
Armorama: 913 posts
Joined: March 04, 2004
KitMaker: 2,511 posts
Armorama: 913 posts
Posted: Wednesday, March 09, 2011 - 03:25 PM UTC
i was about to paint my M4A1 DV when i realized the front headlight were gone... the carpet monster ate them.... i already prime that clear parts but they were lost...too small and easily eaten by the monster..
the clear sprue is big with so many unused parts for this kit. I notice there are another shape of headlight (or perhaps tail light)...
can i used any of this for my M4A1?
or if someone got spares, please let me know.. the part in question is on sprue C parts number 02
thanks
Zaidi
the clear sprue is big with so many unused parts for this kit. I notice there are another shape of headlight (or perhaps tail light)...
can i used any of this for my M4A1?
or if someone got spares, please let me know.. the part in question is on sprue C parts number 02
thanks
Zaidi
junglejim
Alberta, Canada
Joined: February 18, 2003
KitMaker: 1,728 posts
Armorama: 1,629 posts
Joined: February 18, 2003
KitMaker: 1,728 posts
Armorama: 1,629 posts
Posted: Thursday, March 10, 2011 - 05:38 AM UTC
Think I'm pretty much done my Dragon M4 DV - while I was taking photos I noticed I've got silvering on my ammo can decals, have to remedy that! Now to upload some pics into the gallery to make it official
Maybe enough time to start another one...?
Cheers,
Jim
Maybe enough time to start another one...?
Cheers,
Jim
Bigrip74
Texas, United States
Joined: February 22, 2008
KitMaker: 5,026 posts
Armorama: 1,604 posts
Joined: February 22, 2008
KitMaker: 5,026 posts
Armorama: 1,604 posts
Posted: Thursday, March 10, 2011 - 08:02 AM UTC
@ Stefan: I like the sand bags, what was your process for construction?.
@ Jim: is that a putty tarp, it looks good?
Bob
@ Jim: is that a putty tarp, it looks good?
Bob
GaryKato
California, United States
Joined: December 06, 2004
KitMaker: 3,694 posts
Armorama: 2,693 posts
Joined: December 06, 2004
KitMaker: 3,694 posts
Armorama: 2,693 posts
Posted: Thursday, March 10, 2011 - 08:27 AM UTC
I seem to recall someone using pantyhose stretched over a vacuum cleaner nozzle to recover parts from carpet.
Bigrip74
Texas, United States
Joined: February 22, 2008
KitMaker: 5,026 posts
Armorama: 1,604 posts
Joined: February 22, 2008
KitMaker: 5,026 posts
Armorama: 1,604 posts
Posted: Thursday, March 10, 2011 - 10:56 AM UTC
Quoted Text
I seem to recall someone using pantyhose stretched over a vacuum cleaner nozzle to recover parts from carpet.
I need to try that one.
Bob
Posted: Thursday, March 10, 2011 - 09:32 PM UTC
Jim, great work on the DV! The weathering looks spot on! Why the stains around the enging access hatch?
Thanks, I'm not quite satisfied, but hopefully I will improve next time... I used Miliput two part putty (fine white), made "sausages" of the right diameter and cut them to the length of about 1/3 of a 1/35 scale figure (the method described by Honecut a few pages back). I then shaped them, added some structure by pressing them on an old t-shirt and then addded them to the kit.
It is now OD and ready for detail painting...
Cheers!
Stefan
Quoted Text
@ Stefan: I like the sand bags, what was your process for construction?.
Thanks, I'm not quite satisfied, but hopefully I will improve next time... I used Miliput two part putty (fine white), made "sausages" of the right diameter and cut them to the length of about 1/3 of a 1/35 scale figure (the method described by Honecut a few pages back). I then shaped them, added some structure by pressing them on an old t-shirt and then addded them to the kit.
It is now OD and ready for detail painting...
Cheers!
Stefan
BillGorm
New Jersey, United States
Joined: November 02, 2009
KitMaker: 609 posts
Armorama: 433 posts
Joined: November 02, 2009
KitMaker: 609 posts
Armorama: 433 posts
Posted: Saturday, March 12, 2011 - 09:39 AM UTC
Here's an update on my Sherman Mk. III. I didn't like how it was coming out, so I soaked it in windex, took it back down to the primer, and started over. Unfortunately, I didn't do any better the second time around ... I just couldn't get the contrast between the OD and the blue-black underneath that I wanted. Oh well. I've been in a rut for a while now and I just want to finish something ... anything.
Some progress photos:
While the paint dries I'm back to the Panda tracks ... they look great but the connectors are enough to make you cry.
Some progress photos:
While the paint dries I'm back to the Panda tracks ... they look great but the connectors are enough to make you cry.
junglejim
Alberta, Canada
Joined: February 18, 2003
KitMaker: 1,728 posts
Armorama: 1,629 posts
Joined: February 18, 2003
KitMaker: 1,728 posts
Armorama: 1,629 posts
Posted: Saturday, March 12, 2011 - 02:19 PM UTC
@ Bob - Yep, the tarp is rolled out Apoxie Sculpt putty.
@ Stefan - Yes, POL stains around the engine access hatch. Lots of fluids in there to get spilled!
Jim
@ Stefan - Yes, POL stains around the engine access hatch. Lots of fluids in there to get spilled!
Jim
cdharwins
New Jersey, United States
Joined: October 28, 2006
KitMaker: 491 posts
Armorama: 462 posts
Joined: October 28, 2006
KitMaker: 491 posts
Armorama: 462 posts
Posted: Saturday, March 12, 2011 - 11:12 PM UTC
Hey guys! There's some great work going on here.
I finished one of the figures for my M4A3:
Black and white for "Stars and Stripes":
Unfortunately, I'm not going to be able to finish the kit I was working on, because I'm now in Afghanistan with the Army! So now I'm going to "adjust fire" and build a Shermie while I'm here. I have internet access and a camera and there's still plenty of time left in the campaign for my wife to send a kit with some tools, etc. I'm gonna set up a "field" workbench as soon as I get settled. I doubt I'll be able to go all-out on the kit, but there's no way I'm going to go a whole year without modelling!!
Chris
tylusfaust
New Jersey, United States
Joined: December 18, 2005
KitMaker: 371 posts
Armorama: 217 posts
Joined: December 18, 2005
KitMaker: 371 posts
Armorama: 217 posts
Posted: Monday, March 14, 2011 - 04:56 PM UTC
Guys,
Just checking in with some pictures of recent progress. I've not really had alot of time to work on it because real life has kept me away from the shop--work, kids, the daily grind. I've been watching all the great work but have hardly had time to comment.
As you can see I've added some stowage, still some more to go. I'm thinking of a few more C-Ration boxes and a tarp. The strings you see hanging off will eventually tie everything together literally. I'm also waiting for a good block of time to sit and do the sandbags, but that's going to take some planning and working up my courage. Then some more weathering here and there and just about done.
I've included some pics of the new commander.
Lastly, does anyone know if Kitmaker photo gallery automactially reduces your pics? I'm trying to upload some higher resolution ones but they either don't upload or they seem to be reduced. I am a member so I thought the gallery would let me put higher resolutions up.
As always comments welcomed.
ProfessorP
Minnesota, United States
Joined: February 20, 2007
KitMaker: 339 posts
Armorama: 325 posts
Joined: February 20, 2007
KitMaker: 339 posts
Armorama: 325 posts
Posted: Monday, March 14, 2011 - 05:43 PM UTC
WOW! Really nice work on that tank commander Raul! Very impressive overall.
Man, I hear ya on the daily grind...work is kickin' my butt right now as we prepare to travel for a huge trade show in Las Vegas next week. Hopefully when I get back, t I'll be able to devote some serious time to my model projects!
ppawlak1
Victoria, Australia
Joined: March 14, 2006
KitMaker: 1,973 posts
Armorama: 1,843 posts
Joined: March 14, 2006
KitMaker: 1,973 posts
Armorama: 1,843 posts
Posted: Monday, March 14, 2011 - 06:42 PM UTC
G'day Guys !!
@ Wayne - lovely work on those chains. Thanks for posting that technique !
@ Bill - I prefer the SCC 15 Polish Sherman II's. Good luck with those Panda Tracks. DS and Tasca tracks for me any day
@ Eric - Great blog, thanks for posting, you posts are VERY welcome ALWAYS. If you need an extension to finish let me know
@ Jeff - congrats for finishing your project. I'm sure Bill Clinton would approve Make sure your post pics in the Gallery.
@ Raul - The preshading has given I nice subtle effect. The figs and stowage are first class also ! The decals on the commander are a great touch, I love using them.
@ Tim - Matchbox kits are soooo "near and dear" to my heart, I love the fact you're doing one here. It means we're covering just about every possible kit Congrats on a fine build mate !
@ Eion - Congrats on your build. Good work - another matchbox classic !
@ Tom - that Shermie for the "modelling a photo campaign" looks just like the pic !!
@ Stefan - Sand Bags !!!!
@ Zaidi - That Carpet Monster was here also. I'm going to the "market" for some repellent !!
@ Jim - lovely work as always with your dust effect ! YES you have plenty of time for another Shermie too Thanks for posting the reference shots - they are great !
@ Chris - lovely looking figure there. Good luck in Afghanistan mate Let me know if you need an extension to finish this Campaign.
Keep up the awesome work guys, this is the best Campaign ever !!
Sherman's ROCK !!!!
Paul
Posted: Monday, March 14, 2011 - 08:14 PM UTC
BIll, I think it looks good so far, with a little weathering it should turn out fine.
Jim, thanks for those shots, I've never noticed that aspect before!
Chris, great work on the figure! Maybe you could give us a shot wht better lighting?
Raul, great looking Sherman, and your figure looks magnificient!
Here are some progress shots of my Shermie, unfortunately not as far as I'd hoped because the daughter was sick this weekend...
Cheers!
Stefan
BillGorm
New Jersey, United States
Joined: November 02, 2009
KitMaker: 609 posts
Armorama: 433 posts
Joined: November 02, 2009
KitMaker: 609 posts
Armorama: 433 posts
Posted: Tuesday, March 15, 2011 - 03:42 AM UTC
Raul - Nice work with the figures! I avoid them because mine never come out right, but yours really enhance your model.
Paul - As a novice lost in Shermania you have to talk to me like I'm twelve. What is SCC 15? As for Panda tracks ... holy crap they're a lot of work. It took days to clean up the individual track links and now I've got 30 sprues of connectors to do. That's my punishment for ruining the DS tracks.
Stefan - I went back over the blue-black spots with a darkened version of my OD base and then resprayed the OD over the model to tie it back together. It's still subtle, but at least now the blue-black is consistently visible underneath.
Paul - As a novice lost in Shermania you have to talk to me like I'm twelve. What is SCC 15? As for Panda tracks ... holy crap they're a lot of work. It took days to clean up the individual track links and now I've got 30 sprues of connectors to do. That's my punishment for ruining the DS tracks.
Stefan - I went back over the blue-black spots with a darkened version of my OD base and then resprayed the OD over the model to tie it back together. It's still subtle, but at least now the blue-black is consistently visible underneath.
ppawlak1
Victoria, Australia
Joined: March 14, 2006
KitMaker: 1,973 posts
Armorama: 1,843 posts
Joined: March 14, 2006
KitMaker: 1,973 posts
Armorama: 1,843 posts
Posted: Tuesday, March 15, 2011 - 05:06 AM UTC
Quoted Text
Raul - Nice work with the figures! I avoid them because mine never come out right, but yours really enhance your model.
Paul - As a novice lost in Shermania you have to talk to me like I'm twelve. What is SCC 15? As for Panda tracks ... holy crap they're a lot of work. It took days to clean up the individual track links and now I've got 30 sprues of connectors to do. That's my punishment for ruining the DS tracks.
Stefan - I went back over the blue-black spots with a darkened version of my OD base and then resprayed the OD over the model to tie it back together. It's still subtle, but at least now the blue-black is consistently visible underneath.
Hey Bill
SCC 15 is British Olive Drab, a touch greener than US OD. Shermans should be OD IMO
fireontheway
Pennsylvania, United States
Joined: May 17, 2006
KitMaker: 370 posts
Armorama: 368 posts
Joined: May 17, 2006
KitMaker: 370 posts
Armorama: 368 posts
Posted: Tuesday, March 15, 2011 - 06:52 AM UTC
I am sorry that I am jumping right to the "almost" completed Tasca Firefly of mine, but this is a project well over a year in the making. I am scrambling to get it ready for entry into a show in about a week. So again sorry for no build pics. I must say this kit was about one of the best fitting kits I have put together and my first Sherman.
AgentG
Nevada, United States
Joined: December 21, 2008
KitMaker: 1,109 posts
Armorama: 1,095 posts
Joined: December 21, 2008
KitMaker: 1,109 posts
Armorama: 1,095 posts
Posted: Tuesday, March 15, 2011 - 01:06 PM UTC
Quoted Text
WOW! Really nice work on that tank commander Raul! Very impressive overall.
Man, I hear ya on the daily grind...work is kickin' my butt right now as we prepare to travel for a huge trade show in Las Vegas next week. Hopefully when I get back, t I'll be able to devote some serious time to my model projects!
Don, PM inbound!!
G
ppawlak1
Victoria, Australia
Joined: March 14, 2006
KitMaker: 1,973 posts
Armorama: 1,843 posts
Joined: March 14, 2006
KitMaker: 1,973 posts
Armorama: 1,843 posts
Posted: Wednesday, March 16, 2011 - 10:02 PM UTC
Quoted Text
I am sorry that I am jumping right to the "almost" completed Tasca Firefly of mine, but this is a project well over a year in the making. I am scrambling to get it ready for entry into a show in about a week. So again sorry for no build pics. I must say this kit was about one of the best fitting kits I have put together and my first Sherman.
Hey Timothy !
Thanks for posting, your Shermie is looking great !!
We need in process posts after starting on July the 1st 2010 to qualify for a Ribbon in this Campaign..
Please see here :
Sherman Campaign
If you started after the date above you are good for a ribbon as well
Cheers
Paul
fireontheway
Pennsylvania, United States
Joined: May 17, 2006
KitMaker: 370 posts
Armorama: 368 posts
Joined: May 17, 2006
KitMaker: 370 posts
Armorama: 368 posts
Posted: Thursday, March 17, 2011 - 03:20 PM UTC
OK, here are some in progress shots of my Tasca Firefly. From the humble beginnings to what I hope are not overdone attempts to camo.
Posted: Friday, March 18, 2011 - 01:50 AM UTC
Brillient selection of builds going on here folks. The thread is really informative, I just need to go back and start at page 1
Outstanding stuff.
Al
Outstanding stuff.
Al
BillGorm
New Jersey, United States
Joined: November 02, 2009
KitMaker: 609 posts
Armorama: 433 posts
Joined: November 02, 2009
KitMaker: 609 posts
Armorama: 433 posts
Posted: Saturday, March 19, 2011 - 10:27 AM UTC
It's been two steps forward and one step back with my Mk. III, so my update is a bit weak. I had to adjust my OD over blue-black / desert tan scheme because I went too heavy on the OD the first time around. I build so damned slowly that sometimes I think my airbrushing skills develop rust. Anyway, now the blue-black is faintly but clearly visible underneath the OD. I have no idea if this is historically accurate ... I'm simply following the Bison Decals instructions.
And a few questions:
1) Am I right that only the upper portion of the left hand side rear light should be painted (in red)? The rest would have been OD?
2) The T-54 tracks were all steel, right? Just checking I don't need to worry about rubber parts that need to be painted black.
3) Don, if you're reading this, any tips for applying the glue to the Panda Plastics tracks? Did you thin the glue at all? Just use a cocktail stick to dab the track pins with glue and then feed them into the connectors?
And the photos:
HONEYCUT
Victoria, Australia
Joined: May 07, 2003
KitMaker: 4,002 posts
Armorama: 2,947 posts
Joined: May 07, 2003
KitMaker: 4,002 posts
Armorama: 2,947 posts
Posted: Saturday, March 19, 2011 - 12:13 PM UTC
Quoted Text
1) Am I right that only the upper portion of the left hand side rear light should be painted (in red)? The rest would have been OD?
Hey Bill
Yes, the top oval lens on the left side tail-light should be red, but make certain to have it as a dark red as opposed to Ferrari red... The others are all the same, being a dark shade such as gloss black. They are 'combat zone safety lights' which had small lenses inside the slits which employed a system to help keep vehicles in convoy a safe distance from each other.
http://www.alibaba.com/product-tp/112126768/World_War_II_vintage_Jeep_Willys/showimage.html
Brad