Campaigns
Where Armorama group builds can be discussed, organized, and updates posted.
Where Armorama group builds can be discussed, organized, and updates posted.
Hosted by Darren Baker, Richard S.
Eastern European Steel
Posted: Thursday, March 10, 2011 - 05:02 PM UTC
You have done a fantastic job of that camouflage Axel.
ltb073

Joined: March 08, 2010
KitMaker: 3,662 posts
Armorama: 3,078 posts

Posted: Friday, March 11, 2011 - 02:19 AM UTC
Alex, nice job on that camo,
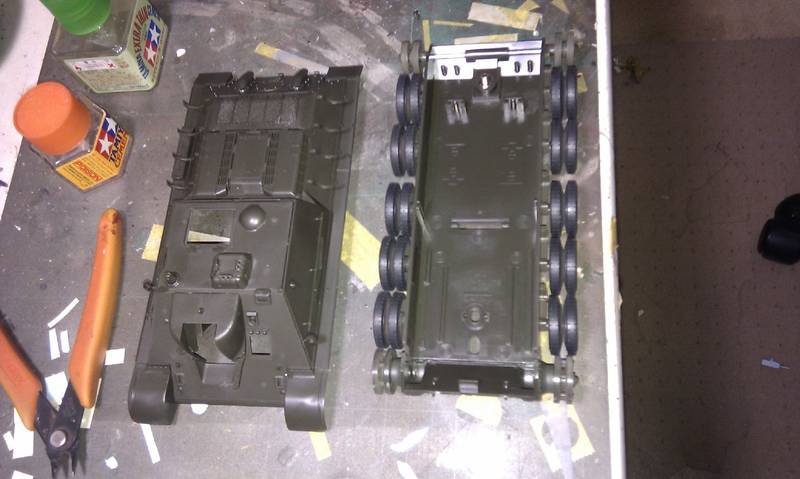
I have decided to go with the SU-122 and will attempt the hairspray method for the 1st time with a white wash so here is the obligatory before work photo and the other day i had about 45 minuets to kill so I got up 2 step 3 completed
seams like this will be a quick and simple build OOB, gotta love those Tamyia kits

I have decided to go with the SU-122 and will attempt the hairspray method for the 1st time with a white wash so here is the obligatory before work photo
 and the other day i had about 45 minuets to kill so I got up 2 step 3 completed
seams like this will be a quick and simple build OOB, gotta love those Tamyia kits


Whitey

Joined: September 20, 2010
KitMaker: 137 posts
Armorama: 100 posts

Posted: Friday, March 11, 2011 - 05:55 AM UTC
Thanks guys, I appreciate the compliments. It's a difficult pattern to replicate, and it's good to know I'm in the ballpark.

meaty_hellhound

Joined: July 23, 2010
KitMaker: 786 posts
Armorama: 753 posts

Posted: Monday, March 14, 2011 - 05:53 AM UTC
hi guys,
here's my contribution to this campaign: the OT34/76:


this model is going to get a whitewash treatment. cheers, bd.
here's my contribution to this campaign: the OT34/76:


this model is going to get a whitewash treatment. cheers, bd.
ltb073

Joined: March 08, 2010
KitMaker: 3,662 posts
Armorama: 3,078 posts

Posted: Tuesday, March 15, 2011 - 01:28 AM UTC

meaty_hellhound

Joined: July 23, 2010
KitMaker: 786 posts
Armorama: 753 posts

Posted: Tuesday, March 15, 2011 - 03:11 AM UTC
Sal, nice looking build on the SU-122, will you be doing the whitewash with the hairspray technique?
as for me using glue... no, it's held together by shear will power alone LOL.
i got my hands on some of that Magic Sculpt epoxy putty (found it at a taxidermist supply shop) and gave it a try on this model. it does handle differently than Milliput. used it on the front hull seam, turret gun ports, adding cast knock off markings and added cast/weld imperfections.
look forward to seeing the next updates from everyone. cheers, bd.

ppawlak1

Joined: March 14, 2006
KitMaker: 1,973 posts
Armorama: 1,843 posts

Posted: Tuesday, March 15, 2011 - 06:35 PM UTC
@ Axel - great start to the Campaign mate, nice paint job and a really fast start !!
@ Kimmo - you'll be Ok. Let us know when you're ready to start !
@ Emre - A Trumpeter KV1 will be awesome.
@ Sal - Love that SU-122 mate
@ Bruce - Thanks for posting, I'm watching your blog too
My T-64B lower hull is done, the Skif kit plastic is sooo soft But the SP upper hull has been fun to add to the Skif lower (NOT)
  (Wheels and all).
Cheers
Paul
@ Kimmo - you'll be Ok. Let us know when you're ready to start !
@ Emre - A Trumpeter KV1 will be awesome.
@ Sal - Love that SU-122 mate

@ Bruce - Thanks for posting, I'm watching your blog too

My T-64B lower hull is done, the Skif kit plastic is sooo soft
 But the SP upper hull has been fun to add to the Skif lower (NOT)
  (Wheels and all).
Cheers
Paul

warreni

Joined: August 14, 2007
KitMaker: 5,926 posts
Armorama: 712 posts

Posted: Saturday, March 19, 2011 - 07:07 PM UTC
Had to stop the build to take a progress shot.. I would love to show it to you BUT the gallery is not working at the moment so the piccy will have to wait.
Just for your info, it is another Tamiya 1/35 Su-122, but unlike Sal's mine has a metal barrel for the gun and a set of aftermarket workable plastic tracks. Unfortunately they have to be glued together as they just don't want to hold together using their own pins.. I think they are AFV Club but I can't remember.
Photos to follow....

vonHengest

Joined: June 29, 2010
KitMaker: 5,854 posts
Armorama: 4,817 posts

Posted: Saturday, March 19, 2011 - 07:22 PM UTC
Quoted Text
as for me using glue... no, it's held together by shear will power alone LOL.
Now THAT's mad skillz!

ltb073

Joined: March 08, 2010
KitMaker: 3,662 posts
Armorama: 3,078 posts

Posted: Sunday, March 20, 2011 - 04:49 AM UTC
Quoted Text
Just for your info, it is another Tamiya 1/35 Su-122, but unlike Sal's mine has a metal barrel for the gun and a set of aftermarket workable plastic tracks. Unfortunately they have to be glued together as they just don't want to hold together using their own pins.. I think they are AFV Club but I can't remember.
Photos to follow....
Yeah Warren the barrel on this kit really s**ks, but I never purchased any AM, if it didn't come with the kit then it don't go on my build but this 1 can really use and upgrade


vonHengest

Joined: June 29, 2010
KitMaker: 5,854 posts
Armorama: 4,817 posts

Posted: Sunday, March 20, 2011 - 05:00 AM UTC
Quoted Text
Quoted TextJust for your info, it is another Tamiya 1/35 Su-122, but unlike Sal's mine has a metal barrel for the gun and a set of aftermarket workable plastic tracks. Unfortunately they have to be glued together as they just don't want to hold together using their own pins.. I think they are AFV Club but I can't remember.
Photos to follow....
Yeah Warren the barrel on this kit really s**ks, but I never purchased any AM, if it didn't come with the kit then it don't go on my build but this 1 can really use and upgrade

Sal, that whole kit is full of weirdness bud. I've been saving one to kitbash with a decent T-34 chassis, and it's still going to need a lot of AM and scratch


warreni

Joined: August 14, 2007
KitMaker: 5,926 posts
Armorama: 712 posts

Posted: Sunday, March 20, 2011 - 07:28 PM UTC
Hi All..
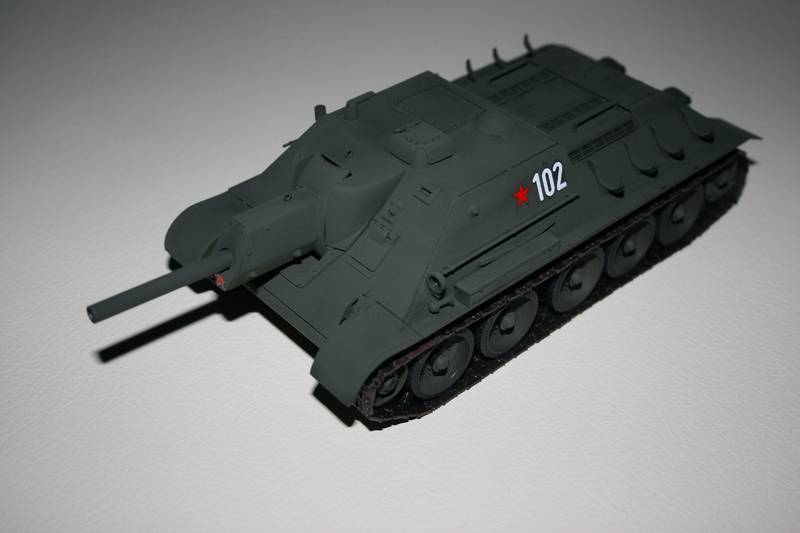
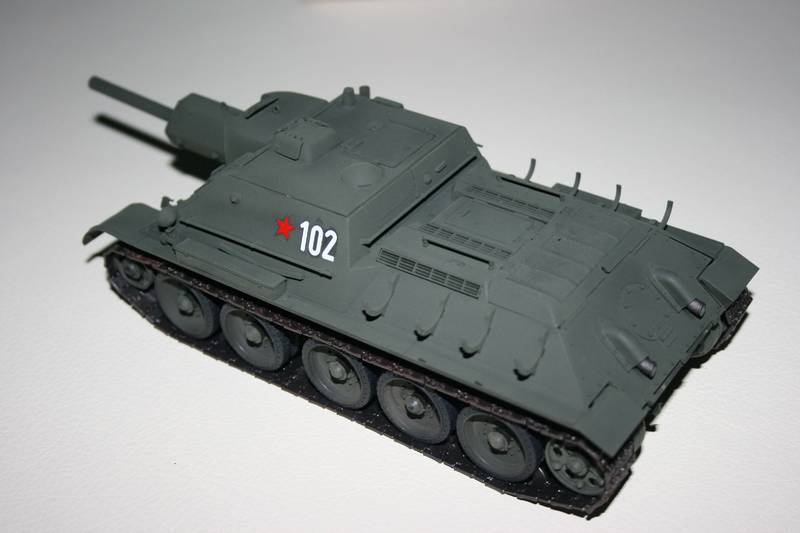
I almost finished building her before I took some progress shots!!
These old Tamiya kits are nice and simple but still look good when finished. Only accessories are a metal gun barrel from CMK and a set of aftermarket workable tracks .... which won't be workable for long because they keep falling to bits so I am gluing them solid just like Dragon Magic Tracks.


Whitey

Joined: September 20, 2010
KitMaker: 137 posts
Armorama: 100 posts

Posted: Sunday, March 20, 2011 - 11:02 PM UTC
Finished


meaty_hellhound

Joined: July 23, 2010
KitMaker: 786 posts
Armorama: 753 posts

Posted: Monday, March 21, 2011 - 04:00 AM UTC
nice finish Axel, looks really good.
here's my finished contribution, the OT34/76 flamethrower version:


cheers, bd.
here's my finished contribution, the OT34/76 flamethrower version:


cheers, bd.
ltb073

Joined: March 08, 2010
KitMaker: 3,662 posts
Armorama: 3,078 posts

Posted: Monday, March 21, 2011 - 03:14 PM UTC

17741907

Joined: December 05, 2007
KitMaker: 953 posts
Armorama: 705 posts

Posted: Monday, March 21, 2011 - 11:44 PM UTC
Quoted Text
I tried a metallic bronze wash on the treads gives them a different look
Will be interesting....Good luck....


meaty_hellhound

Joined: July 23, 2010
KitMaker: 786 posts
Armorama: 753 posts

Posted: Tuesday, March 22, 2011 - 03:31 AM UTC
hi Sal, it is just one white coat airbrushed over a faded green base colour using the hairspray technique. i did go back and add some spots of white paint using a sponge and while i was removing the white paint from the hairspray i streaked it here and there while my brush was loaded with white paint. look forward to seeing how the bronze works for you. cheers, bd.
kruppw

Joined: March 17, 2006
KitMaker: 1,117 posts
Armorama: 1,115 posts

Posted: Tuesday, March 22, 2011 - 01:46 PM UTC
Here is my contribution to the campaign; SP designís PPRU-1M (9S80M1) Sborka, AKA Dog Ear. I will also be using Master Clubís replacement wheel for the MT-LB family and Miniarmís resin tracks. The wheels and tracks in the kit are the only real let down in the whole kit and felt it would be better to replace them with a more detail set. I still havenít figure out how to paint this beast, either overall Russian green set in East Germany during the mid 80ís or tri-scheme during the 90ís in Russia.
First thing I tackled was the power generator by sanding all the details off and adding my own details that closely match the real thing as I can get. I wanted to display power cables coming off the side of the genny running towards a possible CP or some sort of C&C vehicle. There really wonít be another vehicle on the base, just the cables running towards the edge of the base giving the illusion of more behind the radar dish. I have also replaced the rear door with a new one made from plastic since SP dos not really provide a vision port for the door other than some simple lines scribed into it. This kit is pretty basic and simple to build, almost builds itís self. A lot of sanding a dry fitting it required for this, but just a beautiful kit to have. Unfortunately Iím going to have to rebuild the dish since the one provided in the kit has a lot of air bubble in it and large gaps in the resin the can not be filled.


First thing I tackled was the power generator by sanding all the details off and adding my own details that closely match the real thing as I can get. I wanted to display power cables coming off the side of the genny running towards a possible CP or some sort of C&C vehicle. There really wonít be another vehicle on the base, just the cables running towards the edge of the base giving the illusion of more behind the radar dish. I have also replaced the rear door with a new one made from plastic since SP dos not really provide a vision port for the door other than some simple lines scribed into it. This kit is pretty basic and simple to build, almost builds itís self. A lot of sanding a dry fitting it required for this, but just a beautiful kit to have. Unfortunately Iím going to have to rebuild the dish since the one provided in the kit has a lot of air bubble in it and large gaps in the resin the can not be filled.


vonHengest

Joined: June 29, 2010
KitMaker: 5,854 posts
Armorama: 4,817 posts

Posted: Tuesday, March 22, 2011 - 02:35 PM UTC
Axel: Awesome work man! What did you make the flag out of?
Warren & Sal: It's going to be great to see your SU-122's finished up and in the gallery
Christopher: That is one killer choice, always loved the huge soviet radar dishes
Warren & Sal: It's going to be great to see your SU-122's finished up and in the gallery

Christopher: That is one killer choice, always loved the huge soviet radar dishes

roycharnock

Joined: July 26, 2009
KitMaker: 135 posts
Armorama: 134 posts

Posted: Tuesday, March 22, 2011 - 11:01 PM UTC
I have decided to go with the1:35 Trumpeter BMP-3 early version .

i have built up the suspension arms and fitted them allong with the drive hubs,front self digging blade onto the lower hull.

i have built up the suspension arms and fitted them allong with the drive hubs,front self digging blade onto the lower hull.
roycharnock

Joined: July 26, 2009
KitMaker: 135 posts
Armorama: 134 posts

Posted: Wednesday, March 23, 2011 - 09:22 AM UTC
I have managed to fit the interior this evening,no fit issues to report ,i will need to get this painted before i join the top and bottom hulls together
up to now a nice kit to build up


up to now a nice kit to build up

Whitey

Joined: September 20, 2010
KitMaker: 137 posts
Armorama: 100 posts

Posted: Thursday, March 24, 2011 - 03:14 AM UTC
@ Jeremy: Sorry about the late reply, RL has me afk a bit. The flag is made out of tin foil, carefully flattened, and then carefully bent.

warreni

Joined: August 14, 2007
KitMaker: 5,926 posts
Armorama: 712 posts

Posted: Thursday, March 24, 2011 - 08:15 AM UTC
Hi Everyone.
Here is my 1/35 Tamiya Su-100. It has a CMK aluminium barrel and AFV Club tracks.
The only hassle I had was that the CMK barrel and mantlet kit were designed for another kit so the mantlet did not fit the Tamiya support structure, so all I did was use the barrel in the original Tamiya breech etc. I loath seams on barrels... I never seam ( ) to be able to remove them with any great success..
Anyway, I used Tamiya XF-61 to finish this one off. The tracks were moulded in a nice, dark, rusty brown so all they needed was a thin coat of Steel and they came up a treat.


Back to the bench...
Here is my 1/35 Tamiya Su-100. It has a CMK aluminium barrel and AFV Club tracks.
The only hassle I had was that the CMK barrel and mantlet kit were designed for another kit so the mantlet did not fit the Tamiya support structure, so all I did was use the barrel in the original Tamiya breech etc. I loath seams on barrels... I never seam (
 ) to be able to remove them with any great success..
Anyway, I used Tamiya XF-61 to finish this one off. The tracks were moulded in a nice, dark, rusty brown so all they needed was a thin coat of Steel and they came up a treat.


Back to the bench...

kruppw

Joined: March 17, 2006
KitMaker: 1,117 posts
Armorama: 1,115 posts

Posted: Thursday, March 24, 2011 - 02:27 PM UTC
Here is just a small update. After about an hour or so of studying what photos of the dish I can find, I have manage to rebuild the base mount for the dish. One thing I have notice is the arm for the receiver is actually mounted straight out with a slight angle down and this whole assembly folds upwards when in the stow position. There is also two actuators at the back of the support that folds the dish down. The receiver antenna was also rebuild to be longer and thinner than the supplied part. From what I can tell there is four small antennas on either side of the receive that I tried to replicate the best I can. This is still not 100% accurate, but the best I can do with the lack of great photos.


vonHengest

Joined: June 29, 2010
KitMaker: 5,854 posts
Armorama: 4,817 posts

Posted: Thursday, March 24, 2011 - 04:02 PM UTC
Quoted Text
@ Jeremy: Sorry about the late reply, RL has me afk a bit. The flag is made out of tin foil, carefully flattened, and then carefully bent.
No worries bud, and nice job on the flag! I have yet to try using foil.
 |


