Kildare, Ireland
Joined: November 21, 2007
KitMaker: 3,212 posts
Armorama: 2,807 posts
Posted: Monday, June 13, 2011 - 12:16 AM UTC
Quoted Text
Sean
Model looks great
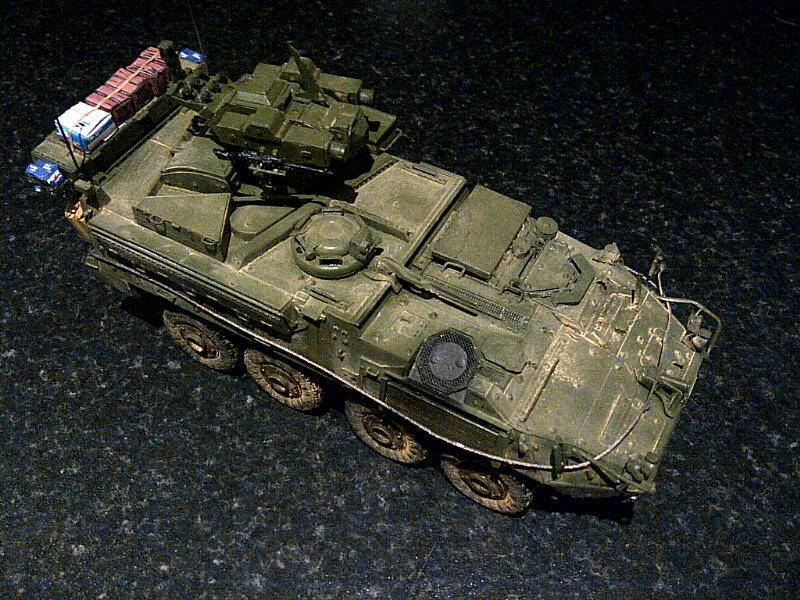
Exactly what color did you use for your stryker?
JP
Thanks JP.
It's not actually a Stryker, but a LAV III, which is the base vehicle that the Stryker is based on....
I used Humbrol enamel 86, light olive, and dusted with Mig Pigments "gulf war" sand
Scott: that looks great. Might have to add it to my collection of 8 wheelers...after the Boxer.
Alexander: That's increadible. When I saw the picture with the € coin....wow! Such detail at that scale...

#041
Kobenhavn, Denmark
Joined: July 20, 2006
KitMaker: 10,069 posts
Armorama: 4,677 posts
Posted: Tuesday, June 14, 2011 - 03:52 PM UTC
Campaign'oholic - 252+ campaigns completed
Lisboa, Portugal
Joined: March 04, 2008
KitMaker: 5,386 posts
Armorama: 4,727 posts
Posted: Tuesday, June 14, 2011 - 04:20 PM UTC
Jesper I like the last camo, but the SFOR looks good if you have the right decals.
The first decal looks weird... like a ACME camo
Active Builds: 0
Active Campaigns: 0
CMOT
 Editor-in-Chief
England - South West, United Kingdom
Joined: May 14, 2006
KitMaker: 10,954 posts
Armorama: 8,571 posts
Posted: Tuesday, June 14, 2011 - 05:47 PM UTC
I have just started an Italeri SdKfz 234/1 as a quick and easy build, and to clear some cardboard that SWMBO keeps on at me about. I do have some pictures from the start of the build and would like to know if it is accetable for me to join this campaign with it?
Ontario, Canada
Joined: January 06, 2006
KitMaker: 63 posts
Armorama: 43 posts
Posted: Friday, June 17, 2011 - 05:30 AM UTC
"Don't sweat the petty things and don't pet the sweaty things" -G.C.
Lisboa, Portugal
Joined: March 04, 2008
KitMaker: 5,386 posts
Armorama: 4,727 posts
Posted: Sunday, June 19, 2011 - 07:04 AM UTC
Another update:
- Be aware that the gun platform takes a huge amount of space and if the arms are not well aligned it will be hard to fit the upper hull.


edit:
The last pic is a little blurry, sorry.
The first and second pic have some different lightning. and there's also some tape securing the fender.
There's a small gap that will have to be worked between the upper and lower hull parts, due to the gun platform that is making constant pressure on the upper hull.
I blame Dragon instructions ... installing the gun platform should have been at least 2 steps before, and also to show us where the platform arms join the upper hull. I haven't done it since it's impossible to fit .. nevermind my ranting..
Active Builds: 0
Active Campaigns: 0
Lisboa, Portugal
Joined: March 04, 2008
KitMaker: 5,386 posts
Armorama: 4,727 posts
Posted: Wednesday, June 22, 2011 - 02:23 PM UTC
Another small update, no pics this time.
The fenders on the previous pics have the small gaps filled with Mr Surfacer.
Let it dry for 1 day and painted with the same Drk Yllw, kept the Brown Camo too.
The painted instructions have a kind of Nato Green, much lighter with a 3 tone camo or a brown camo over dark yellow. Not sure which to paint..
Tomorrow I will continue with the brown camo coats and work on the other small details (equipment and front & rear fenders details).
Stay tuned
Active Builds: 0
Active Campaigns: 0
Scotland, United Kingdom
Joined: December 07, 2007
KitMaker: 2,096 posts
Armorama: 1,983 posts
Posted: Wednesday, June 22, 2011 - 10:08 PM UTC
Hay great work going on here. I have made some progress the first of the paint is on.

By
sudzonic at 2011-06-22
CUIDICH 'N RIGH
life is a river, it always runs.
Lisboa, Portugal
Joined: March 04, 2008
KitMaker: 5,386 posts
Armorama: 4,727 posts
Posted: Thursday, June 23, 2011 - 08:43 AM UTC
Nice job Scott !!
Hope to see it weathered soon...
I will post some pics this weekend, I'm working on the fender details (front & rear) and on building the gun itself.
Slowly but I hope to have some pics soon !
Active Builds: 0
Active Campaigns: 0
Scotland, United Kingdom
Joined: December 07, 2007
KitMaker: 2,096 posts
Armorama: 1,983 posts
Posted: Thursday, June 23, 2011 - 10:27 AM UTC
Quoted Text
Nice job Scott !!
Hope to see it weathered soon...
I will post some pics this weekend, I'm working on the fender details (front & rear) and on building the gun itself.
Slowly but I hope to have some pics soon !
Thanks John.
Here is the latest pic.

By
sudzonic at 2011-06-23


CUIDICH 'N RIGH
life is a river, it always runs.
Ohio, United States
Joined: June 12, 2009
KitMaker: 516 posts
Armorama: 391 posts
Posted: Friday, June 24, 2011 - 11:05 AM UTC
Nice looking construction Alexander, Paul, Zon and Scott. Jesper look forward to your project...interesting camo options.
I am on vacation and actually brought my cutting board, kit and construction tools. I hope to get a full day of building in this weekend.
Tony
On the Bench:
M2A3 Bradley
It's not a sin to get knocked down;It's a sin to stay down
"Master Chief Boatswains Mate Carl Brashear"
Lisboa, Portugal
Joined: March 04, 2008
KitMaker: 5,386 posts
Armorama: 4,727 posts
Posted: Sunday, June 26, 2011 - 06:48 AM UTC
Active Builds: 0
Active Campaigns: 0
Ohio, United States
Joined: June 12, 2009
KitMaker: 516 posts
Armorama: 391 posts
Posted: Wednesday, June 29, 2011 - 01:37 AM UTC
John,
Look forward to updates.
I took my cutting board, tools, adhesives, and kit to West Virginia and back. Kit never got touched. Oh well.
Tony
PS Friendly reminder to post pictures of your finished kits in the campaign photo gallery.

On the Bench:
M2A3 Bradley
It's not a sin to get knocked down;It's a sin to stay down
"Master Chief Boatswains Mate Carl Brashear"
Lisboa, Portugal
Joined: March 04, 2008
KitMaker: 5,386 posts
Armorama: 4,727 posts
Posted: Wednesday, June 29, 2011 - 02:36 AM UTC
Tony, first of all enjoy your vacations, if you can take some time to build ...do it !
As to my 234/4, I added the back and front details and kept working on the gun itself.
After this I will begin working on the tools, boxes and jerrycans.
Active Builds: 0
Active Campaigns: 0
British Columbia, Canada
Joined: August 13, 2009
KitMaker: 420 posts
Armorama: 416 posts
Posted: Wednesday, June 29, 2011 - 12:01 PM UTC
Hi Everyone,
well unfortunately. i'm going to say that i won't be able to finish my LAV III TUA. now that the strike/lockout is over where i work i went to get the stuff i need to finish only to find them out of stock!! grrrr!! Congrats to all the completed Wheeled thingies they all look great!
Kildare, Ireland
Joined: November 21, 2007
KitMaker: 3,212 posts
Armorama: 2,807 posts
Posted: Wednesday, June 29, 2011 - 08:54 PM UTC
What are you short of Ian? If I can help I will...seeing as your TUA inspired me to do mine....
British Columbia, Canada
Joined: August 13, 2009
KitMaker: 420 posts
Armorama: 416 posts
Posted: Thursday, June 30, 2011 - 10:31 AM UTC
Quoted Text
What are you short of Ian? If I can help I will...seeing as your TUA inspired me to do mine....
thanks glad i was inspiring someone. I'm short 2 sets of armour corps resin continuous tie downs
Attica, Greece / Ελλάδα
Joined: February 17, 2010
KitMaker: 625 posts
Armorama: 608 posts
Posted: Saturday, July 02, 2011 - 11:18 AM UTC
Nice builds going on here.
On to my midget Sdkfz 234

Finished the hull building, hand painted the camo scheme and did some fading with the airbrush.

I found some time to work on the turret. I was surprised how well the pieces matched.

The barrel is from Schatton Modelbau, the mg42 is from a Dragon set, the 20mm magazine from the spare box. The PE from the PART set.
The turret painted and on model.

More soon, P.A.
I used to be a scale modeler like you. Then I took an arrow in the knee.
Lisboa, Portugal
Joined: March 04, 2008
KitMaker: 5,386 posts
Armorama: 4,727 posts
Posted: Saturday, July 02, 2011 - 11:24 AM UTC
That's really small Alexander...
I finished the Pak gun for the 234/4 last Friday.
I started painting this afternoon and will do the tires tomorrow.
Equipment & jerrycans this week...
I lend my camera so no pics for a week...
So I hope to post the finished kit next time.
Active Builds: 0
Active Campaigns: 0
Hawaii, United States
Joined: August 27, 2006
KitMaker: 1,646 posts
Armorama: 1,557 posts
Posted: Saturday, July 02, 2011 - 12:26 PM UTC
P.A.: some nice work there!!
Happy Modelling, -zon

"Certainty of death.
Small chance of sucess.
What are we waiting for?"
-Gimli, Return of the King.
Kildare, Ireland
Joined: November 21, 2007
KitMaker: 3,212 posts
Armorama: 2,807 posts
Posted: Sunday, July 03, 2011 - 09:05 AM UTC
Some really great stuff here... here's my humble effort:

I'm now going to stop tinkering with the weathering and call it Done!

Attica, Greece / Ελλάδα
Joined: February 17, 2010
KitMaker: 625 posts
Armorama: 608 posts
Posted: Sunday, July 03, 2011 - 10:53 AM UTC
After a good day of modeling I made progress on hull and turret weathering.
Here is the model prior to weathering.

After some washes, chipping and oil filter.


Next is weathering the underhull with pigments, attaching the wheels and applying filter dots.
Thanks for watching.
More soon, P.A.
I used to be a scale modeler like you. Then I took an arrow in the knee.
Hawaii, United States
Joined: August 27, 2006
KitMaker: 1,646 posts
Armorama: 1,557 posts
Posted: Sunday, July 03, 2011 - 02:12 PM UTC
Sean: Looks good. Congrats.
P.A.: nice weathering. Looking good.
Happy Modelling, -zon

"Certainty of death.
Small chance of sucess.
What are we waiting for?"
-Gimli, Return of the King.
Kildare, Ireland
Joined: November 21, 2007
KitMaker: 3,212 posts
Armorama: 2,807 posts
Posted: Sunday, July 03, 2011 - 09:27 PM UTC
Thanks Zon
Alexander, that's looking great!
SgtRam
 Contributing Writer
#197
Ontario, Canada
Joined: March 06, 2011
KitMaker: 3,971 posts
Armorama: 2,859 posts
Posted: Wednesday, July 06, 2011 - 12:51 AM UTC


