Campaigns
Where Armorama group builds can be discussed, organized, and updates posted.
All American Tracks
Blueheeler
Visit this Community
New South Wales, Australia
Joined: March 18, 2008
KitMaker: 347 posts
Armorama: 79 posts
Posted: Thursday, September 22, 2011 - 01:33 PM UTC
Not far off completion.


Cheers,
Nick.
Joel_W
Staff MemberAssociate Editor
AUTOMODELER
Visit this Community
New York, United States
Joined: December 04, 2010
KitMaker: 11,666 posts
Armorama: 1,143 posts
Posted: Thursday, September 22, 2011 - 01:59 PM UTC
Nick, looking good. Looking forward to your next update.
muttley
Visit this Community
Ontario, Canada
Joined: January 10, 2005
KitMaker: 251 posts
Armorama: 202 posts
Posted: Saturday, September 24, 2011 - 01:24 PM UTC
I'm done with my campaign contribution guys! Here's my vintage kit from Monogram Models, Sherman Hedgehog in 1/32 scale. I took me a full week to build, paint and weather it. I airbrushed the hull dark olive and the sandbags were painted khaki-buff. Weathering was done with burnt umber oil wash with a light olive dry brush to highlight the raised parts of the model. The lower hull was also speckled with Mig pigment mixed with resin to simulate mud on the Cullin hedge cutter and bogie wheels. Finishing was an overall coat of Future and Testors dull-coat. Model appears to be glossy cause I used flash on my digital camera - again! Fun campaign indeed and I hope everybody else is enjoying it


ltb073
Visit this Community
New York, United States
Joined: March 08, 2010
KitMaker: 3,662 posts
Armorama: 3,078 posts
Posted: Saturday, September 24, 2011 - 01:50 PM UTC
hey guys some nice looking Shermans
@Rei General Patton would have had a fit seeing all those sand bags on that tank
Joel_W
Staff MemberAssociate Editor
AUTOMODELER
Visit this Community
New York, United States
Joined: December 04, 2010
KitMaker: 11,666 posts
Armorama: 1,143 posts
Posted: Saturday, September 24, 2011 - 02:10 PM UTC
Rei, Wow!! Talk about an oldie but a goodie. I remember that kit from ages ago.
Sudzonic
Visit this Community
Scotland, United Kingdom
Joined: December 07, 2007
KitMaker: 2,096 posts
Armorama: 1,983 posts
Posted: Sunday, September 25, 2011 - 09:12 AM UTC
Very nice guys well done.

Nick, looking forward to the end result.

Rei, very nice Sherman well done a nice clean build.

muttley
Visit this Community
Ontario, Canada
Joined: January 10, 2005
KitMaker: 251 posts
Armorama: 202 posts
Posted: Sunday, September 25, 2011 - 12:30 PM UTC
@ Sal - yeah I thought I read about old Blood n Guts actually chasing a tank commander to give him sh*t for putting too much armor on his tank, seems like Patton thinks his Shermans can actually withstand Kraut tank guns

@ Joel - good old kit alright and hard to find now too, but I thought I heard rumors that Revell actually has re-boxed this kit together with Monograms other Sherman which was the Screamin Mimi

Im glad you liked the clean build Scott, I try not to do too much conversion on my models
littlebear573
#016
Visit this Community
England - East Anglia, United Kingdom
Joined: March 18, 2009
KitMaker: 142 posts
Armorama: 138 posts
Posted: Wednesday, September 28, 2011 - 03:01 AM UTC
hi guys haven't started yet but have exactly the same M60 A1 kit as you tom, i also plan to fit a dozer blade to mine which i got in a bundle from ebay. plan to start building early next week.

Middle_Franconian
Visit this Community
Bayern, Germany
Joined: January 02, 2011
KitMaker: 279 posts
Armorama: 30 posts
Posted: Wednesday, September 28, 2011 - 09:51 AM UTC
Hi!

I have found some time to proceed with my 1:72 Revell M-48.

I have decided to build a M-48 A2 C G.

This variant was created by upgrading older M-48 A2 during the 60s/70s (means 90 mm gun, smoke dischargers and a spot light for night fighting capabilities)

Together with the Leo 1 the M-48 (Germany had about 1600 M-48 in service) was the backbone of the Panzertruppe der Bundeswehr until the beginning of the 80s when the Leo 2 became operational. Some 650 upgraded M-48 A2 G A2 with newly installed 105 mm gun remained mostly in Territorialheer units until end of Cold War.

Those Territorialheer units were strictly under Bundeswehr control and not part of NATO units. They can be compared to National Guard units in the U.S.

But enough of boring background chitchat...

At first I planned to build it strictly OOB, but then there were some things I wanted to improve. But take a look at the pictures:
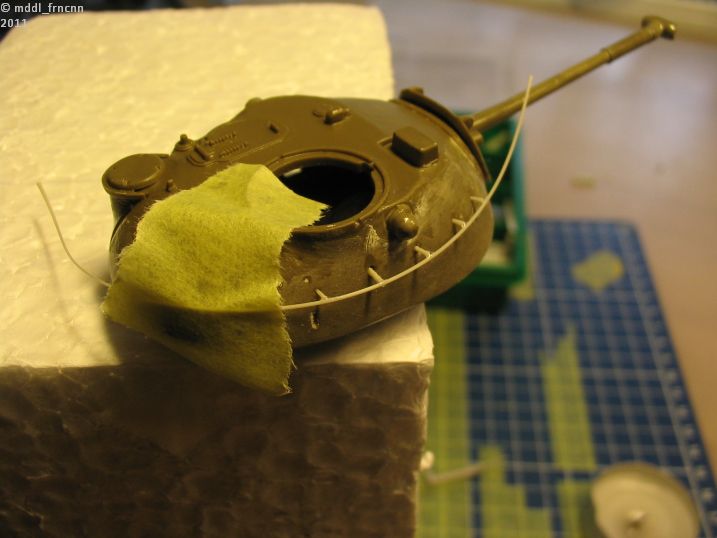

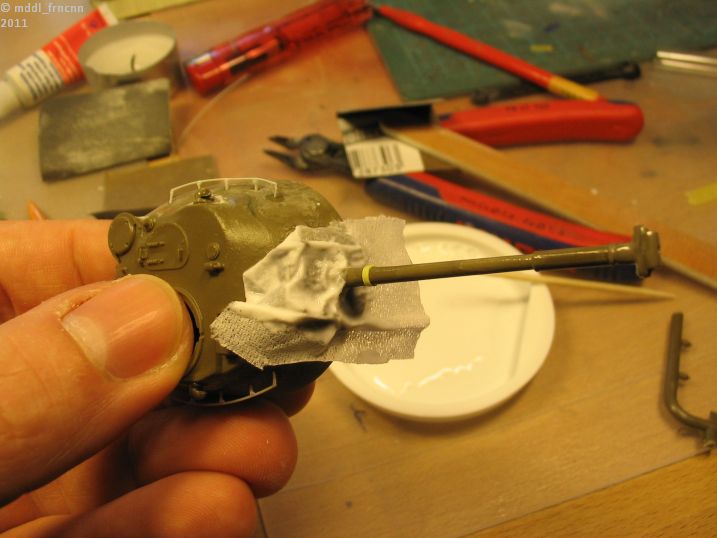
The handle on the turret was poorly rendered so I tried to replace it...


The gun faceplate was canvas-covered. I have imitated it with tissue soaked in thinned wood glue.
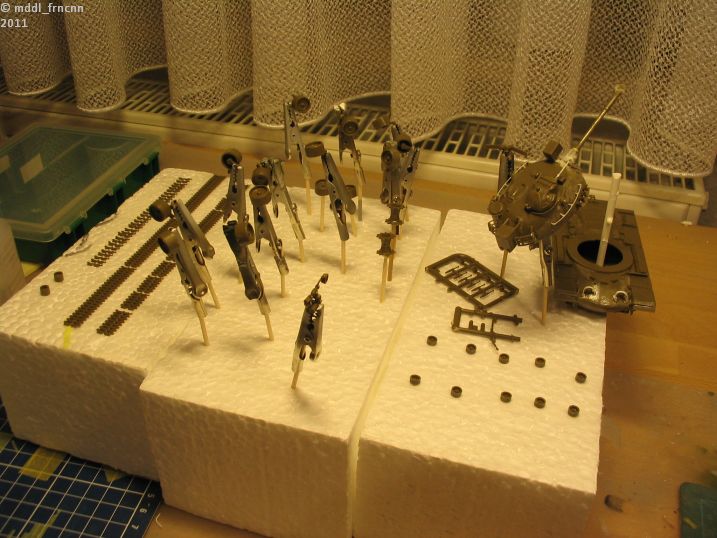

The parts ready for paint....
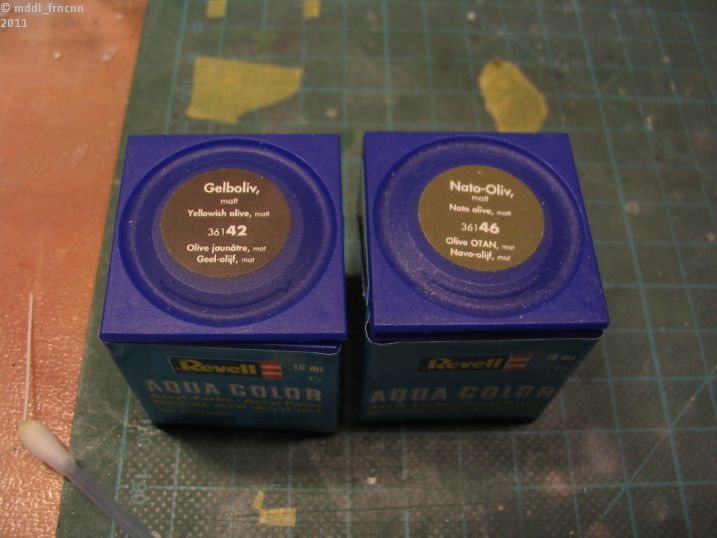

My preferred colors.... I mixed them with white for shading.
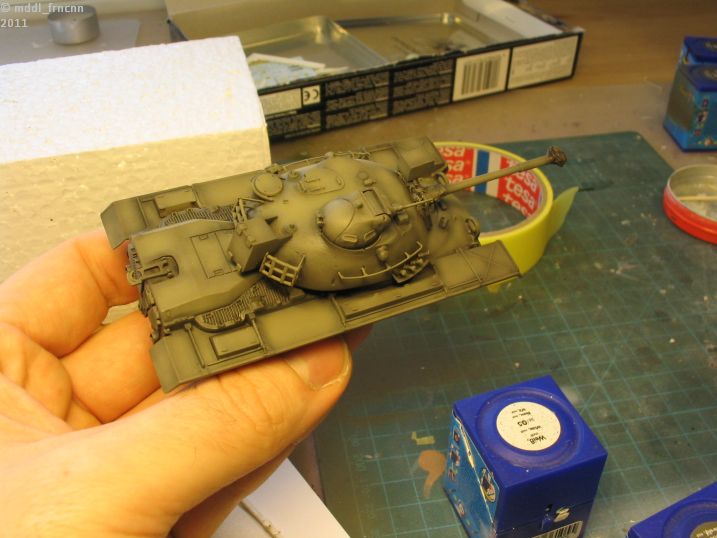

The final result. I sprayed the whole tank with R 46 as main color, followed by a gloss coat. This is the prepration for a. rough wash with almost black diluted oil paint. Due to th glossy surface I can remove the wash more easily.

Then I apllied different brighter shades of R 42 and 46 (mixed with small amounts of white) on the not-recessed parts. With the dark oil wash in the recessed parts the tank becomes more three-dimensional.
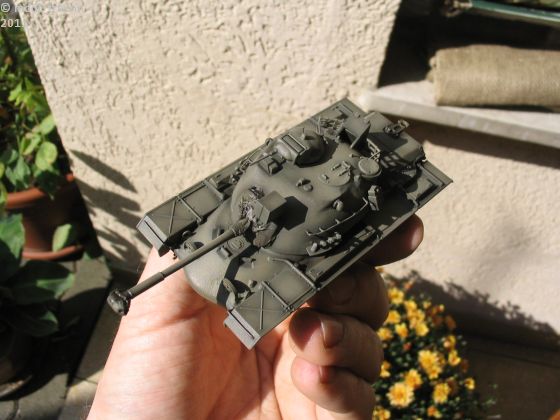

A shot in daylight...

Hope you like my M-48 so far. Comments and critics welcome.

Servus,

Sebastian
Joel_W
Staff MemberAssociate Editor
AUTOMODELER
Visit this Community
New York, United States
Joined: December 04, 2010
KitMaker: 11,666 posts
Armorama: 1,143 posts
Posted: Thursday, September 29, 2011 - 01:51 AM UTC
Nice build so far. Paint job looks great, and the weathering makes everything just pop out. Looking forward to your finished update with pictures.
flyboy92187
Visit this Community
Wisconsin, United States
Joined: March 30, 2011
KitMaker: 199 posts
Armorama: 32 posts
Posted: Friday, September 30, 2011 - 06:42 AM UTC
So, after finding how much fun the T-34 was, I am taking a pause from the aircraft kits, and building one of the other tanks in my stash. My girlfriend was nagging because I hadn't gotten around to building the Tamiya Bulldog she got me last christmas, so I figured If I want santa to keep delivering I may as well build it! So, here is my start. I primed, preshaded some white and hit with Lifecolor OD.


GregCloseCombat
Visit this Community
California, United States
Joined: June 30, 2008
KitMaker: 2,408 posts
Armorama: 2,394 posts
Posted: Friday, September 30, 2011 - 04:23 PM UTC
@Nick and Rei - congrats on finishing!

@Sebastian - great work - love the scratch work and coloring.

@Michael nice start

Rebilda
#057
Visit this Community
Bayern, Germany
Joined: May 11, 2010
KitMaker: 248 posts
Armorama: 119 posts
Posted: Friday, September 30, 2011 - 07:18 PM UTC
Middle_F my man!! Realy nice, awesome shading. What did you use for gloss?
And the turret's a gem. Maybe gimme a heads up on manufactioning hand rails with plastic one of these days?

Just signed up. For me it will be a sherman of course. M4A3E8 of the 4th with all the kewl add on armour slats. Maybe even Abram's Thunderbolt 7 but the dragon decals are awful!!!!

Anyway will be starting this kit on the plane today as I'm going to Canada on vacation (Yeeehaaahhh!!). A first for me let's see what parts of my miniaturized tool box won't pass security. Hope not my beloved jeweler's file!!! Crammed all the parts minus sprues into a sorting box yesterday.

Pics will follow....

Middle_Franconian
Visit this Community
Bayern, Germany
Joined: January 02, 2011
KitMaker: 279 posts
Armorama: 30 posts
Posted: Friday, September 30, 2011 - 08:11 PM UTC
@ Greg: thanks!

@ Mike: very nice M 41! Good start! What about Bundeswehr markings on that one ?

@ Leo: Hope you will not have any turbulences in the air while sanding your Sherman

BTW, the hand rail is done by stretched sprue glued with superglue and Zap-A-Gap kicker. Works fast and is more robust than I thought.

What I want to add is a pack of camouflage netting in the stowage rack. In this scale this is quite a challenge to reproduce the structure of a wrapped net. I am making some trials at the moment and let you know...

Let the tanks roll...
flyboy92187
Visit this Community
Wisconsin, United States
Joined: March 30, 2011
KitMaker: 199 posts
Armorama: 32 posts
Posted: Saturday, October 01, 2011 - 05:38 AM UTC
Well I got a little work done before work this morning, and As I am off tomorrow, I will get some more done. I have the rubber track pads mostly painted. And I started hitting the turret with oils. Seriously, I have fallen in love. Again, I usually do not do tanks, but just using the oils is a ton of fun. So, here is the turret so far. And, as far as the decals, I am just going to use the stock ones that came with it. Im pretty much an oob guy, and I have christmas shopping to do (so I can keep feeding this addiction later.)


GregCloseCombat
Visit this Community
California, United States
Joined: June 30, 2008
KitMaker: 2,408 posts
Armorama: 2,394 posts
Posted: Saturday, October 01, 2011 - 06:00 PM UTC
I finished my 1/48 Kengi Hellcat build! I made my Hedgecutter with plastistruct 'I' beams and strips and made some headlight protecters. The only thing I'm worried about is the resin barrel warping/bending, so I'm ordering a metal replacement from Gasoline. Glad I didn't spend much time on painting the interior as I just primed this and forgot to cover the hole - Doh!


Sudzonic
Visit this Community
Scotland, United Kingdom
Joined: December 07, 2007
KitMaker: 2,096 posts
Armorama: 1,983 posts
Posted: Saturday, October 01, 2011 - 11:25 PM UTC
Very nice work everyone your builds are looking good well done.
Joel_W
Staff MemberAssociate Editor
AUTOMODELER
Visit this Community
New York, United States
Joined: December 04, 2010
KitMaker: 11,666 posts
Armorama: 1,143 posts
Posted: Sunday, October 02, 2011 - 03:10 AM UTC
Greg, outstanding job on stratching out the hedgecutter. It came out great.
jccraemer
Visit this Community
North Carolina, United States
Joined: December 24, 2007
KitMaker: 462 posts
Armorama: 262 posts
Posted: Sunday, October 02, 2011 - 04:27 AM UTC
here my start photo for campaign

Delbert
#073
Visit this Community
Pennsylvania, United States
Joined: October 05, 2002
KitMaker: 2,659 posts
Armorama: 1,512 posts
Posted: Sunday, October 02, 2011 - 08:57 AM UTC
Hello..

I have a free evening and a Red Army Sherman kit I think I'll finally start tonight. Its a kit I've been wanting to build for a while.

Delbert
GregCloseCombat
Visit this Community
California, United States
Joined: June 30, 2008
KitMaker: 2,408 posts
Armorama: 2,394 posts
Posted: Sunday, October 02, 2011 - 04:09 PM UTC
Thanks Joel!
flyboy92187
Visit this Community
Wisconsin, United States
Joined: March 30, 2011
KitMaker: 199 posts
Armorama: 32 posts
Posted: Monday, October 03, 2011 - 04:54 AM UTC
A bit more progress from the weekend. I went to a flea market yesterday in hopes of building the stash, but I forgot this is predominantly nascar country, and was unable to find anything. But, I did manage to get the decals on, I will hit it with some thinned od, and give it a little dusting of buff and call it done soon. Again, I apologize that my camera is not that great, but its something!


flyboy92187
Visit this Community
Wisconsin, United States
Joined: March 30, 2011
KitMaker: 199 posts
Armorama: 32 posts
Posted: Tuesday, October 04, 2011 - 04:57 AM UTC
Okay, I used some heavily thinned od over the decals to fade them a bit, and clear coated it, so I am calling this one done.


Joel_W
Staff MemberAssociate Editor
AUTOMODELER
Visit this Community
New York, United States
Joined: December 04, 2010
KitMaker: 11,666 posts
Armorama: 1,143 posts
Posted: Tuesday, October 04, 2011 - 08:37 AM UTC
Michael, for a Flyboy, you sure did a rock solid job building, painting, and weathering. Congrats on a job well done.
flyboy92187
Visit this Community
Wisconsin, United States
Joined: March 30, 2011
KitMaker: 199 posts
Armorama: 32 posts
Posted: Tuesday, October 04, 2011 - 09:46 AM UTC
Thanks Joel! I am thinking I need to get some more non-wingy thingys for my stash!