England - East Anglia, United Kingdom
Joined: August 12, 2005
KitMaker: 14,499 posts
Armorama: 11,675 posts
Posted: Saturday, July 02, 2011 - 12:51 AM UTC
Thanks Stanley, that takes the pressure off.
Cheers
Al

'Action this Day'
Winston Spencer Churchill
England - North East, United Kingdom
Joined: October 22, 2007
KitMaker: 971 posts
Armorama: 280 posts
Posted: Saturday, July 02, 2011 - 01:35 AM UTC
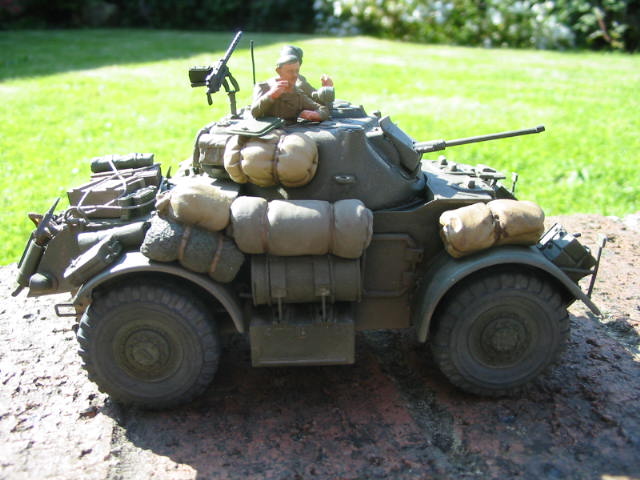
Great work going on here but my progress is slow so far the Staghound is all built and stowage all cleaned up and have just primed all the parts ready for painting hope to get more done soon

England - North West, United Kingdom
Joined: July 18, 2010
KitMaker: 611 posts
Armorama: 584 posts
Posted: Saturday, July 02, 2011 - 01:56 AM UTC
England - North East, United Kingdom
Joined: October 22, 2007
KitMaker: 971 posts
Armorama: 280 posts
Posted: Wednesday, July 13, 2011 - 12:19 AM UTC
All painted and loaded ready for some weathering crew built up and ready for paint few more bits of stowage to add and tie down more soon??


England - North West, United Kingdom
Joined: July 18, 2010
KitMaker: 611 posts
Armorama: 584 posts
Posted: Wednesday, July 13, 2011 - 03:39 AM UTC
that looks great. what colour did you use to paint the staghound?
nice stowage

England - North East, United Kingdom
Joined: October 22, 2007
KitMaker: 971 posts
Armorama: 280 posts
Posted: Wednesday, July 13, 2011 - 11:25 PM UTC
Hi Stan the paint used for the staghound was Tamiya Olive Green with a few drops of Buff mixed in to lighten it but it goes real dark when you put the Johnston Clear on so I have added a mix of Yellow Orche and white Oil wash. Then Over sprayed that with another coat of Tamiya Buff thined with screen wash then a good coat of Matt varnish to give it a flat finnish. the next stage is to dust it up using Mig Pigments aruond the lower hull and wheels and last some pin washed of Burnt umber and Raw umber to highlight the pannel lines then a few scratch marks here and there around the turret where the crew would climb about. Hope to get this all done by the weekend
New South Wales, Australia
Joined: March 18, 2008
KitMaker: 347 posts
Armorama: 79 posts
Posted: Friday, July 15, 2011 - 01:25 AM UTC
Well I have finally got my camera up and working again so thought I would put these up. Hope it is alright for the campaign.


Cheers,
Nick.

Assumption is the mother of all f*#k ups.
England - North West, United Kingdom
Joined: July 18, 2010
KitMaker: 611 posts
Armorama: 584 posts
Posted: Friday, July 15, 2011 - 03:31 AM UTC
thanks for that keith.
yes that is fine nick.

England - South West, United Kingdom
Joined: July 27, 2011
KitMaker: 95 posts
Armorama: 81 posts
Posted: Saturday, July 30, 2011 - 11:35 AM UTC
hello
i have quite literally finished my Challenger II today by applying weathering so i dont have any photos of in progress
i have some finished pictures here though of my Trumpeter Challenger II


I dont mind if it dosent qualify

just wondering if it would count
cheers

The Saipan Diorama is in progress!
its just gonna take a while
England - North East, United Kingdom
Joined: October 22, 2007
KitMaker: 971 posts
Armorama: 280 posts
Posted: Sunday, July 31, 2011 - 10:18 PM UTC
England - North West, United Kingdom
Joined: July 18, 2010
KitMaker: 611 posts
Armorama: 584 posts
Posted: Monday, August 01, 2011 - 12:30 AM UTC
that looks really cool kieth, can't wait to see this diorama!
jack, i don't know, when did you build it? because i saw it in the constructive feedback forum with all your other models so i have no idea of when you built it.
stan

England - South West, United Kingdom
Joined: July 27, 2011
KitMaker: 95 posts
Armorama: 81 posts
Posted: Monday, August 01, 2011 - 01:52 AM UTC
i built it about 2 weeks ago before i joined this forum
i was just wondering seeing as i have only just applied the weathering it might count
i dont mind if it dosent though
The Saipan Diorama is in progress!
its just gonna take a while
England - North West, United Kingdom
Joined: July 18, 2010
KitMaker: 611 posts
Armorama: 584 posts
Posted: Monday, August 01, 2011 - 02:06 AM UTC
2 weeks ago, yeah i'm sure that would be fine.
stan

Istanbul, Turkey / Türkçe
Joined: December 05, 2007
KitMaker: 953 posts
Armorama: 705 posts
Posted: Monday, August 01, 2011 - 11:26 AM UTC
Looking good Keith....

England - South West, United Kingdom
Joined: July 27, 2011
KitMaker: 95 posts
Armorama: 81 posts
Posted: Wednesday, August 03, 2011 - 04:18 AM UTC
ok so do i have to leave the pictures on here or is there somewhere i have to upload them
i have never done a campaign before and im not really sure how they work
cheers
The Saipan Diorama is in progress!
its just gonna take a while
California, United States
Joined: December 06, 2004
KitMaker: 3,694 posts
Armorama: 2,693 posts
Posted: Wednesday, August 03, 2011 - 05:22 AM UTC
Quoted Text
ok so do i have to leave the pictures on here or is there somewhere i have to upload them
i have never done a campaign before and im not really sure how they work
cheers
You might want to read through this thread.
TUTORIAL: Armorama CampaignsHo Chi Minh City, Vietnam
Joined: September 01, 2007
KitMaker: 90 posts
Armorama: 89 posts
Posted: Thursday, August 04, 2011 - 06:50 PM UTC
England - North West, United Kingdom
Joined: July 18, 2010
KitMaker: 611 posts
Armorama: 584 posts
Posted: Friday, August 05, 2011 - 10:57 AM UTC
hi dung, thats looking really cool so far i would love to build one of these, but sadly don't have the money

Istanbul, Turkey / Türkçe
Joined: December 05, 2007
KitMaker: 953 posts
Armorama: 705 posts
Posted: Friday, August 05, 2011 - 12:02 PM UTC
Good choice Dung.....

Ho Chi Minh City, Vietnam
Joined: September 01, 2007
KitMaker: 90 posts
Armorama: 89 posts
Posted: Friday, August 05, 2011 - 03:41 PM UTC
@Hakan: thanks
@Stansmith: i've saved money for the long time

Zuid-Holland, Netherlands
Joined: September 07, 2010
KitMaker: 78 posts
Armorama: 75 posts
Posted: Friday, August 05, 2011 - 09:27 PM UTC
I just enlisted

!
I'm going to do a Churchill Mk. III from AFV-Club!
England - East Anglia, United Kingdom
Joined: August 12, 2005
KitMaker: 14,499 posts
Armorama: 11,675 posts
Posted: Friday, August 05, 2011 - 09:45 PM UTC
Hi Keith and Jack,
Nice work Gentlemen.
Al


'Action this Day'
Winston Spencer Churchill
England - North West, United Kingdom
Joined: July 18, 2010
KitMaker: 611 posts
Armorama: 584 posts
Posted: Friday, August 05, 2011 - 10:09 PM UTC
hi bas, welcome to the campaign and that sounds like a good choice aswell!
stan

New South Wales, Australia
Joined: March 18, 2008
KitMaker: 347 posts
Armorama: 79 posts
Posted: Monday, August 08, 2011 - 06:20 PM UTC
Just a q uick update. Paint on and layer or two of Pledge on. Hopefully get to the decals soon enough then weathering. The green is more on the mark than what it shows in the picture.

Cheers,
Nick.


Assumption is the mother of all f*#k ups.

#110
Florida, United States
Joined: September 20, 2005
KitMaker: 248 posts
Armorama: 224 posts
Posted: Friday, August 12, 2011 - 04:41 AM UTC
Fellow Anglophiles,
I have finally uploaded some photos for the campaign. I am working on the 1/35 Tamiya British Chieftain. I am adding the Eduard Chieftain photoetch and some bits from the On The Mark Chieftain photoetch - most of their parts are much to tiny and fiddly for my tastes!
I currently have the suspension completed and have added the engine deck screens and access handles. The handles were made from wire. A couple of shots follow:


I am also replacing the plastic tiedown 'lumps' on the side skirts with bent wire 'U's'. tedious, but they improve the look. I may use them to anchor netting, foliage, etc.

Hopefully, I will have some more updates soon.
thanks,
Stephen


 !
!


