Campaigns
Where Armorama group builds can be discussed, organized, and updates posted.
Art of the Battlefield (artillery)
GaryKato
Visit this Community
California, United States
Joined: December 06, 2004
KitMaker: 3,694 posts
Armorama: 2,693 posts
Posted: Tuesday, December 06, 2011 - 05:48 AM UTC

Quoted Text


I made a major and amateur mistake. I cannot believe I did it, but no denying it
Some of the glue ran into the "moveable" sliding parts of the gun. No big problem except for the fact that the gun was in full recoil when I assembled it so it set in that position.


Been there, done that. My PAK 40 has the barrel halfway between.
MikeM670
#020
Visit this Community
Illinois, United States
Joined: December 28, 2006
KitMaker: 278 posts
Armorama: 231 posts
Posted: Tuesday, December 06, 2011 - 06:50 AM UTC
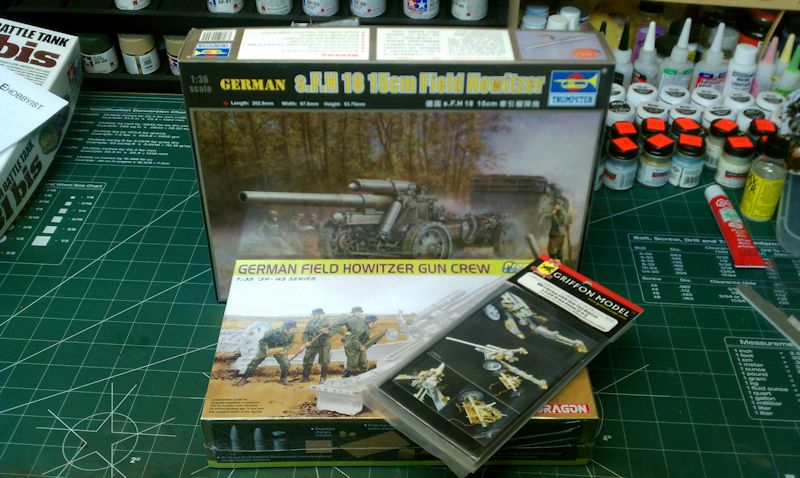
The Trumpeter 10cm s.K. 18 cannon is my entry for the campaign. I will use the Griffon PE Set and Dragon Figures in a diorama. This will be my first ever artillery piece so the build should go fairly slowly.


zontar
Visit this Community
Hawaii, United States
Joined: August 27, 2006
KitMaker: 1,646 posts
Armorama: 1,557 posts
Posted: Tuesday, December 06, 2011 - 07:59 AM UTC
Bruce: good to have you aboard. Looking forward to your MGS.

Jesper: I made the same mistake, except mine fixed the elevation rather than the recoil state Scalerama (one of the advertisers) has a video demo making an 88 fire. It uses their products to represent the muzzle blast and was fairly convincing.

Mike: nice looking cannon and crew.

Happy Modelling, -zon
Tailor
Visit this Community
Nordrhein-Westfalen, Germany
Joined: May 26, 2008
KitMaker: 1,168 posts
Armorama: 256 posts
Posted: Tuesday, December 06, 2011 - 11:09 AM UTC
Jesper: I had the same happening to me. To solve your problem you "just" pose the gunner figures covering their ears and/or turning away from the gun. The problem is always to find a proper set of figures...
Cheers,
Guido
ltb073
Visit this Community
New York, United States
Joined: March 08, 2010
KitMaker: 3,662 posts
Armorama: 3,078 posts
Posted: Wednesday, December 07, 2011 - 02:18 AM UTC
@ Michael, welcome to the campaign looks like some nice goodies there
@ Jasper, I'm sure you will be able to overcome your mishap with a nice finished product
@ Taylor, I see you are lurking are you joining in with a price of artillery and taking a brake from ship, if so I'm looking forward to see what you have planed

I had a bit of a mishap myself this morning. While spraying the Morser Karl with furtures it flew out of my had like a V-1 rocket and crashed into a pail resulting in several of the hand rail supports breaking off. I have located 3 of them and glued them back on as best as possible. I'll have to make the 4th piece from something out of the spare parts box
Tank178
Visit this Community
Illinois, United States
Joined: December 30, 2009
KitMaker: 92 posts
Armorama: 63 posts
Posted: Wednesday, December 07, 2011 - 05:05 AM UTC
Haven't had as much time as I would like to have to work on my Hummel due to work, family, yardwork etc, but I have a couple of in-progress pics here.
I sprayed the interior of the superstructure and the exterior as well as the howitzer the base coat of MM Dunkelgelb. I have started attaching some of the smaller interior bits like the K98's and fire extinguisher. I have started assembling the shell storage lockers and the charge locker.

I finished assembling and have started on the Friulmodel tracks. I first soaked them in the Track 4 Black from Tankrats AFV Depot (ordered it and received it about 6 months ago). It worked really well, but I messed it up by letting the tracks soak in a water/ baking soda solution that i had read about on one of the forums. After soaking in the water/ baking soda solution, the nice brown colored turned to a gray . So after rinsing with plain water and scrubbing the tracks and letting them dry, I spray the tracks with MM Rust with a few drops of black mixed in to darken it just a bit. I then applied a wash of black oil paint. to get into the nooks and such. I then took a piece of rough sandpaper and ran it across the guidehorns and along the side of the guidehorns so show wear from running across the steel return rollers and the steel idler wheels. I then flipped the tracks over and ran the sandpaper over the portion of the tracks that would make contact with the ground and roads. I am going to grind up some pastels in a general rust color and apply it to the tracks then seal it in with a flat dull cote. The Friuls are tedious to assemble, but the realistic sag they give when put on is awesome and well worth it.


Tailor
Visit this Community
Nordrhein-Westfalen, Germany
Joined: May 26, 2008
KitMaker: 1,168 posts
Armorama: 256 posts
Posted: Wednesday, December 07, 2011 - 04:41 PM UTC

Quoted Text


@ Taylor, I see you are lurking are you joining in with a price of artillery and taking a brake from ship, if so I'm looking forward to see what you have planed


I have been lurking for a while now, indeed. Since artillery is my second favorite modelling subject, this campaign cries out "join me".
Since I do have a liking for ugly ducklings, I think I'll try some modern SPG off the beaten track. I just hope I can make that old kit look good! News to follow as soon as some progress has been made.
Cheers,
Guido
ltb073
Visit this Community
New York, United States
Joined: March 08, 2010
KitMaker: 3,662 posts
Armorama: 3,078 posts
Posted: Monday, December 12, 2011 - 03:48 PM UTC
Hi Guys
@ Art nice progress looking forward to seeing more
Here Is my Morser Karl with a black wash and decals added
Photobucket
Photobucket
this beast is sucking up paint like dried out wood
Railmen2000
Visit this Community
California, United States
Joined: February 17, 2007
KitMaker: 87 posts
Armorama: 65 posts
Posted: Monday, December 12, 2011 - 06:43 PM UTC
Hi All:
Here is my entry - Dragon's 1/72 Pak 35/36 3/7 cm gun:


Even on these small kits, you still have to remove seams:


Some great builds here. Hope my little gun is as half as good as the rest.
Jim
AlanL
Visit this Community
England - East Anglia, United Kingdom
Joined: August 12, 2005
KitMaker: 14,499 posts
Armorama: 11,675 posts
Posted: Tuesday, December 13, 2011 - 06:34 AM UTC
Hi Sal,

Looking good. Bad luck on the rocket launch, it does happen, but you seem to have repaired the damge fine.

Excellent work.

Al
MikeM670
#020
Visit this Community
Illinois, United States
Joined: December 28, 2006
KitMaker: 278 posts
Armorama: 231 posts
Posted: Wednesday, December 14, 2011 - 04:05 AM UTC
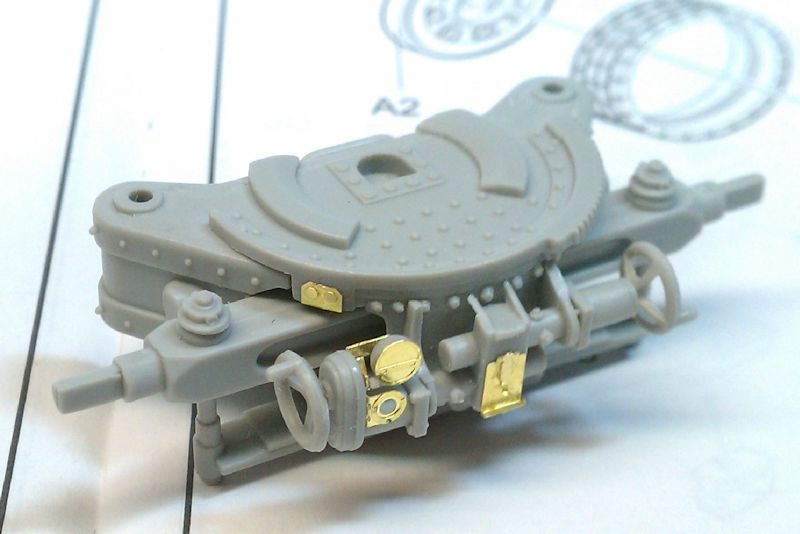
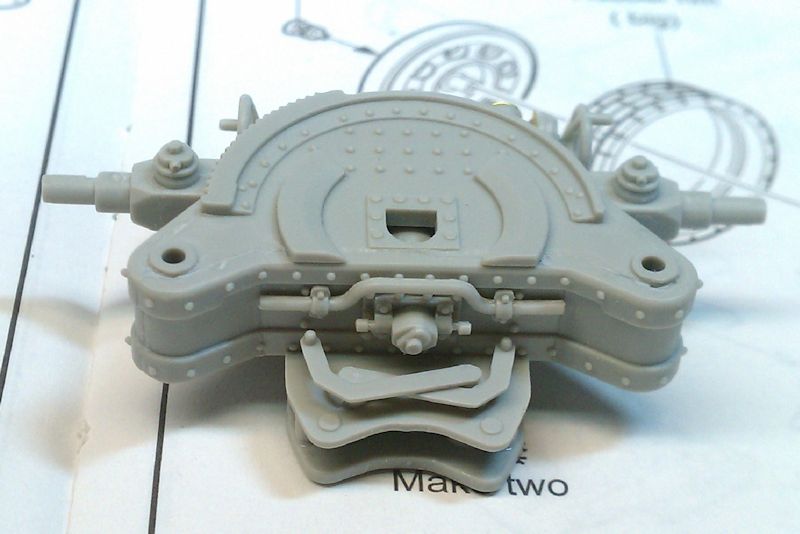
Just wanted to put up a few images of the build start. The carpet monster has already struck so I left off the PE handles on the second image. I lost a few small pe disks that when on the handles. Still not really comfortable with working in PE. My preferred method of assembling the PE parts is solder. In the case where I lost the small parts I used superglue and it did not hold while I was filing down the fold points and they flew off. I do have gator glue but have not tried that yet.

In any case here are a few images to get my build off. If anyone sees something wrong please jump in and say so!


Tailor
Visit this Community
Nordrhein-Westfalen, Germany
Joined: May 26, 2008
KitMaker: 1,168 posts
Armorama: 256 posts
Posted: Wednesday, December 14, 2011 - 04:57 AM UTC
Gentlemen,

I have been a week into the project, now. I got myself in trouble with the good old Heller AMX30 AUF1 155mm Howitzer, which I will finish in a UN Peacecorps paintscheme. While waiting for the Eduard PE (for AMX30 tank) I started basic assembly, running gear and Friul tracks. Actually the AUF1 seems to use a special track which is not avaibale for sale at all. So I'll have to live with the tank track.


Quite a few of the smaller assemblies are finished and ready to prime. The kit has some problems such as very deep ejector marks on the inside on the road wheels. I cleaned them up for the most part, but I will have to tale care in assembly to hide some of them properly. The majority of the parts fit amazingly well.


One of the pitfall is a horribly wrapped hull. With some patience and filler it goes together OK. Of cause most of the smaller mold-on detail has to go and will be replaced by PE or by scratch-built replacements.


The plastic is extremely brittle. I broke the hull in two places and the mudguards came off by looking at them angrily.


The AUF1 is a particulary ugly vehicle, IMHO. This is, of cause, owed to the turret that houese the 155mm howitzer. The fit of the barrel halves is good. Only the mantlet need filling, if one plans to show the gun at extreme high or low elevation.


The parts of said turret fit quite OK, but most of the mold on detail has to go. As many of the shaved off parts are quite massive a bit of filler is required in placed I dug too deep.


The PE parts and paint masks have now arrived and and will be put to use soon.
This has turned into a bigger project than originally planned. But hey - what else is new?

Next update during the weekend.

Cheers,
Guido
Railmen2000
Visit this Community
California, United States
Joined: February 17, 2007
KitMaker: 87 posts
Armorama: 65 posts
Posted: Wednesday, December 14, 2011 - 11:23 AM UTC
Glad to see all the builds coming along here.
I did the asembly on my little gun. No vinyl tracks or warped hulls in this kit!
Here is the gun prior to painting:


I can't get over the detail in this small kit compared to larger artillery kits from the past.
Jim.
SGTJKJ
#041
Visit this Community
Kobenhavn, Denmark
Joined: July 20, 2006
KitMaker: 10,069 posts
Armorama: 4,677 posts
Posted: Sunday, December 18, 2011 - 04:16 PM UTC
A little more progress on my PAK 40. Basic painting done. Next are some detail painting and weathering.

Still have not found out how to make a diorama about a gun in full recoil. I have read that one way to destroy the gun - if it has be be abandoned - is to open the recoil absorbers valves and fire a shell. That would destroy the gun and leave it useless to the enemy. So maybe a captured, but destroyed gun....

More to follow

zontar
Visit this Community
Hawaii, United States
Joined: August 27, 2006
KitMaker: 1,646 posts
Armorama: 1,557 posts
Posted: Sunday, December 18, 2011 - 05:31 PM UTC
Jesper:

I think you should try this:

http://www.youtube.com/watch?v=BGS6tYSZJN4&list=UUGa5DA8Zv_nz1U14D3fj2OQ&index=8&feature=plcp

This video is Part 2. The first 3 1/2 minutes is snow, but the rest of the video is simulating canon fire. The Part 1 video will show the final effect and will likely autoplay after you watch Part 2.

Happy Modelling, -zon
SGTJKJ
#041
Visit this Community
Kobenhavn, Denmark
Joined: July 20, 2006
KitMaker: 10,069 posts
Armorama: 4,677 posts
Posted: Monday, December 19, 2011 - 01:54 PM UTC
Thanks for the link, Zon. Looks great. I will try and see if I can archieve the same effect.

Ironically I just noticed that their 5cm PAK is not in recoil.
zontar
Visit this Community
Hawaii, United States
Joined: August 27, 2006
KitMaker: 1,646 posts
Armorama: 1,557 posts
Posted: Tuesday, December 20, 2011 - 06:25 AM UTC
Jesper: I found the product for sale at Military Miniatures Warehouse under diorama / Scalerama. If I recall, the Smoke Fluid and Micro stuff were about $8.00 each. HTH

Happy Modelling, -zon
SGTJKJ
#041
Visit this Community
Kobenhavn, Denmark
Joined: July 20, 2006
KitMaker: 10,069 posts
Armorama: 4,677 posts
Posted: Wednesday, December 21, 2011 - 05:48 AM UTC
Thanks for the update, Zon. I tried to find it at spruebrothers or squadron, but they did not stock it.

I will try Military Miniatures Warehouse. More to follow
AlanL
Visit this Community
England - East Anglia, United Kingdom
Joined: August 12, 2005
KitMaker: 14,499 posts
Armorama: 11,675 posts
Posted: Wednesday, December 21, 2011 - 06:36 AM UTC
Hi Guys,

Some interesting progress here, nice work folks. I made a start on the Bronco 25pdr. Hope to get a bit more done over Christmas and the New Year.


Cheers

Al
ltb073
Visit this Community
New York, United States
Joined: March 08, 2010
KitMaker: 3,662 posts
Armorama: 3,078 posts
Posted: Wednesday, December 21, 2011 - 12:57 PM UTC
Some real nice progress here guys lets keep it going
I made some as well. Put some washes on the beast and now Im working on the crew
Photobucket
They will be a mix of the Trumpeter 1's that came with it and dragons Karl Morser Set
Photobucket
2 more work days then I'm off till next year so I should get more done on this
gcdavidson
Visit this Community
Ontario, Canada
Joined: August 05, 2003
KitMaker: 1,698 posts
Armorama: 1,563 posts
Posted: Wednesday, December 21, 2011 - 02:15 PM UTC
Here's mine. Going to do her up as a 2 RCHA gun from Korea.

Railmen2000
Visit this Community
California, United States
Joined: February 17, 2007
KitMaker: 87 posts
Armorama: 65 posts
Posted: Thursday, December 22, 2011 - 12:38 PM UTC
I am really enjoying all the builds here.

Love the crew, Sal.

Can't wait to see the finished Pak 40 in full recoil, Jesper. My personal preference would be to see a scene with crew firing the gun rather than a destroyed one.

I pretty much finished my little Pak 35/36. Here it is with first coat of paint:


And here it is pretty much finished on a base:


I really enjoyed building this gun, and since the kit is a "double pack", I just may make the other one (a pak 40) here too!

Jim

(Yes, I know only 1 ribbon will be awarded, but these artillery pieces are just too much fun to build!)
meaty_hellhound
Visit this Community
Alberta, Canada
Joined: July 23, 2010
KitMaker: 786 posts
Armorama: 753 posts
Posted: Saturday, December 24, 2011 - 05:16 AM UTC
Jim, i really like the log cut base... fun idea. your gun turned out really nice sitting on it.
Sal, that monster of a gun looks sweet. kudos to putting together such a beast.
Jesper, glad to see you making lots of progress on your entry, keep 'er rolling.
cheers, bd
AlanL
Visit this Community
England - East Anglia, United Kingdom
Joined: August 12, 2005
KitMaker: 14,499 posts
Armorama: 11,675 posts
Posted: Saturday, December 24, 2011 - 06:23 AM UTC
Hi Sal,

Nice job, the crew will really mak it come to life.

Hi Jim,

The log is a cool idea, nice work on the kit too.

Hi Graeme,

Looking forward to the 25pdr.

Happy Christmas Guys.

Al
meaty_hellhound
Visit this Community
Alberta, Canada
Joined: July 23, 2010
KitMaker: 786 posts
Armorama: 753 posts
Posted: Monday, December 26, 2011 - 09:39 AM UTC
progress update on MGS

hi everyone,
here's my project slowly getting built:


scratchbuilt a Driver's Enhancement Kit, added overlap on side hatches, added slat armour headlight channeling, made a pioneer tool rack and took the stock Griffon stryker storage rack kit and bashed it into an MGS version which still needs more items added.

really enjoying this slow build and look forward to the next steps. got to scratchbuild jerry can racks and finish the basic model assembly before i start the slat armour details.

cheers, bd.