Art of the Battlefield (artillery)
Nordrhein-Westfalen, Germany
Joined: May 26, 2008
KitMaker: 1,168 posts
Armorama: 256 posts
Posted: Wednesday, January 25, 2012 - 12:03 AM UTC
Gentlemen,
I continue at a snails pace, but I am getting there.
I am waiting for replacements for the engineers tools, as the Heller parts were so brittle, I basically pulverised them while trying to remove the mold-on clamps.


I have changed the set up of detail on the rear as per reference photos of actual UNIFIL vehicles.

The mud guards will be braught to shape after the chain/running gear assembly is attached.
The radiator took a bit of tweaking. The Eduard set was using the same pattern of radiator and cover. Neither of them I could not find on any of the pictures available in the internet. So made my own radiator from styrene strips and stock and covered it with photo etched mesh from a scale railroad supplier. Thats' much more like it.

Next I'll turn my attention to the front detail, before starting to paint and final assembly.
More news as soon as available.
Cheers,
Guido
AKA "Tailor" -VMF'06 - German Gamblers
http://www.youtube.com/channel/UCk8zhb1sc4Pe3BRLqq3d-SQ
New York, United States
Joined: March 08, 2010
KitMaker: 3,662 posts
Armorama: 3,078 posts
Posted: Wednesday, January 25, 2012 - 01:24 AM UTC
@ Guido WOW great job with all the PE and scratch work there looking forward to seeing more

@ Steve-O Civil War stuff, a little change of pace is good, have you gotten to Gettysburg yet some real cool stuff there

@ Mecanix, another real interesting project, I have that Landrover on order if it ever gets here

looking forward to seeing how that progresses as well

keep up the great work guys this campaign is becoming more interesting than I thought it would

Active Campaigns on the bench:
Operation Fall Gelb - Pz.Kpfw. IV Ausf. C
Engineering the Future - M-26 Recovery Vehicle
115 Campaigns completed
Nordrhein-Westfalen, Germany
Joined: May 26, 2008
KitMaker: 1,168 posts
Armorama: 256 posts
Posted: Wednesday, January 25, 2012 - 03:52 AM UTC
Thanks, Sal!
I was going to say Thanks for all your kind words, gentlemen, but when I tried, it was too late to edit my posting! So here it is: Thank you, guys!
... and great work all around!
Cheers,
Guido
AKA "Tailor" -VMF'06 - German Gamblers
http://www.youtube.com/channel/UCk8zhb1sc4Pe3BRLqq3d-SQ
Wisconsin, United States
Joined: September 11, 2009
KitMaker: 1,917 posts
Armorama: 735 posts
Posted: Wednesday, January 25, 2012 - 04:18 AM UTC
Guido,
You only get about 10 minutes to edit a post. You have to be really quick!

Add my compliments too! Really excellent, inspiring stuff.
I'd better dig up more photos and do more research before I get back to my own build, if I want to keep up the standards of this campaign!

Thanks,
Sean H.

Current: model railroad layout
Stalled a while ago:
. 1950's Chrome, WW II Twins
Last completed: Police Car
Ontario, Canada
Joined: August 05, 2003
KitMaker: 1,698 posts
Armorama: 1,563 posts
Posted: Wednesday, January 25, 2012 - 04:54 AM UTC
that's some amazing work Guido! Those old Heller kits need a lot of TLC to make them look that nice.
Why plan when you can react?
Ontario, Canada
Joined: October 17, 2002
KitMaker: 448 posts
Armorama: 306 posts
Posted: Wednesday, January 25, 2012 - 03:36 PM UTC
The work so far from everyone has been very impressive.
Here's an update on the Centaur.

Haven't been able to find much time to work on it lately, but seeing how it's a Tamiya kit the assembly doesn't take much time.
There's a couple small detail items to add yet. I also need to sag the track, the headless horseman is waiting for a package in the mail and add some fairly light stowage.
Been a delight to build and would recommend it to anyone.
Cheers,
Jeff
Go Green! Go White!
On the bench
1/32 BF-109 G-6
1/24 1968 Dodge Dart
England - West Midlands, United Kingdom
Joined: May 23, 2010
KitMaker: 642 posts
Armorama: 593 posts
Posted: Thursday, January 26, 2012 - 06:34 AM UTC
Hi Folks,
Some excellent builds going on here, very inspirational. I have my model ready, it is the Revell 210mm Morser 18. I also have the MR Modellbau after-market set with metal barrel for this kit.
Here is the starting photo:

Look forward to contributing and as there are only 3 months left I had better get cracking...
All the best,
Paul
Ohio, United States
Joined: February 05, 2004
KitMaker: 545 posts
Armorama: 295 posts
Posted: Thursday, January 26, 2012 - 07:58 AM UTC
I'm not really experienced with Resin, but this went together pretty quickly!
Now just to paint it! ..and find some way of getting the extra resin blocks off of bottom of the veggie/fruit baskets and barrels without cutting my fingers off in the process.


Ontario, Canada
Joined: October 17, 2002
KitMaker: 448 posts
Armorama: 306 posts
Posted: Thursday, January 26, 2012 - 11:16 AM UTC
The Civil War canon is very cool! I'd love to make one myself if I get my skill level to the point where I feel I could do it justice.
Jeff
Go Green! Go White!
On the bench
1/32 BF-109 G-6
1/24 1968 Dodge Dart
England - East Anglia, United Kingdom
Joined: August 12, 2005
KitMaker: 14,499 posts
Armorama: 11,675 posts
Posted: Thursday, January 26, 2012 - 07:32 PM UTC
Hi Guido,
Looking great so far.
Hi Jeff,
Nice work, the tracks on the Centaur would normally sag a little on to the centre 3 wheels.
Steve,
The Cannon looks great.
Cheers
Al

'Action this Day'
Winston Spencer Churchill
Minnesota, United States
Joined: October 01, 2008
KitMaker: 597 posts
Armorama: 439 posts
Posted: Friday, January 27, 2012 - 04:42 PM UTC
Well, I originally was going to build the M109A6 Paladin for this campaign, then I moved, and sold off a large portion of my stash in an effort to "start fresh". Somehow I forgot to mark my "campaigns in progress" kits. Lessons learned, says I.
Anyways, for the campaign, I'll be building Trumpeter's 1/35th ASU-85 m1956 out of the box. Since I don't get a newspaper, my iPhone will have to suffice for the start date. Really,
newspapers? I kid, of course.


That's my start for tonight. Didn't have much time on the bench due to lots of admin stuff to do elsewhere, and updates galore. Plus the work week was extremely long. Looking forward to getting friendly with this kit over the weekend!
EWC(SW/AW) USN 1990-2005
IPMS #46275
Minnesota, United States
Joined: October 01, 2008
KitMaker: 597 posts
Armorama: 439 posts
Posted: Saturday, January 28, 2012 - 04:39 PM UTC
Lots of house cleaning today, followed by a trip to IKEA to pick up some storage cubby things for my 3 year old daughter's room so she can see her floor. I picked up a new clear self healing mat for my workbench though. It's a very thin plastic cutting board and has a smooth side and a rough side. The rough side has just enough "tack" to keep things from sliding off the desk, and for $6 I figured, "What the heck."
Anyways, my update for tonight. Small I'm afraid. Spent close to an hour fixing the wheels/tires. The seams running around the tire width-wise seemed a bit big and over scale:

So I took a medium sanding stick and ran it across lightly, to knock down the seams on the sidewalls. Photos I've seen of ASU's have the seam across the width of the tire completely gone as it comes in contact with the tracks, so I cleared it out. Got rid of some nasty mold lines as well.

Unmodified on the left, sanded on the right.


After a quick brushcoat of PollyScale "Tarnished Black" with a drop of Vallejo Panzer Ace Dark Rubber. I paint the tires first, as I'll go back later with a draftsman's circle template and shoot the wheels with my airbrush. These don't necessarily have to be super clean as the basecoat of Russian Dark Green is a darker coat and covers quite well.
EWC(SW/AW) USN 1990-2005
IPMS #46275
Ho Chi Minh City, Vietnam
Joined: December 10, 2009
KitMaker: 55 posts
Armorama: 54 posts
Posted: Sunday, January 29, 2012 - 02:13 AM UTC
hi all
do you agree me join your campaign ?
If agree i'll join with Flak 18 AFV

And my phone will have to suffice for the start date


Nordjylland, Denmark
Joined: January 30, 2006
KitMaker: 613 posts
Armorama: 508 posts
Posted: Sunday, January 29, 2012 - 08:09 AM UTC
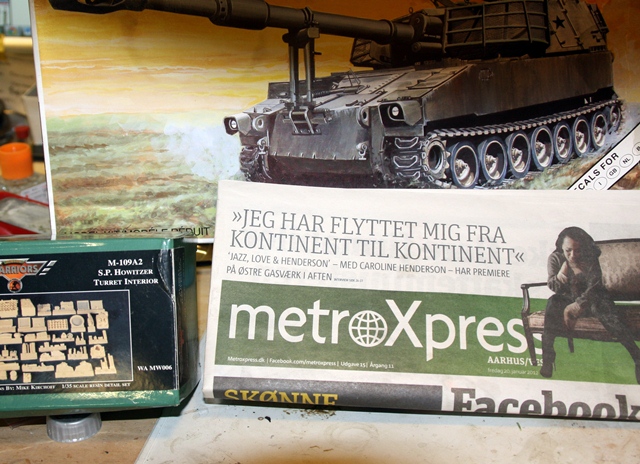

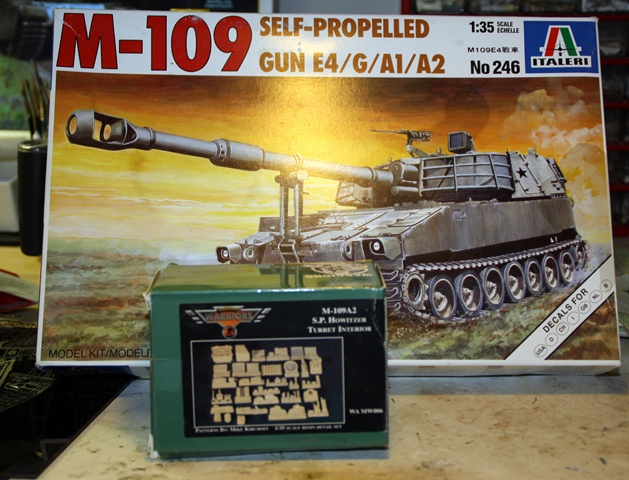
Here is my entry. I'll make a Danish M109A3 with full interior. The base for this build is Italeri's old set, Warriors turret interior and a Barrel Depot barrel (once I find it in my stash

). On it's way, hopefully, are Warrior’s hull interior, ditto exterior update set (whatever that contains??) and Accurate Armor’s German tracks.
It is going to be a very extensive update, however, I hope to pull it throw
British Columbia, Canada
Joined: August 13, 2009
KitMaker: 420 posts
Armorama: 416 posts
Posted: Sunday, January 29, 2012 - 08:57 AM UTC
Quoted Text
On it's way, hopefully, are Warrior’s hull interior, ditto exterior update set (whatever that contains??)
Where'd you get the hull interior set? been looking for one for a while.
Nordjylland, Denmark
Joined: January 30, 2006
KitMaker: 613 posts
Armorama: 508 posts
Posted: Sunday, January 29, 2012 - 10:35 AM UTC
I bought if from a friend. We've been talking about it for some time, and now we have done it. I do know it is very difficult to track down, so I really feel lucky.

#298
Hong Kong S.A.R. / 繁體
Joined: August 08, 2002
KitMaker: 1,182 posts
Armorama: 665 posts
Posted: Sunday, January 29, 2012 - 09:09 PM UTC
New Hampshire, United States
Joined: August 11, 2008
KitMaker: 403 posts
Armorama: 322 posts
Posted: Tuesday, January 31, 2012 - 03:09 AM UTC
Steve-O
Good thing I stumbled over this campaign I've been working on an Annie since the new year. Got the tractors base coated yesterday. The barrel has a long groove in it for the "play" recoil, still not satisfied with the fill I've got in that trough.
I'll try posting some pictures later.
Wisconsin, United States
Joined: September 11, 2009
KitMaker: 1,917 posts
Armorama: 735 posts
Posted: Tuesday, January 31, 2012 - 04:07 AM UTC
Just to chime in, nice work here everyone, good choices and good research!
I'm going slowly on my HMC when I find the time, a few minutes a day. Again, I'm really loving this old Tamiya kit. Really well made kit, so nothing really to show yet, as I clean parts and glue them on.
Cheers!
-Sean H.

Current: model railroad layout
Stalled a while ago:
. 1950's Chrome, WW II Twins
Last completed: Police Car
Nordrhein-Westfalen, Germany
Joined: May 26, 2008
KitMaker: 1,168 posts
Armorama: 256 posts
Posted: Wednesday, February 01, 2012 - 09:33 PM UTC
Gentlemen-
Thank you for your kind words!
Great to see so many more subjects coming up and great craftsmanship to admire in this campaign. I have completed the foward hull with detail from scratch and the Eduard AMX-30 set.


I have already started painting and browsing through my boxes for groundwork material.
More news to follow soon.
Keep up the good work!
Cheers
Guido
AKA "Tailor" -VMF'06 - German Gamblers
http://www.youtube.com/channel/UCk8zhb1sc4Pe3BRLqq3d-SQ
Nordrhein-Westfalen, Germany
Joined: May 26, 2008
KitMaker: 1,168 posts
Armorama: 256 posts
Posted: Thursday, February 02, 2012 - 12:37 AM UTC
...and here's the first step in painting...

Cheers,
Guido
AKA "Tailor" -VMF'06 - German Gamblers
http://www.youtube.com/channel/UCk8zhb1sc4Pe3BRLqq3d-SQ
New York, United States
Joined: March 08, 2010
KitMaker: 3,662 posts
Armorama: 3,078 posts
Posted: Thursday, February 02, 2012 - 01:42 AM UTC
Every one is making some great progress here and there is a large variety of different types of kits showing up

Keep up the good work guys and don't forget to post a picture of your finished build in the gallery

Active Campaigns on the bench:
Operation Fall Gelb - Pz.Kpfw. IV Ausf. C
Engineering the Future - M-26 Recovery Vehicle
115 Campaigns completed
Ontario, Canada
Joined: October 17, 2002
KitMaker: 448 posts
Armorama: 306 posts
Posted: Thursday, February 02, 2012 - 07:11 AM UTC
Here's an update on the Centaur

I got a little more painting to do on the suspension. I hate looking at my models before weathering. They always look like toys and I get to thinking "I don't know if I can make this one look any good.". I get the feeling that the Centaur might not turn out all that great
I need to do a couple brown filters to get it to a closer approximation of it's proper colour, but its not as orange as the photo shows.
It was an absolute joy to build, but once painting started I ran into bad luck one thing after another. To start I had a real time getting my Lifecolor paint to spray properly, and just when I got it right my airbrush grenaded. When I managed to get it fixed I accidentally spilled paint all over the engine deck. After fixing the paint as best I could I knocked the thing over on to it's turret and knocked off the antennas, which I'll reattach later. All of that happening makes me sound like Inspector Clouseau. From there after the gloss coat one of the decals for the turret aiming increments fell apart into 5-6 pieces in the water, but I was able to piece it back together not too badly.
Hopefully from here on in it'll be smooth sailing.
Everyone else keep up the great work.
Cheers
Jeff
Go Green! Go White!
On the bench
1/32 BF-109 G-6
1/24 1968 Dodge Dart

#152
Texas, United States
Joined: December 07, 2002
KitMaker: 487 posts
Armorama: 441 posts
Posted: Saturday, February 04, 2012 - 03:45 PM UTC
My in process photos of the 128mm AT Gun
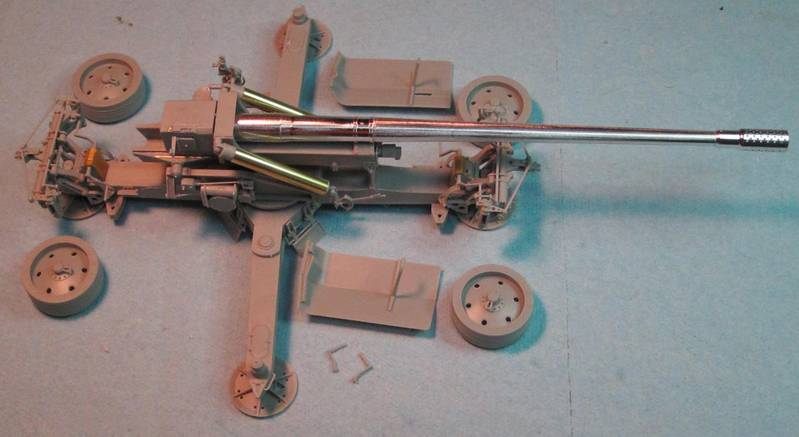
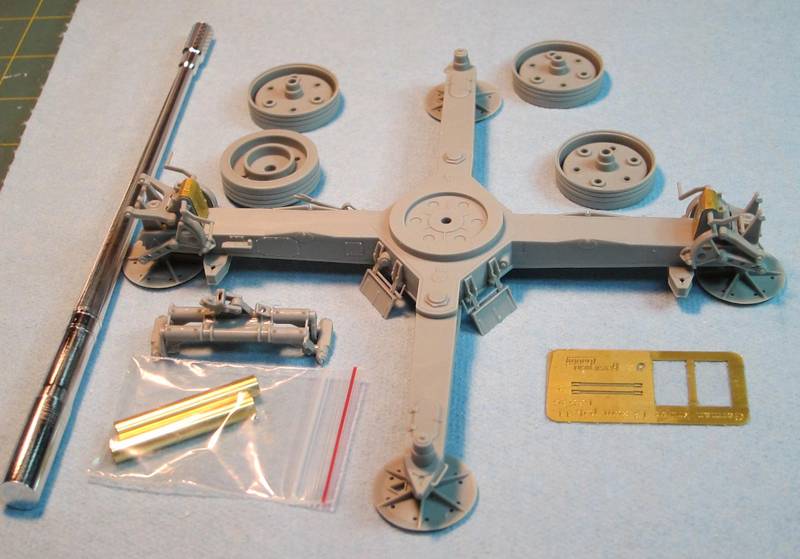
Long time modeller. Starting when I was a teenager, then I found out about girls and college and work and kids. But now that I have one girl, no school, no work and the kids are grown, I'm back to full time modelling. My prime area of interest is armor, b
Arkansas, United States
Joined: June 29, 2009
KitMaker: 11,610 posts
Armorama: 7,843 posts
Posted: Saturday, February 04, 2012 - 10:25 PM UTC
Ideals are peaceful. History is violent.


