
Campaigns
Where Armorama group builds can be discussed, organized, and updates posted.
Where Armorama group builds can be discussed, organized, and updates posted.
Hosted by Darren Baker, Richard S.
Art of the Battlefield (artillery)
erichvon

Joined: January 17, 2006
KitMaker: 1,694 posts
Armorama: 1,584 posts

Posted: Thursday, February 16, 2012 - 12:37 AM UTC

erichvon

Joined: January 17, 2006
KitMaker: 1,694 posts
Armorama: 1,584 posts

Posted: Thursday, February 16, 2012 - 12:39 AM UTC
Ahh! It worked eventually!


Still quite a bit of work to do it. Bits to finish it off, airbrushing, weathering etc...


Still quite a bit of work to do it. Bits to finish it off, airbrushing, weathering etc...
steve-o

Joined: February 05, 2004
KitMaker: 545 posts
Armorama: 295 posts

Posted: Thursday, February 16, 2012 - 03:40 AM UTC
Paul,
I had no idea that was in 1/72nd scale! I thought it was 1/35! Clearly, if I had been paying attention it is obvious - the picture of the model sitting on the directions for one...
That makes it even more impressive. Especially the springs!
Nice work again. Everyone!
- Steve
I had no idea that was in 1/72nd scale! I thought it was 1/35! Clearly, if I had been paying attention it is obvious - the picture of the model sitting on the directions for one...
That makes it even more impressive. Especially the springs!
Nice work again. Everyone!
- Steve

windysean

Joined: September 11, 2009
KitMaker: 1,917 posts
Armorama: 735 posts

Posted: Thursday, February 16, 2012 - 04:02 AM UTC
A quick update on my build (not working on it as often as I'd like, but who is?)...
I used a cheap acrylic paint sludge of water, a tiny drop of detergent, and a dash of rubbing alcohol. On the outer hull, it really knocked down any shine and varied the paint tone, but inside is where it was most effective! I'm pleased with how that turned out.
I applied Future on any panels that will get decalled, then after decals, I'll apply an overall spray of Dull Cote.


Thanks for reading! See? I really am working around here.
-Sean H.
I used a cheap acrylic paint sludge of water, a tiny drop of detergent, and a dash of rubbing alcohol. On the outer hull, it really knocked down any shine and varied the paint tone, but inside is where it was most effective! I'm pleased with how that turned out.
I applied Future on any panels that will get decalled, then after decals, I'll apply an overall spray of Dull Cote.


Thanks for reading! See? I really am working around here.
-Sean H.

steve-o

Joined: February 05, 2004
KitMaker: 545 posts
Armorama: 295 posts

Posted: Thursday, February 16, 2012 - 04:16 AM UTC
I'm all done!
Union 100 pounder (6.4 inch) Parrott Rifle from Verlinden.
"There is, perhaps, no better system of rifled cannon than Parrotts; certainly none more simple in construction, more easily understood, or that can with more safety be placed in the hands of inexperienced men for use.” - Gen. Gilmore (US commander at Charleston, SC)


While rooting through some old stuff, I found a picture of me next to a 100 pounder at Fort Pulaski. I'm entering this in a show this weeknd, so any quick touch-ups or suggestions are very welcomed!
Thanks!
- Steve
Union 100 pounder (6.4 inch) Parrott Rifle from Verlinden.
"There is, perhaps, no better system of rifled cannon than Parrotts; certainly none more simple in construction, more easily understood, or that can with more safety be placed in the hands of inexperienced men for use.” - Gen. Gilmore (US commander at Charleston, SC)


While rooting through some old stuff, I found a picture of me next to a 100 pounder at Fort Pulaski. I'm entering this in a show this weeknd, so any quick touch-ups or suggestions are very welcomed!
Thanks!
- Steve

thewrongguy

Joined: October 17, 2002
KitMaker: 448 posts
Armorama: 306 posts

Posted: Thursday, February 16, 2012 - 08:33 AM UTC
I'm calling this one done.


I'm still working on the tank commander, but right now he looks like just opened the Ark of the Covenant so I'm going to take the paint off and try again. I'm also planning on a small base showing it on a dirt farm road somewhere in Normandy.
I'm loving the campaign system and all the encouragement. Thanks and everyone keep up the amazing work!
Cheers
Jeff
ltb073

Joined: March 08, 2010
KitMaker: 3,662 posts
Armorama: 3,078 posts

Posted: Thursday, February 16, 2012 - 09:12 AM UTC
Some outstanding work going on here 
Congratulations to Jeff and Steve O on their finished projects both look great guys


 Don't forget to post at least 1 picture in the gallery
  And Steve O good luck at the show
For those of you who are still working on your projects you have a little over 6 weeks left


Congratulations to Jeff and Steve O on their finished projects both look great guys


 Don't forget to post at least 1 picture in the gallery
  And Steve O good luck at the show
For those of you who are still working on your projects you have a little over 6 weeks left


zontar

Joined: August 27, 2006
KitMaker: 1,646 posts
Armorama: 1,557 posts

Posted: Thursday, February 16, 2012 - 09:20 AM UTC
Karl: coming along nicely.
Sean: I'm thinking I'll have to try some craft paints! Good work.
Steve: Great looking cannon. and the figure looks the part too. Congrats on finishing.
Jeff: Looks good. Congrats on finishing.
Happy Modelling, -zon
Sean: I'm thinking I'll have to try some craft paints! Good work.
Steve: Great looking cannon. and the figure looks the part too. Congrats on finishing.
Jeff: Looks good. Congrats on finishing.
Happy Modelling, -zon

Posted: Thursday, February 16, 2012 - 09:38 AM UTC
Hi Jeff, Steve and Karl,
Excellent work folks.
Al

Excellent work folks.
Al


spacewolfdad

Joined: May 23, 2010
KitMaker: 642 posts
Armorama: 593 posts

Posted: Thursday, February 16, 2012 - 09:43 AM UTC
@ steve-o: Well done, that is a really nice model you have completed. It is nice to see something from another century apart from the 20th and 21st, it looks good and the figure gives a good indication of the size of the piece. Good luck with the competition.
@ thewrongguy; Nice choice of subject not often seen in model form. You have done a really nice job on it, congratulations of finishing it. It would be nice to see it on the diorama base as you mentioned, look forward to seeing that.
There is such a lot of activity going on in this campaign it makes your head spin. I have to say it is all very inspirational, and a really fun campaign to be involved in.
I will be posting more pictures of my progress presently and the tale of how I set myself a bit of a task, with only 6 weeks to go it might seem a bit foolish, but I think it will make the model. It involves scratch building the walkways on the gun in firing mode. I don't see any other way around it.
Anyway as they say - no pain, no gain.
All the best,
Paul

spacewolfdad

Joined: May 23, 2010
KitMaker: 642 posts
Armorama: 593 posts

Posted: Friday, February 17, 2012 - 10:32 AM UTC
Hi Folks,
I have been busy with the Morser, I realise that there are only six weeks to go and I will need to get some paint on the parts that are finished so I will have time to do this crazy bit of scratch building for the walkways.
Here is the progress so far on the actual lower carriage:


This is the last of the actual building for the lower carriage, the rest that follows is basically putting right a few errors.

The first things are these strange rods, I had no idea what they were for until I studied the walk-around, they are supports for the walkway attached in the firing mode, as seen here:
http://svsm.org/gallery/210mm_21cm_Morser18/dscn3129
The 'rods' now have to be cut off and placed as seen above...not an easy task but I will do it carefully, it would have been easier if there wasn't so much stuff stuck to the lower chassis now. I wish I had studied this artillery piece in more depth before I started with it - there is a lesson to be learnt there I think.
The next photo shows the walkway included in the kit;


These seemed a bit clunky to me and as the real things looked like this:
http://svsm.org/gallery/210mm_21cm_Morser18/dscn3140
So I have decided to scratch-build some better ones. The Revell kit ones come with raised treads on both sides, which is fortunate as I intended to slice them off the piece and use them to scratch all the walkways. Now this is one of those jobs where you know that you have just fitted a very sharp, new scalpel blade to your handle and one slip would mean lots of blood and a sore thumb or finger for days . Well the modelling gods must have been smiling because I didn't slip once...
Here is one of the treads:

I was going to attempt to scratch-build the frame but I found this old piece of PE (Part Pz IV fender supports)which fit the bill:

I cut it to length for the one side and glued the treads on, starting at each end and meeting in the middle. It turned out better than I anticipated and here is the finished result:

I have to scratch-build the hinges, but I don't think that will be a problem. So only three more to do and I can call the building phase finished and get on with the fun part of painting and weathering.
I will post when I have done the other walkways and hopefully will have lots of time to devote to getting a good weathered desert finish.
All the best,
Paul
I have been busy with the Morser, I realise that there are only six weeks to go and I will need to get some paint on the parts that are finished so I will have time to do this crazy bit of scratch building for the walkways.
Here is the progress so far on the actual lower carriage:


This is the last of the actual building for the lower carriage, the rest that follows is basically putting right a few errors.

The first things are these strange rods, I had no idea what they were for until I studied the walk-around, they are supports for the walkway attached in the firing mode, as seen here:
http://svsm.org/gallery/210mm_21cm_Morser18/dscn3129
The 'rods' now have to be cut off and placed as seen above...not an easy task but I will do it carefully, it would have been easier if there wasn't so much stuff stuck to the lower chassis now. I wish I had studied this artillery piece in more depth before I started with it - there is a lesson to be learnt there I think.
The next photo shows the walkway included in the kit;


These seemed a bit clunky to me and as the real things looked like this:
http://svsm.org/gallery/210mm_21cm_Morser18/dscn3140
So I have decided to scratch-build some better ones. The Revell kit ones come with raised treads on both sides, which is fortunate as I intended to slice them off the piece and use them to scratch all the walkways. Now this is one of those jobs where you know that you have just fitted a very sharp, new scalpel blade to your handle and one slip would mean lots of blood and a sore thumb or finger for days
 . Well the modelling gods must have been smiling because I didn't slip once...
Here is one of the treads:

I was going to attempt to scratch-build the frame but I found this old piece of PE (Part Pz IV fender supports)which fit the bill:

I cut it to length for the one side and glued the treads on, starting at each end and meeting in the middle. It turned out better than I anticipated and here is the finished result:

I have to scratch-build the hinges, but I don't think that will be a problem. So only three more to do and I can call the building phase finished and get on with the fun part of painting and weathering.
I will post when I have done the other walkways and hopefully will have lots of time to devote to getting a good weathered desert finish.
All the best,
Paul

Posted: Sunday, February 19, 2012 - 01:50 AM UTC
Hi Paul,
Good progress, hmmmm only 6 weeks!
Al
Good progress, hmmmm only 6 weeks!
Al

roman

Joined: July 20, 2004
KitMaker: 99 posts
Armorama: 95 posts

Posted: Sunday, February 19, 2012 - 08:34 AM UTC
is it OK to particitpate in this campaign with this kit?
http://www.militarymodelling.com/news/article.asp?a=3816
http://www.militarymodelling.com/news/article.asp?a=3816
ltb073

Joined: March 08, 2010
KitMaker: 3,662 posts
Armorama: 3,078 posts

Posted: Sunday, February 19, 2012 - 03:27 PM UTC
Quoted Text
is it OK to particitpate in this campaign with this kit?
http://www.militarymodelling.com/news/article.asp?a=3816
Roman, Wikipedia list that vehicle as an Assault Gun used in the roll of infantry support, So yes that build will be allowed here
 Welcome to the campaign but there is only 6 weeks left so built fast
@ Paul, nice progress there I like the scratch work
Posted: Monday, February 20, 2012 - 01:57 PM UTC
Here are my photos of the finished Artillery Piece.
They are also posted in the Campaign photos.
Enjoy!
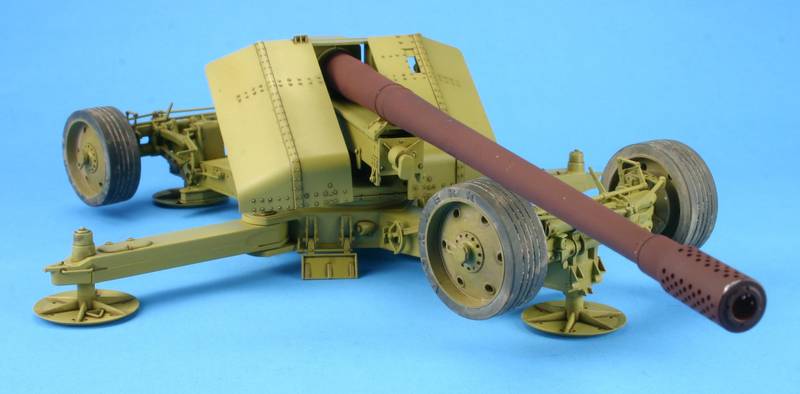
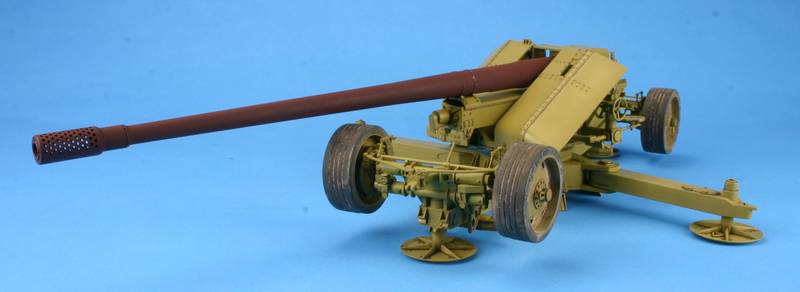
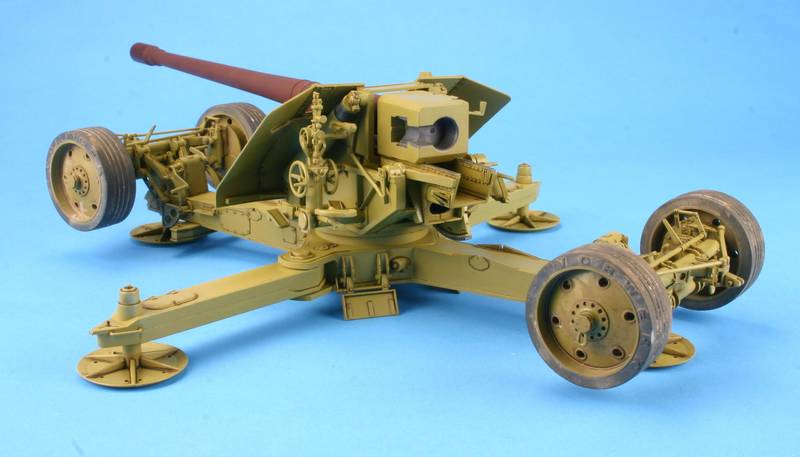
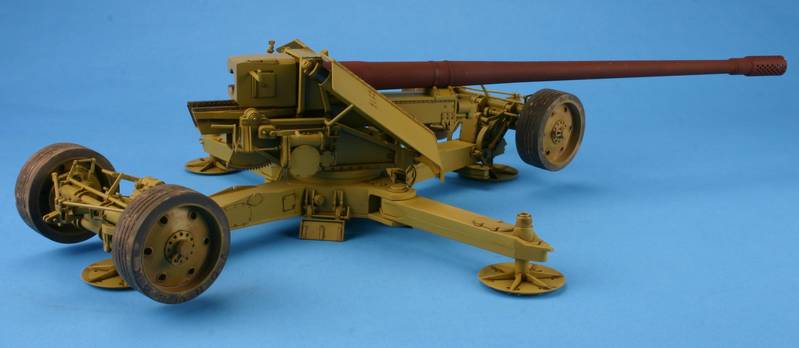
Tom
They are also posted in the Campaign photos.
Enjoy!


Tom
zontar

Joined: August 27, 2006
KitMaker: 1,646 posts
Armorama: 1,557 posts

Posted: Monday, February 20, 2012 - 02:32 PM UTC
Tom: very nice. congrats on finishing!
Happy Modelling, -zon
Happy Modelling, -zon

Tailor

Joined: May 26, 2008
KitMaker: 1,168 posts
Armorama: 256 posts

Posted: Monday, February 20, 2012 - 06:26 PM UTC
Excellent work!
Cheers,
Guido
Cheers,
Guido

spacewolfdad

Joined: May 23, 2010
KitMaker: 642 posts
Armorama: 593 posts

Posted: Wednesday, February 22, 2012 - 12:08 PM UTC
Hi Folks,
@Tmoon: Hi Tom, that's a wicked looking gun you have got there, I don't think anyone does it in 1/72 yet but if they did I would certainly get one. It is nicely finished, is it going in a diorama at all?
Got a bit more done on my Morser, and had some good news that my after-market wheels are arriving soon. I managed to make the other walkway for the gun and they are now both glued onto the carriage. I think the whole thing is nearly ready for painting. I have the detachable walkways to construct and will do this while I am painting the main gun. Anyway here are the progress shots:

The original attachment points for the walkways are cleaned up and chamfered down to a more scale appearance...


The attachment points have some styrene card detail added...


The walkways added to the attachment points...


The walkways on either side...
Well that is it for now, just waiting on the wheels and beginning to plan the paint job. I am looking forward to doing the weathered scheme.
All the best,
Paul
@Tmoon: Hi Tom, that's a wicked looking gun you have got there, I don't think anyone does it in 1/72 yet but if they did I would certainly get one. It is nicely finished, is it going in a diorama at all?
Got a bit more done on my Morser, and had some good news that my after-market wheels are arriving soon. I managed to make the other walkway for the gun and they are now both glued onto the carriage. I think the whole thing is nearly ready for painting. I have the detachable walkways to construct and will do this while I am painting the main gun. Anyway here are the progress shots:

The original attachment points for the walkways are cleaned up and chamfered down to a more scale appearance...


The attachment points have some styrene card detail added...


The walkways added to the attachment points...


The walkways on either side...
Well that is it for now, just waiting on the wheels and beginning to plan the paint job. I am looking forward to doing the weathered scheme.
All the best,
Paul
Posted: Wednesday, February 22, 2012 - 12:14 PM UTC
Hi Tom,
Nice work, unusual looking weapon, excellent stuff.
Al

Nice work, unusual looking weapon, excellent stuff.
Al


Whitey

Joined: September 20, 2010
KitMaker: 137 posts
Armorama: 100 posts

Posted: Saturday, February 25, 2012 - 08:30 AM UTC
Ok, lost a lot of time due to accident and surgery, but I'm ready to get back into it. Sadly I don't have time to finish the MLRS, so I'm going to switch to something a little less complex:


spacewolfdad

Joined: May 23, 2010
KitMaker: 642 posts
Armorama: 593 posts

Posted: Saturday, February 25, 2012 - 08:54 AM UTC
Hi Folks,
I have managed to get the primer on the Morser, and am just waiting for the wheels to arrive. I shall commence the painting next week and, hopefully, will be finished in time. However just in case I hit unexpected problems I have a 'banker' model I would like to do as an alternative, if that is ok with the rest of you. If I get on without hitches I might even do it as a second build. It isn't that big and only has 31 parts!
Here is the Morser all primed up....


This is the second model....

And the date line...

Well that's it for now, I will be firing up the airbrush and pinching the wife's hairspray next week. I will post any progress then, assuming I actually make any.
All the best,
Paul
I have managed to get the primer on the Morser, and am just waiting for the wheels to arrive. I shall commence the painting next week and, hopefully, will be finished in time. However just in case I hit unexpected problems I have a 'banker' model I would like to do as an alternative, if that is ok with the rest of you. If I get on without hitches I might even do it as a second build. It isn't that big and only has 31 parts!
Here is the Morser all primed up....


This is the second model....

And the date line...

Well that's it for now, I will be firing up the airbrush and pinching the wife's hairspray next week. I will post any progress then, assuming I actually make any.
All the best,
Paul

keo

Joined: January 30, 2006
KitMaker: 613 posts
Armorama: 508 posts

Posted: Thursday, March 01, 2012 - 02:57 AM UTC
Now I have made the model ready for paint. The interior is blanked as it’s going to have its base coat soon. I regret I didn´t take photos during the build of the interior, because most of it is going to be dam near impossible, at least for one with my skills, to take photos of.
I did make a lot of extra interior details, especially around the celling, but that’ll never be seen by anyone I’m afraid. On the outside there have many updates and conversions too. Basically they fall into two categories. The first is updating the 30 plus year old kit; that included adding extra nuts and replacing others, make brackets for tools, lids and so on and crating details missed in the kit. The second category are those details special for a Danish version; lights, the turret baskets, the rear hull door and the generator box on the rear, top right side of the turret. These are all just examples of the work done – they are fare to many to be mentioned all. Hope you like it


windysean

Joined: September 11, 2009
KitMaker: 1,917 posts
Armorama: 735 posts

Posted: Saturday, March 03, 2012 - 02:39 PM UTC
keo, I don't think you left any kit piece or detail untouched! Breathtaking work! thanks for posting that!
As for me, I've been angry at my camera, but I stepped up to a better one. (Okay, still a "point-and-shoot" camera, but better than the phone one I had been trying to get away with.)
Call it done!
I'm not completely satisfied with the color of the canvas-- I blended some craft acrylics and using mostly yellow and black, like the prototype, I made my own olive drab. I might take another swing or two at the color later, if I come back to it. I may also add tiedowns for the canvas someday too.
My first try at a resin kit-- the trailer turned out well. (The frame and rear bumper show some warpage, not too bad.) I know the M10 ammo trailer was a WWII item, but I'm not positive the taillights are period correct or Viet Nam era instead.
Also my first try at "chipping". I felt dumb at first, because it's such a simple technique, and at first you think you've just dabbed blobs on a decent model finish, but after it dries and looking at the photos here, it really does look like chipped paint. I used craft acrylic burnt ocher, applied with a torn piece of foam padding material blotted almost dry. I'll keep working on my technique, but I'm happy with this one.
I posted two final photos in the gallery. I was so pleased with the Tamiya kit that I bought a Tamiya M3 now for backdating to an M2A3 or 4 for the Armor Between the Wars campaign, that I'll get into sometime later this year.
Cheers!
-Sean H.


P.S. Also, looking at all the star decals, it seems clear that friendly fire was an issue. Where can we fit more stars on this thing?
Post P.S. I almost forgot to mention that I used the kit vinyl tracks. I left the rubber pad unpainted, but washed burnt umber acrylic along the metal gear, then drybrushed silver acrylic, then lots of #2 pencil wiped on the metal parts of the running gear (including those on the turret sides) and on the machine gun.
As for me, I've been angry at my camera, but I stepped up to a better one. (Okay, still a "point-and-shoot" camera, but better than the phone one I had been trying to get away with.)
Call it done!
I'm not completely satisfied with the color of the canvas-- I blended some craft acrylics and using mostly yellow and black, like the prototype, I made my own olive drab. I might take another swing or two at the color later, if I come back to it. I may also add tiedowns for the canvas someday too.
My first try at a resin kit-- the trailer turned out well. (The frame and rear bumper show some warpage, not too bad.) I know the M10 ammo trailer was a WWII item, but I'm not positive the taillights are period correct or Viet Nam era instead.
Also my first try at "chipping". I felt dumb at first, because it's such a simple technique, and at first you think you've just dabbed blobs on a decent model finish, but after it dries and looking at the photos here, it really does look like chipped paint. I used craft acrylic burnt ocher, applied with a torn piece of foam padding material blotted almost dry. I'll keep working on my technique, but I'm happy with this one.
I posted two final photos in the gallery. I was so pleased with the Tamiya kit that I bought a Tamiya M3 now for backdating to an M2A3 or 4 for the Armor Between the Wars campaign, that I'll get into sometime later this year.
Cheers!
-Sean H.


P.S. Also, looking at all the star decals, it seems clear that friendly fire was an issue. Where can we fit more stars on this thing?

Post P.S. I almost forgot to mention that I used the kit vinyl tracks. I left the rubber pad unpainted, but washed burnt umber acrylic along the metal gear, then drybrushed silver acrylic, then lots of #2 pencil wiped on the metal parts of the running gear (including those on the turret sides) and on the machine gun.
Tailor

Joined: May 26, 2008
KitMaker: 1,168 posts
Armorama: 256 posts

Posted: Saturday, March 03, 2012 - 06:52 PM UTC
Great work both of you Kenneth and Sean!
Well done, indeed!
Cheers,
Guido
Well done, indeed!
Cheers,
Guido
Posted: Saturday, March 03, 2012 - 09:44 PM UTC
Quoted Text
Great work both of you Kenneth and Sean!
Well done, indeed!
Cheers,
Guido
Ditto.
Al


 |


