Campaigns
Where Armorama group builds can be discussed, organized, and updates posted.
Where Armorama group builds can be discussed, organized, and updates posted.
Hosted by Darren Baker, Richard S.
Command Campaign

retiredyank

Joined: June 29, 2009
KitMaker: 11,610 posts
Armorama: 7,843 posts

Posted: Thursday, October 13, 2011 - 07:34 AM UTC
@Dani-nice job. Should the tires fit the wheels? There seems to be a gap.
madmax5510

Joined: May 06, 2008
KitMaker: 354 posts
Armorama: 343 posts

Posted: Thursday, October 13, 2011 - 08:17 AM UTC
Thanks Matt,and you have right with the tires,i must glue them on the wheels.The guilt is the speed  ...but now i have enough time for everything.


 ...but now i have enough time for everything.


Posted: Thursday, October 13, 2011 - 08:21 AM UTC
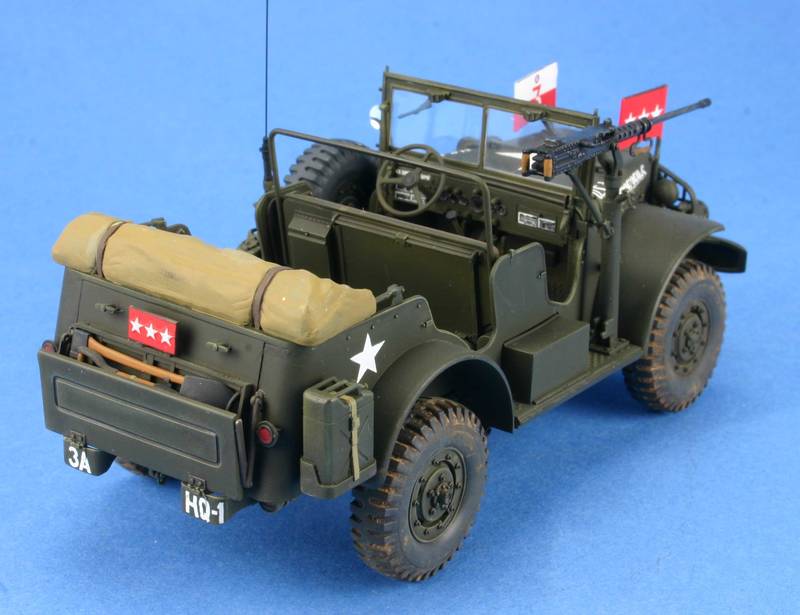
I will be posting my General Patton Jeep Friday evening or Sat Morning.
Tom
Tom
zontar

Joined: August 27, 2006
KitMaker: 1,646 posts
Armorama: 1,557 posts

Posted: Thursday, October 13, 2011 - 11:53 AM UTC
Quoted Text
No problem guys. To be honest, I didn't want this campaign to flop due to time constraints.
@Zon-nice job. What color did you use for the base coat? And, that is exactly the same way I paint my road wheels. I just stick the other end of the toothpick into some wet foam.
Matt: Thanks for the comments. The base color is straight-up Tamiya Panzer Grey, then oversprayed with 50-50 mix of Panzer Grey and Flat White, but very thin (1paint - 10 thinner) to accent the center area of panels and such. I also pre-shaded with Flat Black at the seams and outer edges of panels, etc. before the grey went on.
Happy Modellin, -zon

Removed by original poster on 10/15/11 - 21:48:04 (GMT).
Posted: Saturday, October 15, 2011 - 10:49 AM UTC
Here is my submission to the Command Campaign


retiredyank

Joined: June 29, 2009
KitMaker: 11,610 posts
Armorama: 7,843 posts

Posted: Saturday, October 15, 2011 - 01:52 PM UTC
@Tom-Nice looking build. You need to post some in progress photos to qualify for a ribbon.
Posted: Saturday, October 15, 2011 - 03:49 PM UTC
Here is my in progress shot of the Patton Command Car.
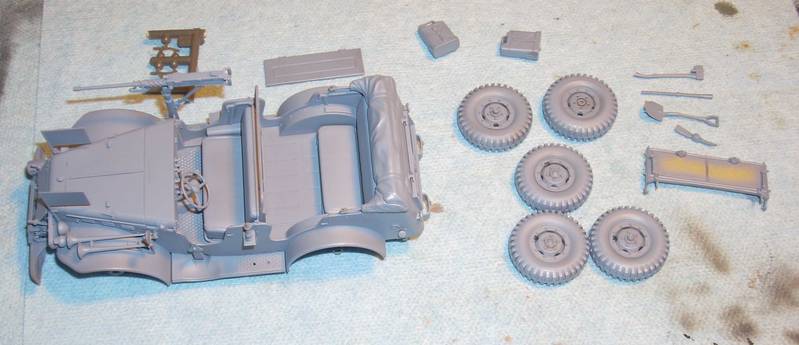
Is this satisfactory?
Thanks,
Tom

Is this satisfactory?
Thanks,
Tom

retiredyank

Joined: June 29, 2009
KitMaker: 11,610 posts
Armorama: 7,843 posts

Posted: Saturday, October 15, 2011 - 03:57 PM UTC
It's acceptable.
spongya


Joined: February 01, 2005
KitMaker: 2,365 posts
Armorama: 1,709 posts

Posted: Sunday, October 30, 2011 - 08:43 AM UTC
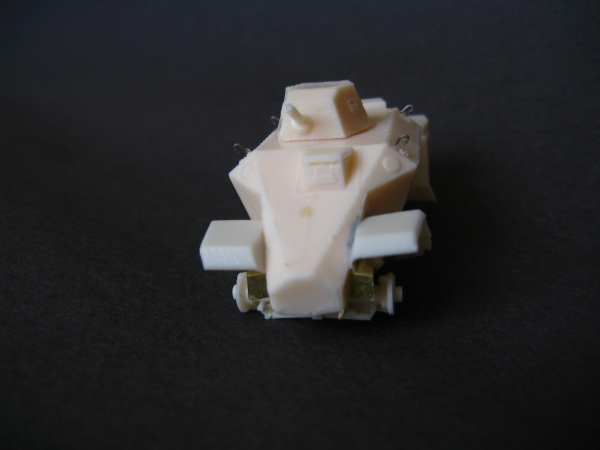
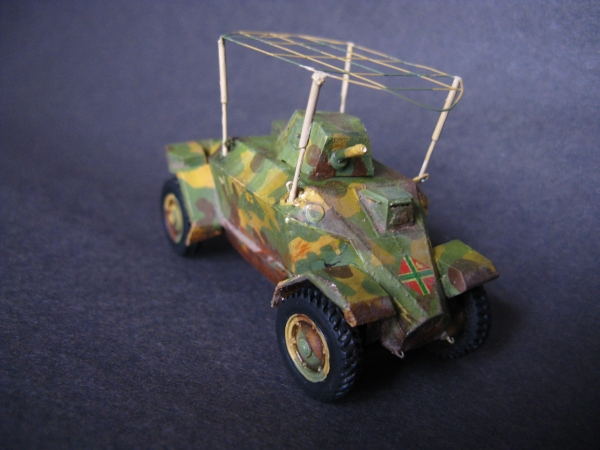
Finally I had some time to turn my computer on... Here's my entry.
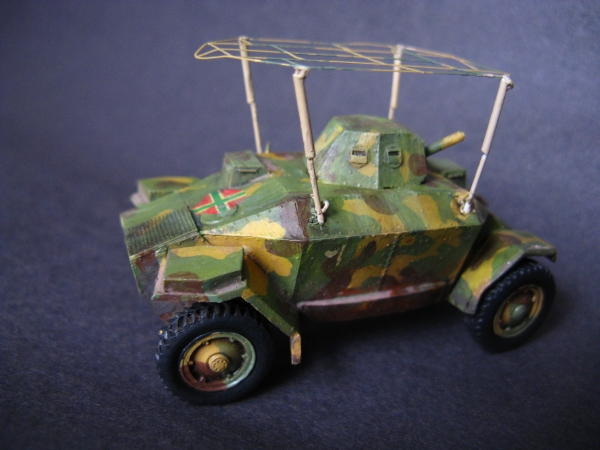


didgeboy

Joined: September 21, 2010
KitMaker: 1,846 posts
Armorama: 1,509 posts

Posted: Monday, November 07, 2011 - 05:37 AM UTC
I cannot find this campaign in the "Campaigns" section anymore. Is the deadline still pushed back to Jan 1 2012? let me know and I will post some progress photos tonight. Cheers.
GaryKato

Joined: December 06, 2004
KitMaker: 3,694 posts
Armorama: 2,693 posts

Posted: Monday, November 07, 2011 - 05:50 AM UTC
Quoted Text
I cannot find this campaign in the "Campaigns" section anymore. Is the deadline still pushed back to Jan 1 2012? let me know and I will post some progress photos tonight. Cheers.
Yes, the campaign has been extended to the end of the year so people can finish their builds. You don't see it anymore in the Campaigns section as the end date on the campaign page hasn't been changed. This way more people can't enlist. It's what I refer to as an Unofficial extension.

retiredyank

Joined: June 29, 2009
KitMaker: 11,610 posts
Armorama: 7,843 posts

Posted: Monday, November 07, 2011 - 08:53 AM UTC
Andras: What vehicle are you depicting there?
spongya


Joined: February 01, 2005
KitMaker: 2,365 posts
Armorama: 1,709 posts

Posted: Tuesday, November 08, 2011 - 11:23 PM UTC
40.M Csaba scout car, Command version, by Hunor Models (1/72). I'm writing a review of the kit.

canuck100a

Joined: September 13, 2005
KitMaker: 96 posts
Armorama: 96 posts

Posted: Sunday, November 20, 2011 - 11:23 AM UTC
Hi Folks,
Well its quite late but here is my 1/35 Type 82 C&C. Not much to say about it, except that I enjoyed the kit and only did some scratch building in the drivers compartment and replaced the kit tie downs and handholds with wire.
Regards,
Eric


Well its quite late but here is my 1/35 Type 82 C&C. Not much to say about it, except that I enjoyed the kit and only did some scratch building in the drivers compartment and replaced the kit tie downs and handholds with wire.
Regards,
Eric


retiredyank

Joined: June 29, 2009
KitMaker: 11,610 posts
Armorama: 7,843 posts

Posted: Sunday, November 20, 2011 - 11:37 AM UTC
That built into a nice little kit Eric. Glad to hear you enjoyed it. That is the reason for building.
panzerbob01

Joined: March 06, 2010
KitMaker: 3,128 posts
Armorama: 2,959 posts

Posted: Monday, November 21, 2011 - 05:49 AM UTC
Eric;
NICE job! Seems that these types of things rarely appear on tables in shows around the Gulf Coast - so I often wonder how these kits build up. Your's looks pretty sharp and certes at least answers a bit of my question!
Bob

NICE job! Seems that these types of things rarely appear on tables in shows around the Gulf Coast - so I often wonder how these kits build up. Your's looks pretty sharp and certes at least answers a bit of my question!
Bob


retiredyank

Joined: June 29, 2009
KitMaker: 11,610 posts
Armorama: 7,843 posts

Posted: Monday, November 21, 2011 - 06:54 AM UTC
Looks like I found my next wheely. Or, I may do a LAV III.
panzerbob01

Joined: March 06, 2010
KitMaker: 3,128 posts
Armorama: 2,959 posts

Posted: Monday, November 21, 2011 - 07:22 AM UTC
Finally, after being distracted and getting another build completed for my first-ever campaign, I'm back on a slow roll with the SdKfz 223 project! A word of Thanks for the reprieve as the Lords of the Campaign have extended us (me!) Yay! 
Progress has been made, albeit with certain gnashing and wailing: HobbyBoss has produced a great kit - stuff is molded well, parts fit, PE is really nice. Just that the interior, while detailed and complete, is almost completely the wrong one! Stuff is missing, and / or mostly in the wrong places.
So, it's scratch-city and scrounge around for bits more like the real thing had. But, hey, loads of good modeling fun
I've started serious work inside the hull - put in the driver's station (GOOD stuff, here), created the storage bin and lid, added in some PE (really nice stuff, IMO), and scraped off the erroneous bulges and styrene details on the hull walls. There's other stuff still to go in here: the radios and rack and conduits and powerboxes, the extra battery, a spare barrel tube and grenade racks and personal gear and radio-op's seats (1 by the driver, 1 in the rear - both folding) and table and lamp (up front). The driver's and r-o front seats don't get in until I paint the floor.

The hull roof starts with the kit grating PE (sharp and fits RIGHT!) and the viewport inner frames and bits (just the bomb! they are really done well). For a real funk, one needs the operating cross-rod on the roof that raises the frame antenna from inside - started with that bit. There will be an R-O 's lamp up front and some other bits - all of which is visible thru open hatches if one bothers to get down and look (so I'm not going with that old AMS thing about "well, I know it's there, even if...) . Somewhere there must be a conduit or cable fitting going out to that antenna...
  I'll put one in and someone will post and tell me I'm wrong
  and I'll relocate it - but just once!
I do have a question for any knowing one out there: Look at the roof grating PE. You will see two small areas to the left and right rear - these seem to correspond to square notches in the hull styrene... but I can find no part which evidently goes there! Any ideas what these areas? little hatches? are for and what should go beneath them inside the hull? (Maybe HB plans on fitting some device here???)

Each time one adds stuff inside an oddly-angled box like this, one should check the fit to see whether stuff still goes together... I did have to do a little fiddling but not much . Actually, my hat is off to HB - the hull really does fit together like an oyster! Dry-fitting also allows me to actually check to see whether the turned wheels will really fit where they should... oh, and a little play while stuff is piled together
  .
.

That's it for now! Soon I'll add in mess kit racks, that radio stuff, and the seats and table and... paint this weekend! ("Black Friday" will actually be elfinbein and green and other colors day for me! ).
).
Cheers!
Bob

Progress has been made, albeit with certain gnashing and wailing: HobbyBoss has produced a great kit - stuff is molded well, parts fit, PE is really nice. Just that the interior, while detailed and complete, is almost completely the wrong one!
 Stuff is missing, and / or mostly in the wrong places.
So, it's scratch-city and scrounge around for bits more like the real thing had. But, hey, loads of good modeling fun

I've started serious work inside the hull - put in the driver's station (GOOD stuff, here), created the storage bin and lid, added in some PE (really nice stuff, IMO), and scraped off the erroneous bulges and styrene details on the hull walls. There's other stuff still to go in here: the radios and rack and conduits and powerboxes, the extra battery, a spare barrel tube and grenade racks and personal gear and radio-op's seats (1 by the driver, 1 in the rear - both folding) and table and lamp (up front). The driver's and r-o front seats don't get in until I paint the floor.
The hull roof starts with the kit grating PE (sharp and fits RIGHT!) and the viewport inner frames and bits (just the bomb! they are really done well). For a real funk, one needs the operating cross-rod on the roof that raises the frame antenna from inside - started with that bit. There will be an R-O 's lamp up front and some other bits - all of which is visible thru open hatches if one bothers to get down and look (so I'm not going with that old AMS thing about "well, I know it's there, even if...)
 . Somewhere there must be a conduit or cable fitting going out to that antenna...
  I'll put one in and someone will post and tell me I'm wrong
  and I'll relocate it - but just once!
I do have a question for any knowing one out there: Look at the roof grating PE. You will see two small areas to the left and right rear - these seem to correspond to square notches in the hull styrene... but I can find no part which evidently goes there! Any ideas what these areas? little hatches? are for and what should go beneath them inside the hull? (Maybe HB plans on fitting some device here???)
Each time one adds stuff inside an oddly-angled box like this, one should check the fit to see whether stuff still goes together... I did have to do a little fiddling but not much
 . Actually, my hat is off to HB - the hull really does fit together like an oyster! Dry-fitting also allows me to actually check to see whether the turned wheels will really fit where they should... oh, and a little play while stuff is piled together
  .
. That's it for now! Soon I'll add in mess kit racks, that radio stuff, and the seats and table and... paint this weekend! ("Black Friday" will actually be elfinbein and green and other colors day for me!
 ).
).Cheers!
Bob


retiredyank

Joined: June 29, 2009
KitMaker: 11,610 posts
Armorama: 7,843 posts

Posted: Monday, November 21, 2011 - 08:03 AM UTC
Bob: Looking good. Nice bit of scratchbuilding on the inside. Can't wait to see you lay some paint on it.
panzerbob01

Joined: March 06, 2010
KitMaker: 3,128 posts
Armorama: 2,959 posts

Posted: Tuesday, November 22, 2011 - 03:08 AM UTC
Ret...;
Thanks! Yeah, I itch to get on to the paint and the exterior...
Long-winded rant warning!
Every once and again a guy suffers an epiphany - and further research into a model subject runs that risk! The story: Here I am with HB's really cool sdkfz 223 kit open and "Gee," says I, when I look into the goodness: "huh? Where's the radios and racks which make a funk car a funk inside?". "Well. OK, if not supplied, maybe I'll cobble some bits together and fill this puppy sorta correctly for the type!". And... on goes the lightbulb "research it!". So I did. I looked for SdKfz 223 interiors - discovered those "famous" pics of that semi-restored one, looked up some other folk's diagrams, and concluded "OK! I think I got some ideas for the guts of the beast!". And started building... When I got to the inside, where those guts should be, I started doing my old-school scratch thing...
And somehow, things were not fitting right. I mean, like the GEOMETRY and locations of stuff seemed "off". There turned out to simply be no place I could put stuff which I could see in pics - photos and diags - of the "real thing". "Harrumpf. Maybe those SODS over at HB have dorked this thing, despite the glowing reviews some have given it..." Now, to spin back a bit - I built the Tamiya version 36 years ago - still on the shelf. So I went and compared the HB kit to that thing. "Hmmmmm. Say! Looks like the hull GEOMETRY over the driver is different, as are the view ports...". So, mutterith I, "Who got it right - Mr. T or the blokes in China?" Back to the research.
The Web is a wonderous thing.
Epiphany Nr. 1: The SdKfz was built in 4 series... uh oh. Some on the old 221 hull which had a single front view port... some on a newer hull with 2 large front view ports and a deeper raised roof, some on the later 222 hull with the 1 large - 1 smaller front view port and the shorter raised-roof section, and some on... Well, you get the picture. Several different 223 hulls with some varied top GEOMETRY were made.
Epi Nr.2: Mr. Tamiya-san did get his right. There are photos of his version around. It's an earlier-war version- built only as a 223. The lads at HB ALSO GOT THEIR'S RIGHT.... It's a LATER-war (1942+) version... built on the hull of the mid-war 222 but with a small MG turret and radio sets and antenna instead of the 2cm hangelafette of the 222. The HB kit matches well some photos, too, and also matches with their 222 kit and with photos of later 222.
And darned if there weren't also an Epi Nr.3 to come... That nice semi-restored 223 is the EARLY version with the single view port and different roof and top GEOMETRY. So the diags - working off a mid version (2 same-size ports) - don't match the geometry of the restored vehicle, AND don't match that of the 222 cum 223 hull which HB has kitted.
So, no wonder I cannot get everything to fit into this wee bitty car correctly! I don't even KNOW what the "correctly" really is, given the paucity of pics of this later-version interior... Live and learn, as they say
For all who want a cool SdKfz 223 - the HB kit really is nice - lacks the right interior but otherwise is the bomb. Perhaps HB or someone else will either modernize the Tamiya version (correct but earlier), or do one based on the 221 kit (BRONCO- You listening? YOU have that kit!), or even just create the right interior bits for this 222 cum 223 version. Why not?
There IS some lesson learned, here: Don't jump to conclusions... get the WHOLE picture if you are looking for a picture. Half the story makes for bad story.
Me? Because I'm a glutton for punishment, I'll carry on and add some bits - probably won't be correct but there will be stuff that COULD have been there for us to look at, and, hey! It's good clean modeling... er.... fun! Paint goes in this FRI regardless of where I'm at in it!
Hey! Thanks for your patience (if you bothered to hang in thru my rant) - I needed to vent and get things off my chest. Whew. Deep breaths. OK. I'm all good now! Pax
Now that I'm back in command of myself oncit-again, maybe I'll get this thing done for this Command Campaign!
Bob
Thanks! Yeah, I itch to get on to the paint and the exterior...
Long-winded rant warning!
Every once and again a guy suffers an epiphany - and further research into a model subject runs that risk! The story: Here I am with HB's really cool sdkfz 223 kit open and "Gee," says I, when I look into the goodness: "huh? Where's the radios and racks which make a funk car a funk inside?". "Well. OK, if not supplied, maybe I'll cobble some bits together and fill this puppy sorta correctly for the type!". And... on goes the lightbulb
 "research it!". So I did. I looked for SdKfz 223 interiors - discovered those "famous" pics of that semi-restored one, looked up some other folk's diagrams, and concluded "OK! I think I got some ideas for the guts of the beast!". And started building... When I got to the inside, where those guts should be, I started doing my old-school scratch thing...
 And somehow, things were not fitting right. I mean, like the GEOMETRY and locations of stuff seemed "off". There turned out to simply be no place I could put stuff which I could see in pics - photos and diags - of the "real thing". "Harrumpf. Maybe those SODS over at HB have dorked this thing, despite the glowing reviews some have given it..." Now, to spin back a bit - I built the Tamiya version 36 years ago - still on the shelf. So I went and compared the HB kit to that thing. "Hmmmmm. Say! Looks like the hull GEOMETRY over the driver is different, as are the view ports...". So, mutterith I, "Who got it right - Mr. T or the blokes in China?" Back to the research.

The Web is a wonderous thing.
Epiphany Nr. 1: The SdKfz was built in 4 series... uh oh.
 Some on the old 221 hull which had a single front view port... some on a newer hull with 2 large front view ports and a deeper raised roof, some on the later 222 hull with the 1 large - 1 smaller front view port and the shorter raised-roof section, and some on... Well, you get the picture. Several different 223 hulls with some varied top GEOMETRY were made.
Epi Nr.2: Mr. Tamiya-san did get his right. There are photos of his version around. It's an earlier-war version- built only as a 223. The lads at HB ALSO GOT THEIR'S RIGHT.... It's a LATER-war (1942+) version... built on the hull of the mid-war 222 but with a small MG turret and radio sets and antenna instead of the 2cm hangelafette of the 222. The HB kit matches well some photos, too, and also matches with their 222 kit and with photos of later 222.
And darned if there weren't also an Epi Nr.3 to come...
 That nice semi-restored 223 is the EARLY version with the single view port and different roof and top GEOMETRY. So the diags - working off a mid version (2 same-size ports) - don't match the geometry of the restored vehicle, AND don't match that of the 222 cum 223 hull which HB has kitted.
 So, no wonder I cannot get everything to fit into this wee bitty car correctly! I don't even KNOW what the "correctly" really is, given the paucity of pics of this later-version interior...
 Live and learn, as they say
For all who want a cool SdKfz 223 - the HB kit really is nice - lacks the right interior but otherwise is the bomb. Perhaps HB or someone else will either modernize the Tamiya version (correct but earlier), or do one based on the 221 kit (BRONCO- You listening? YOU have that kit!), or even just create the right interior bits for this 222 cum 223 version. Why not?
There IS some lesson learned, here: Don't jump to conclusions... get the WHOLE picture if you are looking for a picture. Half the story makes for bad story.
Me? Because I'm a glutton for punishment, I'll carry on and add some bits - probably won't be correct but there will be stuff that COULD have been there for us to look at, and, hey! It's good clean modeling... er.... fun! Paint goes in this FRI regardless of where I'm at in it!

Hey! Thanks for your patience (if you bothered to hang in thru my rant) - I needed to vent and get things off my chest. Whew. Deep breaths. OK. I'm all good now! Pax

Now that I'm back in command of myself oncit-again, maybe I'll get this thing done for this Command Campaign!
Bob

panzerbob01

Joined: March 06, 2010
KitMaker: 3,128 posts
Armorama: 2,959 posts

Posted: Tuesday, November 22, 2011 - 03:22 AM UTC
Matt / all:
I sincerely apolize for my long rant. I've found this build to be both very interesting and rather frustrating. So... Should I post this stuff into a build-blog of this kit and spare this thread some of the blather? Maybe the details of the adventure should be in exposed elsewhere?
Bob
I sincerely apolize for my long rant. I've found this build to be both very interesting and rather frustrating. So... Should I post this stuff into a build-blog of this kit and spare this thread some of the blather? Maybe the details of the adventure should be in exposed elsewhere?
Bob


retiredyank

Joined: June 29, 2009
KitMaker: 11,610 posts
Armorama: 7,843 posts

Posted: Tuesday, November 22, 2011 - 04:20 AM UTC
Bob:
This is what, I think, a campaign is all about. We get to learn from each other in a regulated environment. I'm currently posting my own rant on AFV Club's M36 Jackson in the Allied Armor Campaign. I think the used the upper hull from the M10 and parts designed for a newly designed M36 hull. The hatches are all too small and the turret was a real bear to try and put together. Keep posting and we will keep learning.
This is what, I think, a campaign is all about. We get to learn from each other in a regulated environment. I'm currently posting my own rant on AFV Club's M36 Jackson in the Allied Armor Campaign.
 I think the used the upper hull from the M10 and parts designed for a newly designed M36 hull. The hatches are all too small and the turret was a real bear to try and put together. Keep posting and we will keep learning.
windysean

Joined: September 11, 2009
KitMaker: 1,917 posts
Armorama: 735 posts

Posted: Tuesday, November 22, 2011 - 06:18 AM UTC
Ditto what Matt said.
Bob, thanks for bringing all this to light. I'm taking mental notes.
I fell out of this campaign, but I was thinking of the 223, and someday I may come back to it. Your insights will help a lot.
Thanks!
-Sean H.
Bob, thanks for bringing all this to light. I'm taking mental notes.

I fell out of this campaign, but I was thinking of the 223, and someday I may come back to it. Your insights will help a lot.
Thanks!
-Sean H.

panzerbob01

Joined: March 06, 2010
KitMaker: 3,128 posts
Armorama: 2,959 posts

Posted: Tuesday, November 22, 2011 - 09:09 AM UTC
Gents;
Thanks for the pass! So I'll carry right here!
Windy / All: Maybe a worthwhile project for a good 223 build would be to take the antenna from the HB 223 kit and add it onto the Bronco 221 kit - use the Bronco inside bits where applicable (some, such as ammo racks and driver's stuff and turret base would be "keepers"), and add in some radio stuff (which you'll have to scratch or get from some AM 223 filler kit
  ) and the other items (storage box, R.O seat and table and lamp, antenna crank doo-hicky, etc.) - I think it could really be a good shot - combine a great base 221 car-kit with a fab 223 antenna set and a little creative exercise from the modeler! What's not to like?
Of course, one could start in on this and when almost done find a nice new complete 223 motoring onto the shelf at the LHS. I'd have to bite my tongue before I said something I would later regret

I think on my project I'll still cobble in the second seat and the radio stuff and call it a car - if I try to squeeze the lamp and table in, the R.O will need to be a short-legged midget snake - person to get in Maybe in my version, the R.O will work from a clipboard on his lap!
  "Dang, Hans! Will you just stop the car for a moment - it's nothing but bang! followed by bump! and I've lost my pencil down amongst the crap YOU have tossed under the seat! Herr Hitler will be all over us if we don't send him a signal that we've finally won one soon!"
Bob
Thanks for the pass! So I'll carry right here!

Windy / All:
 Maybe a worthwhile project for a good 223 build would be to take the antenna from the HB 223 kit and add it onto the Bronco 221 kit - use the Bronco inside bits where applicable (some, such as ammo racks and driver's stuff and turret base would be "keepers"), and add in some radio stuff (which you'll have to scratch or get from some AM 223 filler kit
  ) and the other items (storage box, R.O seat and table and lamp, antenna crank doo-hicky, etc.) - I think it could really be a good shot - combine a great base 221 car-kit with a fab 223 antenna set and a little creative exercise from the modeler! What's not to like?
Of course, one could start in on this and when almost done find a nice new complete 223 motoring onto the shelf at the LHS. I'd have to bite my tongue before I said something I would later regret


I think on my project I'll still cobble in the second seat and the radio stuff and call it a car - if I try to squeeze the lamp and table in, the R.O will need to be a short-legged midget snake - person to get in
 Maybe in my version, the R.O will work from a clipboard on his lap!
  "Dang, Hans! Will you just stop the car for a moment - it's nothing but bang! followed by bump! and I've lost my pencil down amongst the crap YOU have tossed under the seat! Herr Hitler will be all over us if we don't send him a signal that we've finally won one soon!"
Bob

 |


