Campaigns
Where Armorama group builds can be discussed, organized, and updates posted.
Where Armorama group builds can be discussed, organized, and updates posted.
Hosted by Darren Baker, Richard S.
US Halftracks Campaign
Cobrahistorian

Joined: November 11, 2006
KitMaker: 710 posts
Armorama: 553 posts

Posted: Saturday, December 01, 2012 - 07:05 PM UTC
Here's my M15A1 alongside the Tamiya/Dragon M16:


Cobrahistorian

Joined: November 11, 2006
KitMaker: 710 posts
Armorama: 553 posts

Posted: Wednesday, December 05, 2012 - 07:14 PM UTC
Wow! Just got the suspension and tracks on the track tonight. I've gotta say it literally just fell together and the halftrack sits perfectly flush on the table top.
I added the bed as well. Some minor issues with warping on the right side of the bed, but nothing that can't be adjusted.


I added the bed as well. Some minor issues with warping on the right side of the bed, but nothing that can't be adjusted.


Posted: Thursday, December 06, 2012 - 08:48 PM UTC
Late start up, Dragen M3 75mm Gun Motor Carriage. 


Posted: Sunday, December 09, 2012 - 06:41 AM UTC
Still plugging away at M3 75mm GMC. 
Got a bunch of the hinges done.
Cheers Rob.


Got a bunch of the hinges done.

Cheers Rob.


Posted: Friday, December 14, 2012 - 11:38 PM UTC
progress update. 


Cobrahistorian

Joined: November 11, 2006
KitMaker: 710 posts
Armorama: 553 posts

Posted: Sunday, December 16, 2012 - 06:45 PM UTC
Made some progress on the M15A1 turret tonight. Converting an M15 to an M15A1 is a far more significant undertaking that I originally envisioned. The gun cradle, .50 mounts, etc needed major reworking. Unfortunately my gun cradle was warped and had some serious air bubbles in it, but I managed to make some adjustments on it and it worked well. Some sheet aluminum from a soda can helped reposition the .50 cal mounts (below the 37mm instead of above) and worked great for the D-can mounts.
I've only got a single .50 cal from the Dragon T19 kit though... need to dig up another Dragon .50 cal to match this one.
I'm going to do as much on it as I can this week, but I seriously doubt I'm going to get it done by the 31st. The entire back end of the tub has to be reworked to put the diamond plate in, the seat rails and the ammo stowage (4 200-round D-Cans around the gun commander's seat)


geogeezer

Joined: February 17, 2011
KitMaker: 263 posts
Armorama: 258 posts

Posted: Sunday, December 16, 2012 - 07:15 PM UTC
Hi all:
I finished the M-21 mortar carrier and posted these pictures to the campaign gallery. I had intended to build a mini-diorama set during the siege of Bastogne but with the campaign ending and too many other things to do, I ran out of time. Maybe do the diorama later, after the holiday uproar subsides.

The picture above is a left side view of the M-21 in action. The folded tripod for the .50 Browning is strapped to the left front fender.

View looking down from above the left rear quarter.

Rear end view, showing the mortar base plate strapped onto the rear door and the markings for HQ company, 54th Armored Infantry Battalion, 10th Armored Division.

Right side view, with mines in the mine rack and a bazooka propped against the windshield.

Head on view.
Comments and criticism are welcome. This was my first try at serious weathering involving snow. The snow is the type used to spray frost on Christmas trees and windows during the holidays. I found that by spraying some on slick paper such as a magazine cover, I could pick it up with a brush while still wet and put it on the running gear, tracks, tires, etc to simulate packed snow.
Cheers
 Dick
Dick
I finished the M-21 mortar carrier and posted these pictures to the campaign gallery. I had intended to build a mini-diorama set during the siege of Bastogne but with the campaign ending and too many other things to do, I ran out of time. Maybe do the diorama later, after the holiday uproar subsides.
The picture above is a left side view of the M-21 in action. The folded tripod for the .50 Browning is strapped to the left front fender.
View looking down from above the left rear quarter.
Rear end view, showing the mortar base plate strapped onto the rear door and the markings for HQ company, 54th Armored Infantry Battalion, 10th Armored Division.
Right side view, with mines in the mine rack and a bazooka propped against the windshield.
Head on view.
Comments and criticism are welcome. This was my first try at serious weathering involving snow. The snow is the type used to spray frost on Christmas trees and windows during the holidays. I found that by spraying some on slick paper such as a magazine cover, I could pick it up with a brush while still wet and put it on the running gear, tracks, tires, etc to simulate packed snow.
Cheers
 Dick
DickCobrahistorian

Joined: November 11, 2006
KitMaker: 710 posts
Armorama: 553 posts

Posted: Tuesday, December 18, 2012 - 07:34 PM UTC
So, I'm clearly not going to finish this build by the deadline, but I'm determined to finish it. I'm hoping to at least get the turret done this week. The driver's compartment, crew and stowage will have to wait until the new year.
Tonight, I added the roof armor, travel lock bracket, turret rear floor, seat rails, seats, turret ammo stowage, trigger pedal and rear rail supports. I'm very pleased with how it is coming out and wish I'd been able to start on this one earlier.


Tonight, I added the roof armor, travel lock bracket, turret rear floor, seat rails, seats, turret ammo stowage, trigger pedal and rear rail supports. I'm very pleased with how it is coming out and wish I'd been able to start on this one earlier.


Posted: Tuesday, December 18, 2012 - 07:45 PM UTC
Hey guys, great progress!
So I been meaning to post for ages but just couldn't find the time... Some pics are ready for posting, though I'm still far from finished with my build. Hope to get to posting this evening...
I'd really like to see some of the started builds finished for this campaign and might need a few days more myself, so how about an additional month 'til end of January? Anyone?
Cheers!
Stefan
Cobrahistorian

Joined: November 11, 2006
KitMaker: 710 posts
Armorama: 553 posts

Posted: Wednesday, December 19, 2012 - 12:50 AM UTC
Quoted Text
Hey guys, great progress!
So I been meaning to post for ages but just couldn't find the time... Some pics are ready for posting, though I'm still far from finished with my build. Hope to get to posting this evening...
I'd really like to see some of the started builds finished for this campaign and might need a few days more myself, so how about an additional month 'til end of January? Anyone?
Cheers!
Stefan
YES PLEASE!!!

That'd give me a chance to get the Archer diamond plate for the turret floor.
Jon
Posted: Wednesday, December 19, 2012 - 07:43 AM UTC
So it's done.  I'm officially prolonging this campaign until the end of January. That is, the campaign page will still say it's over end of Dec. but you will be able to finish until 31 January. No new signups from 1 January.
So finally, here are some pics of where my M3 SPM is at the moment. This is after all the painting's done and a first wash with burnt umber oil colors.


Here's all the stowage painted:

And a first idea of how it could look inside:

Cheers!
Stefan
 I'm officially prolonging this campaign until the end of January. That is, the campaign page will still say it's over end of Dec. but you will be able to finish until 31 January. No new signups from 1 January.
So finally, here are some pics of where my M3 SPM is at the moment. This is after all the painting's done and a first wash with burnt umber oil colors.
Here's all the stowage painted:
And a first idea of how it could look inside:
Cheers!
Stefan
Cobrahistorian

Joined: November 11, 2006
KitMaker: 710 posts
Armorama: 553 posts

Posted: Wednesday, December 19, 2012 - 07:27 PM UTC
A bit more progress tonight. Added the second .50 cal (thanks Keith!), mount and D-can, scratchbuilt the gunner's elevation controls and the cushions on top of the 37mm stowage lockers next to the fuel tank.
The conversion comes with two 37mm stripper clips, but one of mine was full of air bubbles. The good thing is, the bubbles made it possible to use the shells as spent shell casings and there were a couple shells that were useable as unfired rounds. They're going in the 37mm's feed tray and the full stripper clip will be carried by one of the loaders.


The conversion comes with two 37mm stripper clips, but one of mine was full of air bubbles. The good thing is, the bubbles made it possible to use the shells as spent shell casings and there were a couple shells that were useable as unfired rounds. They're going in the 37mm's feed tray and the full stripper clip will be carried by one of the loaders.


Posted: Thursday, December 20, 2012 - 02:50 AM UTC
some update pics. 


IrishGreek

Joined: October 17, 2010
KitMaker: 627 posts
Armorama: 571 posts

Posted: Friday, December 21, 2012 - 07:35 AM UTC
Okay, been slowly working on this along with my Tiger P, so here are a couple update shots. I got her mostly assembled now, painting has been done (main shades) with OD and some lighted patches to give tones. Then I glossed her for decals. Should be able to decal tomorrow. Then detail painting and flat coats.


Cheers,
John


Cheers,
John
Posted: Sunday, December 23, 2012 - 10:23 AM UTC
Jon,
That is coming along nicely!
Lap Man and John,
Looking Good!
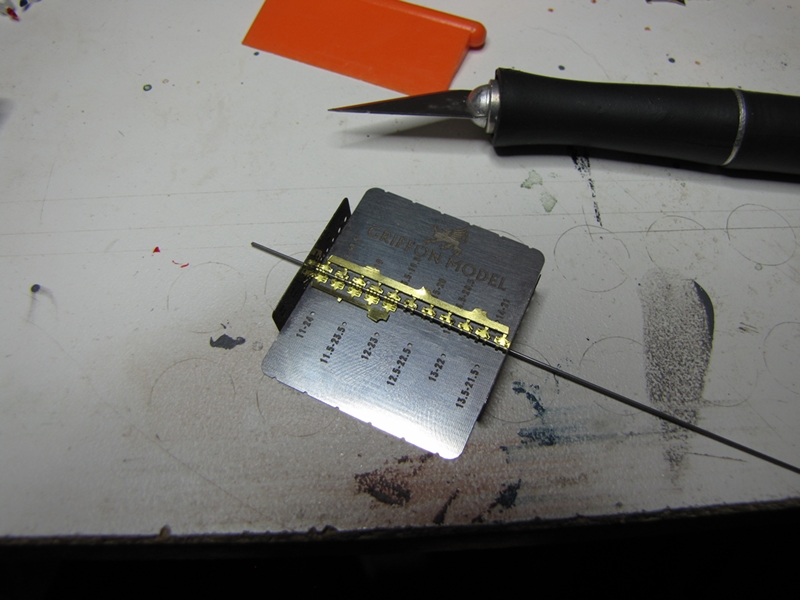
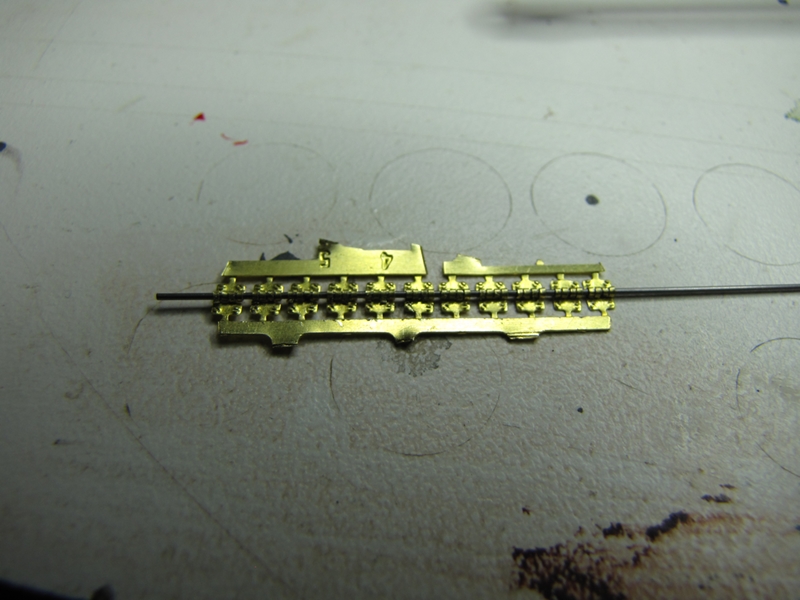
I am working my way through the PE and so far have found all the pieces that have flown away I am also getting better handling these tiny parts
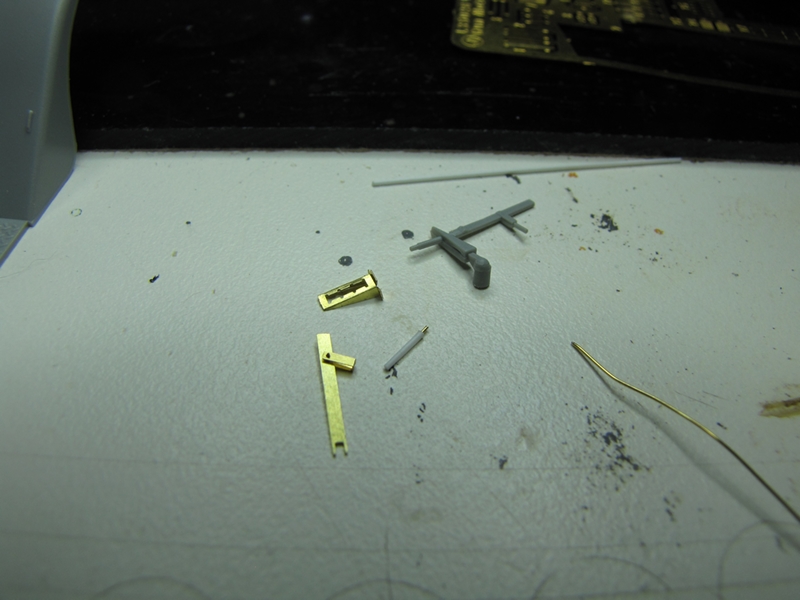
  here is a pic of the parts to replace the lever for the grill openings, incidentally does anyone know what position that should be in for opened or closed, ie forward or back?
Cheers Rob.

That is coming along nicely!

Lap Man and John,
Looking Good!

I am working my way through the PE and so far have found all the pieces that have flown away
 I am also getting better handling these tiny parts
  here is a pic of the parts to replace the lever for the grill openings, incidentally does anyone know what position that should be in for opened or closed, ie forward or back?
Cheers Rob.

Cobrahistorian

Joined: November 11, 2006
KitMaker: 710 posts
Armorama: 553 posts

Posted: Sunday, December 23, 2012 - 10:46 AM UTC
Should be forward for open and back for closed. The last time I messed with that lever, I had to get the sledgehammer to pop the spring on the detent button to get it to move!

CDK

Joined: September 24, 2006
KitMaker: 358 posts
Armorama: 339 posts

Posted: Sunday, December 23, 2012 - 11:36 AM UTC
Actually it's just the opposite, the louvers operate on gravity, their own weight is what closes them.
When you let the lever go forward the louvers weight pulls them into the closed position, pulling back on the lever (which in turn pulls on the cable attached to them) is what opens them up. Placing the operating handle into the various locking notches is what holds them in the open position in different intervals.
When you let the lever go forward the louvers weight pulls them into the closed position, pulling back on the lever (which in turn pulls on the cable attached to them) is what opens them up. Placing the operating handle into the various locking notches is what holds them in the open position in different intervals.
Cobrahistorian

Joined: November 11, 2006
KitMaker: 710 posts
Armorama: 553 posts

Posted: Sunday, December 23, 2012 - 01:19 PM UTC
Quoted Text
Actually it's just the opposite, the louvers operate on gravity, their own weight is what closes them.
When you let the lever go forward the louvers weight pulls them into the closed position, pulling back on the lever (which in turn pulls on the cable attached to them) is what opens them up. Placing the operating handle into the various locking notches is what holds them in the open position in different intervals.
Is it? I'm usually in the driver's seat. Was going from memory and I'm currently 200 miles from my M16.
Cobrahistorian

Joined: November 11, 2006
KitMaker: 710 posts
Armorama: 553 posts

Posted: Sunday, December 23, 2012 - 03:22 PM UTC
Quoted Text
Quoted TextActually it's just the opposite, the louvers operate on gravity, their own weight is what closes them.
When you let the lever go forward the louvers weight pulls them into the closed position, pulling back on the lever (which in turn pulls on the cable attached to them) is what opens them up. Placing the operating handle into the various locking notches is what holds them in the open position in different intervals.
Is it? I'm usually in the driver's seat. Was going from memory and I'm currently 200 miles from my M16.
Yep, it is. Checked the manual. Sorry for the misinformation.
Posted: Sunday, December 23, 2012 - 07:41 PM UTC
Thanks guys!
That works out good in the back position it should be easier to see.
Cheers Rob.
That works out good in the back position it should be easier to see.

Cheers Rob.
IrishGreek

Joined: October 17, 2010
KitMaker: 627 posts
Armorama: 571 posts

Posted: Monday, December 24, 2012 - 03:27 AM UTC
Got the decals on, but a couple are not laying as smooth over details as I would like. I have tried multiple applications of the Micro Set/Sol solutions too. Even used the pin to prick holes.


The first pic shows the initial attempt and the last photo is now.


The first pic shows the initial attempt and the last photo is now.
IrishGreek

Joined: October 17, 2010
KitMaker: 627 posts
Armorama: 571 posts

Posted: Monday, December 24, 2012 - 11:45 AM UTC
Okay, time for a 'dumb' question. Been looking online and trying to find some consensus on the color of the seat cushions for the M2s. I have seen green, tan and black. Seems like anything goes. Is that accurate?
Thanks for your thoughts.
Thanks for your thoughts.

Delta42

Joined: August 27, 2002
KitMaker: 616 posts
Armorama: 511 posts

Posted: Monday, December 24, 2012 - 11:57 AM UTC
John
I believe that the actual color used in WWII was Khaki, but I am no expert.
Dave
I believe that the actual color used in WWII was Khaki, but I am no expert.
Dave
Cobrahistorian

Joined: November 11, 2006
KitMaker: 710 posts
Armorama: 553 posts

Posted: Monday, December 24, 2012 - 12:15 PM UTC
Quoted Text
Okay, time for a 'dumb' question. Been looking online and trying to find some consensus on the color of the seat cushions for the M2s. I have seen green, tan and black. Seems like anything goes. Is that accurate?
Thanks for your thoughts.
John
They were being produced in khaki canvas through 1944. Not sure when production switched to the OD shade 7 green canvas, but it was in 1944 some time.
Jon
IrishGreek

Joined: October 17, 2010
KitMaker: 627 posts
Armorama: 571 posts

Posted: Monday, December 24, 2012 - 12:24 PM UTC
Dave and Jon,
Thanks for the answers. Okay, so looks like it's pretty safe that a M2A1 would be Khaki tan then.
Thanks!
Thanks for the answers. Okay, so looks like it's pretty safe that a M2A1 would be Khaki tan then.
Thanks!
 |


