Campaigns
Where Armorama group builds can be discussed, organized, and updates posted.
Where Armorama group builds can be discussed, organized, and updates posted.
Hosted by Darren Baker, Richard S.
Puffing Dragon
loppywarhammer

Joined: September 23, 2007
KitMaker: 3 posts
Armorama: 1 posts

Posted: Monday, October 08, 2007 - 03:52 AM UTC
Hey, how do you make that flame?
spongya


Joined: February 01, 2005
KitMaker: 2,365 posts
Armorama: 1,709 posts

Posted: Monday, October 08, 2007 - 04:48 AM UTC
The flame is actually impressive. Real convincing.
Here's my entry.
I think I'll play around with the mud (before anyone asks: the earth has a reddish color in many the Pacific islands), some more variation with the base color, but it's essentially done. The turret is not accurate, but I did not feel the strength to correct it.

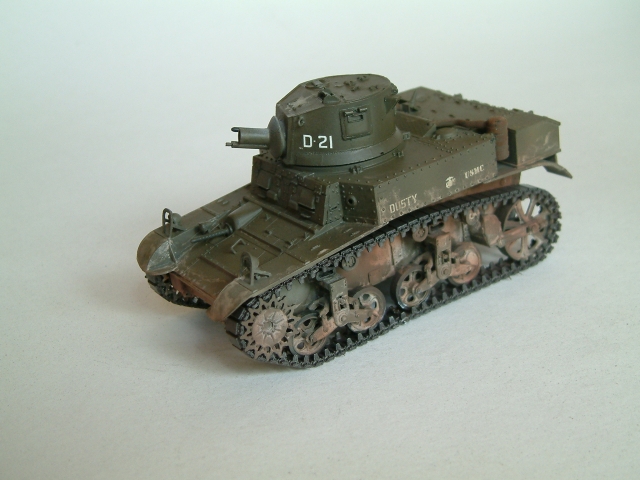
The first photo is taken on the sunlight + flash, the second sunlight only. I think the first one is the better as colors and saturation goes.
Any comments are actually encouraged.
Here's my entry.
I think I'll play around with the mud (before anyone asks: the earth has a reddish color in many the Pacific islands), some more variation with the base color, but it's essentially done. The turret is not accurate, but I did not feel the strength to correct it.


The first photo is taken on the sunlight + flash, the second sunlight only. I think the first one is the better as colors and saturation goes.
Any comments are actually encouraged.

gunnytank

Joined: February 24, 2006
KitMaker: 205 posts
Armorama: 200 posts

Posted: Monday, October 08, 2007 - 06:01 AM UTC
Quoted Text
Hey, how do you make that flame?
I'm sorry I should have thought about posting this here. I've had other people ask me also on this site. This is how I did it:
Here' how you do it:
1. Take a white wire the size of your nozzle
2. push cotton balls down around the wire.
3. Apply superglue to the wire and pull the first cotton ball down on to it.
4. Keep doing this unit you have cotton balls up and down your wire.
5. Start spreading the cotton away from the wire and nozzle.
6. You will probably want to pull off extra cotton on the first couple of balls to make them smaller.
7. Keeping the nozzle white, spray the cotton with yellow.
8. As you go outward toward the end spray orange.
9. Add just a hint of black toward the end and at bulges in the flame.
10. I sprayed mine with gloss coat, don't know if it did anything though.
And thats it, Happy burning.
Don

gunnytank

Joined: February 24, 2006
KitMaker: 205 posts
Armorama: 200 posts

Posted: Monday, October 08, 2007 - 06:08 AM UTC
Andras,
I like the Satan. Where did you get the decals, the Marine Corps emblem in particular. If you haven't guessed by now, I build almost exclusively Marine Corps models.
Don
I like the Satan. Where did you get the decals, the Marine Corps emblem in particular. If you haven't guessed by now, I build almost exclusively Marine Corps models.
Don
spongya


Joined: February 01, 2005
KitMaker: 2,365 posts
Armorama: 1,709 posts

Posted: Monday, October 08, 2007 - 06:24 AM UTC
Hi,
Thanks
The dry transfers came with the conversion kit. It was the first time to use them -I think I'm hooked. Much more convenient than a decal. I think I got some Corps emblems left.
Thanks

The dry transfers came with the conversion kit. It was the first time to use them -I think I'm hooked. Much more convenient than a decal. I think I got some Corps emblems left.

gunnytank

Joined: February 24, 2006
KitMaker: 205 posts
Armorama: 200 posts

Posted: Monday, October 08, 2007 - 06:36 AM UTC
Quoted Text
The dry transfers came with the conversion kit. It was the first time to use them -I think I'm hooked. Much more convenient than a decal. I think I got some Corps emblems left.
What company made them? I'm glad to hear they are dry transfers, I also prefer them. I can make decals look like paint on an aircraft model but armor models are still giving me fits with the decal outline. When ever possible I will use dry transfers or just hand paint the markings on.
Don
kevinb120

Joined: May 09, 2006
KitMaker: 1,349 posts
Armorama: 1,267 posts

Posted: Monday, October 08, 2007 - 05:16 PM UTC
heh, the flame looks great!  threw me when I first saw it scrolling. Nice build too!
 threw me when I first saw it scrolling. Nice build too!
Posted: Monday, October 08, 2007 - 10:21 PM UTC
Andras, looks very good. The weathering looks good to me, but also I would not call myself an expert on the dirt colours of the Pacific Islands. 
Thanks for participating

Thanks for participating

emroglan

Joined: December 16, 2004
KitMaker: 1,163 posts
Armorama: 842 posts

Posted: Monday, October 08, 2007 - 11:18 PM UTC
Great work on the flame and the M4 Don! I should try that flame trick myself.
Keep it up Andras, your little Stuart (or Satan?) is coming along nicely. Dry transfers are also something I plan to try in the near future, as everyone is talking about how good they are.
Keep it up Andras, your little Stuart (or Satan?) is coming along nicely. Dry transfers are also something I plan to try in the near future, as everyone is talking about how good they are.
Martinnnn

Joined: April 26, 2004
KitMaker: 5,435 posts
Armorama: 2,762 posts

Posted: Monday, October 08, 2007 - 11:53 PM UTC
Hmm I'd very much like to join this campaign but for the moment I lack both time and money to get started.....
If I can get something done within time (Churchill Crocodile would be my entry) I'll post it here
You all have very nice projects so far. Keep it up!
Btw. Does anybody know if Tamiya will release 1/48 Churchills? I do assume they will do so in time but I hope within this campaign time
If I can get something done within time (Churchill Crocodile would be my entry) I'll post it here

You all have very nice projects so far. Keep it up!
Btw. Does anybody know if Tamiya will release 1/48 Churchills? I do assume they will do so in time but I hope within this campaign time

BobCard

Joined: August 09, 2006
KitMaker: 1,008 posts
Armorama: 847 posts

Posted: Tuesday, October 09, 2007 - 02:43 AM UTC
Quoted Text
Quoted TextThe dry transfers came with the conversion kit. It was the first time to use them -I think I'm hooked. Much more convenient than a decal. I think I got some Corps emblems left.
What company made them? I'm glad to hear they are dry transfers, I also prefer them. I can make decals look like paint on an aircraft model but armor models are still giving me fits with the decal outline. When ever possible I will use dry transfers or just hand paint the markings on.
Don
Don,
No they are not part of the conversion. The transfers come from hardcorpsmodels , this specific set of transfers is no longer available, but they have 18 others currently available and some do have various emblems included. I highly recommend them.
Bob


gunnytank

Joined: February 24, 2006
KitMaker: 205 posts
Armorama: 200 posts

Posted: Tuesday, October 09, 2007 - 12:52 PM UTC
Quoted Text
Don,
No they are not part of the conversion. The transfers come from hardcorpsmodels , this specific set of transfers is no longer available, but they have 18 others currently available and some do have various emblems included. I highly recommend them.
Bob,
Thank you.
Don
Posted: Tuesday, October 09, 2007 - 06:46 PM UTC
Bob, great link. There are some really cool stuff there. Both books and decals.
Thanks for sharing
Thanks for sharing


BobCard

Joined: August 09, 2006
KitMaker: 1,008 posts
Armorama: 847 posts

Posted: Wednesday, October 10, 2007 - 06:20 AM UTC
Your welcome, great place, they are running a little thin lately with the products. The owner is a very busy person from what I hear. Wish I could afford a couple of those LVT Tracks.
And Don, I just have to try your method for fire, hopefully I can paint as well as yours turned out.
Hopefully my frog will be finished this weekend and I can post some finished photos.
Bob

And Don, I just have to try your method for fire, hopefully I can paint as well as yours turned out.
Hopefully my frog will be finished this weekend and I can post some finished photos.
Bob

dobon68

Joined: June 19, 2007
KitMaker: 392 posts
Armorama: 329 posts

Posted: Saturday, October 13, 2007 - 01:15 AM UTC
Hello all,
I hope I'm not too late in joining this campaign?
I thought it would be a good idea to finally get around to using the very old Verlinden M132 turret I have to convert a M113 to a flamethrower.
I hope this model is OK for this campaign?
When I have a few photos to post I will.
Cheers
David
I hope I'm not too late in joining this campaign?
I thought it would be a good idea to finally get around to using the very old Verlinden M132 turret I have to convert a M113 to a flamethrower.
I hope this model is OK for this campaign?
When I have a few photos to post I will.
Cheers
David
emroglan

Joined: December 16, 2004
KitMaker: 1,163 posts
Armorama: 842 posts

Posted: Saturday, October 13, 2007 - 02:25 AM UTC
Welcome Aboard David! If you think you can complete your model on the deadline, you are not late at all. A flamethrowing M-113 is perfect for this campaign, looking forward to your photos!

BobCard

Joined: August 09, 2006
KitMaker: 1,008 posts
Armorama: 847 posts

Posted: Sunday, October 14, 2007 - 03:11 AM UTC
Hello all,
Here is my entry for the Campaign, "Doris" my fire breathing Matilda Frog.
This turned out to be one of the hardest conversions I ever completed, besides the problems finding the correct parts and decals, the old Tamiya kit was a bear for the amount of cutting and correcting, and even then I don't think I caught them all.
Still was a lot of fun trying,


Thanks for the campaign, and good luck finishing everyone,
Bob

Here is my entry for the Campaign, "Doris" my fire breathing Matilda Frog.
This turned out to be one of the hardest conversions I ever completed, besides the problems finding the correct parts and decals, the old Tamiya kit was a bear for the amount of cutting and correcting, and even then I don't think I caught them all.
Still was a lot of fun trying,
Thanks for the campaign, and good luck finishing everyone,
Bob

Warsawpact

Joined: September 25, 2006
KitMaker: 321 posts
Armorama: 273 posts

Posted: Sunday, October 14, 2007 - 03:47 AM UTC
Hi David, and welcome aboard! The M-113 will make a great addition to the campaign... cant wait for the pics
Woow...Bob, that´s one grim looking killing machine. Ace job!
Here´s my long overdue WIP pics update of my contribution to the campaing, the Churchill Crocodile.
Since this kit requiers no conversions i got more time to due some mud experimentation on it.Hence why i decided to go for a "mucky rust bucket" feel for this one.
So far i´ve only finished the turret andthe main hull is shaping up quite quickly. Although it will take untill next week ,i think, that we may bask in it´s mucky splendour.
Well...whitout any further adue, the pics:
You critisism and commets are, as always, welcome.


P.S
Does anyone got any tips or info on how to make mud WHITOUT plaster ?
D.S
/
Christian
Woow...Bob, that´s one grim looking killing machine. Ace job!
Here´s my long overdue WIP pics update of my contribution to the campaing, the Churchill Crocodile.
Since this kit requiers no conversions i got more time to due some mud experimentation on it.Hence why i decided to go for a "mucky rust bucket" feel for this one.
So far i´ve only finished the turret andthe main hull is shaping up quite quickly. Although it will take untill next week ,i think, that we may bask in it´s mucky splendour.
Well...whitout any further adue, the pics:
You critisism and commets are, as always, welcome.


P.S
Does anyone got any tips or info on how to make mud WHITOUT plaster ?
D.S
/
Christian

BobCard

Joined: August 09, 2006
KitMaker: 1,008 posts
Armorama: 847 posts

Posted: Wednesday, October 17, 2007 - 03:38 AM UTC
Thanks Warsawpact,
Sorry but I just caught your question on the end about mud.
2 ways I can think of is to use paint right out of the tube you can buy from any artist or hobby store, (Burnt Umber or mixed to your tastes, just don't thin it) let it dry and should work, or powders mixed with a dab of thinner and pack it in.
I've heard some say real mud just mixed with white glue but I've never tried that one.
Hopefully it's not too late of a response.
I like the netting. Only thing I can see so far is the mold line on the roll attached to the turret.
Bob

goldenpony

Joined: July 03, 2007
KitMaker: 3,529 posts
Armorama: 588 posts

Posted: Wednesday, October 17, 2007 - 06:56 AM UTC
I was all pumped up last night about starting my OT-26. I was going to start a build log and everything. I took pictures of all the sprues and the box. Then I hit my first problem. I used a white back ground to take my pictures, the kit is molded in white and a very light gray. So, my parts did not turn out all that clear. Then, I pulled out my tools and such. My glue was missing! So, I went to my storage place, and that tube was gone as well. I was batting 1000 last night.
Well, tonight if all goes right, I can start. If not, I guess I will have to sit back and wait until next week to get it running.

Well, tonight if all goes right, I can start. If not, I guess I will have to sit back and wait until next week to get it running.

Posted: Wednesday, October 17, 2007 - 08:33 PM UTC
Great looking Matilda, Bob. Very nice worn and "damp" jungle look of the tank. I would not like to be on the receving end of that flame thrower. Nice touch with the engine screens and the stowage. Thanks for participating 
Christian, good progress on your Churchill. I have used "structured" paint mixed with pastels, small leaves, static grass, and paint for colour. "Structured" paint is normal house paint mixed with fine sand. You can mix this yourself, but it is easier, cheaper and better to buy it ready mixed. All DIY stores should have several versions. A bought a tin of approx. one liter and it will last for 150-200 tanks This has worked really good for me and better than plaster as plaster can be rather brittle and easy to damage later.
Right now I am working with it on my Leopard 1A4 in the whitewash campaign. You can see more progress and inspiration in that tread on how to use this mixture for mud.
Hope this helps.

Christian, good progress on your Churchill. I have used "structured" paint mixed with pastels, small leaves, static grass, and paint for colour. "Structured" paint is normal house paint mixed with fine sand. You can mix this yourself, but it is easier, cheaper and better to buy it ready mixed. All DIY stores should have several versions. A bought a tin of approx. one liter and it will last for 150-200 tanks
 This has worked really good for me and better than plaster as plaster can be rather brittle and easy to damage later.
Right now I am working with it on my Leopard 1A4 in the whitewash campaign. You can see more progress and inspiration in that tread on how to use this mixture for mud.
Hope this helps.


Warsawpact

Joined: September 25, 2006
KitMaker: 321 posts
Armorama: 273 posts

Posted: Monday, October 22, 2007 - 11:21 PM UTC
Thanks Bob for your quick reply.
And Jesper, thank you also, for your reply. I´ll be following your progress in the white-washed campaign. And i must say that Leopard is looking gooooood
I´ll give both of your tips a go - to see if any of the results is what im looking for.
My churchill is quickly nearing completion. All in all it´s 90% completed, i just need too get that mud on it. I´ll put up the update pics as soon as my photobucket account stops messing whit me
Keep building ´em people /
Christian
And Jesper, thank you also, for your reply. I´ll be following your progress in the white-washed campaign. And i must say that Leopard is looking gooooood
I´ll give both of your tips a go - to see if any of the results is what im looking for.
My churchill is quickly nearing completion. All in all it´s 90% completed, i just need too get that mud on it. I´ll put up the update pics as soon as my photobucket account stops messing whit me

Keep building ´em people /
Christian
steve-o

Joined: February 05, 2004
KitMaker: 545 posts
Armorama: 295 posts

Posted: Wednesday, October 24, 2007 - 05:36 AM UTC
Hi,
I'm almost done with my submission. Any hints on how to make it better are most welcome! (I forgot to add the MG42 in the back when I took the pics, it's done though). Any/ all criticisms welcome!
Also, any suggestions on what division to make it from would be nice too.
Thanks!


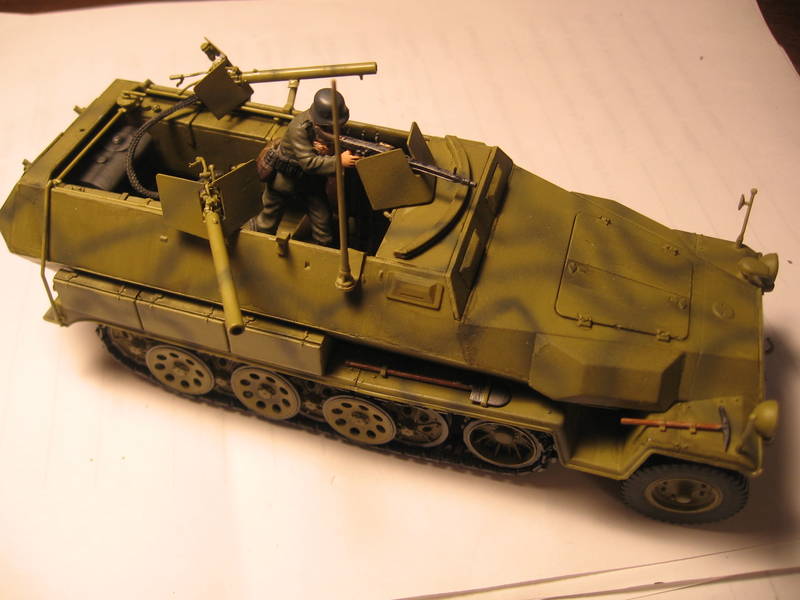
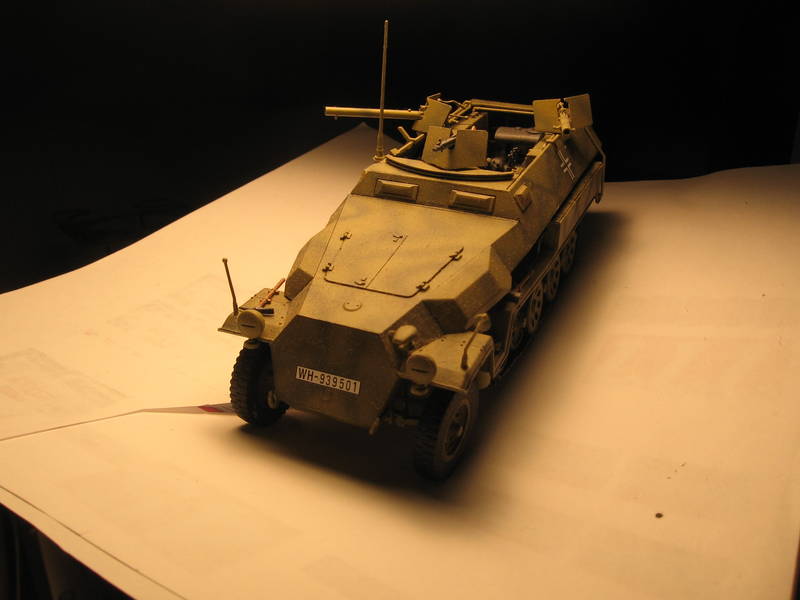
I'm almost done with my submission. Any hints on how to make it better are most welcome! (I forgot to add the MG42 in the back when I took the pics, it's done though). Any/ all criticisms welcome!
Also, any suggestions on what division to make it from would be nice too.
Thanks!


BobCard

Joined: August 09, 2006
KitMaker: 1,008 posts
Armorama: 847 posts

Posted: Wednesday, October 24, 2007 - 06:09 AM UTC
Nice steve-o,
Is that a conversion or kit? I don't think I know anything about this version.
Nice details, only thing I might add would be some weathering, but I don't know your plans for the model. From what I can see looks real good.
Bob

Is that a conversion or kit? I don't think I know anything about this version.
Nice details, only thing I might add would be some weathering, but I don't know your plans for the model. From what I can see looks real good.
Bob

emroglan

Joined: December 16, 2004
KitMaker: 1,163 posts
Armorama: 842 posts

Posted: Wednesday, October 24, 2007 - 06:16 AM UTC
Bob, that's the Sdkfz 251/16 D Flammpanzer kit by Dragon, the kit number is 6247. I had also purchased it as a back up when my Alan Flammpanzer II started to drive me nuts, I might still shift my build and built this. It looks very nice. Should I dig up my stash? Hmmm?
Decent build Steve, good job. Are those hoses for the flamethrowers included in the kit or are they your additions? Just a little opinion, a little more light or natural sunlight will add wonders to your pictures, these are a bittle dark and too "yellowish" because of the lamp.
Decent build Steve, good job. Are those hoses for the flamethrowers included in the kit or are they your additions? Just a little opinion, a little more light or natural sunlight will add wonders to your pictures, these are a bittle dark and too "yellowish" because of the lamp.
 |


