

1⁄35Panther Ausf.G
9
Comments

Introduction
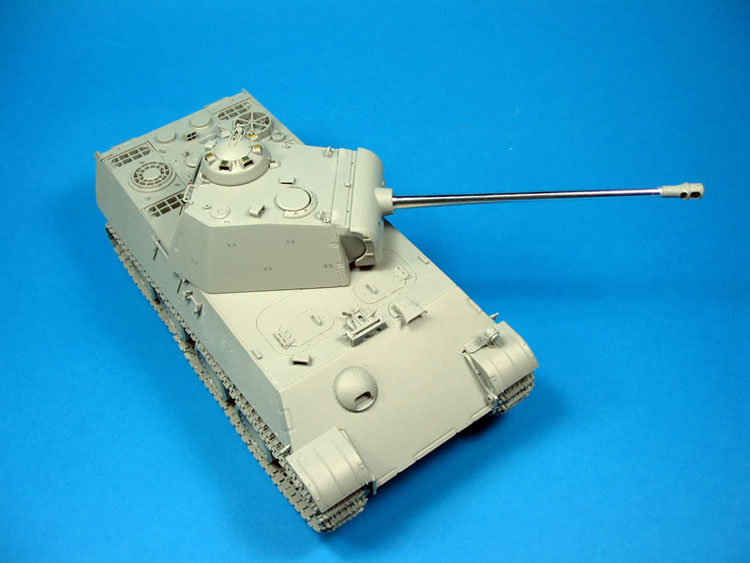
After finishing the Panther D Premium kit I was really looking forward to building the new Panther G Smart Kit to see how they compared. I was also offered the Cyberhobby Update set for the Panther G this includes the metal barrel, Schurzen plates, 2 PE frets and extra decals from Cartograf. It has been said elsewhere that the concept of the Smart kit makes the AM redundant, but as it has been produced its only fair to see how it looks. As Vinnie has already done a comprehensive review and a build, I am going to concentrate on those items that stood out for me during the build. I also used a completely different approach to spraying than I would normally use, (Vinnie convinced me), which I will detail.The Kit
The quality of moulding and level of detail are absolutely superb. I was constantly amazed at the fit of the components during the process, if anything, it is even better then the D. All weld seams now appear to be part of the components, and do not have to be added afterwards. The kit can be built with an articulated suspension (which I did) it works perfectly, and again the level of detail here will have the interior scratch builders rubbing their hands.Things to watch for
Pro - Options are available for those wishing to build a specific variant. Con Unlike the Tiger 3-in-1, no indication is given in the instructions as to which item is for which variation. Fix - You WILL need good references if you want to get it 100% correct. Pro Six hanger brackets per side for Schurzen are fitted under the small side fenders. Con If you are using the update kit they do not extend far quite enough out from under the fenders to fit the overlapping Schurzen (they should be able to lock onto the brackets when slid on). Fix First fit the fenders (C1, C47) to the hull. Then glue the hanger brackets to the underside of the fenders (not to the hull), test fitting the Schurzen as you progress along the hull. Pro Spare track hanger racks are supplied for both sides. Con The holes in the track links are too small for the brackets to go through. Fix There are several: File out the holes in the track links until the brackets fit. This is not ideal as the holes have to be made quite large, and is noticeable. File each bracket until it fits the hole in the track links. Again not ideal as there are 12 U shaped brackets meaning you have to get 24 sides to look the same. Alternatively you can use the rack from the update kit (more on this later).The Update Kit
There are some excellent details in this kit - the equipment tube (all brass), has a fret of its own, and even has the internal fittings should you wish to have it open. You also have the extra decals to give you more flexibility in the variant you are building. As the Smart kit did not have the optional pioneer tools without clamps (instead they are moulded on and are very good), I decided not to risk filing them off in order to use the 3 piece ones in the update kit. The instructions are quite good (if a bit small), but I had to refer to references/Smart kit instructions for several pieces on the tool racks as they are shown complete and in place. I have seen several reviews of Cyberhobby instructions and they all seem to mention this point Cyberhobby might want to look at the way the design instruction sheets to make them a bit clearer. The holes in the Schurzen fit very accurately onto the hanger brackets of the main kit. I did find that some folding parts on the main fret were very unforgiving of mistakes. Whether its a softer type of brass, or the folder lines are cut deeper than sets I have used, several parts broke after the initial bend was manipulated even slightly.Problem areas
Here I must say at the outset that during this build I had no access to the internet as I was moving house and it took 3 weeks to get reconnected. This meant I was unable to access online references or forums for help on the two items listed below. I did however spend a lot of time in contact with Vinnie and others to get it correct, and had access to photographic studies of two existing Panther Gs at Fort Knox and Aberdeen.Rear deck screens- Right hand side
There are slatted screens on the right hand side air intakes on the rear deck. These were apparently to control airflow they would be closed in cold conditions to aid in the starting of the engine. The Smart kit offers two options: open and closed. The update kit offers a sliding screen that goes under the open version. The first (inboard) slat is bent upwards so that it can be used to slide the screen across. So far so good. However, if you look at the included image of the Aberdeen vehicle you can see the following: The usual mesh splinter screens are fitted flush under the slatted screens (the same on the Fort Knox vehicle). If you try and fit all three screens on the model, the top (kit) screen does not fit properly and the turret catches it when turning. Indeed, the Cyberhobby instruction set shows the sliding screen fitted without the mesh screen. If you leave off the mesh screen, it then works fine, but I find it unlikely that any crew would leave off the splinter screens on the air intakes. Initially I put the update screens in but eventually I took them out, left the Kit screen in place, and went for the open look.track hanging racks
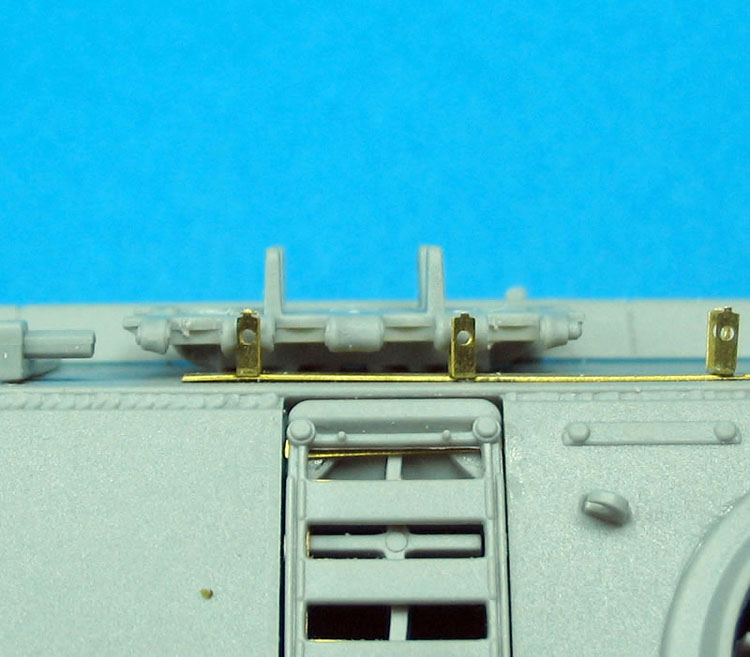
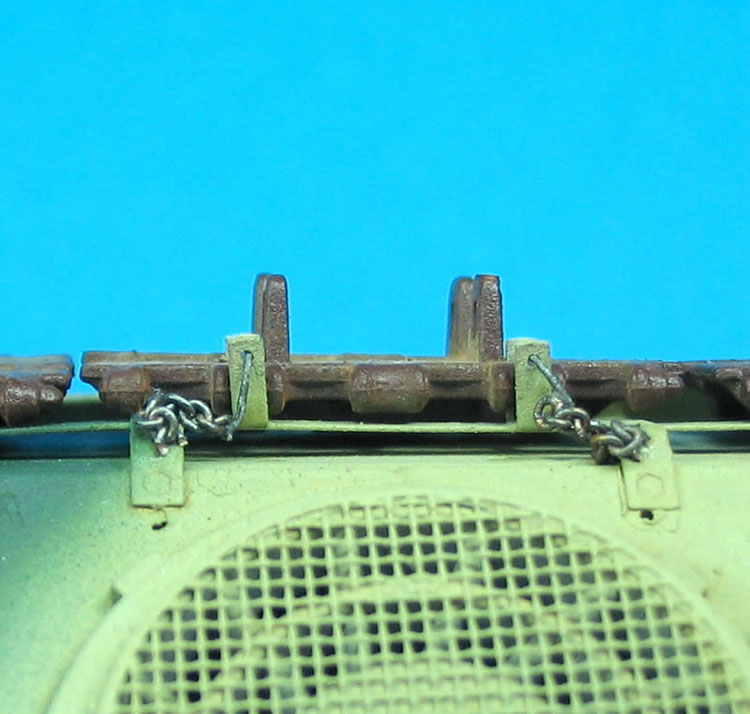
Each horizontal rack has six vertically mounted U brackets attached. Brackets have holes in the ends to allow a pin to lock track links into place. The problem is that while track links are 2.58mm thick, the hole in the brackets is only 1.73mm from the hull. The lower hole in each bracket is completely hidden by the track thickness. Angling the link helps expose the upper hole but further hides the lower one. For comparison I have taken before and after pics without and then with the update. It would appear that the fret design of the brackets and rack has been copied from the Panther D but on the Panther D the horizontal rack is 2mm further offset from the hull by independent brackets, which is not the case on the G where it was welded straight onto the hull. In the attached photos you can clearly see that the extra track thickness is accommodated on the D bracket but not on the G. This meant I had to file off about 1.5mm from the back of each link in order to reduce their thickness to the point where a pin could be inserted through the holes in the bracket. A further problem are the pins on the fret. They are 0.04mm thick (the thinnest side) and attached to the fret in 4 places, including one in the middle of a link in the attached chain. To remove them without damaging them is nearly impossible (to be honest those on the Panther D fret are the same). Also when scaled up at 1:35 .04mm translates to a locking pin diameter of 1.4mm - on the photos these pins look to be around 12-15mm in diameter. As with the Panther D I again made my own pins from 0.15mm steel rod, which gives a much more realistic finish. Editors Note* In fairness to Cyber Hobby, they were contacted about this problem, and sent photographs showing the spare track links fitted as per the instructions.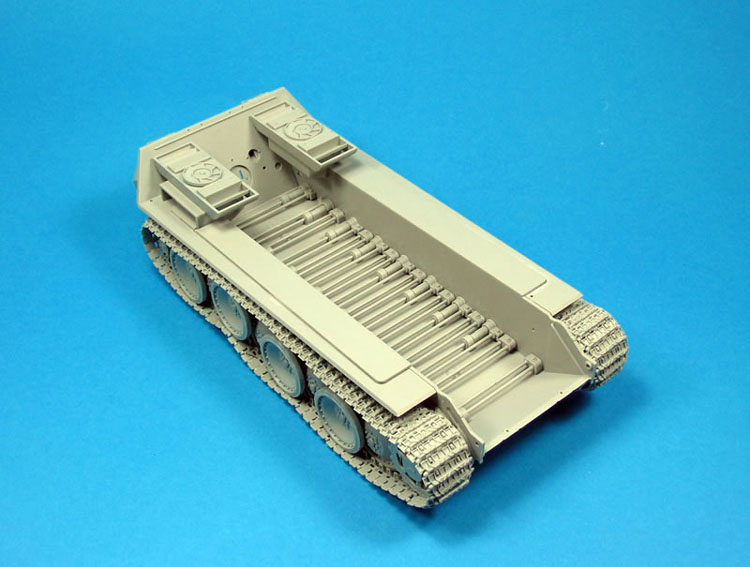

About the Author


FROM: ENGLAND - EAST MIDLANDS, UNITED KINGDOM
Spent time in specialised sales to militay, non-destructive testing, risk engineering, engineering underwriting surveys on mines and mineral processing plants. Modelling from Airfix days, I took a 25yr break and came back to the hobby 18month ago. Currently working on a Sturmtiger with fully detaile...
Comments

A very nice informative article Brian.
Nice job on the model also.
AUG 30, 2006 - 11:20 PM

Well done, but I have a question about the painting method. Since you put it all together first and mask off the tracks, am I correct in assuming that the area behind the wheels and under the fenders is left primarily black?
AUG 31, 2006 - 03:25 AM

Thanks Michael
No I was able to reach most of this area with the yellow. I was also dubious about the method but as Vinnie explained "if you can see it you can spray it - if you can't see it, it doesn't matter if you spray it because no one else will see it either". Once everything was sprayed with Nato Black I masked?wrapped off the tracks with a single length of masking tape (effectively all the way round) and sprayed above them to get paint under the sponson. The black base really gets an effective shadow under there. The tape also covers the horns and top/bottom of the rubber rims where they contact the track. I then sprayed the wheels (very low pressure here) with little or no overspray onto the rims. Any minor overspray was touched up with the appropriate colour.
I will definitely use this method in future (unless magic tracks ever become workable), as its much simpler, quicker, and you do not have to do any post shading. On my next build I will take pictures all the way through and detail each step. I did not do it this time round because I was only half convinced about the method and thought I would screw it up! (Sorry Vinnie - you were right)
Brian
AUG 31, 2006 - 02:35 PM

Congrats Brian for a really good job on the build and the review, hopefull a helpful suggestion not not to criticise the excellent effect but Tamiya Buff or Deck tan, really thinned makes a great dust effect, working carefully as a little goes a long way would add to the contrast. My thoughts only of course.
John
AUG 31, 2006 - 03:22 PM
Thanks a lot for the response Brian. I've been terribly impressed with Vinnie's technique but have had my doubts that a mere mortal such as I could pull it off. I've read everything I could find on preshading over the past couple of days getting ready to start spraying a 251/7 that I just finished. I have to say that I still wasn't quite convinced that I should put the wheels and tracks on first, but after reading your helpful explanation I'm going to go for it. Thanks again.
Michael
AUG 31, 2006 - 06:30 PM

Thanks! great article and a great looking model, as a newbie to this hobby I have learned alot so thanks again.
One question if I may, what did you use to get the dusty look on the deck and over the decal it looks very realistic.
AUG 31, 2006 - 10:52 PM
Thanks Tim
The turret markings are sprayed onto the camo via an Eduard vinyl soft stencil - I use this method 'cos I'm crap at decals. The model was then sealed with Future. Then I washed the entire surface with a thin Burnt Umber/Turpenoid wash - I find this gives the sort of sheen often seen on armour. Then I took Mig Dark Mud pigment and used a blush brush (large soft makeup type) to gently apply it all over the model.
Johns earlier tip of using Tamiya Buff gently misted over the model is also a good way to do this. Instead of Mig pigments you can also use MMP powders which I find are more forgiving (Mig pigments tend to smear if not applied very carefully)
Hope this helps
Brian
SEP 01, 2006 - 01:05 AM

Brian.
Thanks for the great review. I really like the idea of building the wheels and tracks first and spraying black undercoat. Sounds much easier. I shall give this a go on my next model.
Cheers
Tony
SEP 05, 2006 - 06:42 AM
Copyright ©2021 by Brian Balkwill. Images and/or videos also by copyright holder unless otherwise noted. The views and opinions expressed herein are solely the views and opinions of the authors and/or contributors to this Web site and do not necessarily represent the views and/or opinions of Armorama, KitMaker Network, or Silver Star Enterrpises. All rights reserved. Originally published on: 2006-08-31 00:00:00. Unique Reads: 19931

WEB HOSTING BY


Copyright ©2021 Armorama and Kitmaker Network, a subsidiary of Silver Star Enterprises
All Rights Reserved. Please read our Conditions of Use and Privacy Policy.
All Rights Reserved. Please read our Conditions of Use and Privacy Policy.