

1⁄35Bison Bashing
12
Comments
Superstructure
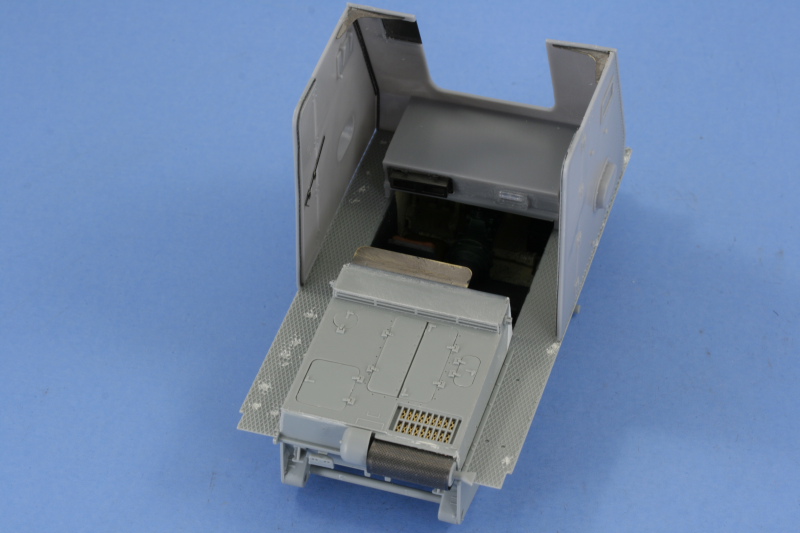
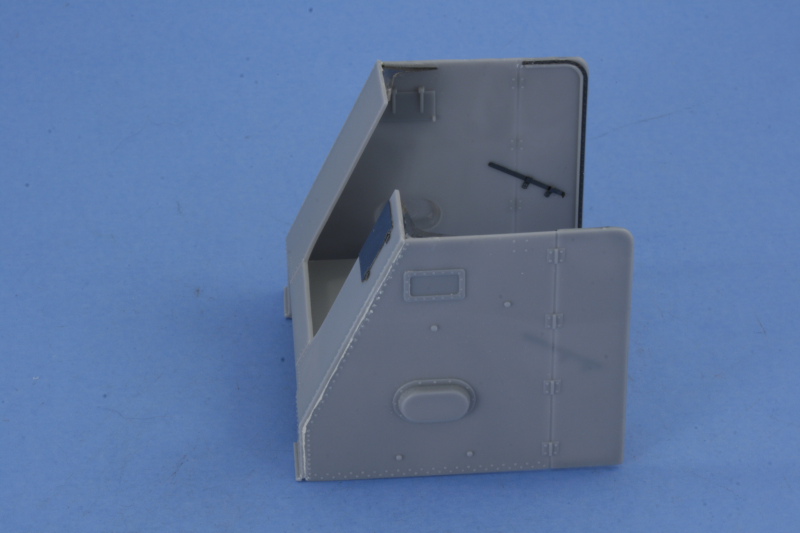
The next major area of modification dealt with joining the DML hull with the Alan superstructure. The DML glacis plate was modified using a keyhole saw to separate the plate to mate to the Alan superstructure. The rough edges were sanded down and the small triangular pieces on the sides removed with sprue cutters before it was installed. All the DML location holes on the fenders for the pioneer tools were filled and sanded at this stage since the Bison stowage arrangement was totally different from that of the Pz I. The Alan superstructure consists of the front and two side panels and the front part needed the most modification. Two ejector marks were filled and sanded and the over-scale reinforcing strips were removed with a #11 blade and sanded smooth and replaced with the Eduard PE strips. The Bison had two vision ports, a double port for the driver and an added single port to the left. I cut out the appropriate sized hole and fitted one of the visors from the DML kit to add this detail. The Eduard PE port parts were used in place of the chunky Alan parts. Starting with the right side, the side panel was added along with the Eduard reinforcing strip and the angled bracket at the top. The bolt strip around the hinged rear flap was also added and the Eduard set used to create the angled locking bar that secured it in place. This was repeated with the left side and the structure test-fit with the glacis plate and fenders to insure proper alignment. As a final step, the join seam on the exterior for the side plates was carefully filled and sanded, taking care not to damage the fine bolt detail in the process.The gun
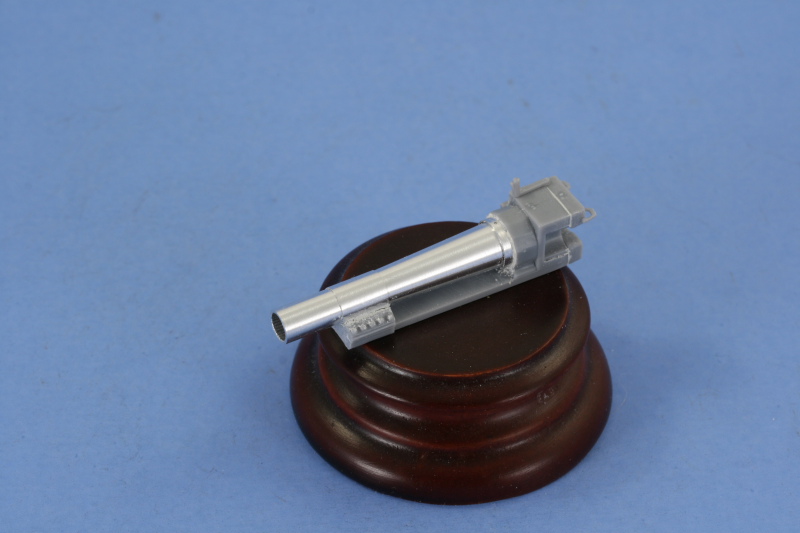
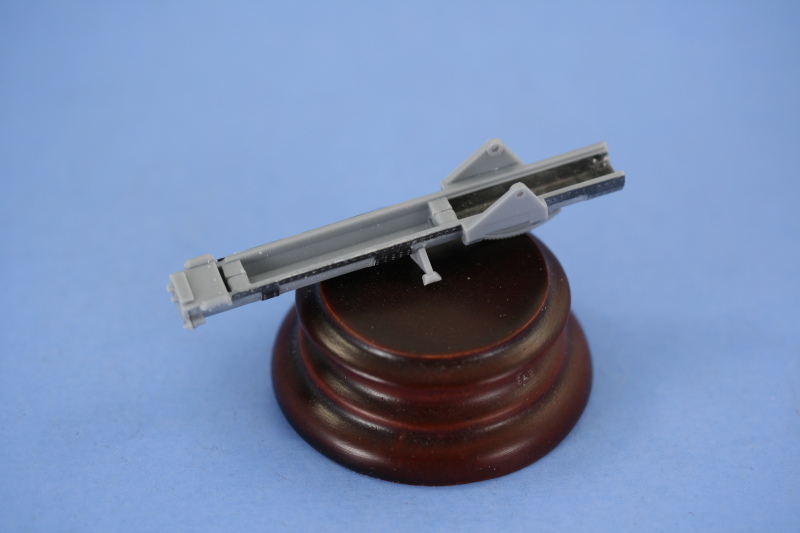
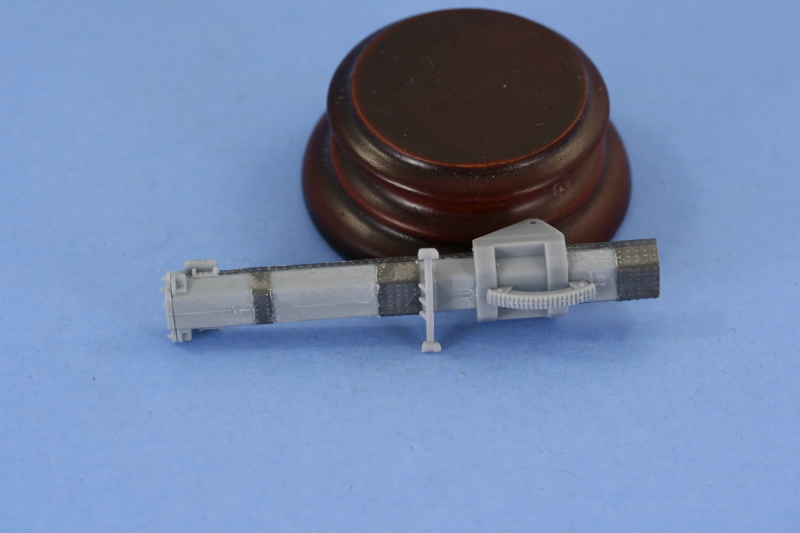
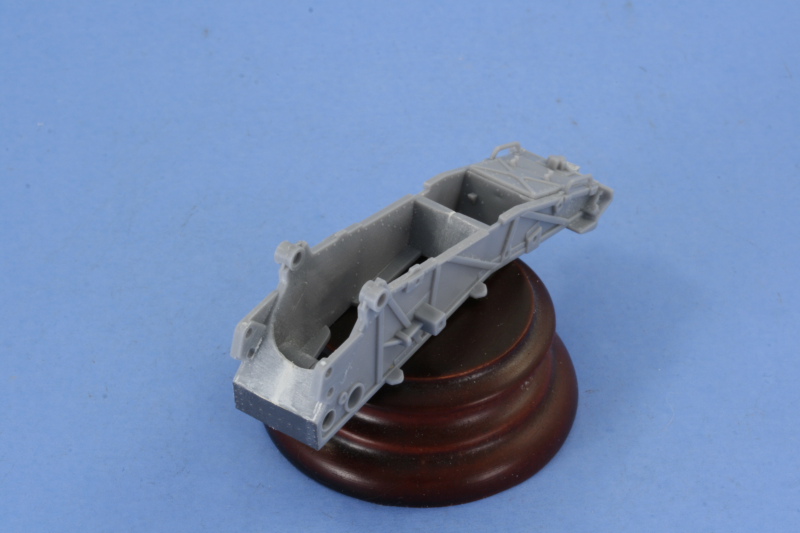
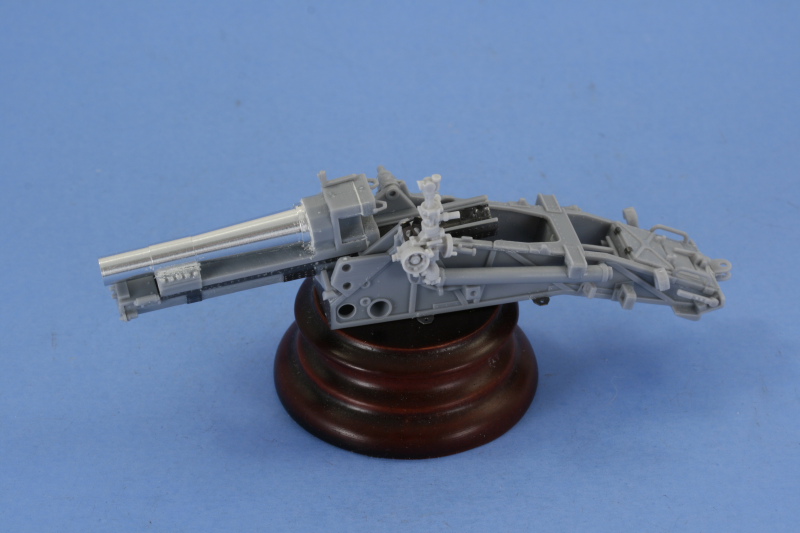
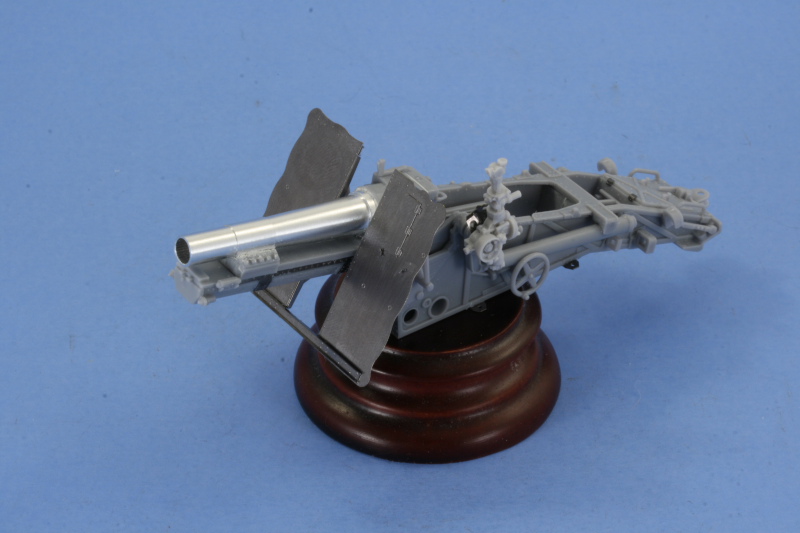
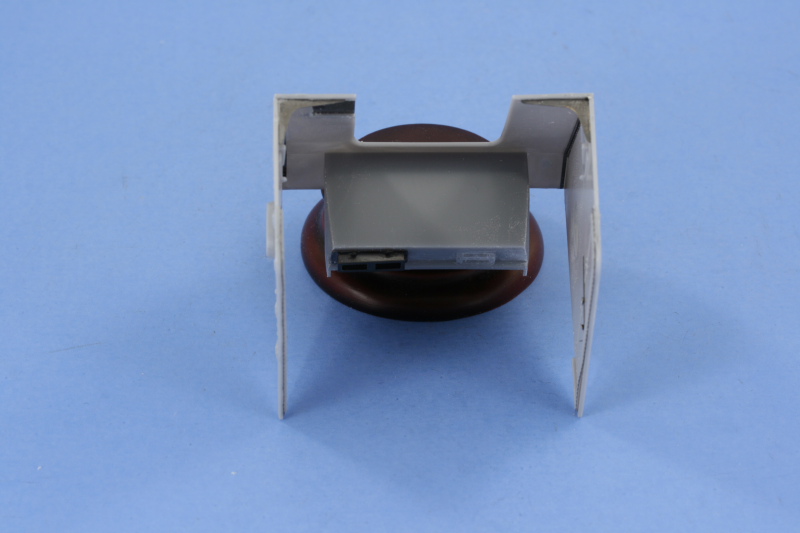
Next up was the main attraction, the sIG 33 15 cm gun. This is where the Alan kit contributed the most and is also the area that required the most work. The Alan barrel was a two-piece arrangement integrated into the recoil sled, so both halves needed to be cut down to take the Model Point aluminum barrel. The Alan barrel was also slightly over-sized, so some putty work was needed to correct the fit of the replacement barrel to the sled. The breech block was assembled and attached as well with putty also required to fill gaps on the Alan parts. The gun mount and recoil tray fit poorly due to over-sized or misaligned mating pins, these were removed and sanded down to get the two halves together. The soft bolt detail was also removed and the Eduard replacement items used to recreate it. The Eduard set includes a very nice one-piece insert for the interior of the recoil sled, covering up the large join seam and providing additional detail all in one modification. The base of the gun carriage was also a two piece arrangement and also had problems with its mounting pins. These were removed and the parts sanded to get the best possible fit, testing constantly with the gun mount to insure the right gap was present for the mount spacing. A large gap at the front of the base required a small strip of styrene glued on the inside as a foundation and generous amounts of putty to fill. The remaining details were added once that had been settled, using the Eduard parts to replace the solid eyes on the lower edge and adding hinge detail to the tool box in the gun trail and replacing the simplified Alan gun sight with the TMD item. The guns splinter shield was constructed entirely from the Eduard set, a great improvement vs. the over-scale Alan item. Rather than solder the parts, I decided to try out a product called Gator Glue, an acrylic-based glue with more work time than CA, and it did the job beautifully. Once assembled, I used CA gel to attach it first to the lower mount points, then carefully angled it and attached it to the upper points to complete it. The remaining parts for the gun carriage to support the large carriage wheels were installed and the carriage wheels themselves detailed using parts from the Eduard set. The wheels, because of how they mate up with the carriage and the superstructure, were left off for the time being. Once the carriage itself was completed, test-fits with the superstructure were needed to determine the exact placement of the wheel boxes and the bracing arms for the trail mount bar across the rear hull. The Alan superstructure front was too wide to take the spacing on the brake drums, so the superstructure had to be carefully sanded and tapered to allow it to fit properly.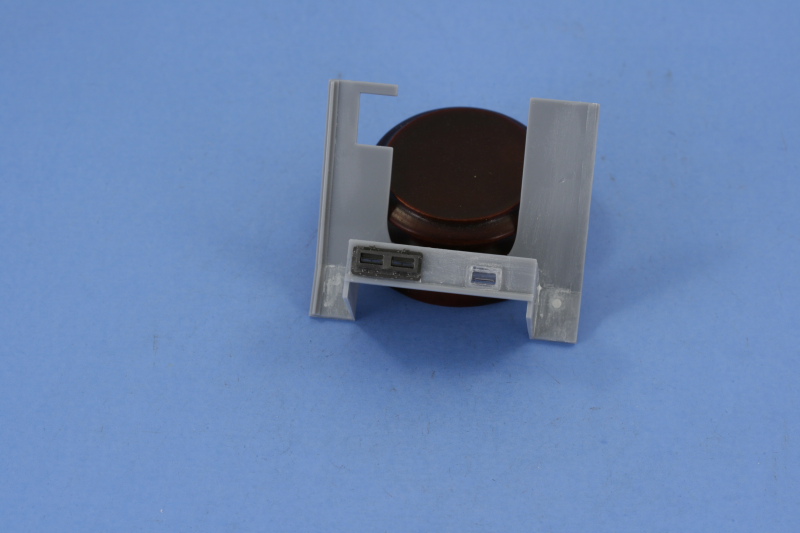


About the Author


FROM: TEXAS, UNITED STATES
Like many, I started out in the hobby as a kid building airplanes to hang from my bedroom cieling. I took a long break from the hobby, returning in 2001 with an interest in armor inspired mostly by online gaming. WW2 armor, 1/35 scale, is my preferred genre with a special taste for the stranger vehi...
Comments


Great job!
I would like to get some subjects by Alan - above all the Pz.II J - but the price is around 40!!!
MAY 04, 2008 - 05:47 AM

Thanks DJ, the radio was a fun item to work on even though you'll need a dental mirror to see it on the finished vehicle, it's there!
Gary, given the fact that DML and Trumpeter have been on an artillery kick lately and the fact that CH has the munitionspanzer version of the Grille out...it may only be a matter of time before a Bison I appears, especially since I spent the time to bash this one together. Same thing happened when I did the Alan Flakpanzer 38(t), so Murphy's Modeling Law could strike again! The Osprey book is a neat one, while its chapter on the Bison I deals with scratch-building one using the Italeri Pzjgr I chassis as the foundation, I had previously kitbashed a Pzjgr I using the Italeri with the DML, so I figured why not try with the Bison? Very useful guide.
Darren,
The Bison I doesn't get a lot of attention due to many factors...not may produced, only used for a relatively short space of time, and ultimately not too successful a concept even though it pushed development for other later vehicles like the Grille. I had a lot of fun learning about and researching the vehicle and was surprised to learn that some were still in service at Kursk in 1943! It's the original "frankenpanzer" though and for that reason has always appealed to me.
James,
40 Euro for an Alan kit! That's pretty steep, IIRC I picked up the Bison I for around $20 USD a couple of years back via Great Models but the kit may be harder to find these days and could explain the price.
MAY 04, 2008 - 05:58 AM
Excellent kitbashing, Bill. You invested a lot of money and time into this Bison and it clearly shows.
Thanks for sharing
MAY 04, 2008 - 01:39 PM
Thanks Jesper, I had accumulated the different items for this project over a long period of time, 2 years or more, so it didn't hurt the wallet too much at any one point. GM sales are wonderful things if you're patient. Appreciate the comments.
MAY 05, 2008 - 02:21 AM

Turned out looking great Bill.
A rather strange looking thing though, appears to be extremely top heavy, and esay to tip over on uneven ground.
MAY 05, 2008 - 12:35 PM
Thanks Dave. The design severely overstressed the chassis...there are pictures in France showing them being transported on trailers to avoid/reduce chances of mechanical breakdowns on road marches!
MAY 05, 2008 - 03:00 PM

Bill , you've done another great one Your extremely talented and I look forward to more of your work Thanks, Bob
MAY 10, 2008 - 10:38 AM

Hello Bill. Im sorry to say Ive missed most of this build, and also the article until now. But what a joy to read it from start to finish as one installment. Love what you´ve done, and its inspiring models like this, when I wish I had more time to attempt similar. For some reason Im being drawn more and more to early way German, and this has to be one of the coolest! Excellent build, and also a very, very useful feature. have the osprey book as well, and between both of these articles, I´m really hoping Dragon or Tristar release this in the near future ... else I´ll be collecting parts!!! Nice one.
MAY 30, 2008 - 10:53 PM
Copyright ©2021 by Bill Plunk. Images and/or videos also by copyright holder unless otherwise noted. The views and opinions expressed herein are solely the views and opinions of the authors and/or contributors to this Web site and do not necessarily represent the views and/or opinions of Armorama, KitMaker Network, or Silver Star Enterrpises. All rights reserved. Originally published on: 2008-05-04 00:00:00. Unique Reads: 23069

WEB HOSTING BY


Copyright ©2021 Armorama and Kitmaker Network, a subsidiary of Silver Star Enterprises
All Rights Reserved. Please read our Conditions of Use and Privacy Policy.
All Rights Reserved. Please read our Conditions of Use and Privacy Policy.