

1⁄35How to Create Accurate Weld Effects
The Tools to Be Used
 |
 |
So how can we replicate such effects? We need a set of tools. In our case our welding torch will be a set of hand made brass formers, our weld beads will be milliput and our section to be joined will be the plastic, brass sections etc of our kits.
In order to make a tool that can simulate the look of a weld bead we have to
identify exactly what such beads look like. If we look at the diagram to the
right we can see how a weld is formed. It should have the look of a number of
evenly spaced ridges that have a half moon shape and that run a distance with
constant width.
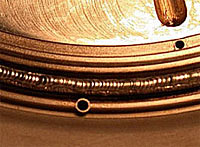
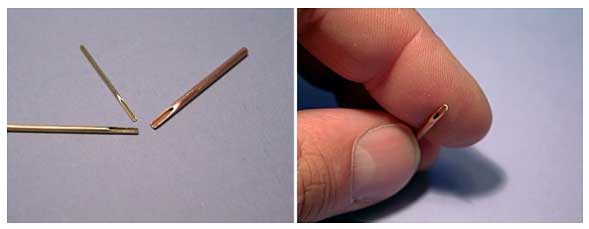
A finished and very neat weld seam can be seen in the photo to the right. This
is the purest form of welding we would like to achieve but as we will see this
type of effect is far from what is often seen on fighting vehicles. The kind of
results we will replicate will be rough and ready but in keeping with the
vehicles of the time.
The tools to be used to create such effect should therefore be capable of
creating a half moon shape when applied to our welding material. To create such
tools we need to use a number of brass tubular sections, in our case K&S brass
tube was used in a number of small diameters. It is best to make a number of
such tools from as many varied diameters of tubing that can be obtained in order
to make welds of different widths.
Making the Tool
To create the tool we need to perform the following steps.
|
Stage 1: |
 |
 |
|
|
Stage 2: |
 |
 |
|
|
Stage 3: |
 |
With the final resulting tools being developed as below.
For the weld seam itself I always use superfine white milliput. I have tried
other materials, most recently Revell Plasto putty, but in most cases I have
found the cohesive consistency of such materials in small quantities to be very
poor. When using Milliput you can roll this material to very thin diameters
provided you keep the material wet. I mix my Milliput and roll it on a wooden
table top in a pool of water and with a bit of care and attention can roll out
>1mm diameter lengths of putty. I have found once you have created a desired
putty diameter you have a relatively short working time as in such small
quantities the Milliput tends to dry out quite quickly.
Once you have your Milliput welds lengths it is a simple matter to drape them
around/on the unit to be welded. Make sure when you do this you keep you
applicator (fingers?) wet as in such small quantities the Milliput has a
fantastic ability to stick to anything other than what you want it too!
|
|
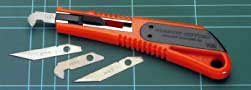
For the sections to be welded a certain amount of preparation is also necessary. When making a fillet weld there should really be no modifications made to the sections as the putty can be applied directly at the desired location. If a butt weld is to be made it is best to score the surface as per the weld example pictures so that the weld can be built up properly and does not stand too proud of the sectional surfaces when finished. A good tool for creating such scribed lines is a panel scriber of the type seen here. This tool has a reverse cut blade that creates cut lines that leaves no burs in a plastic surface. I understand that aircraft modellers also use this type of tool frequently for re-scribing panel lines on aircraft. By creating a groove into which the putty can be set you are guaranteed to keep the putty in place while making your weld seam.
About the Author


Comments


All Rights Reserved. Please read our Conditions of Use and Privacy Policy.