

1⁄35hold on...hold on...
26
Comments
"The Base"
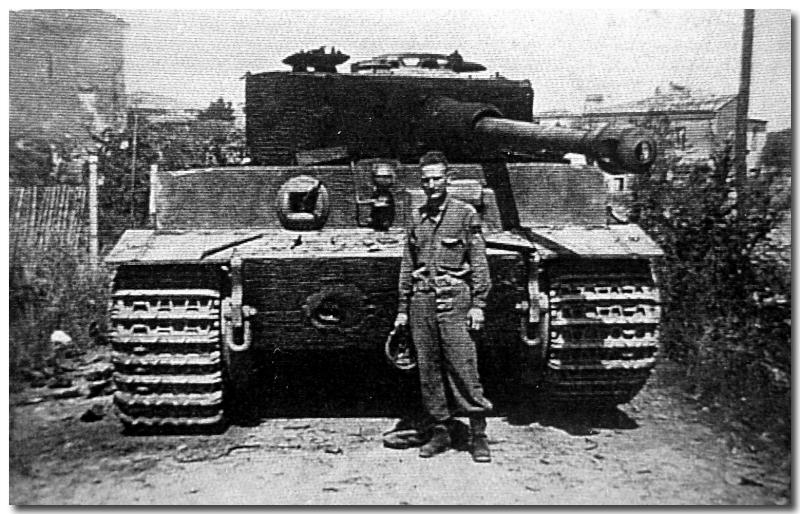
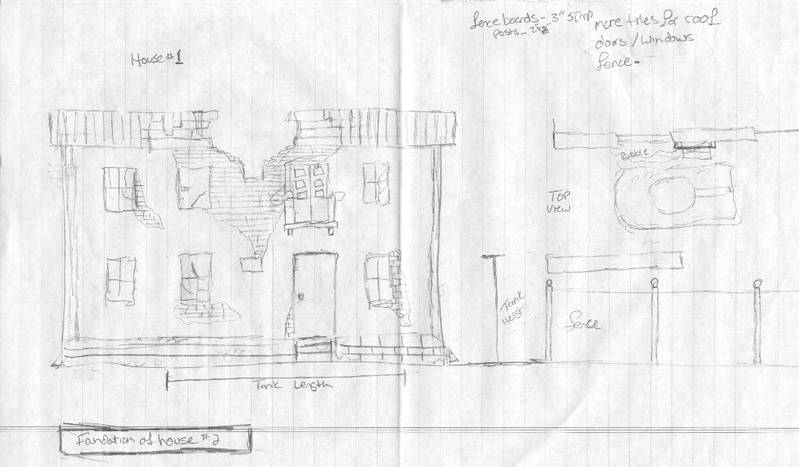
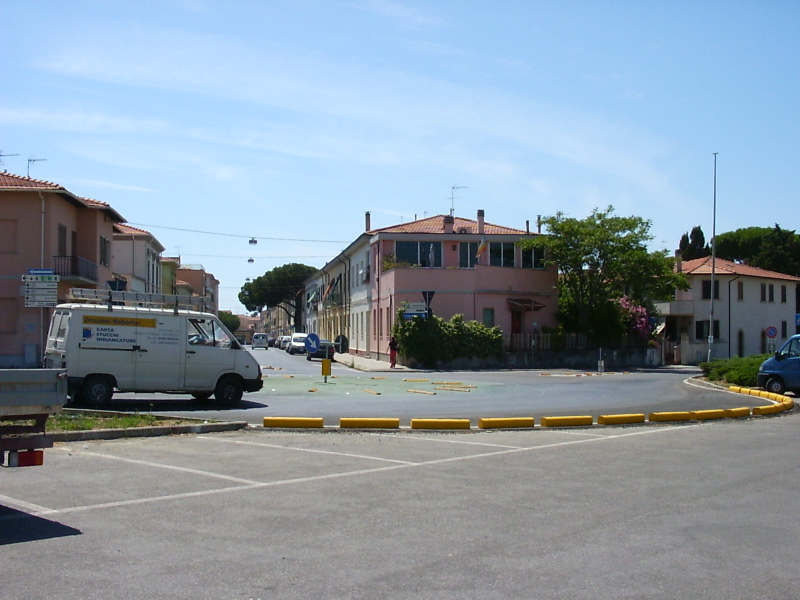
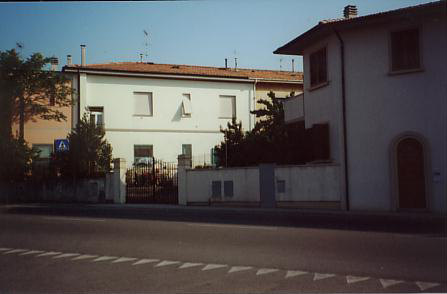
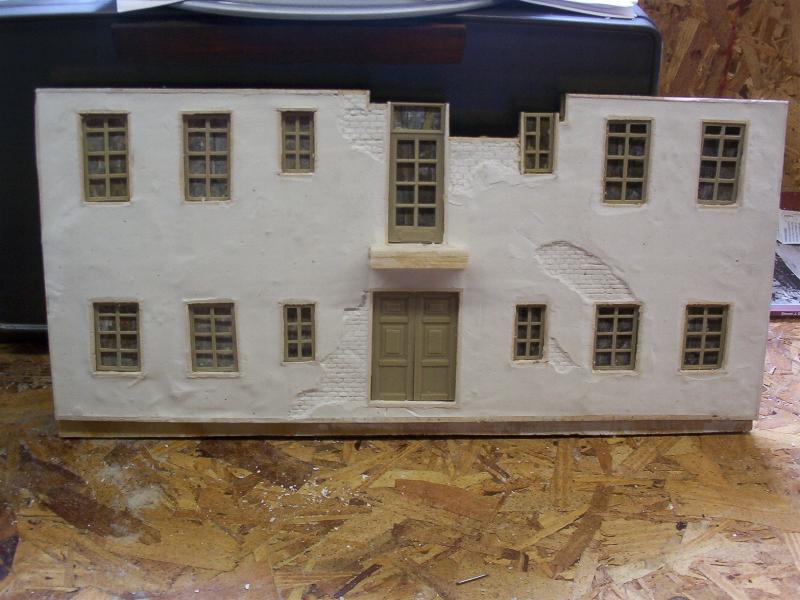
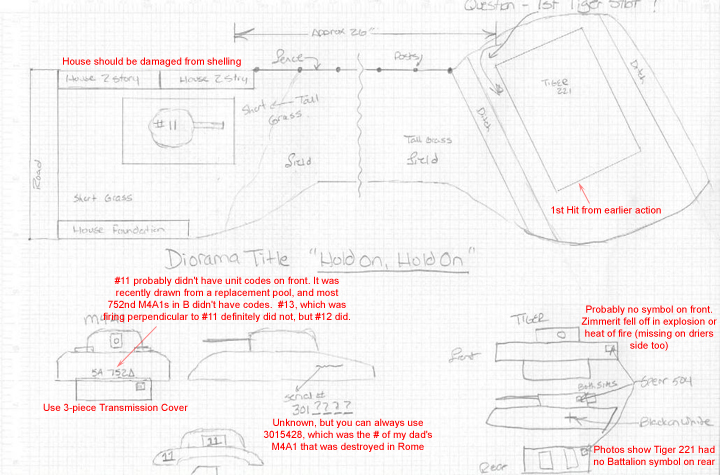
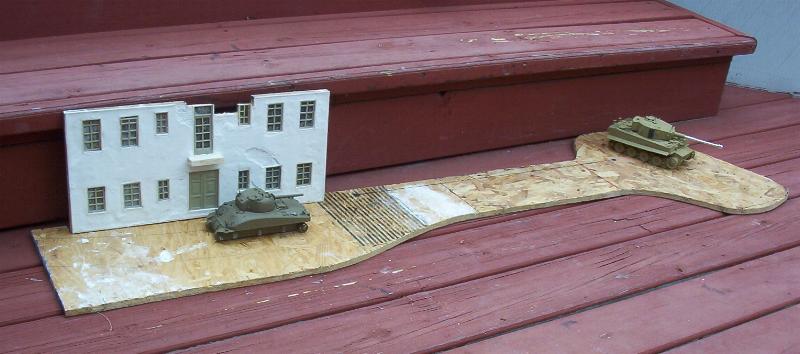
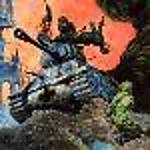
As the story goes M4A1 #11 of A Company of the 752nd Tank Battalion was parked up tight against an Italian 2-story home, nose pointed away from the Tiger 221 of the 2nd Platoon of the 2nd Company of the 504th Heavy Panzer Battalion and turret swung around towards the Tiger for the final shot. To construct the entire block where the action took place was out of the question. I had to show both tanks so for #11 it was a given that I had to also construct the house and for #221 it was the street. I considered 2 separate dioramas showing each. Not practical. So when I found out that the fatal shot was stepped off at 30 paces a simple conversion to 1/35 scale was called for. 30 paces, or 30 yards, to 90 feet, to 1080 inches, to 1/35 scale of 31 inches approximately. That was from the barrel of #11 to the right rear of #221. So plus the width of the Tiger plus the road ditch and the length of #11 plus half the house I finally gave up trying to figure anything out and decided to make it road to road with 31 inches separating both tanks and adding on to either end that what would help to tell the story. From information supplied by Mr. Holt I decided on making just the front wall of the house #11 was parked up against, the back yard of the home where #11 had to cross to get to its position and the street #221 had to follow to its fate. It was a flat area consisting of 2 hard packed gravel roads, wild unkempt grassy area and a yard area between 2 homes. Photo 1 This map depicts the exact layout of the area and defines certain aspects for details. Photo 3 This photo of the destroyed Tiger shows the road area, the yard #11 has to cross, and the fence running down the length of the yard. The base of the diorama is particle board, nice and sturdy and has numerous crevices for a nice tight hold for anything being glued to it. Note; I constructed the vehicles first which helped in my measurements of the layout of the base. It is important not only to get the sizes as close as possible but also just to make sure the layout will properly portray what you want to show. I wait until the end to weather all items together so I can keep them looking as if they belong together. Of course this puts your models in harms way because of all the handling. I want to first construct the main wall of the house. I was treating this as another model in the respect that the main wall was not going to change no matter what, same as #11 and #221, all 3 were going to be placed on the base. Photo 4, 4a and 4b These photos show the planning stage of the house. My ideas were determined by period photos and current photos of homes in Cecina Italy. Which also goes to prove you can plan a campaign out to the closest details and once the plan is put into action nothing goes as planned. I decided when building that it wasn't wide enough and added another row of windows to the house. The wall was constructed with another piece of particle board, measured out to the approximate size of my drawing. Utilizing windows and doors from the 3 different kits, I laid them out and framed the entire pattern out in balsa wood, door and window frames, this way when finished I just had to insert the windows and doors into their proper locations. Using plaster I made up a really runny batch and poured it around the windows and doors to make up the wall, which is to represent a brick wall covered in plaster. After drying for about about 2 hours it is easy to scribe out the damaged sections and scrape in the bricks using a ruler and pointed scribe. The open area in the middle of the wall is where there is bomb damage and I wanted to build this area up using bricks. Photo 5 This photo shows this step in the construction. My first step on the base was again to do a little preplanning and draw out what I wanted to accomplish. Mr. Holt also explained special items when I showed my ideas to him. Photo 6 I knew exactly what both ends would be like but I was unsure on how I was going to complete the middle. I made this easier by just cutting up the base in 3 sections, #11 with the house and yard, #221 sitting on the road section and in the middle the distance between the main sections. I could always adjust the length of the middle section accordingly to achieve my 30 paces. Photo 7 This photo shows the layout of the entire diorama.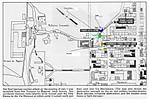 1
1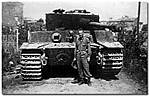 3
3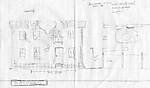 4
4 4a
4a 4b
4b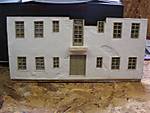 5
5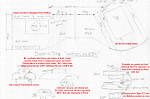 6
6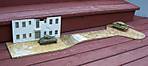 7
7

About the Author


Comments

hi bob, wow...very nice. i like the historical facts and details of your work. and the photography is perfect..the eye level shot and the sight waiting to fire on the tiger is beautifully done. seconds on making a history. thanks for sharing. ed
thanks henk for the thread. ed
DEC 25, 2008 - 12:59 PM


A bit late catching this feature, but it is very well done. It catches all the details of the story very well, while the layout focuses on the action. Nicely done.
JAN 04, 2009 - 03:00 PM
I read over the write up and looked over the photos of the build and WWII after the action. Let me add my compliments on a job well done and great write up.
As mentioned in the write up, the Tiger's main gun was in full recoil.out of battery. If one did look at the photo without researching the back ground, it does look as the crew destroyed the tank, not knock out from combat. In the book Tigers in Combat I, it did mentioned the loss of Tiger 211 in combat, but no details.
So how did the main gun get into its after action 'out of battery?' Were there any ammunition 'cook offs' after the Tiger was on fire? One possiblity is the recoil fluid leaked out from the hits and then the round in the main gun breach went off from the fire and the main gun went into full recoil.
An idea for a follow on diorama is to have the knock out Tiger with the Sherman crew member in front of it getting his photo taken, as in the picture.
JAN 08, 2009 - 03:25 AM
First thanks Alan, Kent and Duane for the comments.
Duane, The ammo did cook off, In one of the photos of 221 you can see a 2inch gap on the deck plate where it seperated. The idea of making an after Tiger is a good one because of the excellent photos. Just way to much to do with so little time.
Thanks again everyone for taking the time to comment,
Bob
JAN 08, 2009 - 09:24 AM

Copyright ©2021 by Robert Card. Images and/or videos also by copyright holder unless otherwise noted. The views and opinions expressed herein are solely the views and opinions of the authors and/or contributors to this Web site and do not necessarily represent the views and/or opinions of Armorama, KitMaker Network, or Silver Star Enterrpises. All rights reserved. Originally published on: 2008-12-24 00:00:00. Unique Reads: 23812

WEB HOSTING BY


Copyright ©2021 Armorama and Kitmaker Network, a subsidiary of Silver Star Enterprises
All Rights Reserved. Please read our Conditions of Use and Privacy Policy.
All Rights Reserved. Please read our Conditions of Use and Privacy Policy.