

1⁄35Building the Italeri 232 6-Rad
9
Comments
Stages 10 & 11
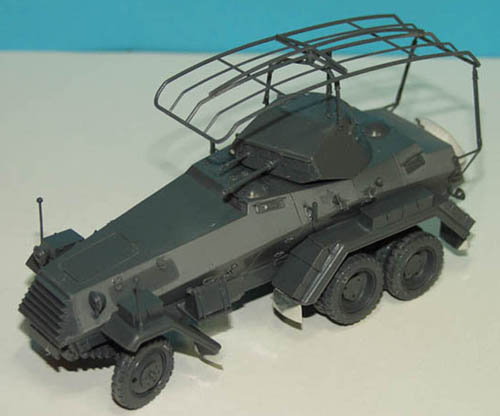
The final two stages are assembly of the turret and frame aerial. The same problem as earlier had to be dealt with, that is, poorly fitting hatches. Once I had these fitted to my satisfaction, the rest of the turret was fairly quickly assembled. I drilled the MG out. The 20cm Kwk cannon had a small hollowed out extension for the end, it actually looked quite good, but would benefit from one of the many metal replacement barrels on the market. The inside of the hatches, should you wish to leave them open, do include handles, but overall they are very simplified. Since no interior is included I decided to built mine all closed up. The MG does include the rest of the gun inside the turret though, as does the 20cm Kwk, but if youre closing yours up you can leave these off.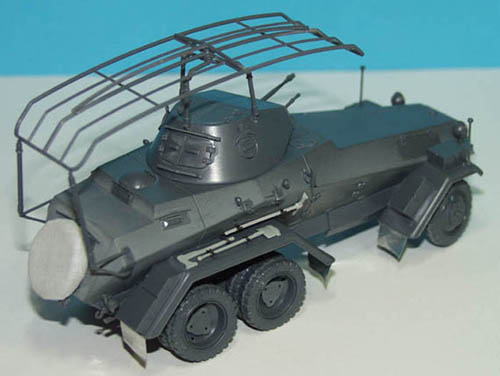
About the Author


Comments


I agree, nice little build and article. Thanks for sharing Vinnie!
NOV 02, 2005 - 04:54 PM

Nice build Vinnie
As with Jim's AB41 build review , it seem italeri are really coming on strong.
And thankyou for explaining the oil paint spotting filter method , Ive heard of this before but was never sure exactly how to do it , now i cant wait to try it (on an old kit first though :-) )
Ian
NOV 02, 2005 - 05:40 PM

nice work there. it made very interesting reading.. I have this kit along with several other early german thingies that should be gray.. I may try your filter technique on one of them it looks interesting...
NOV 03, 2005 - 02:00 AM

Very nice article Vinnie, thanks for sharing. I have the same kit in the stock and your article will be very helpful.
NOV 03, 2005 - 08:33 PM

Great article Vinnie. Loads of good tips and things to be aware of in advance, and is exactly what is needed for anybody wishing to build this. If a good article means you are inspired enough to want to build the vehicle afterwards, then you succeded! Nice one.
NOV 03, 2005 - 11:18 PM
Great article Vinnie. Very nice build, very nice indeed.
Applying filters, using small dots of oil's, I definitely have to try.
NOV 03, 2005 - 11:23 PM

Excellent article Vinnie (and excellent 6 Rad too)
Skipper
EDIT: still on the filter technique:
You can also "cheat" on this using the base colour of the inicial spots according to the type of colour break that you need; meaning if you pretendo to have the top surfaces more "sun burned" white and yellow dots should be more - for areas where there's more darkened colours, reds and burned sienna outnumber the other colours.
This is great to break the monocromatic colours of some craft, vehicles whatever you are working on!
I don't want to change focus on Vinnie's 6 Rad but here are some examples:
NOV 04, 2005 - 12:01 AM

Nice article Vinnie, Ive been looking at this kit for a while i love those six and eight rads, also thanks for explaining the filter tech, now i understand how its done.
NOV 11, 2005 - 09:17 AM
Copyright ©2021 by Vinnie Branigan. Images and/or videos also by copyright holder unless otherwise noted. The views and opinions expressed herein are solely the views and opinions of the authors and/or contributors to this Web site and do not necessarily represent the views and/or opinions of Armorama, KitMaker Network, or Silver Star Enterrpises. All rights reserved. Originally published on: 2005-11-03 00:00:00. Unique Reads: 18131

WEB HOSTING BY


Copyright ©2021 Armorama and Kitmaker Network, a subsidiary of Silver Star Enterprises
All Rights Reserved. Please read our Conditions of Use and Privacy Policy.
All Rights Reserved. Please read our Conditions of Use and Privacy Policy.