

1⁄35Panzer IV D
11
Comments
painting, decals & weathering
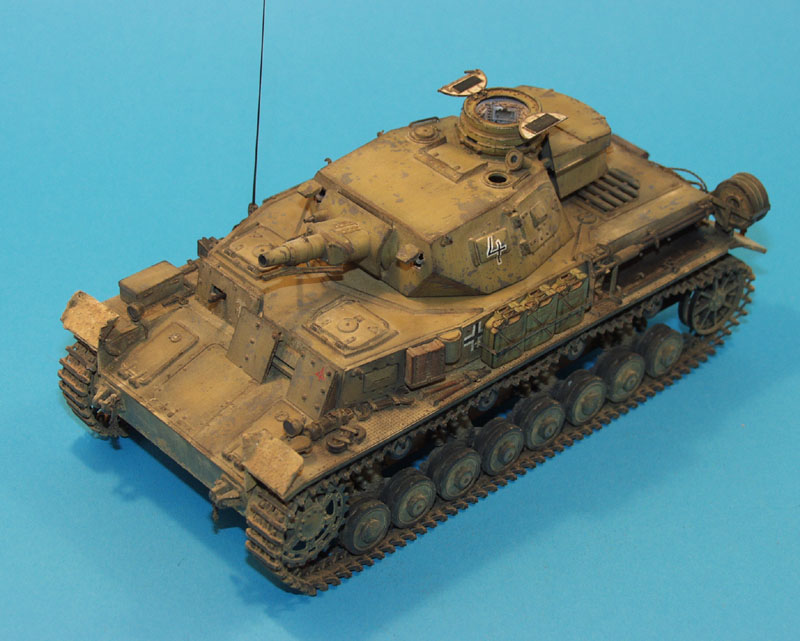
There are four marking options for the tropical version offered by the kit. I chose the last one offered, 4 Kompanie, Panzer Regiment 8, 15th Panzer Division in Libya during 1941. This tank would have been supplied in a dark grey basecoat, which on arrival in Africa would have been repainted a sand colour. Firstly I applied a dark grey basecoat, and then successively lighter tones of grey. When this had had time to dry, I again applied masking fluid with a small piece of scotchbrite, trying to apply it more heavily in areas of high wear such as the glacis plate where the crew would have dismounted, etc. When this has been given a short while to dry, I misted a very light coat of sand over the entire vehicle, before applying a heavier coat around detail, and in the centre of panels etc. After a short while it was time to remove the masking fluid. I had previously dipped several cotton buds in the masking fluid and allowed them to dry. Now they could be used to rub over the surface of the vehicle, and the masking fluid easily comes away. You should still take care using this method as small details can become dislodged, but its a lot quicker, and less tedious than picking off with a pair of tweezers! Next, the detail colours were applied, such as the tyres of the road wheels, in very dark grey, the rear reflectors and convoy light, the machine gun, and all the tools, again in dark grey. The wooden tool handles were hand-painted in a flesh tone, and later some raw burnt umber oil paint would be dragged along their length, and the engine and traverse motor exhaust were painted in a custom reddish-brown mix. When all the detail had been given time to dry, the entire vehicle was given a coat of gloss acrylic in preparation for the decals. For these I dabbed some Micro Sol on each of them after applying. The wooden tool handles were then treated to the burnt umber oil paint. It was now time to apply a pin wash. For this I use an O brush, and a strong solution of burnt umber oil in white spirit. This does not attack the acrylic gloss coat, and also doesnt spread by capillary action the way it tends to on a matt surface. I always keep a small dish of clean white spirit by the side, and a clean brush, just to remove the wash in areas where Ive applied a little too much. It was applied around all detail, and brushed over the pattern on the side fenders. After allowing the wash to dry for about 30 minutes, I then used a matt black enamel to dry brush the vehicle, again paying particular attention to areas of high wear. The application of a dry brush using an enamel meant leaving the vehicle to dry overnight before scrubbing the entire vehicle with a sand-coloured pigment powder. This leaves deposits around the smaller details and acts as a filter during the next step. I then prepared a small container of clean white spirit, and using a clean flat brush, dampened only with the white spirit, I brushed the vehicle, starting at the top and working my way downwards. The tracks were treated to a similar treatment as that outlined above, but using a slightly redder pigment powder. In addition they then had some graphite powder applied with the tip of a finger to the edges of the tracks to mimic bare metal caused by ground contact. The final step was to mix up a paste of the sand coloured pigment using white spirit and apply it to the surface of the upturned front mudguards and bottom of the hull. When dry it can be lightly brushed off to achieve the effect you desire. There you have it! My Panzer IV Ausf.D, finished. References: Panzer IV, the PanzerKampfwagen IV Medium Tank 1939-1945 by Kevin Hjermstad, Squadron/Signal publications, 2000. My thanks to Dragon for the review sample.


About the Author


Comments

Excellent Vinnie. This will be handy when building the kit. The finish and weathering look great. Another nice model for your collection.
What chain did you use, (Links per inch) and where did you get it? I agree that etched chain does not look the part .. I´d rather go with some slightly out of scale chain instead!
APR 29, 2006 - 05:08 AM

Amazing work as allways Vinnie
Thanks for the tips and hints , it will be great help as im building a DML Panzer IV as we speak
Ian
APR 29, 2006 - 05:09 PM

Thanks for the Review. Looks great & you make it seem so easy. So, Like I could do it in a weekend right? :-) :-) :-)
APR 29, 2006 - 06:48 PM

Brilliant Vinnie,
another first class build,the weathering is top notch.
I think the D.A.K tanks with the yellow over grey are one of the most difficult to get right,and you got it spot on
Is this going in a dio? with a zundapp :-) :-) ???
Must do one of these IV's soon, what one?,B,C,D, Vorpanzer...aaahhhh can't choose :-) :-) but when I do I will follow your review
Cheers mate
Andy
APR 30, 2006 - 12:07 AM

LOved the article Vinnie!! Especially since I am in the throes of building the Tristar version. So many parts, so many opportunities to goof. Glad to see I'm not the only one having a few difficulties. What I found amazing is that areas I have struggled with are the same ones you had problems with even though they are different brands....hhmmmm. My biggest complaint on the Tristar is that in several areas it is not clear how parts are suppossed to go togehr and that has caused me the most problems. LIke that chain, I use the stuff for anchor chain on my 350 scale ships, I'll have to see if what I have can be used to substitute or go fid some finer chain soeplace
APR 30, 2006 - 12:49 AM

Vinnie i can say only one thing, "damn good job " sir.
And also a perfect review.
043
APR 30, 2006 - 12:57 AM
Steve, I get some strange looks when going in cheap girly accessory shops looking for earings with very fine chain,and tell the nosey assistants "They not for me,they for my model tank!!" :-) :-) :-)
APR 30, 2006 - 01:35 AM

[quote]Here''s a full build of the DML Panzer IV Ausf.D, finished in tropical scheme!
Vinnie
Please forgive my lack of knowledge....
But which modification , would be needed , in order to represent the " Up - gunned " Panzer IV Ausf.D , as shown at the Bovington museum ?
Cheers...
Mike
APR 30, 2006 - 09:05 PM

Hi Vinnie, great job as usual
If I can say something... I don't like the desert yellow tone. In my opinion it should be pale and lighter cause the sun, and the wear and tear of dust and sand....
But it's only my personal opinion!!!
ciao
tom
MAY 04, 2006 - 01:02 PM

Vinnie
Another superb project. Got some really good tips from the article as well. I don't know where you get the time to do the project AND the article!!
MAY 12, 2006 - 12:46 AM
Copyright ©2021 by Vinnie Branigan. Images and/or videos also by copyright holder unless otherwise noted. The views and opinions expressed herein are solely the views and opinions of the authors and/or contributors to this Web site and do not necessarily represent the views and/or opinions of Armorama, KitMaker Network, or Silver Star Enterrpises. All rights reserved. Originally published on: 2006-04-29 00:00:00. Unique Reads: 24081

WEB HOSTING BY


Copyright ©2021 Armorama and Kitmaker Network, a subsidiary of Silver Star Enterprises
All Rights Reserved. Please read our Conditions of Use and Privacy Policy.
All Rights Reserved. Please read our Conditions of Use and Privacy Policy.