135
Making Trees with Wire

My wife's grandma is 94. When she was only a few years younger, her eyesight was better and here hands more steady. She used to pass some of her spare time making miniature trees with copper wire and beads. The exact same method works excellently to make trees for dioramas. Here's how you can make diorama trees that are larger than the mini-trees you'll find in a hobby store. They look very convincing. It may look hard at first, but it's really easy.

The whole method consists of making a metal wire skeleton, that can be covered by different methods of your choice to simulate the bark.

You need nine or twelve strands of wire. The length of each strand is easy to calculate : first you decide how high the tree needs to be, then you multiply its heighth with 2,5. (two point five). For example : a tree of 30 cm needs strands of wire of 30 x 2,5 = 75 cm. I use the kind of wire that you'll find in a DIY store or garden center, with a thickness of about 0,5 mm.

Part One : Making the Roots

You cut nine or twelve strands to equal size, and hold them together. You bend the whole bunch in the middle.


Next, you place 3 or 4 fingers (depending on tree size) on the middle section to form a loop around your fingers.


Next, you twist the strands a few times to make this a firm loop.


The loop that you now created, will become the base of the tree's root system. Divide the loop into bunches of one, two, three or four wires each, thus creating separate loops.


Now start twisting each of these loops to form the root system. These roots are placed horizontally: they become the basis of your tree. This basis will be buried in the base of your diorama, or you can even make part of those tree roots visible on top of the grass or soil the tree "grows" in.


Start twisting each of the individual loops a few times, then split them in two or three again and continue twisting till you get a root-like system.
 

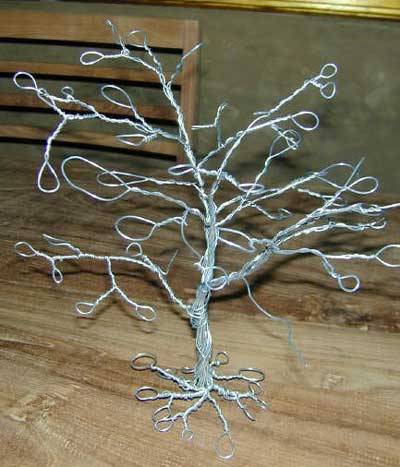
Now the root system starts taking shape. First you spread the roots horizontally in a way that you like, and that seems natural. The roots in this picture show you the result we have reached thus far (branches come in the next chapter).

Next, you take a pair of pliers and snap the individual little loops in half. Thus, the roots don't end in an individual little loop (one strand thick), but in two loose pieces. Don't cut right in the middle (at six O'clock), but somewhere between three and five o'clock, so you end up with two pieces of different length. This is illustrated further down when we discuss the tree's branches. Straighten the pieces out so they look like real pieces of twisted root.

About the Author

About Jan (GeneralFailure)
FROM: EUROPEAN UNION

I live in Belgium, Europe. Though modeling was big on my list of hobbies, I spent all my time refurbishing the home we bought a few years ago. I promised I'd be back some day. That day can't be far off, now.


Comments

Is Jan still a member here? I can't access his profile to see an email or send him a private message. Thanks Pat
MAR 19, 2009 - 09:46 AM
Belg1960 Short answer (from memory) is that Jan left a few years ago and used to drop in occasionally. I have used his technique and I think it makes fantastic trees - I used magic sculpt instead of grout - which made the tree more expensive but then my excuse is that I was getting a feel for the putty. I think there is a photo somewhere in my gallery. From memory I used copper telephone wire and the height of the tree is effected by how many twists and how "tight" they are, as well as the size of the initial loops. What you may be able to do with the one that you have started is to twist in some additional strands of wire - just overlap and twist for a couple of inches so it has some strength when covered with the trunk material. I did something similar to that when I came up short on a couple of branches. Brian
MAR 20, 2009 - 02:32 AM
Yep, the pics are gone, but step by step is very useful, I'll have to try this method. Thanks for sharing it. milvehfan
MAR 20, 2009 - 02:53 AM
There is a link at the top of the page to the whole how to with pictures of this thread. Pat
MAR 20, 2009 - 06:37 AM
Hi Jan, I must be the only unlucky person on this site, all I see are 2 boxes (1 inside the the other) with a red cross inside, no pix whatsoever, could you please, or someone help as this this tree making seems so good, but I'd like to view it. Thank you.
MAR 20, 2009 - 11:32 AM
Alec and anyone else here is the link to the article with pictures, LINK Pat
MAR 20, 2009 - 11:18 PM
On YouTube there's this kind of spacey guy who makes absolutely great diorama objects and has very good videos showing how he does it. He has a 7 or more part tree making video and he goes through several types of scratch builds based on dowels and twisted wire as well as from other materials. He shows how to build evergreens, palm trees, bushes, shrubs and more. He has dozens of videos on every conceivable thing you could ever want in a diorama or vignette. I believe he may be more into sword and sorcery fantasy type stuff, but everything he does is capable of military diorama use. I think he's really worth checking out. He goes by the name of the Kamloopian and I posted about him in another thread. I really think he's worth mentioning again. Here's a link to one of his tree making videos: http://www.youtube.com/watch?v=V8U177-hOrM&feature=channel
MAR 21, 2009 - 06:16 AM
Belg 1960 thank you for that.
MAR 21, 2009 - 07:07 PM
Oh yes, I'm still very much alive and kicking. 4 years ago I shelved my modeling gear to thoroughly renovate the large house we hought, an old nunnery. Only two more rooms to go and all is done. I already refurbished a large attic room into a modelers's paradise / computer game room. More details to make you all drool about that later I hope to finish all work by x-mas and start modeling again about that time. The good news: you can all perfectly master without me. I see great things on this website. Look forward to joining again Uncle Jan
JUN 09, 2009 - 09:33 AM
Welcome back, Jan!
JUN 09, 2009 - 11:00 AM