California, United States
Joined: September 15, 2007
KitMaker: 59 posts
Armorama: 56 posts
Posted: Monday, July 28, 2008 - 07:12 AM UTC
This is my first build blog. It will be a scratch built Opel Blitz workshop based on various designs I have seen (pictures and other models). It was started last Sept 2007 and has made it back to my bench after a 6mo breather. It will be painted in DAK colors (early war). Eventualy it will make it into a diorama I have planned.
I have yet to take newer pictures (these are from a while ago) but will update later tonight,
All comments and hints welcome!


Enjoy!
Massachusetts, United States
Joined: April 11, 2008
KitMaker: 52 posts
Armorama: 44 posts
Posted: Monday, July 28, 2008 - 08:05 AM UTC
Great job so far, love the look of real wood. I have one ondeck for a next project with the new Tamiya Blitz and Verlinden workshop conv kit, but after seeing yours I may try your real wood techniqe to overcome some knockout marks. Look forward to more pics of your build.

Oost-Vlaanderen, Belgium
Joined: May 14, 2006
KitMaker: 3,829 posts
Armorama: 881 posts
Posted: Monday, July 28, 2008 - 08:17 AM UTC
cool, I also rebuild a "loadplatform" for an blitz,


I like what you have done here, it fits very well together, and nice bolt details

as a "wanne be scratchbuilder", I must say, BIG THUMBS UP!
greetz Tha Pit
Rest in peace my dearest of friends, Mike I 'll miss ya a lot
fastest way to get killed,
messing with the man with a gun.
modelling is life, anything before or after is waiting...
California, United States
Joined: September 15, 2007
KitMaker: 59 posts
Armorama: 56 posts
Posted: Monday, July 28, 2008 - 06:51 PM UTC
Medicman: It wasn't that hard. Just time consuming. I got the Lion Roar PE for the opel which had the side struts for the side panels (see photo below) and instead of grinding off the ones on the plastic panel I decided to make them from scratch.
jointhepit: Nice version of the Opel. I like the open bed and that it isn't a war time model. I also have to admit I like Glock also.
Anyway here is the latest progress.
This shows the rear panel that when folded down has a step:
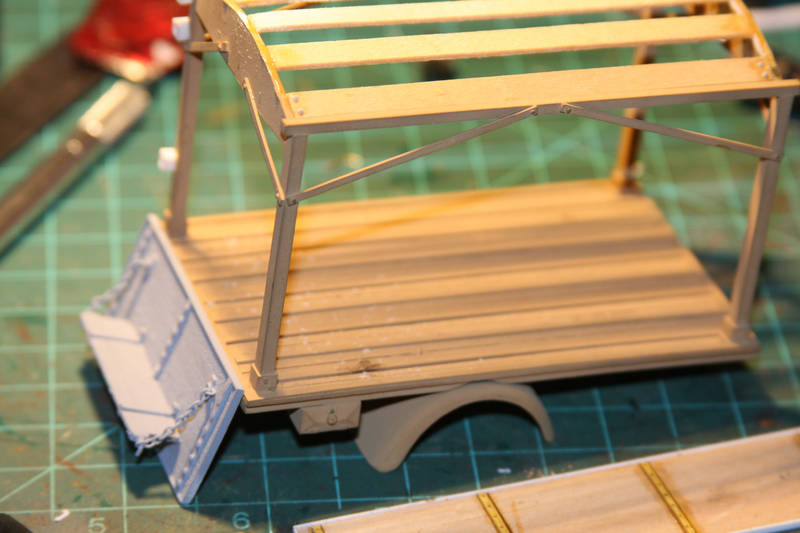
This shot shows I changed the top struts to a wider flat board and am detailing it with nuts and bolts:

These next two show some of the work on the workshop pieces. I have used both Verlinden Workshop tool set and the Italeri workshop tool set:
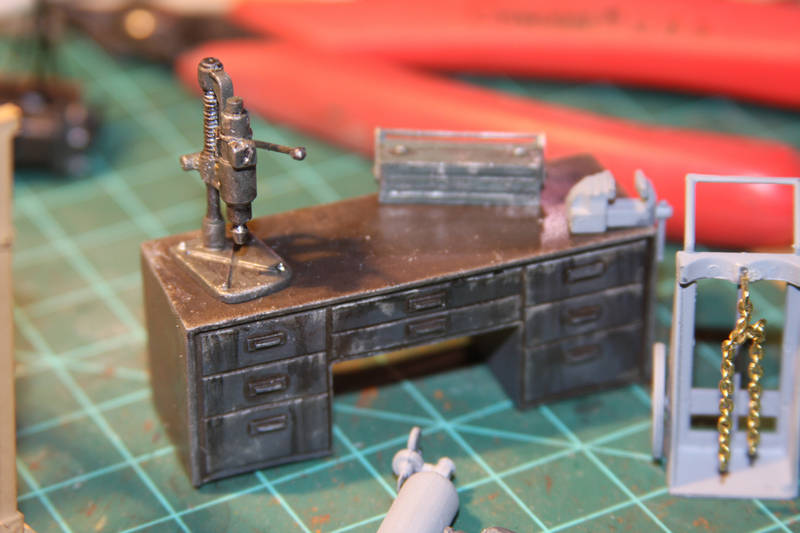

Enjoy.
Kevin

#041
Kobenhavn, Denmark
Joined: July 20, 2006
KitMaker: 10,069 posts
Armorama: 4,677 posts
Posted: Monday, July 28, 2008 - 10:48 PM UTC
Looks good, Kevin. I am looking forward to see more
Campaign'oholic - 252+ campaigns completed
California, United States
Joined: September 15, 2007
KitMaker: 59 posts
Armorama: 56 posts
Posted: Tuesday, July 29, 2008 - 07:36 PM UTC
Ok.. I got all of the top struts glued in place with bolts. There are still brackets underneath to finish.
Also close to finishing the swing out lift.


Enjoy.
Kevin
Connecticut, United States
Joined: December 15, 2006
KitMaker: 1,165 posts
Armorama: 1,105 posts
Posted: Wednesday, July 30, 2008 - 08:57 AM UTC
Looking great so far Kevin. that last photo though dosen't show up.
On da bench
Dragon Tiger I Early
Takom T-55A
Three Takom Mark IV's
California, United States
Joined: September 15, 2007
KitMaker: 59 posts
Armorama: 56 posts
Posted: Wednesday, July 30, 2008 - 09:02 AM UTC
jimz66: I will look into it. I started using an ftp account of mine after filling my kitmaker photo space. It may be also to large as I like to keep my photos big enough to see detail.
Thanks for the compliments everyone. It makes it easier to sit at the bench when you know someone wants to see the finished product.
Kevin
Georgia, United States
Joined: July 14, 2004
KitMaker: 79 posts
Armorama: 52 posts
Posted: Wednesday, July 30, 2008 - 09:33 AM UTC
Can't wait to see this one done!Very nice indeed!
Bob[ ]

California, United States
Joined: September 15, 2007
KitMaker: 59 posts
Armorama: 56 posts
Posted: Wednesday, July 30, 2008 - 05:17 PM UTC
Ok... Here is a quick update. A little more done on the rear lift.


Enjoy.
Kevin
Virginia, United States
Joined: June 20, 2007
KitMaker: 510 posts
Armorama: 469 posts
Posted: Wednesday, July 30, 2008 - 05:28 PM UTC
WOW...

Workbench:
251/1 Ausf.C. (AFV Club)
M16 Motor Gun Carriage (Tamiya)
M4A3 (76mm) (Dragon)
Firefly Ic Hybrid Hull (Orange Box)
California, United States
Joined: September 15, 2007
KitMaker: 59 posts
Armorama: 56 posts
Posted: Wednesday, July 30, 2008 - 06:35 PM UTC
Maryland, United States
Joined: May 04, 2007
KitMaker: 1,132 posts
Armorama: 1,123 posts
Posted: Thursday, July 31, 2008 - 01:47 AM UTC
Great work Kevin! Awesome job all around. Thanks for sharing your photos! Looking forward to seeing your continued progress.
Cheers -
Tim
Current projects:
AFV 8.8cm Flak 18 (35088) (paint stage)
Academy Warrior MCV (OIF) (final touches...then paint)
Next up:
Revell A-6E Intruder (?)
bill_c
 Campaigns Administrator
New Jersey, United States
Joined: January 09, 2008
KitMaker: 10,553 posts
Armorama: 8,109 posts
Posted: Thursday, July 31, 2008 - 04:55 AM UTC
You scratch builders make me tired - with admiration.
I just don't know where you get the patience to produce the tiny miracles you do.
Superb work here.
Connecticut, United States
Joined: December 15, 2006
KitMaker: 1,165 posts
Armorama: 1,105 posts
Posted: Thursday, July 31, 2008 - 07:46 AM UTC
There ya go! Now I can see it. Nice job so far keep us posted.
On da bench
Dragon Tiger I Early
Takom T-55A
Three Takom Mark IV's
California, United States
Joined: September 15, 2007
KitMaker: 59 posts
Armorama: 56 posts
Posted: Thursday, July 31, 2008 - 08:43 PM UTC
A mockup of more parts.


Enjoy.
Kevin
#041
Kobenhavn, Denmark
Joined: July 20, 2006
KitMaker: 10,069 posts
Armorama: 4,677 posts
Posted: Thursday, July 31, 2008 - 11:04 PM UTC
Looking good, Kevin. I think you will end up with a unique build with lots of detail.
Keep us updated
Campaign'oholic - 252+ campaigns completed
Texas, United States
Joined: February 22, 2008
KitMaker: 5,026 posts
Armorama: 1,604 posts
Posted: Friday, August 01, 2008 - 03:19 PM UTC
Kevin great work on the opel and shop acceries. Thanks for sharing and giving others the building process that you have done that will inspire us to better in our own build.
Cheers
ROBERT
If it aint broke dont fix it.
California, United States
Joined: September 15, 2007
KitMaker: 59 posts
Armorama: 56 posts
Posted: Tuesday, August 05, 2008 - 04:38 PM UTC
Here is the latest. I have completed most of the cab and engine compartment. Got the first coat of paint and am about ready to start chipping and weathering the cab. I have used the Lionroar PE set (my first attempt at a full set of PE) and it really makes a difference. I scratched the battery and shelf and most of the engine compartment.
Anyway.... enjoy.


Thanks for all the comments.
Kevin
#247
Nordjylland, Denmark
Joined: January 03, 2008
KitMaker: 1,102 posts
Armorama: 1,018 posts
Posted: Tuesday, August 05, 2008 - 07:43 PM UTC
Hi Kevin
Your Blitz is coming out beautifully. Are you concidering using some AM wheels? I mean, after all this great work you have put in it, why cut corners at this place. looking forward to se more pictures. Keep up the great work.
Best regards
Jacob

"I never apologize - Sorry, that's just the way I am" Homer Simpson
California, United States
Joined: September 15, 2007
KitMaker: 59 posts
Armorama: 56 posts
Posted: Thursday, August 07, 2008 - 06:28 AM UTC
Yes... wheels are on the list to order. I still have a ways to go on the bed and workshop equipment and the wheels are usualy last anyway. Its a shame to have to waste them. Maybe I will use them as rusted husks in a junk pile.
I will post some pics of the weathering process (still working on my techniques) I have done on the cab and frame.
Thanks again for the comments.
Kevin
Connecticut, United States
Joined: December 15, 2006
KitMaker: 1,165 posts
Armorama: 1,105 posts
Posted: Thursday, August 07, 2008 - 08:31 AM UTC
This build is really coming out nicely. Keep it coming. This one is fun to follow.
On da bench
Dragon Tiger I Early
Takom T-55A
Three Takom Mark IV's
California, United States
Joined: September 15, 2007
KitMaker: 59 posts
Armorama: 56 posts
Posted: Sunday, August 10, 2008 - 04:06 PM UTC
Here is a little update. I have finished the cab and frame weathering (still working out the kinks in chipping paint and wash/filters). Added some interior stuff (map, MP-40, canteen, helmet and mag pouch).
Enjoy...All comments welcome.


Kevin
Virginia, United States
Joined: February 05, 2002
KitMaker: 6,149 posts
Armorama: 4,573 posts
Posted: Monday, August 11, 2008 - 02:19 AM UTC
Kevin-- great work! Outstanding paint job and chipping.
DJ
DJ Judge
COL (R), USA
"Tanker Boots do not a Tanker Make."
Alberta, Canada
Joined: September 02, 2004
KitMaker: 705 posts
Armorama: 505 posts
Posted: Monday, August 11, 2008 - 07:19 AM UTC
Hi Kevin,
Love what you've done so far, the swing out lift is a real bonus. I like the rough saw marks on the woods, it adds realism.
May I suggest that you replace the stubby streering column with a proper full sized one ( if you are planning on showing with the hood up). Also you may consider leaving the six bolt wheels (although the military version on the blitz had 8 bolt wheels, there were plenty of 6 bolts wheel versions used), considering the "heavy used" look of your blitz it looks like its been around since the start of the war.
Keep the photos coming
Bruce

">


