the mixture I used:
vallejo paint white / light grey
Mig's acrylic resin
plaster
the visible red points were made with a scalpel (I scribed off some of the resin).
now it's a little bit too clean comparing to the other parts of the tanks so I'll have to find a way to dust it up a bit
what do you think?
spit
Hosted by Darren Baker
Hybrid pz VI ausf B "Kampfgruppe Berlin"
spitfire303
Vendee, France
Joined: December 22, 2006
KitMaker: 1,437 posts
Armorama: 1,406 posts
Joined: December 22, 2006
KitMaker: 1,437 posts
Armorama: 1,406 posts
Posted: Sunday, April 26, 2009 - 10:33 PM UTC
H_Ackermans
Gelderland, Netherlands
Joined: July 11, 2006
KitMaker: 2,229 posts
Armorama: 2,221 posts
Joined: July 11, 2006
KitMaker: 2,229 posts
Armorama: 2,221 posts
Posted: Monday, April 27, 2009 - 05:35 AM UTC
You're a bit in development hell, it looks.
Anyway, your original idea was outside the box, and whilst doing that you got pulled back into the box on a certain level, and that makes it very difficult to finish, since one of the two has to be chosen, you can't be AND accurate AND make a thing that never existed. That being said, where the rules of accuracy DO still apply, you should follow it.
My main gripe with "What if" ideas is that these often wonder of into the impossible. Fitting colossal guns in turrets that can never ever hold the gun trunnions or recuperators, and than STILL have optical gear next and over it. E-100 B
But I do wonder now, what is the tale of the Zimmerit? If only partially was removed? Surface wear?
spitfire303
Vendee, France
Joined: December 22, 2006
KitMaker: 1,437 posts
Armorama: 1,406 posts
Joined: December 22, 2006
KitMaker: 1,437 posts
Armorama: 1,406 posts
Posted: Monday, April 27, 2009 - 08:18 PM UTC
My god!! Herbert is back Everybody take cover and prepare to return fire !!!
from the first post:
oh just think about it as knocked out vehicle, with a lot of missing zimmerit. I know this scenario is highly impossible but let's keep it this way for this build
spit
Quoted Text
But I do wonder now, what is the tale of the Zimmerit?
from the first post:
Quoted Text
Just imagine: the last days of war and a need to put on the front anything that could move and fire. An old hull which was brought back from let's say Normandy (for example FKL 316) is re-equipped with one of few turrets ready in advance.
oh just think about it as knocked out vehicle, with a lot of missing zimmerit. I know this scenario is highly impossible but let's keep it this way for this build
spit
barkmann424
England - North West, United Kingdom
Joined: November 23, 2008
KitMaker: 357 posts
Armorama: 353 posts
Joined: November 23, 2008
KitMaker: 357 posts
Armorama: 353 posts
Posted: Monday, April 27, 2009 - 10:22 PM UTC
Hi Pawel! You could try dragging a Tamiya Zimmerit Comb Tool on the damaged areas, as when removed often the residual impression and or 'ghosting' occured on the primer, I think that this would be because of the surface hardening process with a blow torch, and the heat not evenly dispersing through the final patterns ridges.
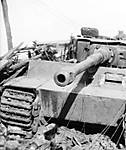
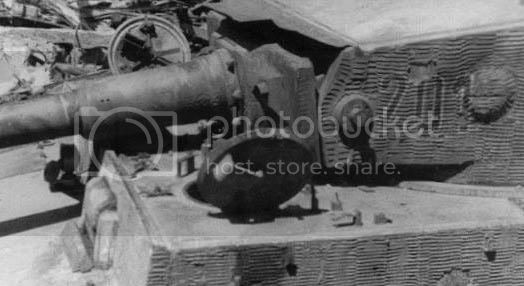
I really like the concept, good to see you 'sticking' at it just hang in there and you will have it nailed in no time. On the Elsdorf Tiger '201' 'Kompanie Hummel' /4.Kmp. s.Pz.-Abt. 506 the zimmerit has been removed from the mantlet (possibly to weld the rainguards 'eyelashes' over the co-axial mg and monocular gun sight? ) and you can just discern the the remaining paste albeit it very scant.
On a 'on hold' build of this beastie I used Mr Surfacer 500 and the Tamiya applicator in order to depict the light residue of the removed zimmerit...
Sorry for jumping in so late, hope this helps and doesn't hinder!
Looking great... Phil.
Jamesite
United Kingdom
Joined: December 05, 2006
KitMaker: 2,208 posts
Armorama: 2,152 posts
Joined: December 05, 2006
KitMaker: 2,208 posts
Armorama: 2,152 posts
Posted: Tuesday, April 28, 2009 - 04:21 AM UTC
Quoted Text
My god!! Herbert is back Everybody take cover and prepare to return fire !!!
lol!
Well Pawel, I think you are on the road to recovery here, as your latest photos show a good example of partially damaged zimmerit, however, you can still show bigger areas of knocked off zimmerit and red primer I feel, it just needs to have the layering that you now have to make it accurate, something that your earlier attempt was missing.
In the larger areas don't be afriad to show bigger areas of primered metal, providing that there is zimmerit residue around the edges, you can also have thos small 'islands' of zimmerit in there too.
Essentially you wan't a combination of all the effects so far used, but not over heavy on any one in particular, a natural blend with some logic applied on how the zimmerit layring would break off will have this looking beautiful.
Not that this is by any way a perfect rendition of zimmerit (far from it) here is a photo of the rear of my Stug, hopefully illustrating this layering thing i'm talking about:
I think the issue is that you have far too much Zimmerit missing still. Even a knocked out tank would not show this much damage on all surfaces, but would have one or two more damaged than the rest. However I understand you wanted to show a battle weary tank from every angle, and so I won't preach to you about this.
Don't lose heart, I can't wait to see this mated with the turret!
James
spitfire303
Vendee, France
Joined: December 22, 2006
KitMaker: 1,437 posts
Armorama: 1,406 posts
Joined: December 22, 2006
KitMaker: 1,437 posts
Armorama: 1,406 posts
Posted: Friday, May 01, 2009 - 01:20 PM UTC
Phil & James,
your help and advices are invaluable. I owe you at least few rounds in a pub Just come to France
This said I must say that the final look of those areas haven't changed much. Well it did in terms of colours. The texture will stay as it is and I won't add any more zimmerit bits. The reason is simple. The first time I did it I was not happy with the look of it and finally I have a really strong will to move on.
So here's what has been done. I applied few coats of grey filters and neutral (grey) wash. Few areas of red primer have been increased but not very much.
Moving on on weathering I added some mud on the very low part of the hull and sprayed a mix of flat earth, buff and neutral grey on the lower parts of hull and turret. It's best visible on the turret.
One thing I decide to change was the colour of the armoured plates over the air intakes. I think it looks better and will help to break the the green and yellow of the rest of the model.
The exhausts shields have been reworked with some.... less rust don't know if it looks good but it's definitely better than the first attempt
Yeah, I know I haven't really posted any picture with the turret on... here you go mate... (the barrel is freshly repainted as the first attempt to do anything with it was a pure disaster )
To come: some rainmarks, few pigments more here and there, few details to repaint and it will be finished oufff.
thank you all for your interest and support.
spit
your help and advices are invaluable. I owe you at least few rounds in a pub Just come to France
This said I must say that the final look of those areas haven't changed much. Well it did in terms of colours. The texture will stay as it is and I won't add any more zimmerit bits. The reason is simple. The first time I did it I was not happy with the look of it and finally I have a really strong will to move on.
So here's what has been done. I applied few coats of grey filters and neutral (grey) wash. Few areas of red primer have been increased but not very much.
Moving on on weathering I added some mud on the very low part of the hull and sprayed a mix of flat earth, buff and neutral grey on the lower parts of hull and turret. It's best visible on the turret.
One thing I decide to change was the colour of the armoured plates over the air intakes. I think it looks better and will help to break the the green and yellow of the rest of the model.
The exhausts shields have been reworked with some.... less rust don't know if it looks good but it's definitely better than the first attempt
Quoted Text
Don't lose heart, I can't wait to see this mated with the turret!
James
Yeah, I know I haven't really posted any picture with the turret on... here you go mate... (the barrel is freshly repainted as the first attempt to do anything with it was a pure disaster )
To come: some rainmarks, few pigments more here and there, few details to repaint and it will be finished oufff.
thank you all for your interest and support.
spit
jimz66
Connecticut, United States
Joined: December 15, 2006
KitMaker: 1,165 posts
Armorama: 1,105 posts
Joined: December 15, 2006
KitMaker: 1,165 posts
Armorama: 1,105 posts
Posted: Friday, May 01, 2009 - 04:21 PM UTC
Well done Spit. Keep it coming. Very nicely done.
chefchris
North Carolina, United States
Joined: February 06, 2006
KitMaker: 1,544 posts
Armorama: 1,464 posts
Joined: February 06, 2006
KitMaker: 1,544 posts
Armorama: 1,464 posts
Posted: Friday, May 01, 2009 - 06:59 PM UTC
Pawel,
FINALLY, a charcoal laquered gun barrel!! Nice. Could I suggest filtering some grey into the zimm. areas? It just looks abit too white. I think the weathering on the tracks and lower hull is outstanding! Youre work inspires me! Thanks
Chris
FINALLY, a charcoal laquered gun barrel!! Nice. Could I suggest filtering some grey into the zimm. areas? It just looks abit too white. I think the weathering on the tracks and lower hull is outstanding! Youre work inspires me! Thanks
Chris
SIRNEIL
England - South East, United Kingdom
Joined: July 30, 2007
KitMaker: 658 posts
Armorama: 599 posts
Joined: July 30, 2007
KitMaker: 658 posts
Armorama: 599 posts
Posted: Friday, May 01, 2009 - 11:57 PM UTC
Hi pawel
In all honesty i didn't think there was anything wrong with the way that you were painting this tiger in the first place.The red oxide primer looked way to loud but you still had to apply a lot of weathering to these areas and this would have toned the reddish colour down.please don't get me wrong but you should have carried on with the painting as you wanted to.This build was your idea and not mean't to be historicaly accurate so if you had made a mistake then you could have put that down to experiance and learn't from it.In the end pawel you have created another brilliant looking tiger B and good luck with the "workhorse".As the saying says at the bottom of this reply............................
"The man that makes no mistakes usually makes very little else"
p.s great pictures as always.
neil...........
Posted: Saturday, May 02, 2009 - 02:11 AM UTC
Hi Pawel,
Beautiful work...AS ALWAYS! I also agree that you were doing a great job in the beginning of this project. We have a saying here in the USA: "Too many cooks spoil the soup." Luckily...because of your skill...the "too many cooks" didn't spoil your model. Modeling is supposed to be FUN!!!!! Let it be fun and use some artistic license (Am I becoming one of those cooks?)
I always follow your posts and always learn something or get some kind of inspiration for my models. I hope someday to have even half of your talent. Thanks for sharing.
Jeff
bizzychicken
Wales, United Kingdom
Joined: September 06, 2008
KitMaker: 967 posts
Armorama: 842 posts
Joined: September 06, 2008
KitMaker: 967 posts
Armorama: 842 posts
Posted: Saturday, May 02, 2009 - 05:04 AM UTC
H Spit. Nice to see the all the gang involved in this great build. Its definanely a Hybrid. Nice concept, the two different camo's look very striking. The exchausts look great now with the little rework, spot on. Looking good LOL Geraint PS Are you going to make a small base for this KT
spitfire303
Vendee, France
Joined: December 22, 2006
KitMaker: 1,437 posts
Armorama: 1,406 posts
Joined: December 22, 2006
KitMaker: 1,437 posts
Armorama: 1,406 posts
Posted: Saturday, May 02, 2009 - 09:38 AM UTC
Hi,
James,
thank you glad you like my kitty
Chris,
thank you for your feedback.
you mean the zimmerit or rather the zimmerit free areas? I must say I'm really hooked on those late war vehicles. Each of them gives a lot of inspiration.
Neil,
The historical inaccuracy of this build was the mix of last known/found type of turret with a initial hull. Than I had an idea of this very buttered hull with a lot of that paste missing. The red areas where tempting me from the visual point of view. After comments here I've changed the direction in this point. I know it was not my first idea (and God know that often first ideas are the best) but finally I preferred to stick with the accuracy than go with the idea I had on the beginning. I really appreciate your support since long time. I'm glad that finally you do like it.
Jeff,
Some of the points were given just above. At the end the most important vision of a hybrid Tiger B survived with just one modification. My idea of the build logs I keep posting here on armorama is on the on hand to share and show to others what I know to do so they can learn and get some help and on the other hand acquire new knowledge by hearing what people have to say about the things I do.
I'm always happy to hear that there are people here that follow my posts, if you learn something or find an inspiration I'm even more happy as this is always one of my primary targets here. Finally... let's not exaggerate about the talent
Geraint mate,
Nice to hear from you. I'm really glad about the whole "gang" being involved here. Always happy to hear from the "bizzychicken"
cheers
thank you all I'll try to be back soon.
spit
James,
thank you glad you like my kitty
Chris,
thank you for your feedback.
Quoted Text
Could I suggest filtering some grey into the zimm. areas? It just looks abit too white.
you mean the zimmerit or rather the zimmerit free areas? I must say I'm really hooked on those late war vehicles. Each of them gives a lot of inspiration.
Neil,
The historical inaccuracy of this build was the mix of last known/found type of turret with a initial hull. Than I had an idea of this very buttered hull with a lot of that paste missing. The red areas where tempting me from the visual point of view. After comments here I've changed the direction in this point. I know it was not my first idea (and God know that often first ideas are the best) but finally I preferred to stick with the accuracy than go with the idea I had on the beginning. I really appreciate your support since long time. I'm glad that finally you do like it.
Jeff,
Some of the points were given just above. At the end the most important vision of a hybrid Tiger B survived with just one modification. My idea of the build logs I keep posting here on armorama is on the on hand to share and show to others what I know to do so they can learn and get some help and on the other hand acquire new knowledge by hearing what people have to say about the things I do.
Quoted Text
I always follow your posts and always learn something or get some kind of inspiration for my models. I hope someday to have even half of your talent. Thanks for sharing.
I'm always happy to hear that there are people here that follow my posts, if you learn something or find an inspiration I'm even more happy as this is always one of my primary targets here. Finally... let's not exaggerate about the talent
Geraint mate,
Nice to hear from you. I'm really glad about the whole "gang" being involved here. Always happy to hear from the "bizzychicken"
cheers
thank you all I'll try to be back soon.
spit
Beyond
West-Vlaaderen, Belgium
Joined: October 17, 2008
KitMaker: 240 posts
Armorama: 112 posts
Joined: October 17, 2008
KitMaker: 240 posts
Armorama: 112 posts
Posted: Monday, May 04, 2009 - 06:50 AM UTC
Quoted Text
..................... but finally I preferred to stick with the accuracy than go with the idea I had on the beginning. .................
Just want to say, it's not because there are no pictures of it, that it didn't exist.....
Maybe there was a KT like this Who will tell....
Stranger things have existed during wartime....
Like your work anyhow, accurate or not
Grtz,
Beyond
H_Ackermans
Gelderland, Netherlands
Joined: July 11, 2006
KitMaker: 2,229 posts
Armorama: 2,221 posts
Joined: July 11, 2006
KitMaker: 2,229 posts
Armorama: 2,221 posts
Posted: Monday, May 04, 2009 - 07:06 AM UTC
Quoted Text
Quoted Text
..................... but finally I preferred to stick with the accuracy than go with the idea I had on the beginning. .................
Just want to say, it's not because there are no pictures of it, that it didn't exist.....
Maybe there was a KT like this Who will tell....
Stranger things have existed during wartime....
Like your work anyhow, accurate or not
Grtz,
Beyond
Well, no, this combo never ever could have existed.
The most extreme combo I know that has happened is the early 15mm loader's hatch on the final turrets, and the earliest transporttracks on late/final Tiger-B's.
Why could this particular combo never be? Because it is too much work. A Tiger-B which would be of this vintage at the time the new tracks came out is a rarity in itself. Most were destroyed in France or lost on the eastern front. The Schnorkel itself on the engine deck is a rarity, mostly seen on test vehicles only.
Fitting a final turret to such a vehicle would mean it was shipped back to Henschel. Didn't happen. There is nothing on record of rebuilds of Tiger-B's like had happened for instance with the first 13 Panther-D's. Even if it had happened, the rebuild would've been just that, taking it apart, fixing small stuff and defects, and putting the whole lot together again. Not swapping turrets etc.
wbill76
Texas, United States
Joined: May 02, 2006
KitMaker: 5,425 posts
Armorama: 4,659 posts
Joined: May 02, 2006
KitMaker: 5,425 posts
Armorama: 4,659 posts
Posted: Monday, May 04, 2009 - 08:15 AM UTC
You're making good progress Pawel, seeing the turret in place with the lower hull creates an impressive visual combination for sure. Looking forward to seeing this one get completed.
spitfire303
Vendee, France
Joined: December 22, 2006
KitMaker: 1,437 posts
Armorama: 1,406 posts
Joined: December 22, 2006
KitMaker: 1,437 posts
Armorama: 1,406 posts
Posted: Monday, May 04, 2009 - 08:52 AM UTC
Beyond,
Since the very beginning of this build I knew it was just that something that never happened, it's just my pure imagination and.... the need of zimmerit to cover some damaged areas of the tank after the first paint has been taken off and some parts like shürzen were cut off I'm glad you like it anyway thanks.
Herbert,
I'm glad you still posting here I always appreciate your input in my buids.
Bill,
thank you for your comment, I think it will be finished soon. Some additional works has already been done, btw thank you for the tips about pigments.
My biggest issue now is the lack of ideas how to weather this damn dark barrel. Any ideas would be greatly appreciated.
spit
Jupiterblitz
Joined: December 30, 2007
KitMaker: 885 posts
Armorama: 796 posts
KitMaker: 885 posts
Armorama: 796 posts
Posted: Monday, May 04, 2009 - 09:49 AM UTC
Hello Pawel,
an idea would be to apply darker oils (brown tones, blue etc.) on the barrel without any thinning, then let it dry for at least an hour (up to a half day).
The coating should be ample but not too thick.
After this dry period remove the oils with a soft brush only (no cloth, tissue).
You can repeat this method as often as you want.
spitfire303
Vendee, France
Joined: December 22, 2006
KitMaker: 1,437 posts
Armorama: 1,406 posts
Joined: December 22, 2006
KitMaker: 1,437 posts
Armorama: 1,406 posts
Posted: Monday, May 04, 2009 - 10:48 AM UTC
Quoted Text
Hello Pawel,
an idea would be to apply darker oils (brown tones, blue etc.) on the barrel without any thinning, then let it dry for at least an hour (up to a half day).
The coating should be ample but not too thick.
After this dry period remove the oils with a soft brush only (no cloth, tissue).
You can repeat this method as often as you want.
hi Marco, would you have any picture of this kind of technique It scares me a little bit
Jupiterblitz
Joined: December 30, 2007
KitMaker: 885 posts
Armorama: 796 posts
KitMaker: 885 posts
Armorama: 796 posts
Posted: Monday, May 04, 2009 - 11:39 AM UTC
Hello Pawel,
I gonna prepare some pics.
I have just started to paint one the plastic barrel of my Tiger II kit as an example.
Pics will be posted soon...for sure this afternoon/evening at the latest.
I gonna prepare some pics.
I have just started to paint one the plastic barrel of my Tiger II kit as an example.
Pics will be posted soon...for sure this afternoon/evening at the latest.
GibsonSG
British Columbia, Canada
Joined: April 14, 2008
KitMaker: 183 posts
Armorama: 180 posts
Joined: April 14, 2008
KitMaker: 183 posts
Armorama: 180 posts
Posted: Monday, May 04, 2009 - 06:20 PM UTC
That is one bashed up Tiger. I love it!!
CHESTERNIMITZ
Vizcaya, Spain / España
Joined: March 01, 2009
KitMaker: 96 posts
Armorama: 95 posts
Joined: March 01, 2009
KitMaker: 96 posts
Armorama: 95 posts
Posted: Monday, May 04, 2009 - 10:45 PM UTC
Hi Pawel, ami I really find it a really extraordinary work that the canyon that leads to that color makes me weird, but is otherwise very good.
bizzychicken
Wales, United Kingdom
Joined: September 06, 2008
KitMaker: 967 posts
Armorama: 842 posts
Joined: September 06, 2008
KitMaker: 967 posts
Armorama: 842 posts
Posted: Tuesday, May 05, 2009 - 03:18 AM UTC
Hi Pawel .The hybrid looks great. If the Barrel is the only thing that is bugging you maybe a bit of Blue wash would be enough. Or you could add a little heat stress couloring to it. maybe afew marks near the recoil area near the mantlet. Just slightly tone down the black. I personally love what you have done with the KT historically correct or not, its another cool cat. Thanks for the tip on the tracks LOL Geraint
Jamesite
United Kingdom
Joined: December 05, 2006
KitMaker: 2,208 posts
Armorama: 2,152 posts
Joined: December 05, 2006
KitMaker: 2,208 posts
Armorama: 2,152 posts
Posted: Tuesday, May 05, 2009 - 04:15 AM UTC
Great progress Spit, you've really reigned this one in and are back on track with it.
- I like the latest zimm, i'd say it will keep the accuracy police happy!
- The red engine deck guards look better in my opinion.
- Thanks for the shots with it mated to the turret. I know you probably have this under control, but make sure the weathering is the same on turret and hull. Those dark washes and streaks should in theory be found on the hull, as any weathering on the turret would be after it was connected to the hull.
- As for the barrel, you're primer grey-black looks nice, i'd suggest some blue-grey filters, or perhaps some super-light dry brushing with a lighter grey-black. Last time I did this I hardly did anything and all it saw was part of the 'dust coat' I sprayed over the whole model, whitch stopped it looking so dark. I like Geraint's idea of some scratching around the recoil area too.
One suggestion though. IIRC, the muzzle break on the Ausf. B was a seperate part that screwed onto the main barrel, and therefore is an opportunity for some more colour. How about a 2nd hand muzzle brake, or at least one ready painted in dunklegelb?
eg.
James
spitfire303
Vendee, France
Joined: December 22, 2006
KitMaker: 1,437 posts
Armorama: 1,406 posts
Joined: December 22, 2006
KitMaker: 1,437 posts
Armorama: 1,406 posts
Posted: Friday, May 08, 2009 - 12:00 PM UTC
thank you all for your comments.
Felix, I know that this color of canon is not very common but this was in fact the real colour of a primed not painted barrel. There are pictures of a brand new Hetzer and few Pz IV with dark grey barrels.
Geraint,
thanks mate for your feedback, I've added few things to the barrel hope it looks good.
James,
Like always I appreciate your great feedback & advices. Finally the zimmerit looks well. LOL I'll not touch a zimerited vehicle for a loooong time now. NO WAY
The Idea of green armoured plates came from the green base colour in 1945. It definitely looks better as it is. I hope you'll find the hull weathered coherently with the turret. Less streaks comes from the difficulty to reproduce them on the zimmerit.
On the barrel I used some painting with grey/buff and grey/black/white mixes. few scratches have been made with a lead pencil. At the end some pigments (industrial city dirt, russian earth, europe dust) have been added.
I like your idea of making the muzzle in a different colour than the barrel. I'll will use it for sure (but not on this one).
Final steps:
The turret's roof and hull got some pigments dusting and rain marks have been added to all sides of the turret.
I decided to add a B on the front glacis, don't really know why
An antenna and the MG (both from JB model) have been added at the very end.
Thank you all for watching and participating in this thread
Final pictures
and finally... a small family picture
cheeees
spit
Felix, I know that this color of canon is not very common but this was in fact the real colour of a primed not painted barrel. There are pictures of a brand new Hetzer and few Pz IV with dark grey barrels.
Geraint,
thanks mate for your feedback, I've added few things to the barrel hope it looks good.
James,
Like always I appreciate your great feedback & advices. Finally the zimmerit looks well. LOL I'll not touch a zimerited vehicle for a loooong time now. NO WAY
The Idea of green armoured plates came from the green base colour in 1945. It definitely looks better as it is. I hope you'll find the hull weathered coherently with the turret. Less streaks comes from the difficulty to reproduce them on the zimmerit.
On the barrel I used some painting with grey/buff and grey/black/white mixes. few scratches have been made with a lead pencil. At the end some pigments (industrial city dirt, russian earth, europe dust) have been added.
I like your idea of making the muzzle in a different colour than the barrel. I'll will use it for sure (but not on this one).
Final steps:
The turret's roof and hull got some pigments dusting and rain marks have been added to all sides of the turret.
I decided to add a B on the front glacis, don't really know why
An antenna and the MG (both from JB model) have been added at the very end.
Thank you all for watching and participating in this thread
Final pictures
and finally... a small family picture
cheeees
spit
scratchmod
Massachusetts, United States
Joined: November 07, 2008
KitMaker: 796 posts
Armorama: 763 posts
Joined: November 07, 2008
KitMaker: 796 posts
Armorama: 763 posts
Posted: Friday, May 08, 2009 - 12:12 PM UTC
Wow Pawel thats looks totally awesome. I can't get over the weathering. I don't think I would would have the time or patience to pull off a build like that.
The last pic of the three kitties is great, I like the ones on the ends, something about the camo schemes.
Rob
The last pic of the three kitties is great, I like the ones on the ends, something about the camo schemes.
Rob