Hi Guys,
this is my first post here
A while ago I started working on an old Tamiya kit, and Panther Ausf. A in 1/35 scale.
This is the box
The contents of the box isn't that spectacular, but for 21 euro's you can't complain
Some flash and sinkholes here and there, but not much.
After two days of construction i got the following result.
The barrel was/is terrible, it would not align!! but eventually i got it right and a lot of scraping and sandin.
And the last couple of days I began working on the Panther again
I've drilled out the exhaust pipes and added the deviders
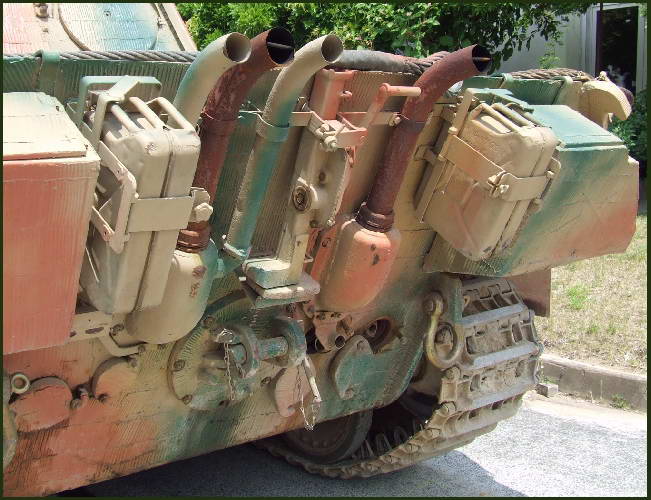
Unfortunatly i did not have any reference picture during the build and i even added the two smaller ones, than do not belong there, so i'll remove them.
I've cut my own mesh for the fans and grates
This is the viewport in real
The viewport on my model, pretty bad.
I've tried to make it look a like.
I also closed up the ugly open periscoop windows with little pieces of styrene.
I'll keep you guys posted.
Hosted by Darren Baker
Tamiya Panther Ausf. A [1/35]
MichelCaudron
Gelderland, Netherlands
Joined: November 19, 2007
KitMaker: 129 posts
Armorama: 13 posts
Joined: November 19, 2007
KitMaker: 129 posts
Armorama: 13 posts
Posted: Tuesday, January 27, 2009 - 03:27 AM UTC
scratchmod
Massachusetts, United States
Joined: November 07, 2008
KitMaker: 796 posts
Armorama: 763 posts
Joined: November 07, 2008
KitMaker: 796 posts
Armorama: 763 posts
Posted: Tuesday, January 27, 2009 - 03:35 AM UTC
That old timer is coming along nicely, even the old kits have great potential when done right. Your off to a go start, looking foward to seeing your progress.
Rob
Rob
MichelCaudron
Gelderland, Netherlands
Joined: November 19, 2007
KitMaker: 129 posts
Armorama: 13 posts
Joined: November 19, 2007
KitMaker: 129 posts
Armorama: 13 posts
Posted: Tuesday, January 27, 2009 - 07:01 AM UTC
thanks
210cav
Virginia, United States
Joined: February 05, 2002
KitMaker: 6,149 posts
Armorama: 4,573 posts
Joined: February 05, 2002
KitMaker: 6,149 posts
Armorama: 4,573 posts
Posted: Tuesday, January 27, 2009 - 07:03 AM UTC
Michael-- I like it. Your various grab handles are really nice. How did you measure the correct length and height for these items?
thanks
DJ
thanks
DJ
bellers
England - East Midlands, United Kingdom
Joined: September 30, 2008
KitMaker: 253 posts
Armorama: 218 posts
Joined: September 30, 2008
KitMaker: 253 posts
Armorama: 218 posts
Posted: Tuesday, January 27, 2009 - 07:27 AM UTC
hi michel just finished this old timer myself not long back check out my photos .i replaced the tools and the tracks but funds ran low so couldent get the grills wish i had.nice work so far keep posting
wbill76
Texas, United States
Joined: May 02, 2006
KitMaker: 5,425 posts
Armorama: 4,659 posts
Joined: May 02, 2006
KitMaker: 5,425 posts
Armorama: 4,659 posts
Posted: Tuesday, January 27, 2009 - 07:46 AM UTC
Welcome Michel! Looks like you're dressing up the old kit with some nice add-ons that will certainly improve things. Are you planning to add zimmerit to it? Look forward to your progress.
MichelCaudron
Gelderland, Netherlands
Joined: November 19, 2007
KitMaker: 129 posts
Armorama: 13 posts
Joined: November 19, 2007
KitMaker: 129 posts
Armorama: 13 posts
Posted: Tuesday, January 27, 2009 - 09:07 AM UTC
@DJ Judge
I made the handles just with a pair of flat long nose pliers, but you can also make them with the Tamiya PE bending tool. I Just measured it out and bended on sight/feeling.
@bellers
well the tracks are 'kinda' crappy (a lot), way to tight, no track sag
but i don't want to go, full monty with friul tracks
@wbill
i'm way to far to add zimmerit, if i would apply it now i would need to remove some parts.
I want to make this a clean panther, i also got a panther from dragon on the shelf where i'm going full monty
padawan_82
United Kingdom
Joined: December 10, 2008
KitMaker: 817 posts
Armorama: 555 posts
Joined: December 10, 2008
KitMaker: 817 posts
Armorama: 555 posts
Posted: Tuesday, January 27, 2009 - 09:31 AM UTC
hi michel that panther's looking okay, my brother had the same kit and he looked at and decided to get dragon's instead so he handed over to me, what did i do? well i cracked open the spares box and started replacing parts... i even replaced the capola with the spare dragon one you get with the 'achtung jabo' figures, mine's no where near as complete as yours but i like what you've done so far... just one question where did you source the mesh for the engine grilles coz it looks quite convincing. keep up the good work. Ant
Eaglewatch
United Kingdom
Joined: December 19, 2008
KitMaker: 560 posts
Armorama: 352 posts
Joined: December 19, 2008
KitMaker: 560 posts
Armorama: 352 posts
Posted: Tuesday, January 27, 2009 - 09:41 AM UTC
Hi Michel if you don't want to fork out for friul or MK tracks then you could try gettin tamiya's individual link Panther tracks now i know they might not be considered as accurate as the aforementioned Friul's or MK's but with a little mud they should suffice for your old kit nicely
bellers
England - East Midlands, United Kingdom
Joined: September 30, 2008
KitMaker: 253 posts
Armorama: 218 posts
Joined: September 30, 2008
KitMaker: 253 posts
Armorama: 218 posts
Posted: Tuesday, January 27, 2009 - 09:52 AM UTC
i used tamiya track links michel on they were fine
MichelCaudron
Gelderland, Netherlands
Joined: November 19, 2007
KitMaker: 129 posts
Armorama: 13 posts
Joined: November 19, 2007
KitMaker: 129 posts
Armorama: 13 posts
Posted: Tuesday, January 27, 2009 - 10:12 AM UTC
@paddawan
funny thing is that i got a lot of the same questions about the mesh, the mesh is from a industrial plastic extruder, a big machine that makes plastic foil, bags and such by heating plastic pellets and by high pressure going through the system, the mesh is a filter that is used in the extruder, wich come in three grades, big, medium and fine....this is the medium one...guess what the fine one looks like
by coicidence i could get my hands on one each, to bad i didn't take more
@eaglewatch&bellers
Where can i get those tracks?
edit: i found a set of tamiya panther G track links on ebay for $ 8
MichelCaudron
Gelderland, Netherlands
Joined: November 19, 2007
KitMaker: 129 posts
Armorama: 13 posts
Joined: November 19, 2007
KitMaker: 129 posts
Armorama: 13 posts
Posted: Thursday, January 07, 2010 - 10:35 PM UTC
Well it's been a while since my last post. That's because i didn't have that much time, had to wait for the tracks, didn't receive a set, had to order a new one.
Well here is a little update, I've assembled the tracks.
an SBS how i did it.
Prepare all track links.
stick a piece of tape over the length of your cuttingmat.
Push the edges of the tape outwards, by that pulling the piece of tape flat over the mat.
place each individual tracklink on the tape. count the number of tracklinks, and when you reach the number of required number of tracklinks for your tank (often stated on the box or manual) your done.
again stick a piece of tape face down, with the same length as your tracks plus a little extra on the mat.
measure the inside of the track
cut and even strip of tape with the measured width
stick this strip of tape on the inside of your tracks and press it down good.
after that you pull off the taped together tracks of the other tape on your mat
now you've got workable tracks that you can put on your tank.
When the tracks are to long and sag to much, you can remove a couple of tracklinks, if there are to few you can stick on a few. later on you can always glue them in shape.
I hope that someone profits off this tip and hopefully i didn't reinvent the wheel
this is what the track looks like on my panther.
Blueheeler
New South Wales, Australia
Joined: March 18, 2008
KitMaker: 347 posts
Armorama: 79 posts
Joined: March 18, 2008
KitMaker: 347 posts
Armorama: 79 posts
Posted: Thursday, January 07, 2010 - 11:05 PM UTC
Coming together nicley! I like the little trick with the tracks; always HATE trying to put together the individual links!
MichelCaudron
Gelderland, Netherlands
Joined: November 19, 2007
KitMaker: 129 posts
Armorama: 13 posts
Joined: November 19, 2007
KitMaker: 129 posts
Armorama: 13 posts
Posted: Thursday, January 07, 2010 - 11:45 PM UTC
Yeah, they can be tricky. it takes a lot of patience, because you also have to sand every tracklink
When i started on the tracks, i tried to use a link and length trick, making pieces of track and glue them together. but soon that didn't work out because i also wanted to know if the required number of links for one track are the correct one, and if i had to remove one...well you know what happens when they are already glued together
I Wanted to use a L-profile rod on a base and align them with the sides. but had to glue them together. they didn't want to stay inline when glueing etc.
then i sticked the links on a piece of tape and hope that i could wrap the track on the tank with the tape on the outside, but obviously that doesn't work, because the tracks dont bend that way with the tension of the tape on the outside, so I had to put tape on the inside to make them bend around the trackwheels...and thats how i used this trick.
Treadhead12
Kentucky, United States
Joined: September 26, 2007
KitMaker: 162 posts
Armorama: 116 posts
Joined: September 26, 2007
KitMaker: 162 posts
Armorama: 116 posts
Posted: Saturday, January 09, 2010 - 05:20 AM UTC
Michel, thanks for the phots and tips you have used on the old Panther kit. Like the track and periscope techniques you have used.
Please keep posting your photos and work.
H_Ackermans
Gelderland, Netherlands
Joined: July 11, 2006
KitMaker: 2,229 posts
Armorama: 2,221 posts
Joined: July 11, 2006
KitMaker: 2,229 posts
Armorama: 2,221 posts
Posted: Saturday, January 09, 2010 - 09:42 AM UTC
You say, regarding the exhausts I think that you added the 2 smaller one that do not belong there.
Are you referring to the 2 smaller pipes on the left exhaust? Because those definitly are an Ausf. A feature only. Early A's didn't have them, but all later ones do. They are part of the Ausf. A version of the Kampfraumheizung.
MichelCaudron
Gelderland, Netherlands
Joined: November 19, 2007
KitMaker: 129 posts
Armorama: 13 posts
Joined: November 19, 2007
KitMaker: 129 posts
Armorama: 13 posts
Posted: Saturday, January 09, 2010 - 11:30 PM UTC
NP about the tips, thats what were here for right? to share info
Yeah, about the 2 smaller piper, later on I figured out that those where on the Ausf. A only and used as air-vents for fresh air to be sucked in for the engine. That's also the reason why they dont have black exhaust residue on them.
Posted: Tuesday, January 12, 2010 - 06:22 PM UTC
Hey Michel,
I really like what you've done with this old Tamiya kit. I think a lot of people look down thier noses at these kits but with skills such as yours they can be made into very respectable models. I'm looking forward to the finished product!
Jeff
I really like what you've done with this old Tamiya kit. I think a lot of people look down thier noses at these kits but with skills such as yours they can be made into very respectable models. I'm looking forward to the finished product!
Jeff
smokeys_keepers
Auckland, New Zealand
Joined: November 04, 2008
KitMaker: 193 posts
Armorama: 187 posts
Joined: November 04, 2008
KitMaker: 193 posts
Armorama: 187 posts
Posted: Wednesday, January 13, 2010 - 02:51 PM UTC
Hey Michel,
Nice work you are doing on your Panther A, keep it up!
Also, a bit how's your Evo going? I remember seeing you on cardomain. My 5 is getting a replacement turbo bolted on next week.
Cheers
Nice work you are doing on your Panther A, keep it up!
Also, a bit how's your Evo going? I remember seeing you on cardomain. My 5 is getting a replacement turbo bolted on next week.
Cheers
Steamjohn
Maryland, United States
Joined: November 22, 2009
KitMaker: 43 posts
Armorama: 42 posts
Joined: November 22, 2009
KitMaker: 43 posts
Armorama: 42 posts
Posted: Wednesday, January 13, 2010 - 03:00 PM UTC
Hi Michael. Looking good, that was one of the first models I ever built. I built the same kit straight out of the box in one 3 hour setting. I think it's still sitting somewhere at my parents house. Keep me posted.
TonyDz
United States
Joined: December 13, 2009
KitMaker: 420 posts
Armorama: 419 posts
Joined: December 13, 2009
KitMaker: 420 posts
Armorama: 419 posts
Posted: Wednesday, January 13, 2010 - 07:05 PM UTC
Quoted Text
Your various grab handles are really nice. How did you measure the correct length and height for these items?
thanks
DJ
Rulers come in real handy for that.
Hohenstaufen
England - South East, United Kingdom
Joined: December 13, 2004
KitMaker: 2,192 posts
Armorama: 1,615 posts
Joined: December 13, 2004
KitMaker: 2,192 posts
Armorama: 1,615 posts
Posted: Thursday, January 14, 2010 - 05:26 PM UTC
Nice work Michael. I've got one of these in my stash that was bought for me as a 50th birthday present (that was a year or two ago!), which I had "put to one side". Now inspired by your efforts I may dig it out and have a go at it. I need to bookmark your build log for ideas...
MichelCaudron
Gelderland, Netherlands
Joined: November 19, 2007
KitMaker: 129 posts
Armorama: 13 posts
Joined: November 19, 2007
KitMaker: 129 posts
Armorama: 13 posts
Posted: Monday, January 18, 2010 - 11:12 PM UTC
You guys do have a way to inspire me, in a humble way i don't see how my panther is that special, I'm just trying to make it nicer with simple adjustments. But i like the inspiring feedback
It's a shame that i don't have that much time for all my hobbies
i have to glue the upper half and lower half of the tank together and and putty up the openings and such. after that the panther is ready for a bath and priming.
I'll keep you guys posted on the track, because the horror isn't over yet, need to do the track wheels, paint the track etc.
@Andrew
Cool, more Evo owners out there and that have a modelling hobbie aswell
My Evo is doing a nice wintersleep in the garage atm. Still have to do some work on it, but who doesn't.
My website is still up2date, but i don't update my cardomain that often, it's better to check my website www.alter-evo.nl (also in english so, no worries)
The other day i tried to bolt on a Cusco cooling plate, but due to my Koyo Radiator9 wich is thicker that the stock one) i couldn't fit it, so it think it'll have to grind a strip off the cooling plate and make it FIT
forrynz
New Zealand
Joined: November 26, 2013
KitMaker: 1 posts
Armorama: 1 posts
Joined: November 26, 2013
KitMaker: 1 posts
Armorama: 1 posts
Posted: Monday, November 25, 2013 - 05:08 PM UTC
Looking good..Can you please advise me the maker of the tracks as I'm interested in getting them, as I have the exact same kit
cheers
cheers
Konigwolf
Tasmania, Australia
Joined: November 06, 2009
KitMaker: 368 posts
Armorama: 321 posts
Joined: November 06, 2009
KitMaker: 368 posts
Armorama: 321 posts
Posted: Monday, November 25, 2013 - 06:59 PM UTC
Zombie Thread...
The last post on this thread was nearly 4 years ago and I believe the original poster hasn't logged into the forums in over a year.