


Hosted by Darren Baker
Airfix "WWI Male Tank" Mark 1

adamsmasher

Joined: June 27, 2009
KitMaker: 192 posts
Armorama: 54 posts
Posted: Tuesday, December 01, 2009 - 08:22 PM UTC
Thanks for the update, Matthew. I'm glad to see you attempt the camo; I was just going to do grey or tan myself. Were you planning on making a diorama for this? It'd be interesting to see some trenches.

firstcircle


Joined: November 19, 2008
KitMaker: 2,249 posts
Armorama: 2,007 posts
Posted: Wednesday, December 02, 2009 - 10:30 AM UTC
Thanks for the compliment Andras! Adam, I have bought some figures, after finally locating some decent WW1 British infantry, so am thinking of a diorama base. Not sure how lazy I might get once the tank is done though!
On the colour scheme, if you choose to go for all over brown, I think you need to lose the limber, as from what I can tell they were abandoned pretty soon after the tanks were deployed in action, and by the time they went all brown, the limbers were no more. Grey is the colour prior to arriving in France, so is OK with limber.
Anyway, the fairly nerve-wracking painting has been proceeding, and as noted by Bill Plunk, it has been freezing in the garage some evenings here as well!
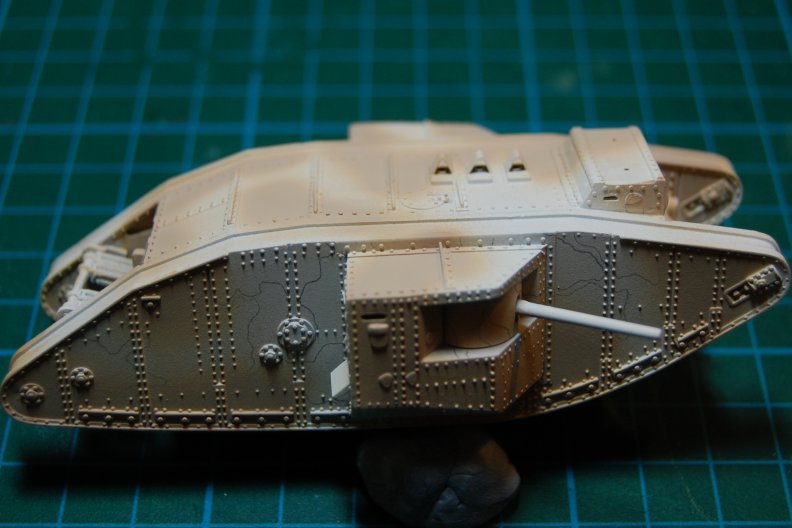
One of the images I have been looking at is this fab photo of "Creme de Menthe": The Tanks at Flers
If that pale colour is sand, then I figured it was a pretty light shade, so after a first attempt, I chucked in a load more white and ended up with 50-50 Tamiya Desert Yellow / Flat White. This is the revised, lighter shade:
After leaving it overnight, toothpaste was applied to mask off the sand. I chose the kids' gel Shrek toothpaste thinking it is stickier and firmer than the usual type. I had to pick the minty stars out though.
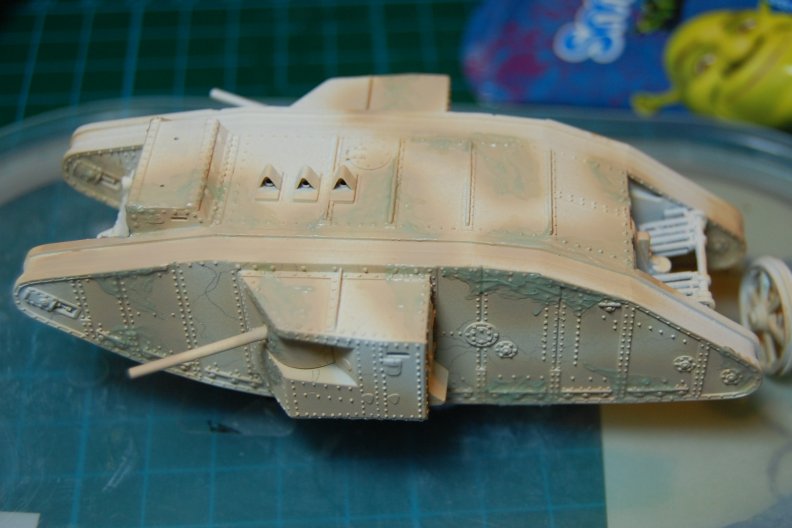
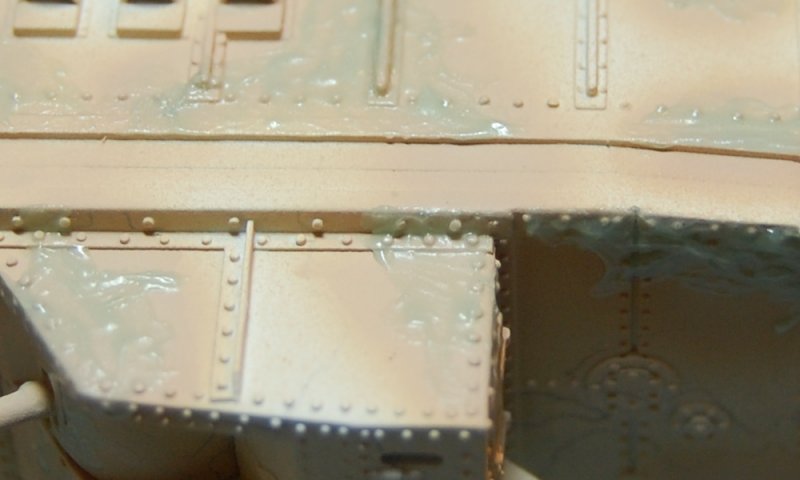
I missed taking a photo of the next colour, which was pink. That was 10 parts Flat White, 2 parts Red, 1 part Desert Yellow. The next photos are the toothpaste covering the sand and the pink, and now the brown has been sprayed over. The brown was Tamiya Khaki + 33% Flat Brown as I wanted to take it away a bit from the standard Khaki colour. Maybe it should be that standard Khaki though. Who knows?
Final application of toothpaste, now covering the brown as well:
And now the green sprayed over. This is Tamiya JGDF Dark Green.
So I left each colour to harden over night, including this last one, to await the interesting moment when the toothpaste will come off . . .

On the colour scheme, if you choose to go for all over brown, I think you need to lose the limber, as from what I can tell they were abandoned pretty soon after the tanks were deployed in action, and by the time they went all brown, the limbers were no more. Grey is the colour prior to arriving in France, so is OK with limber.
Anyway, the fairly nerve-wracking painting has been proceeding, and as noted by Bill Plunk, it has been freezing in the garage some evenings here as well!
One of the images I have been looking at is this fab photo of "Creme de Menthe": The Tanks at Flers
If that pale colour is sand, then I figured it was a pretty light shade, so after a first attempt, I chucked in a load more white and ended up with 50-50 Tamiya Desert Yellow / Flat White. This is the revised, lighter shade:
After leaving it overnight, toothpaste was applied to mask off the sand. I chose the kids' gel Shrek toothpaste thinking it is stickier and firmer than the usual type. I had to pick the minty stars out though.
I missed taking a photo of the next colour, which was pink. That was 10 parts Flat White, 2 parts Red, 1 part Desert Yellow. The next photos are the toothpaste covering the sand and the pink, and now the brown has been sprayed over. The brown was Tamiya Khaki + 33% Flat Brown as I wanted to take it away a bit from the standard Khaki colour. Maybe it should be that standard Khaki though. Who knows?
Final application of toothpaste, now covering the brown as well:
And now the green sprayed over. This is Tamiya JGDF Dark Green.
So I left each colour to harden over night, including this last one, to await the interesting moment when the toothpaste will come off . . .

spongya

Joined: February 01, 2005
KitMaker: 2,365 posts
Armorama: 1,709 posts

Posted: Wednesday, December 02, 2009 - 11:50 AM UTC
I hate cliffhangers. I was following the photos, you know like, it's getting there, it's getting there, aaaaaaand...
thank you for watching, see you next week.
:)
I've never used toothpaste for masking; how does it work out? (I'd try it, but right now in the next few years I won't have access to an airbrush.)
thank you for watching, see you next week.
:)
I've never used toothpaste for masking; how does it work out? (I'd try it, but right now in the next few years I won't have access to an airbrush.)
firstcircle
Joined: November 19, 2008
KitMaker: 2,249 posts
Armorama: 2,007 posts
Posted: Thursday, December 03, 2009 - 09:07 AM UTC
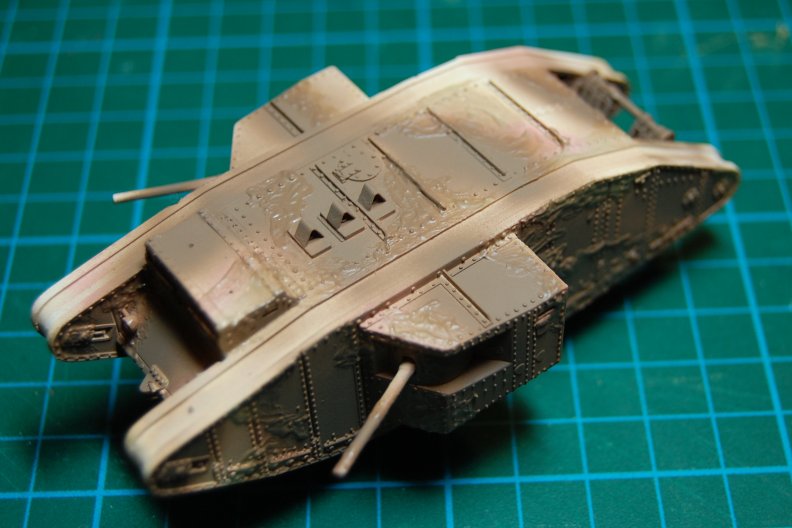
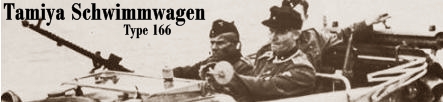
Sorry, but it seemed like a good moment to break it off. Once the paint was definitely set, I got an ice cream tub of warm water and a medium stiffness flat brush and started to wash off the toothpaste. Once you break the paint skin with the brush, the water starts to dissolve the toothpaste straight away, so no hard scrubbnig is needed.
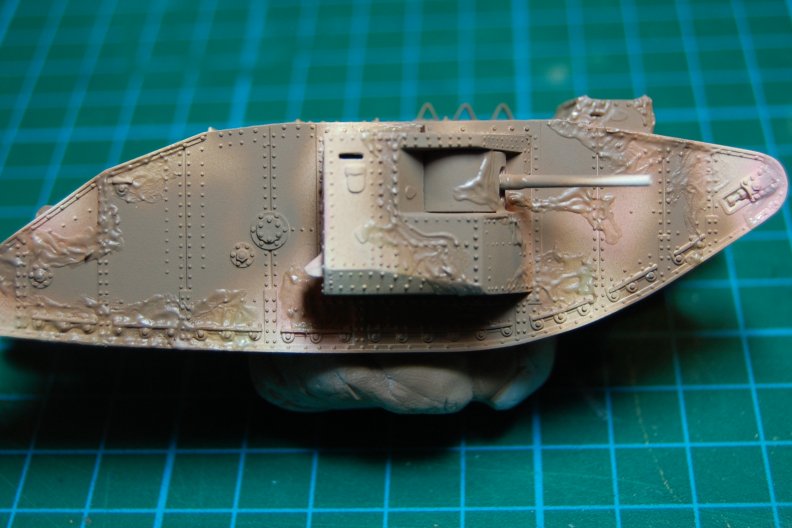
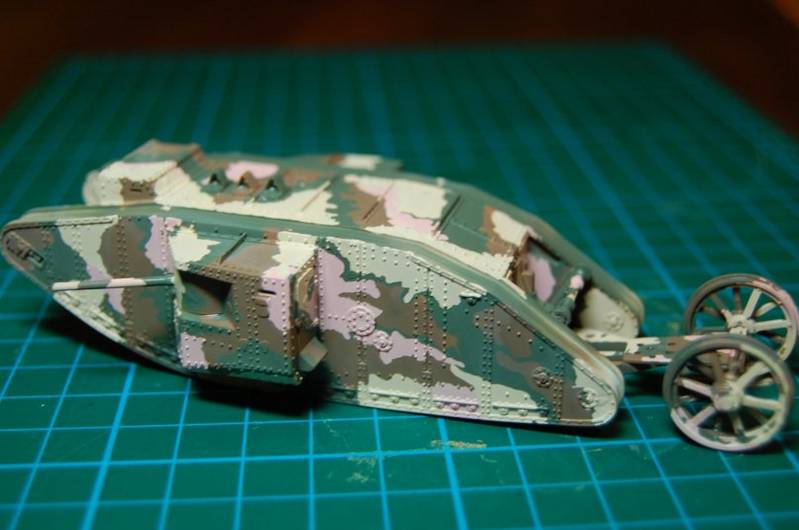
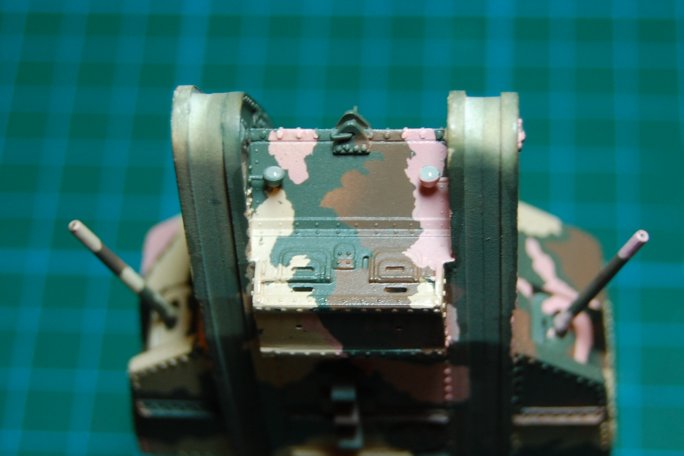
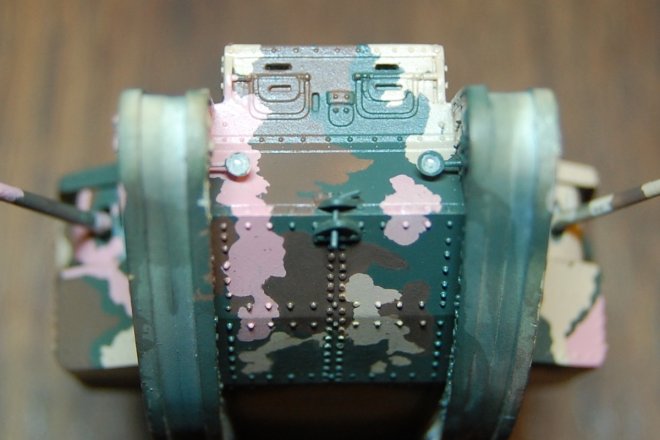
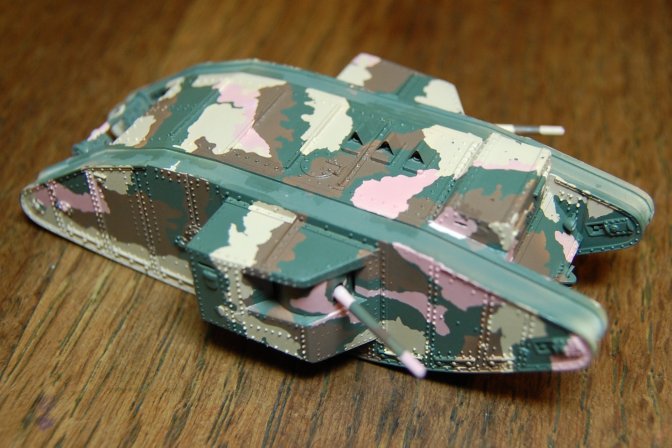
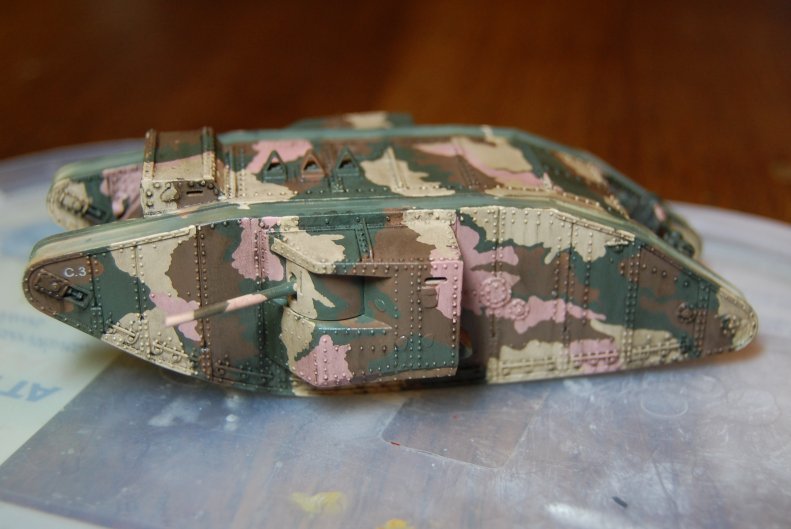
I must admit, I had only used toothpaste once before and that was in order to get a patchy, distressed winter white wash, whereas for this I wanted a fairly neat and well defined finish as the real thing was painted by hand. So I was relieved when I saw that it did seem to have worked:
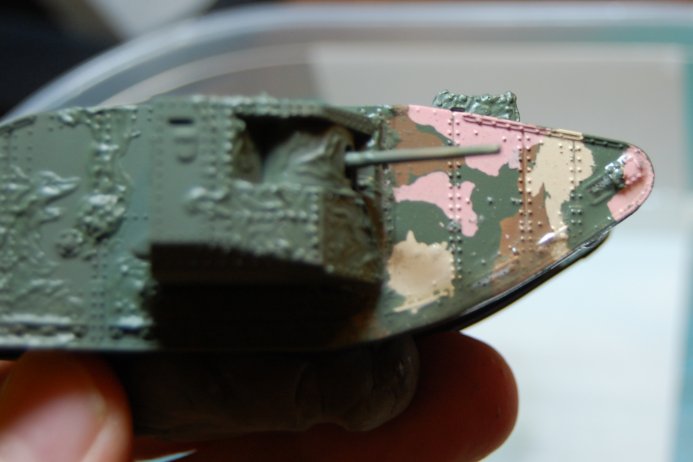
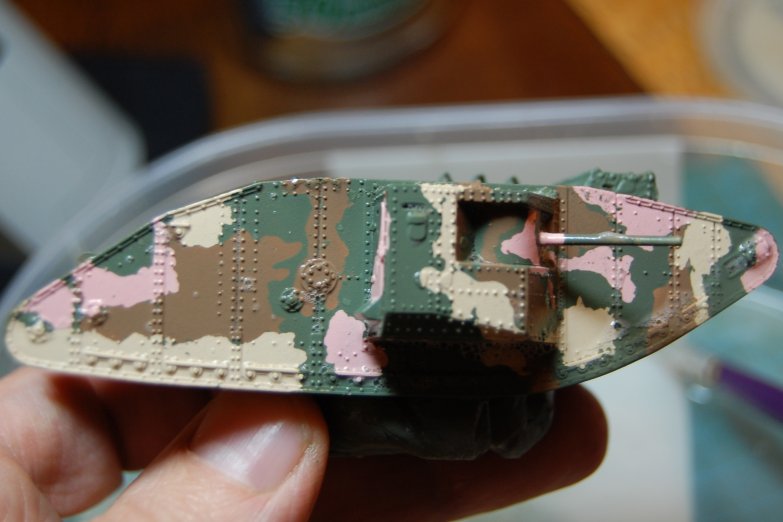
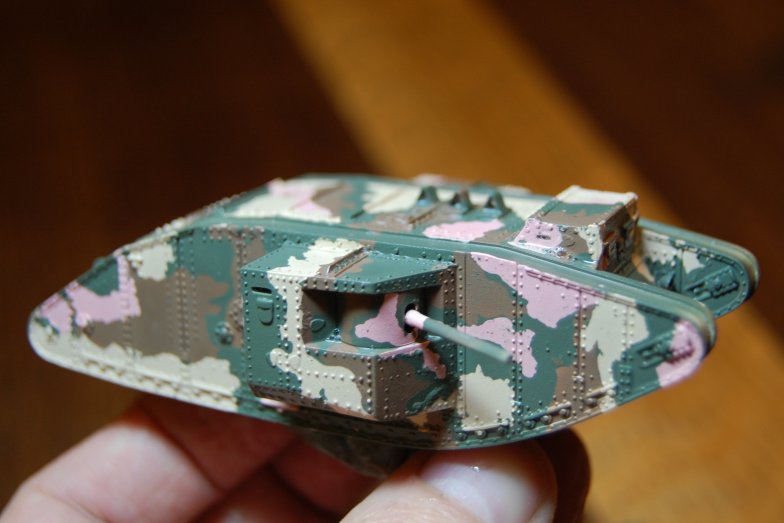
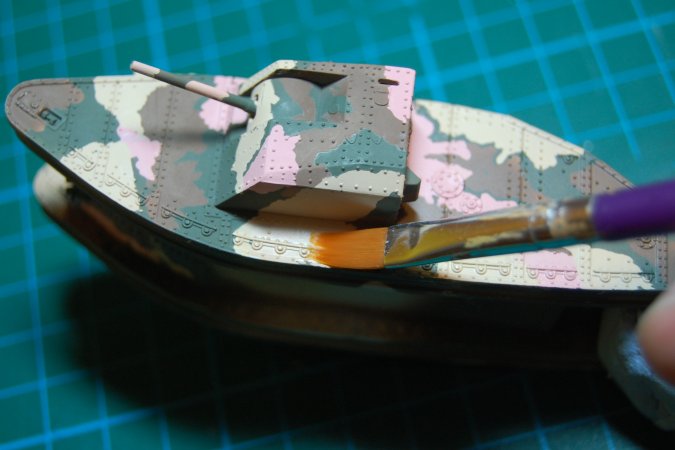
For this next photo I just rested the limber back in place. Confession: it was fixed on before, but on the way back in from the garage after painting the sand, I dropped it on the wooden floor. . . luckily nothing else broke off.

I don't think the front or the roof came out quite as well as the sides, and that's because I didn't plan it as well with the detailed drawing I did for the sides - too impatient again. The front is a little bit scruffy at the edges of the cab roof where I didn't get the demarcation in the right place. I also think the roof has too much sand and not enough green or brown, so I might even that up a bit. Maybe too it could do with another colour on the gun in this next picture.

I must admit, I had only used toothpaste once before and that was in order to get a patchy, distressed winter white wash, whereas for this I wanted a fairly neat and well defined finish as the real thing was painted by hand. So I was relieved when I saw that it did seem to have worked:
For this next photo I just rested the limber back in place. Confession: it was fixed on before, but on the way back in from the garage after painting the sand, I dropped it on the wooden floor. . . luckily nothing else broke off.
I don't think the front or the roof came out quite as well as the sides, and that's because I didn't plan it as well with the detailed drawing I did for the sides - too impatient again. The front is a little bit scruffy at the edges of the cab roof where I didn't get the demarcation in the right place. I also think the roof has too much sand and not enough green or brown, so I might even that up a bit. Maybe too it could do with another colour on the gun in this next picture.
tread_geek

Joined: March 23, 2008
KitMaker: 2,847 posts
Armorama: 2,667 posts
Posted: Thursday, December 03, 2009 - 09:23 AM UTC
Simply marvellous Matthew. The pictures and your commentary are first rate as you keep your audience on the edges of our seats.  I've passed over ever purchasing one of these numerous times but after this build I may relent the next time I see one.
Cheers,
Jan
I've passed over ever purchasing one of these numerous times but after this build I may relent the next time I see one. Cheers,
Jan
adamsmasher
Joined: June 27, 2009
KitMaker: 192 posts
Armorama: 54 posts
Posted: Friday, December 04, 2009 - 12:39 PM UTC
The paint job looks great to me, and I don't think anyone will notice the issues you mentioned (with the exception of the one barrel that didn't have much camo on it). I have to say... the pink really blows my mind.
Dangeroo

#023

Joined: March 13, 2009
KitMaker: 2,058 posts
Armorama: 1,656 posts

Posted: Friday, December 04, 2009 - 10:21 PM UTC
Toothpaste! I would never have thougt of that! Great work! shows what can be done with some TLC to those old kits!
Cheerio!
Cheerio!

Beaver2206

Joined: November 03, 2007
KitMaker: 61 posts
Armorama: 56 posts
Posted: Saturday, December 05, 2009 - 01:36 AM UTC
I agree, that was a pig of a kit to start with and it shows how much work you have to pump into it to make it presentable. Looks stunning in the end. well done
Stuart
Stuart
firstcircle
Joined: November 19, 2008
KitMaker: 2,249 posts
Armorama: 2,007 posts
Posted: Saturday, December 05, 2009 - 11:08 AM UTC
The toothpaste idea came from an article by Steve Zaloga on his winterised SU-76
Funny that looking back at that article, he says the problem with toothpaste is that it eats away at the Tamiya acrylic. The first time I tried it was a whitewash on a SU-122 and I followed his advice and used Klear as a barrier. This time I completely forgot that advice and it didn't seem to do any damage to the paint. Maybe it's to do with different types of toothpaste?
I don't know that the kit is that bad in terms of presentability, in that fit etc. is very good and it would look OK if made out of the box, but the problems with it are all to do with accuracy. Airfix are bringing out a Female Mk I next year, it will be interesting to see if they have got over all of those problems - I have a sneaking suspicion they will have.
adamsmasher
Joined: June 27, 2009
KitMaker: 192 posts
Armorama: 54 posts
Posted: Saturday, December 05, 2009 - 09:00 PM UTC
Is the Female going to be in the same scale? It would be great if more WWI kits would be made, and in some larger scales than 1/76.

AlanL

Joined: August 12, 2005
KitMaker: 14,499 posts
Armorama: 11,675 posts
Posted: Saturday, December 05, 2009 - 10:52 PM UTC
Hi Matthew,
Really grand work on the kit.
Al
Really grand work on the kit.
Al

spaarndammer

Joined: January 28, 2007
KitMaker: 1,945 posts
Armorama: 282 posts
Posted: Saturday, December 05, 2009 - 11:46 PM UTC
Hi Matthew,
impressive reworking and painting on the Airfix kit. And really very well explained! Looking forward to see more updates.

Jelger
impressive reworking and painting on the Airfix kit. And really very well explained! Looking forward to see more updates.
Jelger
firstcircle
Joined: November 19, 2008
KitMaker: 2,249 posts
Armorama: 2,007 posts
Posted: Tuesday, December 15, 2009 - 09:27 AM UTC
I've managed to squeeze in a tiny bit of modelling in between designing the Christmas cards, internet shopping, printing cards, decorating the tree, gluing cards, more internet shopping, writing the cards. . .
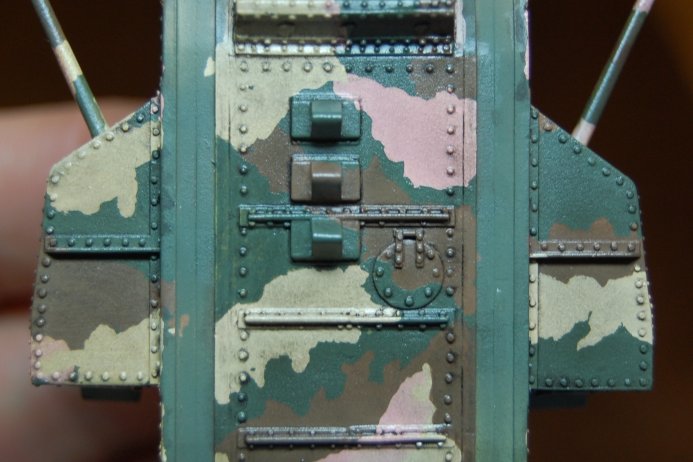
Managed to find a few minutes to do a couple of coats of Klear. Applied with a wide flat brush, very slowly, especially over all the rivets so as not to create bubbles. Couldn't wait 30 minutes or whatever the bottle says, did the second coat after about 5 minutes.
Nice and semi-shiny. Didn't darken it I don't think, as has been mentioned on a another thread. Big blue tac blob wedges nicely between the rear track horns.
Lenses for the lights. Thet insides of the shells were first painted white. I read someone on a thread here saying that they did lenses with PVA, which sounds easier than mixing epoxy, so I tried it. For some reason the PVA seemed to mostly disappear, I guess it evaporated. I was left with a tiny bit in the bottom of the lamp shells. Would be interested to know if anyone has made that work. So I used epoxy instead. Surprisingly easy to adjust the amount. Add a little more by getting a little hanging filament of it on the cocktail stick and touching to the blob that's in there, and it gets drawn in. Less, just touch a stick point to it and it draws a bit out.
Keeping it upright on the big blue tac blob while it sets.
The one time I did this before was in 1/35 scale and the lenses set opaque, while these seem to be transparent, and I think you can even see the dried up bit of PVA in there. Is that good? Not sure . . .
To go back a bit, earlier I said that there was too much sand colour on the roof and no camouflage on one gun. I tried to rectify this before the Klear went on, adding some brown and green. As a measure of how utterly careless I am, I couldn't be bothered to do masking and get the airbrush out for such a small touch up, so did it by brush. Unfortunately the bit of brown I tried to save did dry out over four days, so I tried to mix the same shade again, but didn't get it exact. I'm hoping you'd need to compare with the earlier photo to see where I added the paint, but I suspect it is visible. Never mind. It'll be OK after a driving a few miles at night through some shell holes.
adamsmasher
Joined: June 27, 2009
KitMaker: 192 posts
Armorama: 54 posts
Posted: Thursday, December 17, 2009 - 05:44 PM UTC
The camo job turned out really nice, matthew. Whatever flaws you see are only visible to you, because I can't see them.
Looking forward to seeing it with some weathering.
Looking forward to seeing it with some weathering.

Gorizont

Joined: November 28, 2007
KitMaker: 1,462 posts
Armorama: 1,289 posts
Posted: Thursday, December 17, 2009 - 09:14 PM UTC
Nice camo on this tank and great detail-work for the kit!
I like WW1 camoflage.
greetings...
Soeren
I like WW1 camoflage.
greetings...
Soeren

Dogwatch
Joined: December 14, 2009
KitMaker: 48 posts
Armorama: 41 posts
Posted: Friday, December 18, 2009 - 03:05 AM UTC
Quoted Text
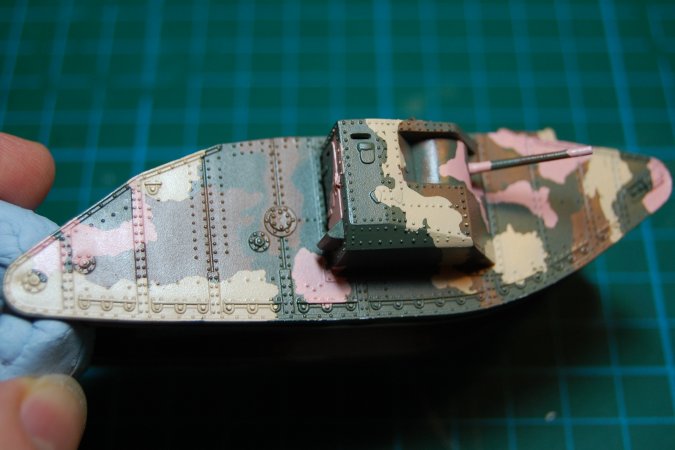
Once I thought I'd nearly finished, then I went backwards some more. Next to each gun is a narrow sighting slit in the shield completely missing from the kit. Obviously it needs to look like a hole all the way through but the curved plastic of this part is quite thick. If I'd done it before building the sponsons I might have been able to get the hole drilled nice and neatly, but the first attempt didn't look too straight and was also too wide. So I had to get drastic... this picture shows the hole enlarged even more, for reasons that will be explained.
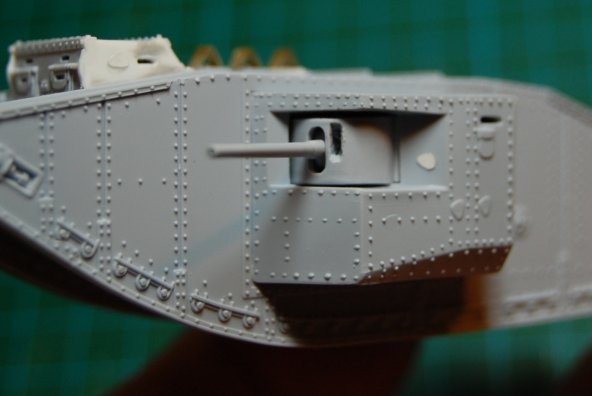
The only way left was to make a kind of mask, from very thin plastic card. Spent two hours making one of them then realised it was so thin at the top edge that I needed to bend it first before attaching it so that the pastic didn't crack. So here it is wired to a knife handle:
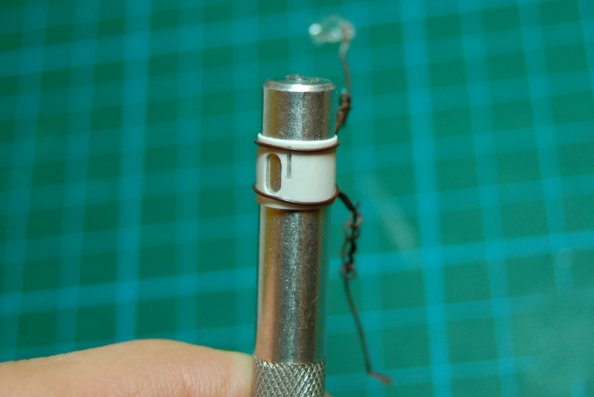
which was then held in steam from the kettle, resulting in this:
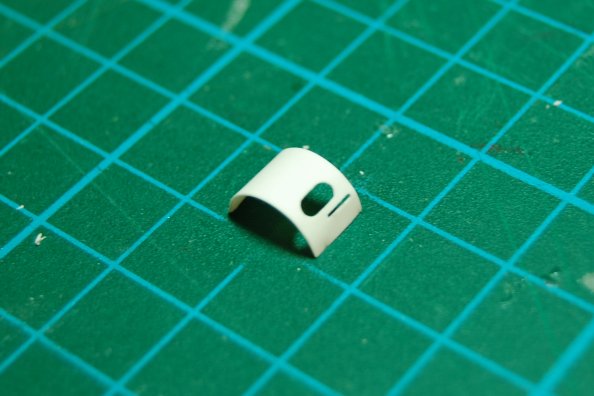
In fact this is the one for the other side, but it came out better.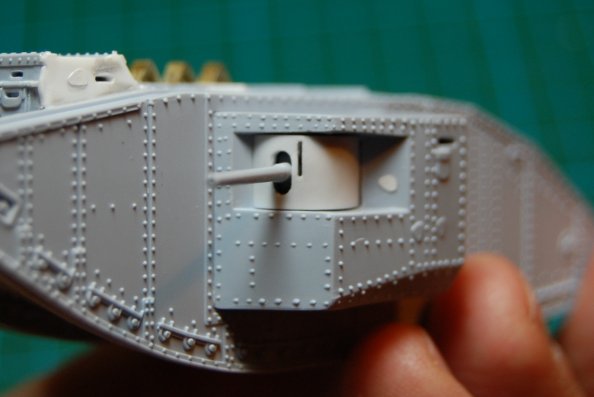
They were mounted over the guns, the edges tucking inside the sponson, and cemented on. The holes underneath was cut out oversize to provide a dark space behind the new narrow slits going on top.
Notice that the sighting slit is to the right of the gun on both sides, so they aren't symmetrical as it were. Here is the other side. To be honest, this was even more of a pain because the shield wasn't set as far back into the sponson, so the new layer stood out beyond the sponson, which looked bad. I had to remove the sponson
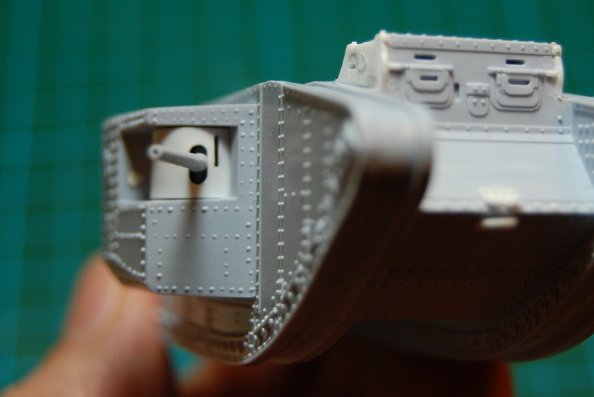
Also, these masks have helped reduce the gaps between the shield and the aperture they are mounted in.
This is in fact a really enjoyable model to build. There's something so solid about the chunky little lozenge - it would have been nice to add some weight inside the hull to bring it up to scale weight - and except on the limber, not a single wheel!
What an incredible effort you are putting into this! Its fascinating. I do have one question and please do not think Im bagging on your effort, but when looking at what you did with the sighting slits in the gun mantles, one is to the right of the barrel on one side and the other is to the left on the other. Is this accurate? If the gunner had the gun facing forward on that one side, he wouldnt be able to see anything at all. Maybe the gun doesnt travel that far forward?
Dogwatch
firstcircle
Joined: November 19, 2008
KitMaker: 2,249 posts
Armorama: 2,007 posts
Posted: Friday, December 18, 2009 - 10:35 AM UTC
Quoted Text
the sighting slits in the gun mantles, one is to the right of the barrel on one side and the other is to the left on the other. Is this accurate? If the gunner had the gun facing forward on that one side, he wouldnt be able to see anything at all. Maybe the gun doesnt travel that far forward?
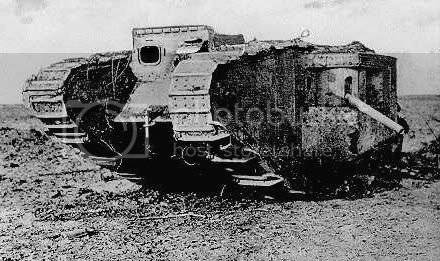
Thank you so much for the enthusiasm. I admit this issue nearly caught me out when I was planning this detail, but it is correct - in fact, the slits are both to the left of each gun if you're inside the tank. You can just about make this out on the box art, which is more accurate than the kit itself, but you can also see it on this picture of what I think must be "Mother" with the gun, on the side you are talking about, pointing straight ahead. You'll have to go look at this yourself as I can't link to it:
http://www.landships.freeservers.com/jpegs/mk1_bw42.JPG
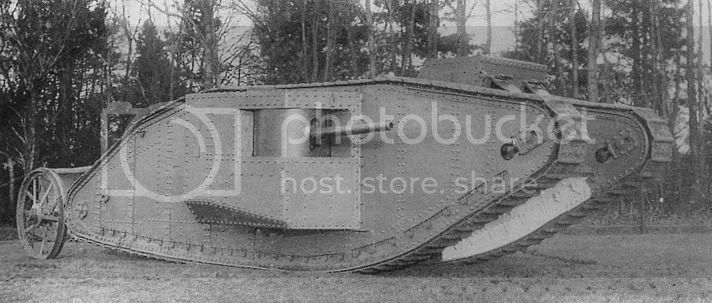
You can see the slit is clearly between the gun and the hull. And here is a picture of the other side this time with the slit on the outside of gun, away from the hull, as it were.
http://www.landships.freeservers.com/Mk1_1.jpg
I must say that I am also finding this project fascinating, and just from a £5 kit - although I have now spent considerably more than that on reference material, including splashing out on Trevor Pidgeon's definitive The Tanks at Flers. Some of what I've been reading in there is just utterly, well, you know. . . mindblowing.
Adam, almost ready for the weathering, it now has decals, which have also been coated. It is now meant to represent C.3 "Chartreuse" which had the ignominious fate in the battle of getting stuck in a shell hole.
I should say that both photos above are from the Landships site that I linked to earlier in this thread.
Dogwatch
Joined: December 14, 2009
KitMaker: 48 posts
Armorama: 41 posts
Posted: Friday, December 18, 2009 - 08:45 PM UTC
Crap! Your pics arent showing up in that last post! If you need a better host for images, try Photobucket. Thanks for setting me straight and I look forward to those pics.
Dogwatch Steve
EDIT: Thanks for posting the link to the images. Ive rehosted them for the benefit of the others here reading this thread. Again, amazing work!
Dogwatch Steve
EDIT: Thanks for posting the link to the images. Ive rehosted them for the benefit of the others here reading this thread. Again, amazing work!
adamsmasher
Joined: June 27, 2009
KitMaker: 192 posts
Armorama: 54 posts
Posted: Saturday, December 19, 2009 - 09:00 AM UTC
If you make a diorama for it, I think I would kill to see it stuck in a shell hole like it's namesake.
Dogwatch
Joined: December 14, 2009
KitMaker: 48 posts
Armorama: 41 posts
Posted: Saturday, December 19, 2009 - 11:09 AM UTC
firstcircle
Joined: November 19, 2008
KitMaker: 2,249 posts
Armorama: 2,007 posts
Posted: Monday, December 21, 2009 - 02:35 PM UTC
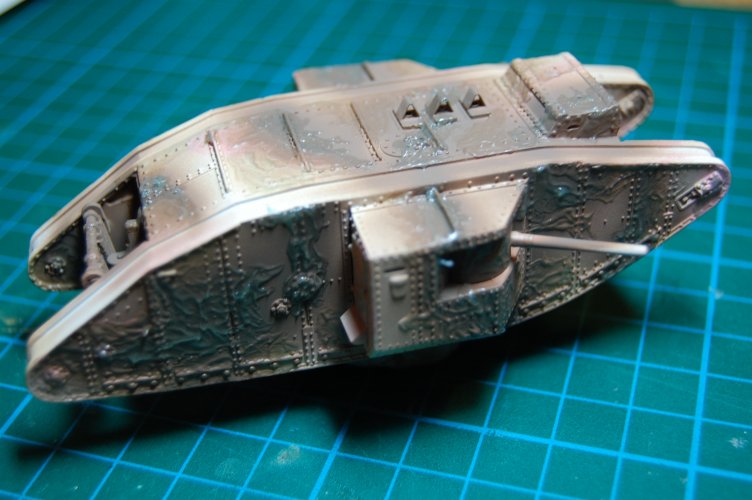
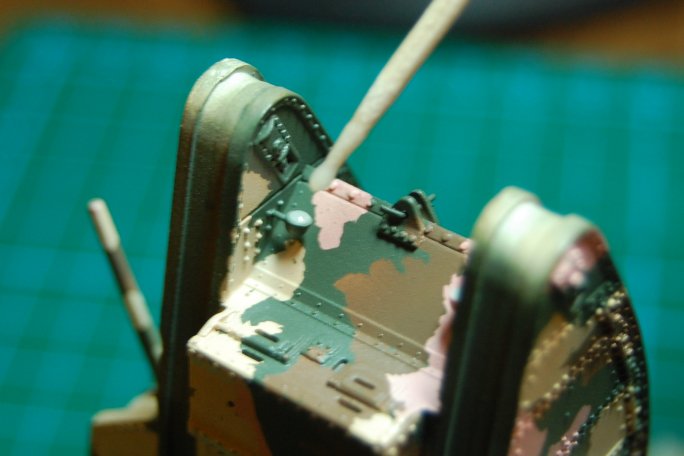
Some work on the tracks. Over the white primer went a dark brown black shade, not meant to be rusty, but that dark burnished brown iron colour. This is a mix of thinned oil paint, something like burnt sienna, black, with a bit of red and blue in it, as far as I remember. In the photo, the top track has also had some black shading added to the left of each tread, as there should be a join there of course. Not that subtle looking at the moment, and at this magnfication.
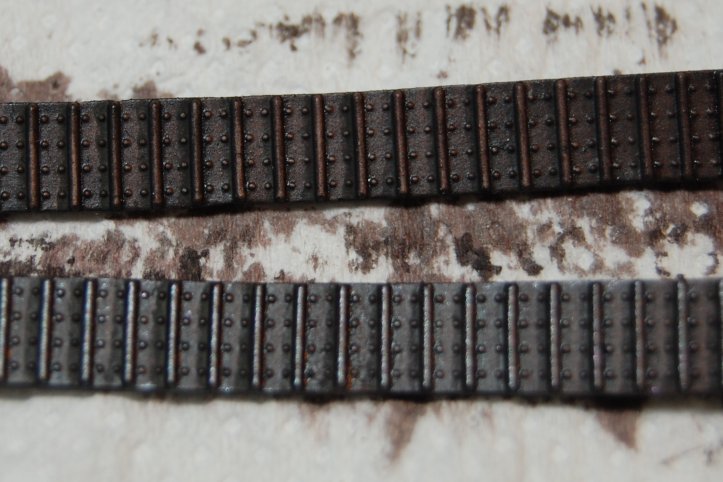
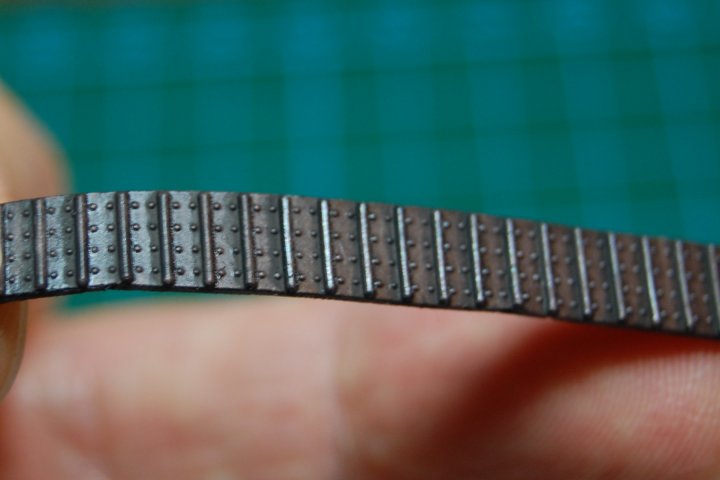
The bottom track above hasn't got any highlights added to it, that is just a reflection off the shiny oil paint. In the pic below, a silvery hightlight has now been added to the links to the right, Winsor and Newton Pewter.
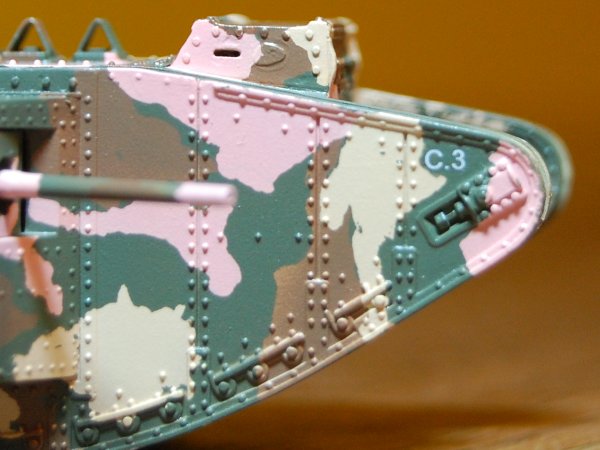
As I said, the decals are on, but not many of them. This is meant to be C3, Chartreuse. The Black Lion decal set allows you to make any combination of letters and numbers, so for the battle of Flers you could make any of the tanks in C and D Company. However they also supply names for a few of them, e.g. C5 Creme de Menthe, and, unfortunately they spelled it wrong, C6 Cordon Rouge (not "Cordon Rogue"!) I couldn't see any photos where the names of these were clearly applied, although there are precious few photos of these tanks, so you don't get all the angles covered and not every individual tank. Black Lion seem to suggest that they go on the nose plate, but in fact don't give specific instructions for the exact position of the name decals, which is a bit odd. Anyway, mine hasn't got the name written on it, and I haven't seen a photo to convince me it should actually be there. I had to add a tiny extra bit of green to the nose on the side in the photo below so that the C didn't sit on the sand colour and be rendered almost invisible.
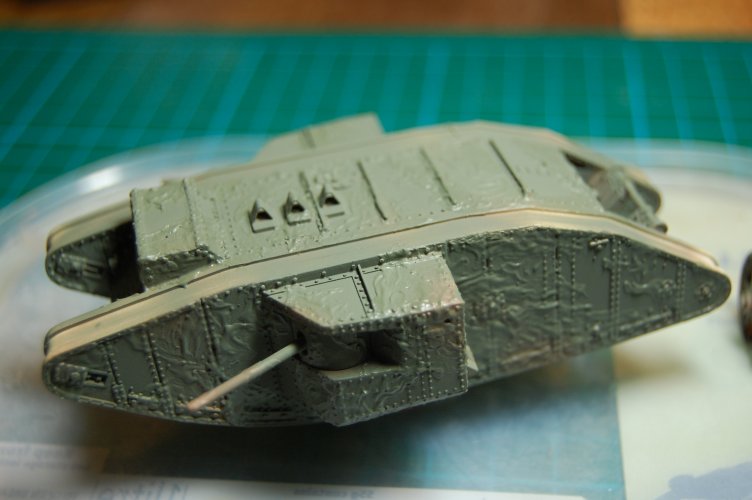
Adam asked for some weathering; as I'm sometimes confused by all the technique talk that takes place, I'm not sure if this is weathering or not . . . it is a mostly black with a bit of burnt umber wash, very thin, in the ANPWilder type style which I hadn't really tried before, and I took on board his moving it down all the time with a no 2 brush advice. Mine is maybe a bit heavier, so does probably count as weathering. This is it more or less freshly done:
Then this is it kind of toned down:

Notice the black staining coming down off the rivets at the top behind the sponson is now a bit more subtle. Again, good advice from Mr Wilder is to keep working the wash. When first applied it is just thin liquid, so touching it at all will move it around a lot, but due to all the white spirit in it, which evaporates pretty quickly (for oil paint that is) it thickens up and starts to set, but remains workable in progressively more subtle ways. After a couple of hours, I could start to use the brush quite hard and reduce and blend it where necessary, after about three hours it was more of less set.
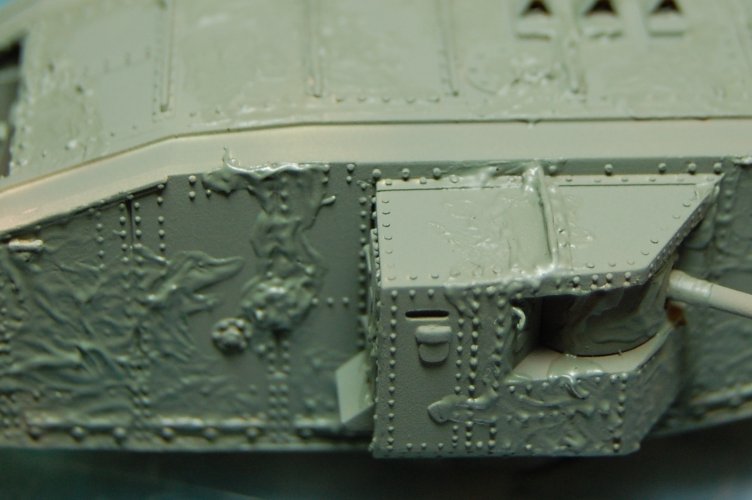
The next thing was to try and do something along the lines of "adding depth" or "filters" or some such jazz. Steve Zaloga seems to manage to build a kit every month in Military Modelling, and he has been taking recently about Winsor and Newton Liquin, which is a medium for mixing into oil paint, so some time ago I bought a bottle and this was the first time I've used it. It was interesting; it is meant to reduce brush stroke visibility, which is a good thing, I think, and it makes the various colours being mixed blend more easily. Without any need to actually thin the paint, (it is in fact quite thick) I found you can still spread it around so it can go on very thinly. Unlike using white spirit I didn't get any of that thing where the paint kind of disintegrates into tiny particles (is that just me and my cheapskate decorators' white spirit?)
Anyway, the colour was mainly yellow ochre with some white and a bit of flesh and some brown (I think). Here is a comparison photo, where the left sponson top has been treated with this mixture, the right sponson has just had the black wash.
Here is another comparison photo of my Mk 1, when it first came out of the shower with its camouflage paint job, and now.

I do wonder how much rain and weathering these things had been through by the time they went into action. Later there will certainly be plenty of mud, but a lot of their so far short lives to this point had been during summertime, and under tarpaulins, which is what I think can be seen bundled up on the tops in several photos. Nevertheless, whether the weathering is authentic or not, it somehow seems appropriate that this tank should have a kind of aged sepia look, in keeping with its Edwardian-era paint and the quality of contemporary photos.
The bottom track above hasn't got any highlights added to it, that is just a reflection off the shiny oil paint. In the pic below, a silvery hightlight has now been added to the links to the right, Winsor and Newton Pewter.
As I said, the decals are on, but not many of them. This is meant to be C3, Chartreuse. The Black Lion decal set allows you to make any combination of letters and numbers, so for the battle of Flers you could make any of the tanks in C and D Company. However they also supply names for a few of them, e.g. C5 Creme de Menthe, and, unfortunately they spelled it wrong, C6 Cordon Rouge (not "Cordon Rogue"!) I couldn't see any photos where the names of these were clearly applied, although there are precious few photos of these tanks, so you don't get all the angles covered and not every individual tank. Black Lion seem to suggest that they go on the nose plate, but in fact don't give specific instructions for the exact position of the name decals, which is a bit odd. Anyway, mine hasn't got the name written on it, and I haven't seen a photo to convince me it should actually be there. I had to add a tiny extra bit of green to the nose on the side in the photo below so that the C didn't sit on the sand colour and be rendered almost invisible.
Adam asked for some weathering; as I'm sometimes confused by all the technique talk that takes place, I'm not sure if this is weathering or not . . . it is a mostly black with a bit of burnt umber wash, very thin, in the ANPWilder type style which I hadn't really tried before, and I took on board his moving it down all the time with a no 2 brush advice. Mine is maybe a bit heavier, so does probably count as weathering. This is it more or less freshly done:
Then this is it kind of toned down:
Notice the black staining coming down off the rivets at the top behind the sponson is now a bit more subtle. Again, good advice from Mr Wilder is to keep working the wash. When first applied it is just thin liquid, so touching it at all will move it around a lot, but due to all the white spirit in it, which evaporates pretty quickly (for oil paint that is) it thickens up and starts to set, but remains workable in progressively more subtle ways. After a couple of hours, I could start to use the brush quite hard and reduce and blend it where necessary, after about three hours it was more of less set.
The next thing was to try and do something along the lines of "adding depth" or "filters" or some such jazz. Steve Zaloga seems to manage to build a kit every month in Military Modelling, and he has been taking recently about Winsor and Newton Liquin, which is a medium for mixing into oil paint, so some time ago I bought a bottle and this was the first time I've used it. It was interesting; it is meant to reduce brush stroke visibility, which is a good thing, I think, and it makes the various colours being mixed blend more easily. Without any need to actually thin the paint, (it is in fact quite thick) I found you can still spread it around so it can go on very thinly. Unlike using white spirit I didn't get any of that thing where the paint kind of disintegrates into tiny particles (is that just me and my cheapskate decorators' white spirit?)
Anyway, the colour was mainly yellow ochre with some white and a bit of flesh and some brown (I think). Here is a comparison photo, where the left sponson top has been treated with this mixture, the right sponson has just had the black wash.
Here is another comparison photo of my Mk 1, when it first came out of the shower with its camouflage paint job, and now.
I do wonder how much rain and weathering these things had been through by the time they went into action. Later there will certainly be plenty of mud, but a lot of their so far short lives to this point had been during summertime, and under tarpaulins, which is what I think can be seen bundled up on the tops in several photos. Nevertheless, whether the weathering is authentic or not, it somehow seems appropriate that this tank should have a kind of aged sepia look, in keeping with its Edwardian-era paint and the quality of contemporary photos.
tread_geek
Joined: March 23, 2008
KitMaker: 2,847 posts
Armorama: 2,667 posts
Posted: Tuesday, December 22, 2009 - 05:17 AM UTC
Matthew, you are doing a positively marvellous job on this little kit. Your commentary on the build is both enlightening and entertaining. I was at the LHS the other day and from what I saw they had restocked the shelves for the season. Imagine my surprise when I saw two of these little gems on the shelf. They haven't had any Airfix kits in ages and then these appear. While tempted to purchase one, I thought about what you have gone through and decided to take a pass on them.
Cheers,
Jan
I was at the LHS the other day and from what I saw they had restocked the shelves for the season. Imagine my surprise when I saw two of these little gems on the shelf. They haven't had any Airfix kits in ages and then these appear. While tempted to purchase one, I thought about what you have gone through and decided to take a pass on them. Cheers,
Jan
firstcircle
Joined: November 19, 2008
KitMaker: 2,249 posts
Armorama: 2,007 posts
Posted: Tuesday, December 22, 2009 - 10:46 AM UTC
Thanks very much, Jan; you might be interested to know that C3 fought with infantry from the 2nd Canadian Division. If I was you I would wait for the Female - I just noticed something quite exciting today, that Airfix have now revealed the box art for the now delayed Female Mark 1. Previously their site listed the kit accompanied by a photo of a real tank, but now we can see this:
Airfix Female
Unless it is just a case of the box artist getting it more right than the tool designer, it suggests that there will *not* be a reappearance of the errors in the Male. Note the rounded instead of square track adjuster recess, three little tufts of smoke issuing from the exhaust holes instead of a silencer, as well as the completely flat roof, in other words, without the incorrect raised roof hatch.
In fact the artwork is very close to the illustration in the New Vanguard book, both showing the wonderfully named "HMLS We're All In It", but minus the roof anti-grenade netting.
I can see a companion piece for my male might be not too far away!
adamsmasher
Joined: June 27, 2009
KitMaker: 192 posts
Armorama: 54 posts
Posted: Tuesday, December 22, 2009 - 07:13 PM UTC
Hi Mathew. It's really coming together.
I don't mean any specific techniques for weathering; rather, anything that adds signs of wear and tear or usage. Everyone seems to have their own favourite techniques and degrees of weathering. Personally, I like to make my kits look like they rolled around in the mud and rusted for a year.
The wash you applied looks nice and subtle - as it should.
tread_geek
Joined: March 23, 2008
KitMaker: 2,847 posts
Armorama: 2,667 posts
Posted: Wednesday, December 23, 2009 - 06:33 AM UTC
Quoted Text
Thanks very much, Jan; you might be interested to know that C3 fought with infantry from the 2nd Canadian Division. If I was you I would wait for the Female - I just noticed something quite exciting today, that Airfix have now revealed the box art for the now delayed Female Mark 1. Previously their site listed the kit accompanied by a photo of a real tank, but now we can see this:
Airfix Female
.....
I can see a companion piece for my male might be not too far away!
Matthew, thanks for that little bit of historical information about C2.
The Airfix site lists the male as supposedly a new kit release for 2009. Might I be correct in assuming that it is merely a rerelease of the older kit? I also noticed that the male has 49 parts while the female has 69 parts. Even with double the gun positions on the female I can't see 20 extra parts for two extra gun positions. This might imply a different or new mould.Cheers,
Jan
 |

WEB HOSTING BY


Copyright ©2021 Armorama and Kitmaker Network, a subsidiary of Silver Star Enterprises
All Rights Reserved. Please read our Conditions of Use and Privacy Policy.
All Rights Reserved. Please read our Conditions of Use and Privacy Policy.