

Exactly - as I said at the start of this thread, the Male is just a re-release of the 1960's kit. The only things new are, I think, the box art, the track material, which presumably no longer rots as it ages as I believe used to be the case, and the country of manufacture. Even the decals are the same.
The way the sprues are laid out means that some bits at least could be shared between male and female, most obviously the limber, but I am guessing, and hoping, that this won't be the case, and strongly suspect that the female will be all new. I hadn't noticed the parts number discrepency, so that does seem to back this up. Also the fact that it was meant to come out in 2009, but has been delayed until 2010, suggests (to me anyway, in my optimistic way as far as this release goes) that they have been working very hard to "get it right".
This could of course open up possibilities for interbreeding the two kits; after all, what are males and females of the same species for??
Hosted by Darren Baker
Airfix "WWI Male Tank" Mark 1

firstcircle


Joined: November 19, 2008
KitMaker: 2,249 posts
Armorama: 2,007 posts
Posted: Wednesday, December 23, 2009 - 10:10 AM UTC

adamsmasher

Joined: June 27, 2009
KitMaker: 192 posts
Armorama: 54 posts
Posted: Saturday, December 26, 2009 - 05:21 PM UTC
Quoted Text
This could of course open up possibilities for interbreeding the two kits; after all, what are males and females of the same species for??
The mental image this brought to mind was comical yet highly disturbing. It's like retro Transformers porn.

firstcircle
Joined: November 19, 2008
KitMaker: 2,249 posts
Armorama: 2,007 posts
Posted: Wednesday, December 30, 2009 - 11:45 AM UTC
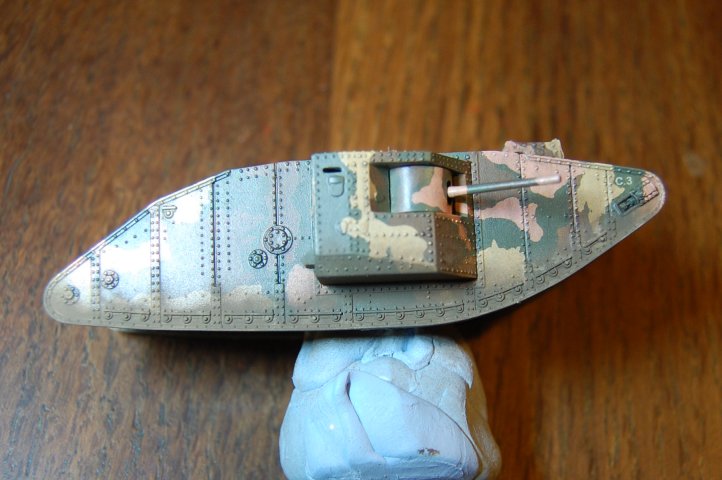
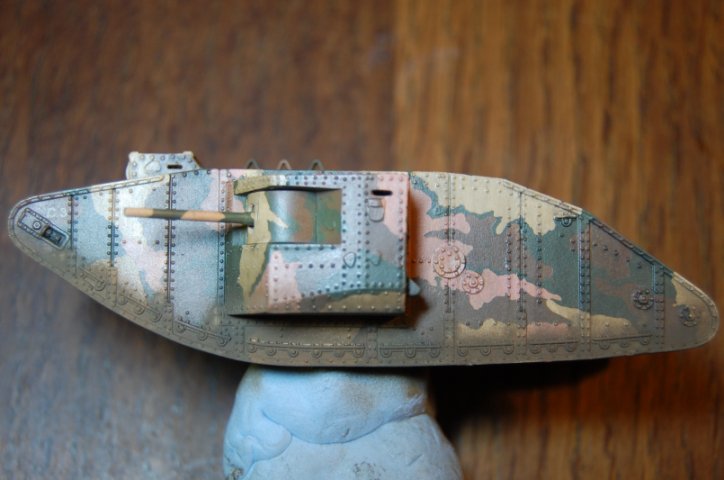
An update to this thread which seems to move slower than a Mark 1 tank across a battlefield (1mph). Airbrushing the mud stains. Again, taking my lead from others, I've sprayed certain parts with earth colour. As per Tony Greenland, this is Humbrol Earth with a little black added (though more like 5% rather than his 30%.) It was also thinned to about 50%. As per Adam Wilder's sometime advice I reduced the pressure on the compressor down to 15psi and this combination gave a very controllable way of applying a small amount. (And I'm happy to say the earth enamel didn't clog the airbrush  )
)
I say "mud stains" because the normal advice is that the running gear is sprayed like this. Of course these rhomboids are different in that there is no demarcation between the suspension and the superstructure, so I was pondering how this applies, but studying certain photos seems to show that the tanks ploughed into the ground to an extent. Photos of the operations at Flers in September 1916 show the ground looking like freshly excavated, quite finely pulverised soil, fairly dry on top, but dark and moist underneath, like when you dig the garden. Except that was the result of intensive artillery barrages earlier that morning . . . Therefore the bottom few inches would be ground through the earth, often to the depth of the bottom of the sponson, and it was indeed observed that the male sponsons would sometimes dug in.
So this is really undercoat for soil that I will add later, and I think, a certain amount of chalk, as the photos seem to show a white, or light element to the earth. Note that it starts around the track adjuster as these machines would tip forward in and out of the shell holes. On these pics you can easily see the matt earth against the reflective satin of the rest of the paintwork.
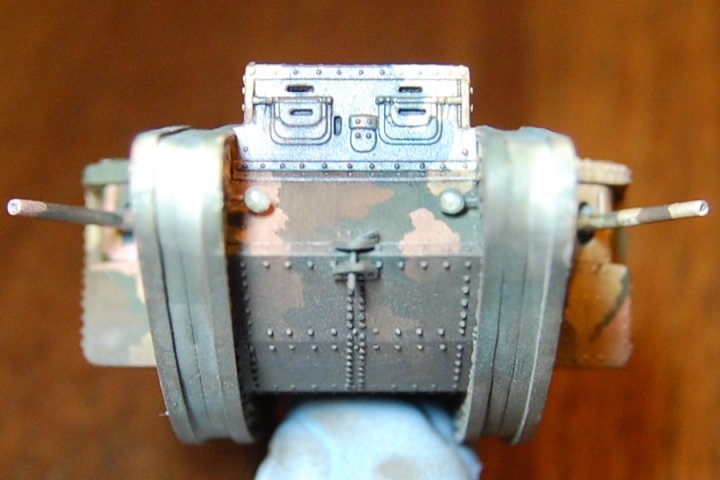
The underside was more or less completely coated as I imagine it would be scraped along the ground sometimes:
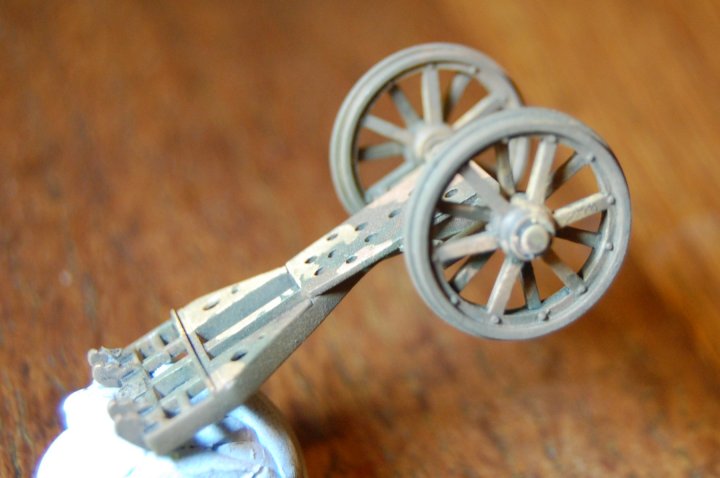
And the limber as well - the camouflage just visible through the earth paint. The limber is bothering me though, as apparently on C3 it was damaged by shell fire soon after it set out, but there is no photo showing it. I'm therefore unsure what type of damage - I suppose it is possible that it could be damaged in some way without being too visible. On the other hand there is a photo of Creme de Menthe in action with apparently only one limber wheel left.
So as the application of mud approaches, I have also given thought to the display, and Adam's desire to see this machine ditched in the shell hole that was its resting place in the battle. I'm thinking of making it from Super Sculpey, but for now I have made a prototype from Plasticine to check for size and fit etc. The colours don't mean anything, I just ran out of grey and had to use black as well.
Aerial view with the track marks leading in from the left:
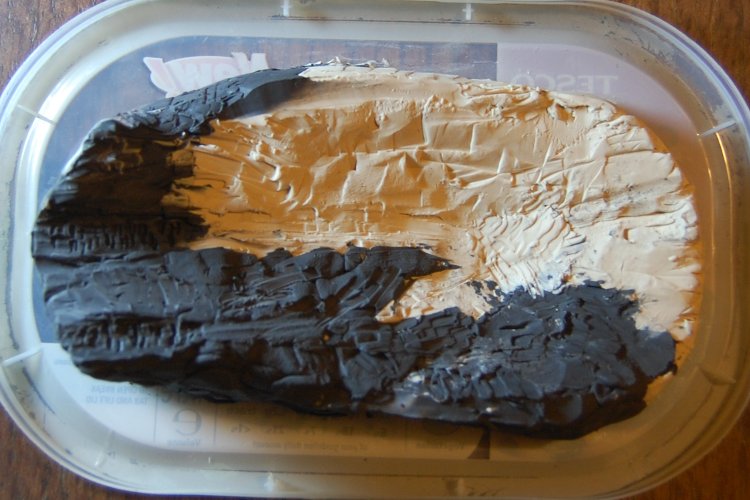
And the bottom of the crater:
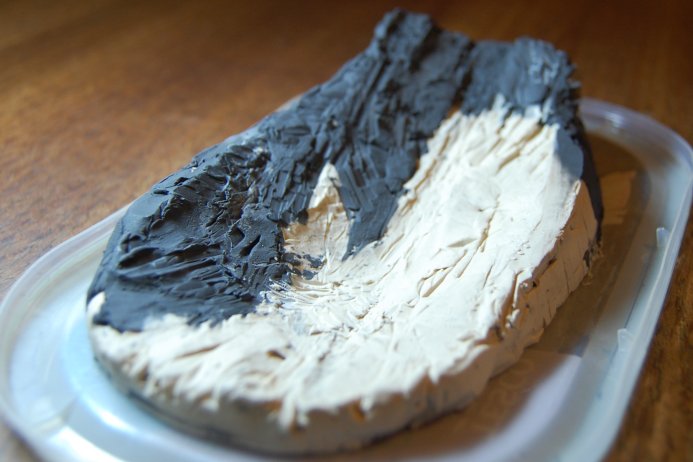
I don't have a photo of the tank in it, I'm afraid, but it does sit in there at a horrible angle, looking very forlorn and tragic.
)I say "mud stains" because the normal advice is that the running gear is sprayed like this. Of course these rhomboids are different in that there is no demarcation between the suspension and the superstructure, so I was pondering how this applies, but studying certain photos seems to show that the tanks ploughed into the ground to an extent. Photos of the operations at Flers in September 1916 show the ground looking like freshly excavated, quite finely pulverised soil, fairly dry on top, but dark and moist underneath, like when you dig the garden. Except that was the result of intensive artillery barrages earlier that morning . . . Therefore the bottom few inches would be ground through the earth, often to the depth of the bottom of the sponson, and it was indeed observed that the male sponsons would sometimes dug in.
So this is really undercoat for soil that I will add later, and I think, a certain amount of chalk, as the photos seem to show a white, or light element to the earth. Note that it starts around the track adjuster as these machines would tip forward in and out of the shell holes. On these pics you can easily see the matt earth against the reflective satin of the rest of the paintwork.
The underside was more or less completely coated as I imagine it would be scraped along the ground sometimes:
And the limber as well - the camouflage just visible through the earth paint. The limber is bothering me though, as apparently on C3 it was damaged by shell fire soon after it set out, but there is no photo showing it. I'm therefore unsure what type of damage - I suppose it is possible that it could be damaged in some way without being too visible. On the other hand there is a photo of Creme de Menthe in action with apparently only one limber wheel left.
So as the application of mud approaches, I have also given thought to the display, and Adam's desire to see this machine ditched in the shell hole that was its resting place in the battle. I'm thinking of making it from Super Sculpey, but for now I have made a prototype from Plasticine to check for size and fit etc. The colours don't mean anything, I just ran out of grey and had to use black as well.
Aerial view with the track marks leading in from the left:
And the bottom of the crater:
I don't have a photo of the tank in it, I'm afraid, but it does sit in there at a horrible angle, looking very forlorn and tragic.
adamsmasher
Joined: June 27, 2009
KitMaker: 192 posts
Armorama: 54 posts
Posted: Thursday, December 31, 2009 - 11:19 AM UTC
I'm really enjoying this build, Matthew! I can't express how pleased I am to see the shell hole base; I think I'll need to make an extra toast to the crew of the Chartreuse and their crippled landship.
To the C3, may your melancholy abate despite being comically marooned in a mud pit.

Oh, and I'm excited to see some mud appearing on the hull. Nothing contributes to that touch of realism like dirt.
To the C3, may your melancholy abate despite being comically marooned in a mud pit.
Oh, and I'm excited to see some mud appearing on the hull. Nothing contributes to that touch of realism like dirt.

Bryan29

Joined: January 17, 2010
KitMaker: 3 posts
Armorama: 2 posts
Posted: Sunday, January 17, 2010 - 05:26 AM UTC
This has got be an amazing coincidence - C3 Chartreuse was the tank my father commanded in the first ever tank operation in the Somme!
How on earth did Airfix come to choose that particular tank I wonder?
As you may know, info about C3 Chartreuse and its crew is available on line by Googling "The First Tank Crews"
How on earth did Airfix come to choose that particular tank I wonder?
As you may know, info about C3 Chartreuse and its crew is available on line by Googling "The First Tank Crews"

weathering_one

Joined: April 04, 2009
KitMaker: 458 posts
Armorama: 456 posts

Posted: Sunday, January 17, 2010 - 06:22 AM UTC
This is really turning out to be a stupendous Braille scale build of an often overlooked subject. Haven't been on in a while so the progress is extremely evident and impressive. The local shop had two of these the last time I was there. When I saw them I thought of this thread and said to myself, :no way, forget it."  Leave kits like that to the experts.
AJ
Leave kits like that to the experts.AJ
firstcircle
Joined: November 19, 2008
KitMaker: 2,249 posts
Armorama: 2,007 posts
Posted: Monday, January 18, 2010 - 10:42 AM UTC
Quoted Text
This has got be an amazing coincidence - C3 Chartreuse was the tank my father commanded in the first ever tank operation in the Somme!
Bryan, I have to say that I am rather stunned ! I have just finished reading the excellent Trevor Pidgeon book "The Tanks at Flers", so knew that 2/LT SDH Clarke was the commander of C3, but to receive a message from his son seems, I hope you don't mind me saying, somewhat amazing. I suppose, in a sense, the people in a history such as this become part of the public domain, and it is easy to forget that there are others for whom these historic figures are so much closer and more real.
Quoted Text
How on earth did Airfix come to choose that particular tank I wonder?
Well, they didn't; the Airfix kit comes only with markings to represent HMLS Dragonfly. I wanted mine to represent one of those that was deployed at Flers, and chose Chartreuse for a number of reasons: some of the tanks had anti-grenade nets which I didn't want to make as it would cover up some of detail on the top, so C Company Section 1 suited that; I wanted to use one of the colourful camouflage schemes, and the photographs that inspired the paint were of Creme de Menthe. Due to the difficulty of making it exactly represent that machine, I chose another in the same company and section, and as it had to be male, this meant it could only be Champagne or Chartreuse; I chose the latter as it operated with Creme de Menthe so I felt it would probably look similar.
The only photograph of C3 in the above book is the one of it stuck in the shell crater, so wanting to set in on a scenic base, I decided it should represent the moment at which Private Boult unfortunately steered the machine into the hole in which it stayed.
I almost feel that I should ask you if you mind me doing that . . . ?
Quoted Text
As you may know, info about C3 Chartreuse and its crew is available on line by Googling "The First Tank Crews"
I have seen this website, and some of the stories of these men in Trevor Pidgeon's book I found very moving. The exploits of some of the crews in trying to dig out or repair machines while under enemy fire are often truly grim, such as the account of C14 once it became stuck. Fortunately however a good and perhaps surprising number of the crews did make it through relatively unscathed, at least on the outside.
My building of this model has been interrupted by me spending a long time thinking about how to improve the tracks over what Airfix provided. Both the tank and the base are waiting for the track solution, so until I have the tracks ready, it is on hold. I will come up with a solution soon hopefully.
Bryan29
Joined: January 17, 2010
KitMaker: 3 posts
Armorama: 2 posts
Posted: Tuesday, January 19, 2010 - 08:28 AM UTC
Matthew,
It is great to learn of your interest and what you are doing - my father will surely live on in cyberspace!
I have a photo of my father with, possibly,his crew and a number of tanks being on or off loaded to rail , not obvious if one of them is C3 - happy to send it but that looks a bit complicated.
Have wait listed "The Tanks at Flers" from Amazon - thank you.
Bryan

Braille

#135
Joined: August 05, 2007
KitMaker: 1,501 posts
Armorama: 1,485 posts

Posted: Tuesday, January 19, 2010 - 10:38 AM UTC
Matthew,
This has to be by far the most inspirational WWI build logs ever, in MHO! Masterful kit building. Extremely well written, researched and documented. Both historically accurate and interesting.
You've done an absolutely splendid job on the camouflage and building of this kit. Excellent step by step fixes, modifications and corrections to the kit with some very well taken photographs. I hope that you will think about doing a build feature here to capture all of what you have done to upgrade this moldy but goody kit bringing it up to the kit standards of today.
That idea that you mentioned here earlier in this post about a hand sticking out of the crew hatch with the bird would have really topped this one off!!! But as it stands it is still great. And now you even have the commanders family member posting here . . . I can't wait for the next step . . .
-Eddy
firstcircle
Joined: November 19, 2008
KitMaker: 2,249 posts
Armorama: 2,007 posts
Posted: Wednesday, January 20, 2010 - 05:34 AM UTC
Quoted Text
I have a photo of my father . . . happy to send it but that looks a bit complicated.
Bryan, it would be wonderful to see the photo. Posting pictures here can be tricky, but if you are prepared to do so, you could email it directly to me. I'll send you a personal message via this site with my email address. If you look near the top of the screen you should see that there is a message waiting for you, next to where it says "my account".
Quoted Text
Have wait listed "The Tanks at Flers" from Amazon - thank you..
Yes, Amazon don't have it in stock because I bought the last one they had! I have found someone else who has it, and will include details in the same message.
Eddy and AJB, thank you very much for your feedback, much appreciated. The pigeon was in fact released from another machine; interestingly the Trevor Pidgeon book (honestly . . . ) has a photo of a post WW1 "recreation" of the event, with the pigeon being released from one of the gun loops on the back of the sponson rather than from the crew hatch - a safer option I suppose.
firstcircle
Joined: November 19, 2008
KitMaker: 2,249 posts
Armorama: 2,007 posts
Posted: Thursday, January 21, 2010 - 10:45 AM UTC
Bryan very kindly sent this photograph of his father, 2/LT SDH Clarke, commander of C3 Chartreuse at the Battle of Flers. Stanley Darrell Houghton Clarke is the officer smoking the pipe in the lower right hand corner of the photo.
Others may well be more knowledgeable than me, but I speculate that this was taken shortly after the armistice, my reasoning being mainly that those four men standing behind him, and the very young looking man to the left of the platform, look like they are wearing German army uniforms - yet no-one looks like they are taking any notice of them, so they hardly look like prisoners.
Notice the white red white vertical stripes on the tanks on the far right, which I believe dates them at least after June 1918. I suppose these are probably Mark IVs? Not sure what the distinguising features are that would be visible in this picture.
firstcircle
Joined: November 19, 2008
KitMaker: 2,249 posts
Armorama: 2,007 posts
Posted: Tuesday, March 16, 2010 - 10:46 AM UTC
That was a long pause, while I thought about tracks. I thought about it for a long time. I even had a conversation with people on another site about it, the Landships site, and I regret to say that I notice this evening that they are currently off the air. Their service provider page gives a possible reason, but whatever has happened, I hope they are back soon.
Although I showed work on painting the tracks tracks earlier on, I always had in mind that every photo I've seen of this model has been somewhat let down by the rubber band thickness and entirely untextured sides of the track plates. Note that on this tank, what you see are track plates which are rivetted onto cast links; these castings we can take as being not visible at this scale.
How to make better track plates? From the New Vanguard book I know that the plate is 520mm wide. Measuring from a photo of the example at Bovington (having extrapolated the scale of the photo by the relative width of the plate) I figured out that the plate is about 225mm long, and the ridge along the edge approximately 52mm wide. I was planning to drive down to Bovington over Christmas to check it out on the real thing, but the terrible weather here made a long car journey with the kids out of the question.
Scaled down this is 6.84mm x 2.96mm with the ridge 0.68mm. Cutting a piece from plastic card is fairly easy. I tried various ways of making the ridge, and had some success with pressing the card piece down hard on to some 0.5mm wire which was taped to the cutting mat. Here is one of the first attempts, seen before the long edge was trimmed:

I tried to make a few to see how easy it was to get them uniform. Not that easy of course, and to make a full set, you need 180 of them. Worse still is trying to make the rivet pattern; even on one this was difficult to achieve with the plastic.
I then tried making a plate from brass sheet; obviously that's harder to cut than plastic, but has the advantage that you can more easily bend the ridge in, which I did with two pairs of pliers, and emboss the rivets in, which I did with a slightly blunted map pin.
I already had in mind that the solution is of course to be able to reproduce the plates mechanically. It seems to me that the ideal would be to have a punch and die with which to stamp them out of brass sheet, but I couldn't figure out how those things are made, and paying someone to make one seems costly.
The brass plate could be used as a master, and for a while I imagined I'd make a few masters, learn how to do metal casting, and knock them out ten at a time. Well it didn't work out like that . . .
Before going into the mould making and casting, I should give credit to the rail modeller from whom I learnt this - Nigel Lawton and his marvellous 009 Vee Tipper site. Look at the bottom left of his page where he has great articles on etching, resin casting and metal casting - great because he gives so much practical advice, and from the perspective of someone who is learning how to do it himself - his articles are also quite funny which is a bonus.
So I won't re-explain it all in detail here, as he does it so well and at great length. Instead here is a flavour of the process.
A not very good photo of the brass master. Behind is the small plastic block that was superglued to the back, and which is designed to sit in the track mounting ridge on the tank.

Using some of my daughter's Lego, a box was built to contain the mould. Plasticine was packed in up to half way. The guide to how big this box should be is explained in Nigel Lawton's guide, but basically you need about 25mm all round the item to be cast, and a longer run of about 60mm for the sid e which will contain the channel through which metal will be poured - enough length to contain sufficient weight of metal to force it into and completely fill the mould. The bits of chopped up brush handle that act as the locating posts for the two halves of the mould, and the brass master are all in place:

Completely gratuitous photo of mixing the catalyst with the latex - although you do need to do this for blooming ages to ensure all the rubber cures:

Some latex is brushed carefully on to the master to avoid any air bubble forming around it:

Then the box is filled with liquid rubber; it doesn't leak out of the Lego.

After leaving to cure for a day, the Lego was removed, and the rubber separated from the Plasticine. Here is the resulting first half of the mould, with the impression of the track plate arrowed:

When I saw that, I thought, this is never going to work, it's too small to get anything from. Nigel does warn about not trying to cast items that are very thin . . . Anyway, rebuild the Lego box, this time around the rubber block, and put the master back in place, but now with the other side up. Spray the surface of the first half of the latex with mould release, a petrochemical spray that stops the two halves of latex from permanently attaching. Then a second batch of latex is poured on top in the same way as before, having brushed some directly on to the master first:

Taking the Lego off, I have what seems to be one solid block:

After very carefully slitting around the join line with a sharp knife, the two halves separated and this was revealed:

Then I was able to take the master out and see the other half of the track plate impression:

Having done this, the latex must be allowed to fully cure for about three or four days before attempting to do any casting, which I will come to.
Of course I have made this all sound quite easy, but in fact a few things went wrong, including having to remake one half of the mould, twice . . .
All this has been mixed in with doing a build of a Puma for the Matchbox Nostalgia Campaign by the way, now complete - for a bit of light relief.
Although I showed work on painting the tracks tracks earlier on, I always had in mind that every photo I've seen of this model has been somewhat let down by the rubber band thickness and entirely untextured sides of the track plates. Note that on this tank, what you see are track plates which are rivetted onto cast links; these castings we can take as being not visible at this scale.
How to make better track plates? From the New Vanguard book I know that the plate is 520mm wide. Measuring from a photo of the example at Bovington (having extrapolated the scale of the photo by the relative width of the plate) I figured out that the plate is about 225mm long, and the ridge along the edge approximately 52mm wide. I was planning to drive down to Bovington over Christmas to check it out on the real thing, but the terrible weather here made a long car journey with the kids out of the question.
Scaled down this is 6.84mm x 2.96mm with the ridge 0.68mm. Cutting a piece from plastic card is fairly easy. I tried various ways of making the ridge, and had some success with pressing the card piece down hard on to some 0.5mm wire which was taped to the cutting mat. Here is one of the first attempts, seen before the long edge was trimmed:
I tried to make a few to see how easy it was to get them uniform. Not that easy of course, and to make a full set, you need 180 of them. Worse still is trying to make the rivet pattern; even on one this was difficult to achieve with the plastic.
I then tried making a plate from brass sheet; obviously that's harder to cut than plastic, but has the advantage that you can more easily bend the ridge in, which I did with two pairs of pliers, and emboss the rivets in, which I did with a slightly blunted map pin.
I already had in mind that the solution is of course to be able to reproduce the plates mechanically. It seems to me that the ideal would be to have a punch and die with which to stamp them out of brass sheet, but I couldn't figure out how those things are made, and paying someone to make one seems costly.
The brass plate could be used as a master, and for a while I imagined I'd make a few masters, learn how to do metal casting, and knock them out ten at a time. Well it didn't work out like that . . .
Before going into the mould making and casting, I should give credit to the rail modeller from whom I learnt this - Nigel Lawton and his marvellous 009 Vee Tipper site. Look at the bottom left of his page where he has great articles on etching, resin casting and metal casting - great because he gives so much practical advice, and from the perspective of someone who is learning how to do it himself - his articles are also quite funny which is a bonus.
So I won't re-explain it all in detail here, as he does it so well and at great length. Instead here is a flavour of the process.
A not very good photo of the brass master. Behind is the small plastic block that was superglued to the back, and which is designed to sit in the track mounting ridge on the tank.
Using some of my daughter's Lego, a box was built to contain the mould. Plasticine was packed in up to half way. The guide to how big this box should be is explained in Nigel Lawton's guide, but basically you need about 25mm all round the item to be cast, and a longer run of about 60mm for the sid e which will contain the channel through which metal will be poured - enough length to contain sufficient weight of metal to force it into and completely fill the mould. The bits of chopped up brush handle that act as the locating posts for the two halves of the mould, and the brass master are all in place:
Completely gratuitous photo of mixing the catalyst with the latex - although you do need to do this for blooming ages to ensure all the rubber cures:
Some latex is brushed carefully on to the master to avoid any air bubble forming around it:
Then the box is filled with liquid rubber; it doesn't leak out of the Lego.
After leaving to cure for a day, the Lego was removed, and the rubber separated from the Plasticine. Here is the resulting first half of the mould, with the impression of the track plate arrowed:
When I saw that, I thought, this is never going to work, it's too small to get anything from. Nigel does warn about not trying to cast items that are very thin . . . Anyway, rebuild the Lego box, this time around the rubber block, and put the master back in place, but now with the other side up. Spray the surface of the first half of the latex with mould release, a petrochemical spray that stops the two halves of latex from permanently attaching. Then a second batch of latex is poured on top in the same way as before, having brushed some directly on to the master first:
Taking the Lego off, I have what seems to be one solid block:
After very carefully slitting around the join line with a sharp knife, the two halves separated and this was revealed:
Then I was able to take the master out and see the other half of the track plate impression:
Having done this, the latex must be allowed to fully cure for about three or four days before attempting to do any casting, which I will come to.
Of course I have made this all sound quite easy, but in fact a few things went wrong, including having to remake one half of the mould, twice . . .
All this has been mixed in with doing a build of a Puma for the Matchbox Nostalgia Campaign by the way, now complete - for a bit of light relief.

Andronicus
Joined: March 13, 2007
KitMaker: 391 posts
Armorama: 321 posts

Posted: Wednesday, March 17, 2010 - 04:51 AM UTC
This is a great thread - thanks for sharing this build. I've learnt a great deal for building in 1/72-6 - esp toothpaste as a mask!
Will continue to follow your progress with real interest....
A
Will continue to follow your progress with real interest....
A
tread_geek
Joined: March 23, 2008
KitMaker: 2,847 posts
Armorama: 2,667 posts
Posted: Wednesday, March 17, 2010 - 07:32 AM UTC
Positively fantastic thread and build.  You are definitely turning this project into an epic, Matthew. After you complete this I could see a feature, magazine article or book in your future. Thanks for sharing and waiting with bated breath for the next instalment.
Cheers,
Jan
You are definitely turning this project into an epic, Matthew. After you complete this I could see a feature, magazine article or book in your future. Thanks for sharing and waiting with bated breath for the next instalment.Cheers,
Jan
adamsmasher
Joined: June 27, 2009
KitMaker: 192 posts
Armorama: 54 posts
Posted: Thursday, March 18, 2010 - 04:38 AM UTC
I have to concur. This project went from in-depth to epic when you brought out the legos. 
I can't wait to see the metal casting begin!
I can't wait to see the metal casting begin!
BWP

Joined: June 06, 2006
KitMaker: 20 posts
Armorama: 16 posts

Posted: Thursday, May 06, 2010 - 01:57 PM UTC
[quote]That was a long pause, while I thought about tracks./quote]
Just wanted to add my voice to the compliments on your fantastic build effort. This kit was one of the first kits I ever built as a youngster (many, many years ago!) and I have had one in my stash now for a little while ... threads like this are certainly encouraging me to pay some attention to it!
As you are probably already aware by now, the Airfix Female tank is (disappointingly) exactly the same as the original kit, with a few new bits for the MG sponsons. No attempt has been made to fix any errors in the original.
Regarding tracks, you seem to have gone the long hard path in fixing them! -- but are you aware of the resin replacements from Matador? I'm contemplating getting a set of them but they're a tad expensive by the time to get to this part of the world, and would like to see some indendent evaluations first.
http://www.matadormodels.co.uk/gw/lists%20GWE.htm
firstcircle
Joined: November 19, 2008
KitMaker: 2,249 posts
Armorama: 2,007 posts
Posted: Monday, May 17, 2010 - 11:56 AM UTC
Sorry to those showing an interest that the posting has become so erratic. I partly blame Jan (tread_geek) and the totally addictive Matchbox Nostalgia Campaign he has been running - I finished one, and then just had to do another. I did also go on holiday. 
Bruce, the Female was indeed disappointing; I recently wrote a review of it on this site, if you look under reviews by manufacturer, it's the only Airfix AFV review there is. I was aware of the Matador tracks, but couldn't find any reviews of them anywhere and somehow ended up going the DIY route. In fact I have now ordered a set from Scale Link; part of the problem was last time I looked, I thought they were only available direct from Matador, and they seemed to still be only taking orders by fax... which is a bit retro. I will see how they go for the inevitable Female build and will give you my "independent evaluation" (compared to my home-made efforts that is!)
Now, following on from the last photo of the brand new mould of red latex, it's necessary to cut a channel through which to pour the metal. The kit I bought from Alec Tiranti included a "sprue cutter" which is a lot like a lino cutter I remember using at school for making lino prints. The channel is gouged out with the cutter, and has to be big at the top end, as it is partly the weight of the molten metal that ensures the mould is filled, while at the same time, care is needed to keep the channel quite fine where it meets the actual impression. The object being made is so small that it would be easy to damage the mould by making it too big at this point, and also the bigger the channel is, the more cleaning up there is to do. On the other hand, if the channel is too small as it goes into the mould, the flow of metal may be restricted. You can also see in this photo that the mould has been dusted with talc to protect it from the hot metal.
firstcircle
Joined: November 19, 2008
KitMaker: 2,249 posts
Armorama: 2,007 posts
Posted: Tuesday, May 18, 2010 - 11:50 AM UTC
Last post was cut short due to unforeseen circumstances.
The two halves are put together, wrapped in foil to keep them clean, then put in the oven at 180c for about 10 mins to warm the mould. When ready, metal is melted on the stove - obviously the crucible is too small for the ring but it just sits on the edge and is fine:

This small amount takes about 1 minute to melt, so as soon as it goes on the gas, I get the mould out of the oven and clamp it together with two bits of hardboard to keep it rigid and a couple of thick rubber bands. Standing it upright in a metal biscuit tin or tray, then just pouring the metal straight in, in one quick but careful go:

I should point out that I wear a leather glove on the left hand while doing all of this, and if you don't wear glasses, goggles would be a good idea as the metal is around 200c . The mould is given a few taps to ensure the metal flows all the way down and fills the mould. Now the frustrating bit while waiting for it to cool - about 3 or 4 minutes, not really time to do anything else, especially as I have been trying to speed the process up, so don't want to get distracted!
When the top of the metal is hard, and then a minute longer, on opening the mould:


At this stage, the metal is still too hot to hold, so I remove it wearing the glove, then straight away redust the mould with talc, wrap it in the foil and back in the oven. Then snip the casting from the sprue with sidecutters, carefully, into a box, so it doesn't fly across the room.
When I tried to make the first couple of castings, the metal didn't fill the mould and I ended up with kind of half a track plate. Lack of experience led me to enlarge the pouring channel, thinking that would cure it, but in doing this I damaged one half of the mould, and as mentioned above, had to remake it.
What I now know is that I had the mould clamped too tightly. If the rubber bands are too tight, the void in the mould is squeezed together and becomes too small, resulting in an incomplete casting. If the bands are too loose, you just end up with a great deal of flash. In the photo below, the left hand casting is about as good as I get, the right hand one the result of looser clamping.

The flash is very thin however and easy to clean up. The thick sprue part is trimmed with sidecutters again, then the rest cleaned with a file and emery paper.

So after many hours casting I had this:

Then they gradully get transformed:

A full set for the Mark I would need 180 pieces, but as this is Chartreuse ditched in a crater, those tracks churning into the mud as it tries to get out, most of the bottom run will be buried in the ground, so I think I need about 120-130 links. I started off only making about 10 per evening but have managed to double this, so that I can now make a link every 5 or 6 minutes. Anyway, I currently have 96 of them, so a couple more evenings to go. I know I should have made two moulds, or a way of casting several at once, but maybe next time.
The two halves are put together, wrapped in foil to keep them clean, then put in the oven at 180c for about 10 mins to warm the mould. When ready, metal is melted on the stove - obviously the crucible is too small for the ring but it just sits on the edge and is fine:
This small amount takes about 1 minute to melt, so as soon as it goes on the gas, I get the mould out of the oven and clamp it together with two bits of hardboard to keep it rigid and a couple of thick rubber bands. Standing it upright in a metal biscuit tin or tray, then just pouring the metal straight in, in one quick but careful go:
I should point out that I wear a leather glove on the left hand while doing all of this, and if you don't wear glasses, goggles would be a good idea as the metal is around 200c
. The mould is given a few taps to ensure the metal flows all the way down and fills the mould. Now the frustrating bit while waiting for it to cool - about 3 or 4 minutes, not really time to do anything else, especially as I have been trying to speed the process up, so don't want to get distracted!When the top of the metal is hard, and then a minute longer, on opening the mould:
At this stage, the metal is still too hot to hold, so I remove it wearing the glove, then straight away redust the mould with talc, wrap it in the foil and back in the oven. Then snip the casting from the sprue with sidecutters, carefully, into a box, so it doesn't fly across the room.
When I tried to make the first couple of castings, the metal didn't fill the mould and I ended up with kind of half a track plate. Lack of experience led me to enlarge the pouring channel, thinking that would cure it, but in doing this I damaged one half of the mould, and as mentioned above, had to remake it.
What I now know is that I had the mould clamped too tightly. If the rubber bands are too tight, the void in the mould is squeezed together and becomes too small, resulting in an incomplete casting. If the bands are too loose, you just end up with a great deal of flash. In the photo below, the left hand casting is about as good as I get, the right hand one the result of looser clamping.
The flash is very thin however and easy to clean up. The thick sprue part is trimmed with sidecutters again, then the rest cleaned with a file and emery paper.
So after many hours casting I had this:
Then they gradully get transformed:
A full set for the Mark I would need 180 pieces, but as this is Chartreuse ditched in a crater, those tracks churning into the mud as it tries to get out, most of the bottom run will be buried in the ground, so I think I need about 120-130 links. I started off only making about 10 per evening but have managed to double this, so that I can now make a link every 5 or 6 minutes. Anyway, I currently have 96 of them, so a couple more evenings to go. I know I should have made two moulds, or a way of casting several at once, but maybe next time.
adamsmasher
Joined: June 27, 2009
KitMaker: 192 posts
Armorama: 54 posts
Posted: Tuesday, May 18, 2010 - 12:13 PM UTC
Incredible work, Matthew. My hat is off to you for this! Your cast tracks should beat the crap out of the inferior rubber (or was it vinyl?) tracks supplied with the kit.
I'm curious what you're going to MacGuyver-up next.
By the way, what metal did you use for casting?
I'm curious what you're going to MacGuyver-up next.
By the way, what metal did you use for casting?
firstcircle
Joined: November 19, 2008
KitMaker: 2,249 posts
Armorama: 2,007 posts
Posted: Tuesday, May 18, 2010 - 12:27 PM UTC
Cheers Adam. It's Tiranti no 4 Extra Low Melt lead / bismuth, tinless. I have been trying not to eat it or breath any fumes. 
firstcircle
Joined: November 19, 2008
KitMaker: 2,249 posts
Armorama: 2,007 posts
Posted: Monday, August 23, 2010 - 11:35 AM UTC
After another long break, some more progress. I cast 127 track plates, which I think should be enough. Of these about 100 are more or less cleaned up, but I'm a bit stuck with the remainder at the moment: I took them on holiday to France, along with the tool kit, and managed to leave them there. Fortunately someone has brought them back and I should pick them up at the weekend.
To check that it is enough links, I need to start on the real base so I can see how much of the track will be showing, and how much buried. So taking the rough plasticine base as a guide, I started making one from Super Sculpey. I have no idea if this is going to work well or not.


Super Sculpey is polymer clay, so is baked to harden. The advantage, I think, is that it will remain soft for as long as I want to mess around with the base and repositioning the tank and so on; when I am happy I can bake it, but even after that it can be drilled, filed and carved. The instructions say to keep thicknesses to about 1/2 inch (12-13mm), so once the base slab is done, I started to build up the contours of the shell hole with balls of aluminium cooking foil, just embedded into the clay:


Gradually covering over the foil; the top layer needs to get quite thick again to make the base firm, but there is a hollow foil core - hopefully the foil enables the heat to be conduted so that the whole thing will harden. The cutting mat is covered in foil to try to keep the clay clean, and I also make sure my hands are clean, and cover it over with an ice cream tub at the end of the session to keep the dust off.


Well enough of the blob for now, we want to see another tank (never enough tanks on this site...). Having done all that paintwork on the tank, I realised I couldn't afford to mess it up by using it to help shape the base out and for trying out the track plates etc., so I had to buy another kit, and just half made it up for these purposes.
So what I am trying to achieve can be seen here, with the photo of the real Chartreuse in the crater in the background:

To check that it is enough links, I need to start on the real base so I can see how much of the track will be showing, and how much buried. So taking the rough plasticine base as a guide, I started making one from Super Sculpey. I have no idea if this is going to work well or not.
Super Sculpey is polymer clay, so is baked to harden. The advantage, I think, is that it will remain soft for as long as I want to mess around with the base and repositioning the tank and so on; when I am happy I can bake it, but even after that it can be drilled, filed and carved. The instructions say to keep thicknesses to about 1/2 inch (12-13mm), so once the base slab is done, I started to build up the contours of the shell hole with balls of aluminium cooking foil, just embedded into the clay:
Gradually covering over the foil; the top layer needs to get quite thick again to make the base firm, but there is a hollow foil core - hopefully the foil enables the heat to be conduted so that the whole thing will harden. The cutting mat is covered in foil to try to keep the clay clean, and I also make sure my hands are clean, and cover it over with an ice cream tub at the end of the session to keep the dust off.
Well enough of the blob for now, we want to see another tank (never enough tanks on this site...). Having done all that paintwork on the tank, I realised I couldn't afford to mess it up by using it to help shape the base out and for trying out the track plates etc., so I had to buy another kit, and just half made it up for these purposes.
So what I am trying to achieve can be seen here, with the photo of the real Chartreuse in the crater in the background:

opsguy
Joined: April 18, 2010
KitMaker: 55 posts
Armorama: 54 posts

Posted: Monday, August 23, 2010 - 03:45 PM UTC
I guess the crew figured out what happens when you have a ridiculously long artillery barrage preceding an attack!
Great work!
Great work!
adamsmasher
Joined: June 27, 2009
KitMaker: 192 posts
Armorama: 54 posts
Posted: Monday, August 23, 2010 - 03:55 PM UTC
The base is coming along nicely. I can definitely support the virtues of sculpey; I've used it since I was little.
Amazing that your build continues despite the french plot to stymie it.
Amazing that your build continues despite the french plot to stymie it.
tread_geek
Joined: March 23, 2008
KitMaker: 2,847 posts
Armorama: 2,667 posts
Posted: Tuesday, August 24, 2010 - 05:34 AM UTC
Astounding progress, Matthew. Perhaps you got too much sun while on holiday and it has affected your mind. I cannot seriously imagine casting 127 individual track links and maintaining any semblance of sanity.  When complete, this endeavour seriously cries out to be a Feature to preserve it for posterity. Excellent work and equally excellent commentary.
Cheers,
Jan
Perhaps you got too much sun while on holiday and it has affected your mind. I cannot seriously imagine casting 127 individual track links and maintaining any semblance of sanity. When complete, this endeavour seriously cries out to be a Feature to preserve it for posterity. Excellent work and equally excellent commentary. Cheers,
Jan
tankmodeler
#417
Joined: March 01, 2004
KitMaker: 3,123 posts
Armorama: 2,539 posts

Posted: Tuesday, August 24, 2010 - 05:58 AM UTC
Really good thread. I am curious why you decided to use metal as opposed to resin for the tracks (if it was stated earlier, I'm sorry, I must have missed it)? Once you had cast 5-10 of them, you could have easily made a gang mould and poured them 10 at a time after that. The moulds are more forgiving and the ability to capture detail is better with resin, never mind the reduced hassles casting at room temperature as opposed to pouring molten metal.
I made CDP track in 1/35 for a Skink project a long time ago and each track ended up as 3 pieces because I was less experienced with casting, but it still took less than 3 weeks to cast, clean up and assembly over 250 links.
Also, a small question on the mould material. Is it actually latex or is it silicone RTV rubber? If rubber is it a tin cure product or a platinum cure product? If it really is latex, can you pass on the product name as I'd be very interested in trying such a product with resin.
Thanks,
Paul

 |

WEB HOSTING BY


Copyright ©2021 Armorama and Kitmaker Network, a subsidiary of Silver Star Enterprises
All Rights Reserved. Please read our Conditions of Use and Privacy Policy.
All Rights Reserved. Please read our Conditions of Use and Privacy Policy.