Illinois, United States
Joined: March 29, 2009
KitMaker: 1,135 posts
Armorama: 1,030 posts
Posted: Monday, December 14, 2009 - 11:08 AM UTC
Quoted Text
Assuming I get them, it won't be a problem sending them to you. The problem is the unpredictable weather at Ft. Lewis.
Thanks! I'll be starting in a couple days so hopefully by then. Its been a real help so far. Also, I hear you built a Cougar before. Could you possibly email me your build photos to
[email protected]?Thanks!

Currently taking back the fight to beat modeling ADD
Colorado, United States
Joined: January 20, 2005
KitMaker: 7,219 posts
Armorama: 6,097 posts
Posted: Monday, December 14, 2009 - 04:37 PM UTC
Quoted Text
Also, I hear you built a Cougar before. Could you possibly email me your build photos to [email protected]?
Thanks! 
Not much to send I'm afraid. I deleted the build photos from Photobucket long ago. However, after fourteen months I've started with the kit again. Progress here is minimal. Most of the other details are attached to the walls or roof of the body, and look like a mess right now until they get painted.
And yes, the Packbot does overhang the locker like this. Everything will be lashed down later.

A strong man stands up for himself; A stronger man stands up for others.
Admit nothing. Deny everything. Make counter-accusations.
He is not Khan who calls himself Khan. Afghan proverb
Rio Grande do Sul, Brazil
Joined: February 22, 2004
KitMaker: 65 posts
Armorama: 58 posts
Posted: Wednesday, December 16, 2009 - 11:57 AM UTC
S!
Hum, maybe you, or somebody else, could help me out.
I've just got my Stryker MGS. I noticed that the "coax" gun is placed inside a box in the left side of the main gun. The kit does not have a barrel for this machine gun, just has the "box".
The barrel of the "coax" guns is placed so deep in the box that cannot be seen from outside or I have to find a way to put a barrel inside the box?

"Battles are won by slaughter and maneuver. The greater the general, the more he contributes in maneuver, the less he demands in slaughter"
Sir Winston Churchill (1874-1965)
Colorado, United States
Joined: January 20, 2005
KitMaker: 7,219 posts
Armorama: 6,097 posts
Posted: Wednesday, December 16, 2009 - 12:18 PM UTC
You could probably save yourself some effort. Not much visible in here.

A strong man stands up for himself; A stronger man stands up for others.
Admit nothing. Deny everything. Make counter-accusations.
He is not Khan who calls himself Khan. Afghan proverb
Louisiana, United States
Joined: October 20, 2008
KitMaker: 1,069 posts
Armorama: 1,062 posts
Posted: Wednesday, December 16, 2009 - 12:34 PM UTC
I wouldn't have believed it was real until I saw the photos!!

WOW this is going to be a realy awesome build. Think you have enuff paint and stuff LOL? Any way grate subject and love the two I-bots.
Building the impossible is my main goal. Build baby build never sleep!!
Colorado, United States
Joined: January 20, 2005
KitMaker: 7,219 posts
Armorama: 6,097 posts
Posted: Thursday, December 17, 2009 - 03:29 AM UTC
Thanks. I am contintuing to post updates in the "Cougar Interior" thread in order to save room for Sean's progress photos, which I expect to be forthcoming any day day now.
A strong man stands up for himself; A stronger man stands up for others.
Admit nothing. Deny everything. Make counter-accusations.
He is not Khan who calls himself Khan. Afghan proverb
Illinois, United States
Joined: March 29, 2009
KitMaker: 1,135 posts
Armorama: 1,030 posts
Posted: Thursday, December 17, 2009 - 05:13 AM UTC
I finish up finals today and then I leave saturday for home. Also I picked up some goodies. The Terra Cotta paint at the local home depot was on sale. So going to the LHS to get some more random goodies then building can begin! Until then I'll be enjoying a beer or 10. See you guys very soon

Currently taking back the fight to beat modeling ADD
Oklahoma, United States
Joined: October 07, 2002
KitMaker: 1,280 posts
Armorama: 1,208 posts
Posted: Thursday, December 17, 2009 - 05:29 AM UTC
Quoted Text
Thanks. I am contintuing to post updates in the "Cougar Interior" thread in order to save room for Sean's progress photos, which I expect to be forthcoming any day day now.
Rob,
Is that a subtle hint???


I too would like to see some of his progress, especially with the non skid as I skipped that feature on my first MGS build last year... I am debating on going back and adding it, along with some new details that were not available the - gun shields, PE storage bins and tool rack, etc...
John
John Charvat
"Hey baby, I only ride 'em, I don't know what makes them work" Oddball
Join AMPS: https://www.amps-armor.org/SiteMain/Main.aspx
Illinois, United States
Joined: March 29, 2009
KitMaker: 1,135 posts
Armorama: 1,030 posts
Posted: Thursday, December 17, 2009 - 07:48 AM UTC
Quoted Text
Quoted Text
Thanks. I am contintuing to post updates in the "Cougar Interior" thread in order to save room for Sean's progress photos, which I expect to be forthcoming any day day now.
Rob,
Is that a subtle hint??? 

I too would like to see some of his progress, especially with the non skid as I skipped that feature on my first MGS build last year... I am debating on going back and adding it, along with some new details that were not available the - gun shields, PE storage bins and tool rack, etc...
John
I don't want to keep everyone waiting but like I said before I will be home in 2 days to begin building. It sucks because I have to wait as well

but soon enough. Thanks for all the interest. I think I will include a story or something tonight to kick things off.
Cant wait to start!
T-2 Days


Currently taking back the fight to beat modeling ADD
Rio Grande do Sul, Brazil
Joined: February 22, 2004
KitMaker: 65 posts
Armorama: 58 posts
Posted: Thursday, December 17, 2009 - 09:45 PM UTC
S!
Thanks Skipper. I'll leave as it comes in the kit.

"Battles are won by slaughter and maneuver. The greater the general, the more he contributes in maneuver, the less he demands in slaughter"
Sir Winston Churchill (1874-1965)
Illinois, United States
Joined: March 29, 2009
KitMaker: 1,135 posts
Armorama: 1,030 posts
Posted: Monday, December 21, 2009 - 05:53 PM UTC
Hey everyone

sorry for the delay. Not being home for the whole semester meant i had to reconnect with the family and my nine month old australian shepherd.
started some things tonight and will post pics once I'm done for the evening.

Currently taking back the fight to beat modeling ADD
Oklahoma, United States
Joined: October 07, 2002
KitMaker: 1,280 posts
Armorama: 1,208 posts
Posted: Tuesday, December 22, 2009 - 04:01 AM UTC
Quoted Text
Hey everyone 
sorry for the delay. Not being home for the whole semester meant i had to reconnect with the family and my nine month old australian shepherd.
started some things tonight and will post pics once I'm done for the evening. 
Sean,
I understand about the reconnection time, especially with your Aussie (I have a Mini Aussie) Hope to see some pics soon.
John
John Charvat
"Hey baby, I only ride 'em, I don't know what makes them work" Oddball
Join AMPS: https://www.amps-armor.org/SiteMain/Main.aspx
Illinois, United States
Joined: March 29, 2009
KitMaker: 1,135 posts
Armorama: 1,030 posts
Posted: Tuesday, December 22, 2009 - 04:16 AM UTC
Finally some photos!
I did some masking work which is hard to believe is my favorite thing to do. I'm A big perfectionist so once I get the Terra Cotta on it will be much nicer. And yes, I was able to sneak a can of the Terra Cotta into the communist block as some of you stated.
Here are some progress shots so far:

Also, this is the first time I've had some Alpine Miniature Figures and they're AMAZING. Hope I can do it some justice by painting them well. I also got Hobby Fan's U.S. Stryker Brigade MGS Crew so looking forward to painting them as well.


Currently taking back the fight to beat modeling ADD
Illinois, United States
Joined: March 29, 2009
KitMaker: 1,135 posts
Armorama: 1,030 posts
Posted: Tuesday, December 22, 2009 - 04:51 AM UTC
Currently taking back the fight to beat modeling ADD
Paris, France
Joined: August 30, 2005
KitMaker: 2,315 posts
Armorama: 2,158 posts
Posted: Tuesday, December 22, 2009 - 06:16 AM UTC
Finally some work


Good start
Alpine figures are really great
Congrats
Seb
Oklahoma, United States
Joined: October 07, 2002
KitMaker: 1,280 posts
Armorama: 1,208 posts
Posted: Tuesday, December 22, 2009 - 11:50 AM UTC
Quoted Text
I have to fix that stupid sink hole... 
Well Sean,
At least you found the sink hole before the final coat, unlike me


Filling the sinkmark forced a complete repaint of my M1128.
The terracotta looks nice, let it set overnight before you start peeling of your masking. I let my experiment with terracotta paint set for about 4 hours and it was still a bit tacky.
John
John Charvat
"Hey baby, I only ride 'em, I don't know what makes them work" Oddball
Join AMPS: https://www.amps-armor.org/SiteMain/Main.aspx
Illinois, United States
Joined: March 29, 2009
KitMaker: 1,135 posts
Armorama: 1,030 posts
Posted: Tuesday, December 22, 2009 - 01:26 PM UTC
Actually I let it set for an hour and that was all. Humidity in my room is pretty nice but I have a few touch ups to do, but other than that I got lucky I must say.
Currently taking back the fight to beat modeling ADD
Illinois, United States
Joined: March 29, 2009
KitMaker: 1,135 posts
Armorama: 1,030 posts
Posted: Tuesday, December 22, 2009 - 03:00 PM UTC
So this is all I'm going to do for the evening. I have a really early day tomorrow, but with that being said, time to work on the Leopard 2 finally!

I finished the suspension on the stryker, just did it as a standard, with no wheels turned. I have an idea as to how I want to go about things with my little diorama so the wheels being straight seemed natural.
Tomorrow I'll work on the mine protection kit.
WIsh me luck!


Currently taking back the fight to beat modeling ADD
Noord-Holland, Netherlands
Joined: October 11, 2009
KitMaker: 30 posts
Armorama: 27 posts
Posted: Wednesday, December 23, 2009 - 07:20 AM UTC
Sean,
looks great, I have a question about the last picture, where did you get the photoetch that is on the front. That piece is part of the mine protection kit. are there als other parts covering the underside of the front suspension?
I have added a picture of my scratchbuilding efforts of the mine protectionkit.
kind regards Michel


Bucuresti, Romania
Joined: October 27, 2009
KitMaker: 26 posts
Armorama: 25 posts
Posted: Wednesday, December 23, 2009 - 12:08 PM UTC
Sean,
Hope your finals went well. Good to see you making headway on the MGS build. Your careful masking really paid off, the antislip looks great. Look forward to seeing your progress on this build and the final product displayed in your planned diorama. I'll be watching for updates on your Leopard and Challenger builds as well. Keep up the outstanding work.
On a side note Michel, excellent scratch building on your MGS, I wish I had the patience and skills that you both have.
best,
Scott
Illinois, United States
Joined: March 29, 2009
KitMaker: 1,135 posts
Armorama: 1,030 posts
Posted: Wednesday, December 23, 2009 - 06:44 PM UTC
Michel: I got it from the Eduard M1128 PE set. I noticed it on my reference photos so I put it in.
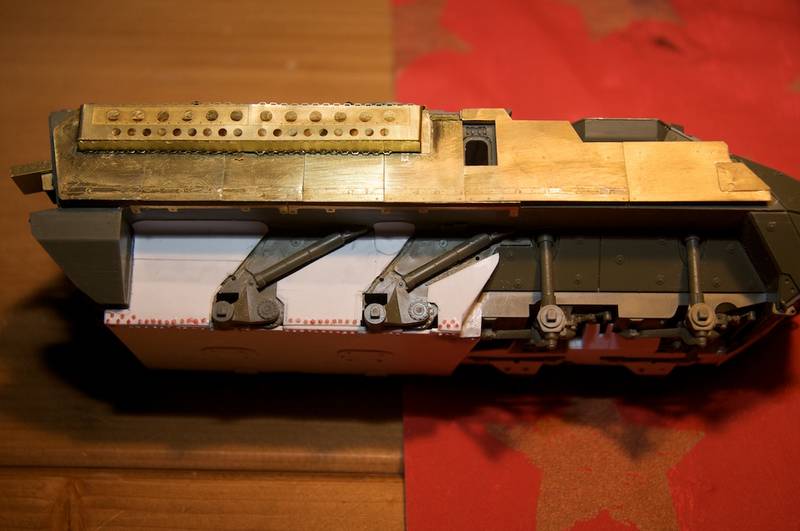
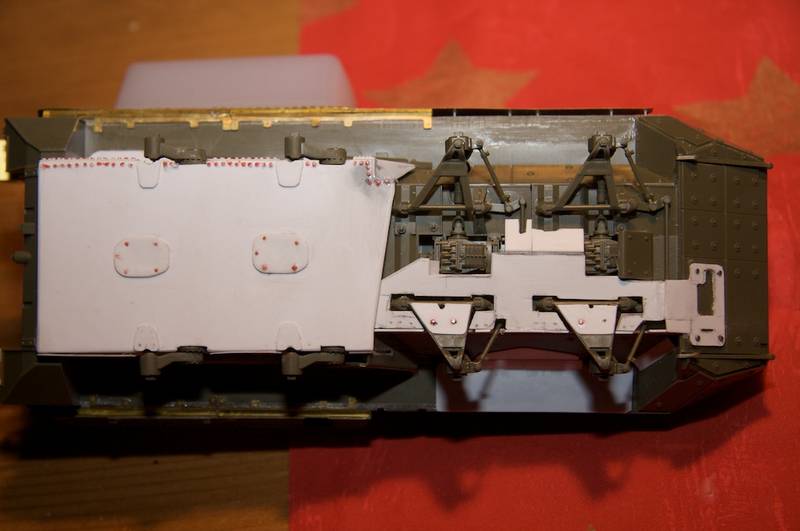
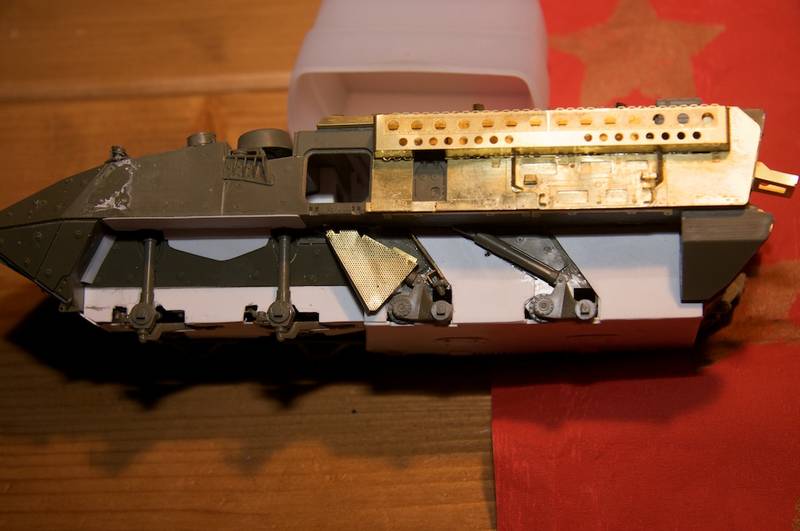
Here are my progress shots for the mine protection kit:
Here I started from the rear mounting bracket. I noticed it has angled supports running down the side of the vehicle so that was the first step. Once I got past the chamfering the edges I wasn't as concerned because these will not be seen after the wheels go on. However I missed one big portion on the mine plate which I'll get to later


So it took me three times to get the plate right. But I soon discovered again that it still is not correct...

At the end it should not be squared off. Michel has the end correct. Hopefully it won't be too much trouble to fix but with this being my first scratch building job I can only pray

First Attempt:

Second Attempt:

Third and last one (not taking into account the small error)
On the LEFT is the third attempt when compared to the second attempt on the right


Thats all for tonight!
This wore me out but I will come to fix the problems tomorrow or after Christmas. Happy holidays everyone

Currently taking back the fight to beat modeling ADD
Illinois, United States
Joined: March 29, 2009
KitMaker: 1,135 posts
Armorama: 1,030 posts
Posted: Wednesday, December 23, 2009 - 06:47 PM UTC
Quoted Text
Sean,
Hope your finals went well. Good to see you making headway on the MGS build. Your careful masking really paid off, the antislip looks great. Look forward to seeing your progress on this build and the final product displayed in your planned diorama. I'll be watching for updates on your Leopard and Challenger builds as well. Keep up the outstanding work.
On a side note Michel, excellent scratch building on your MGS, I wish I had the patience and skills that you both have.
best,
Scott
Thanks alot. Don't be crazy now, this is my first time scratch building things and hopefully it won't be such a disaster it would be my last.

Currently taking back the fight to beat modeling ADD
Idaho, United States
Joined: March 14, 2006
KitMaker: 229 posts
Armorama: 227 posts
Posted: Thursday, December 24, 2009 - 04:51 AM UTC
Great work on the Mine Protection Kit. I wish my scratchbuilding was as good as yours. I can't wait to dig into my M1128 later on this next year.
Illinois, United States
Joined: March 29, 2009
KitMaker: 1,135 posts
Armorama: 1,030 posts
Posted: Thursday, December 24, 2009 - 05:15 AM UTC
Quoted Text
Great work on the Mine Protection Kit. I wish my scratchbuilding was as good as yours. I can't wait to dig into my M1128 later on this next year.
Thank you very much. Like I said before, this is my first time doing anything scratch. The best way to go about it so far is what they say in cycling. "Put you head down, hammer, and don't look back, ever"

Currently taking back the fight to beat modeling ADD
Removed by original poster on 12/25/09 - 06:52:52 (GMT).


