

Very strange.
I freely passed on this link.
This Ukrainian forum on models.
That link gives way to the photo BTR-80, I made them at the exhibition of arms in Sevastopol.
If there is anything of interest on the BTR-80 tell me, I can send you photos of E-mail.
Яusso-Soviэt Forum
Russian or Soviet vehicles/armor modeling forum.
Russian or Soviet vehicles/armor modeling forum.
Hosted by Darren Baker, Jacques Duquette
Trumpeter BTR-80
Dmitriy_Dregval

Joined: January 15, 2010
KitMaker: 43 posts
Armorama: 42 posts

Posted: Friday, January 15, 2010 - 02:38 PM UTC
Boggie

Joined: December 08, 2005
KitMaker: 1,370 posts
Armorama: 1,331 posts

Posted: Saturday, January 16, 2010 - 01:26 AM UTC
Dmitriy
I am thinking that you are a registered member of this site and have your preferences set on your computer in such a way that when YOU log in it goes to an active page, just a thought. When we go to the site it asks us to log in and or join the group.
I could well be wrong as I do not speak or read the language.
Bill


weathering_one
Joined: April 04, 2009
KitMaker: 458 posts
Armorama: 456 posts

Posted: Sunday, January 17, 2010 - 06:44 AM UTC
Holy molly, I almost missed this. How come it's not in the Braille section where you normally post? Man, talk about being obsessive compulsive when it comes to details.  I have this kit and it looks like you're giving me a reason not to attempt to build it.
  Can't wait to see more.
AJ
I have this kit and it looks like you're giving me a reason not to attempt to build it. Can't wait to see more.AJ

Gorizont

Joined: November 28, 2007
KitMaker: 1,462 posts
Armorama: 1,289 posts
Posted: Sunday, January 17, 2010 - 07:13 AM UTC
As I saw, on the linked page one has to log in.
greetings...
Soeren
greetings...
Soeren
tread_geek
Joined: March 23, 2008
KitMaker: 2,847 posts
Armorama: 2,667 posts
Posted: Sunday, January 17, 2010 - 05:31 PM UTC
Quoted Text
Holy molly, I almost missed this. How come it's not in the Braille section where you normally post? Man, talk about being obsessive compulsive when it comes to details.
AJ
AJ, if you read back in the thread in the Braille Scale forum you'll find my best guess about the move.
 As far as fearing to attempt this kit, just give it a try. Besides, I can't possibly have OCD or my medication isn't working. Thanks for looking and commenting.
Cheers,
Jan

tread_geek
Joined: March 23, 2008
KitMaker: 2,847 posts
Armorama: 2,667 posts
Posted: Thursday, January 21, 2010 - 09:31 AM UTC
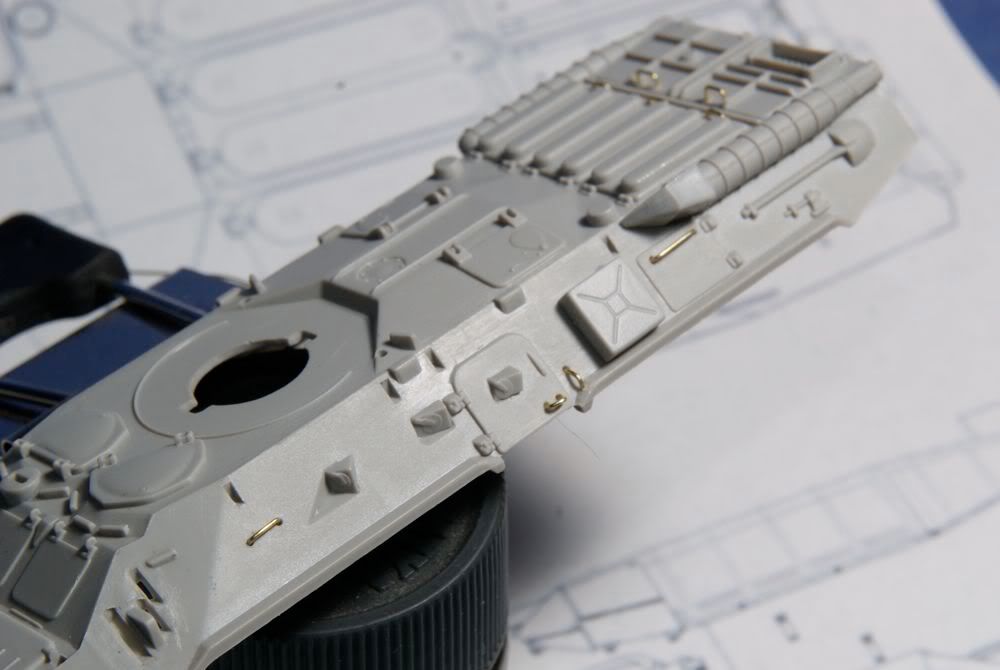
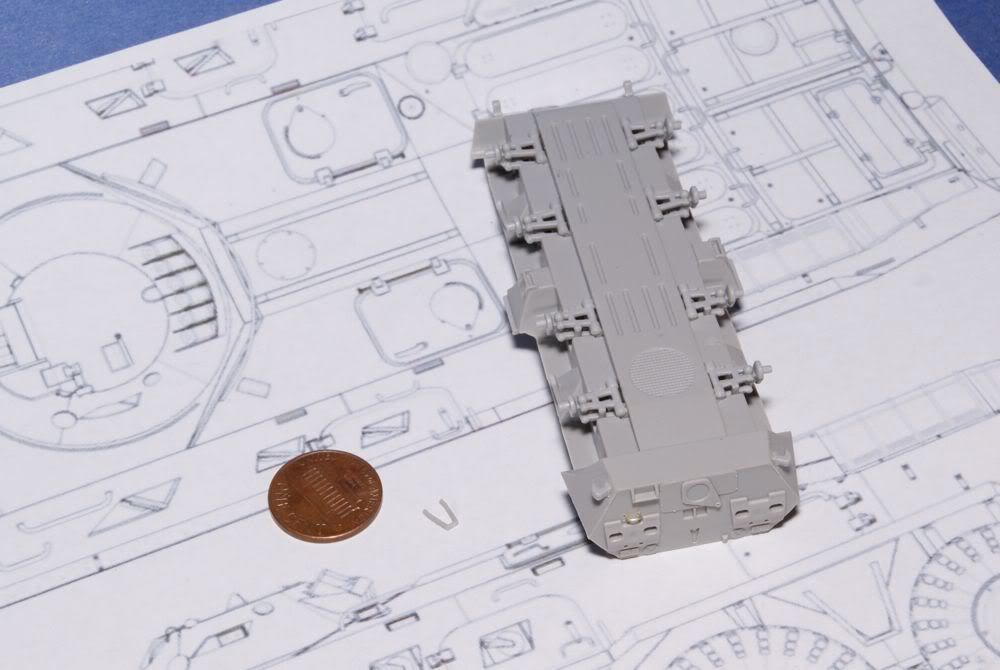
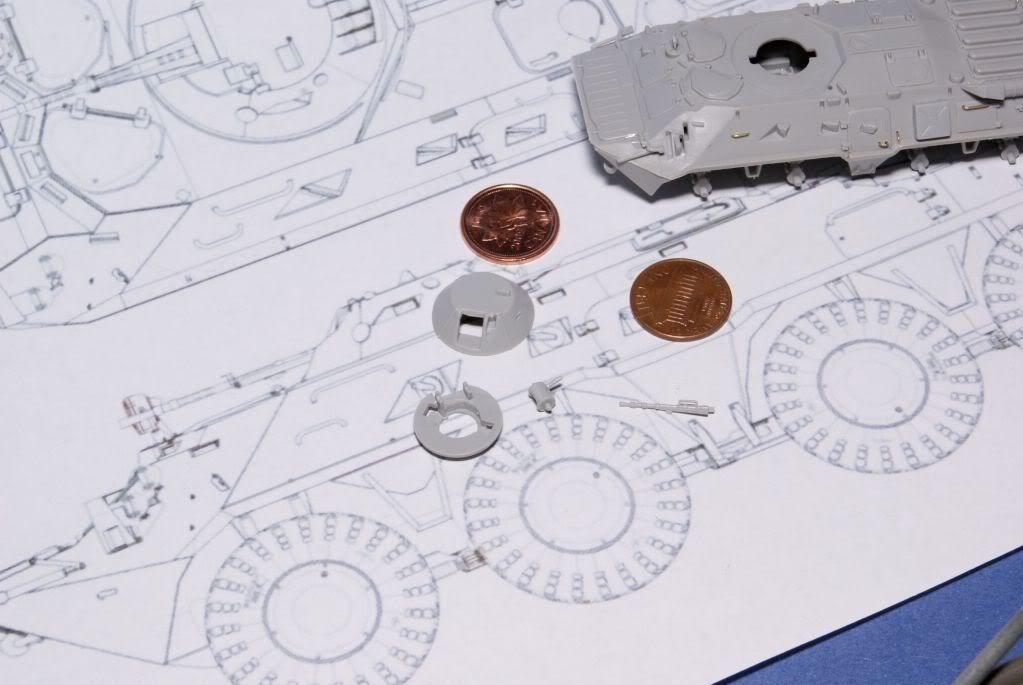
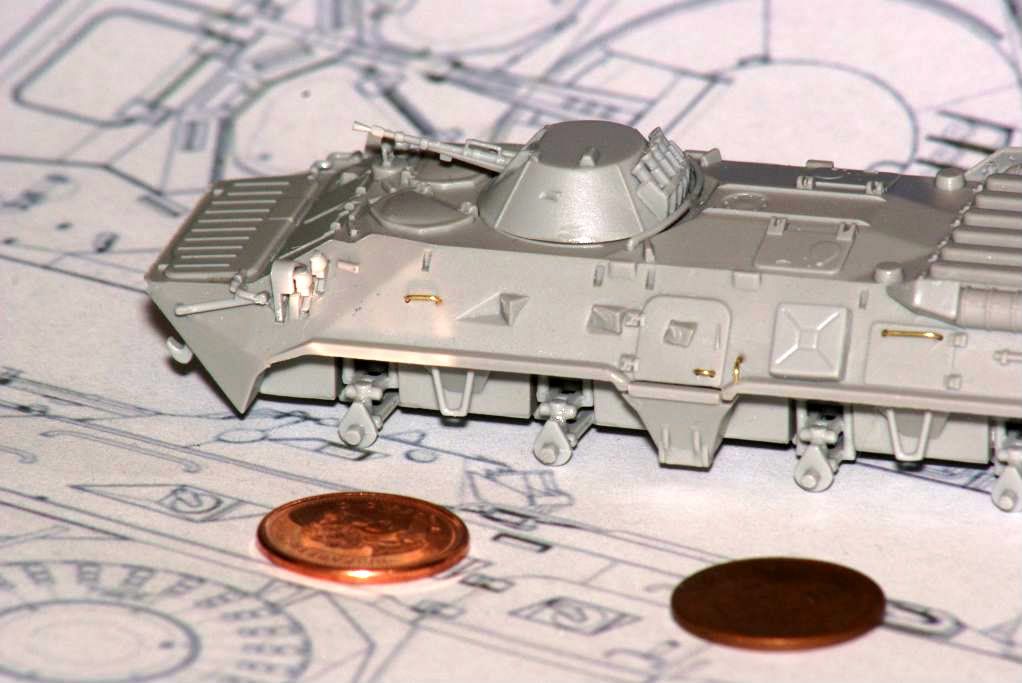
Another small (in more ways than one) update. The little handles on and by the doors have been a real bear to tackle. The finest tweezers I had were still too large to bend such small pieces. The SWMBO came to the rescue by buying me an even smaller pair. In this first picture you can see numerous handles as well as the plastic storage box and muffler guard (the first plastic pieces put on since the suspension work).
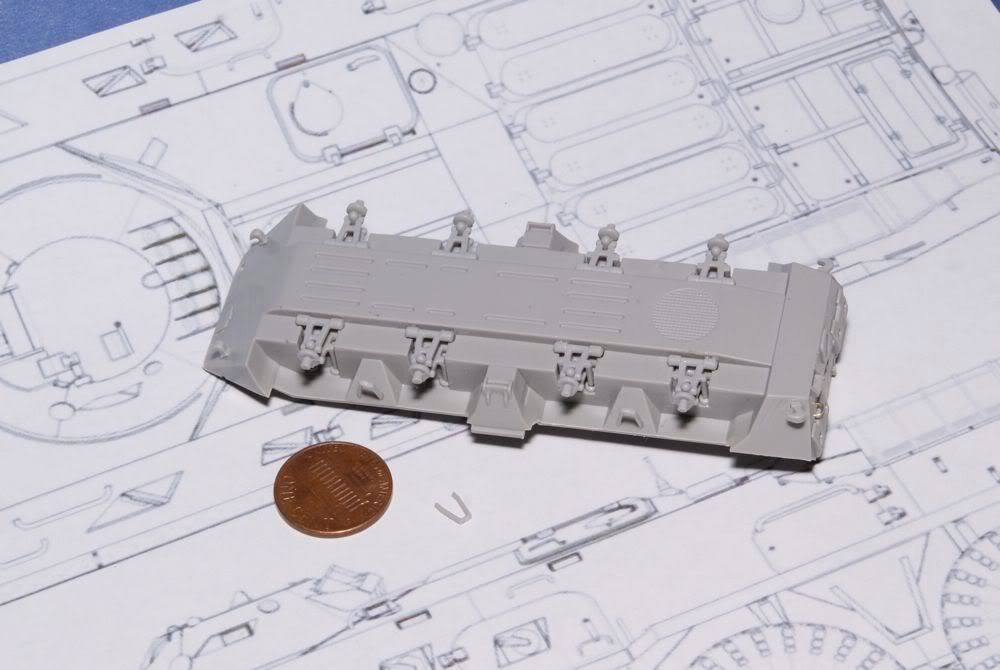
In this next picture I attempted to use a remote flash with a 4X macro filter t get a closer shot. It's not the best as I should have used a tripod.
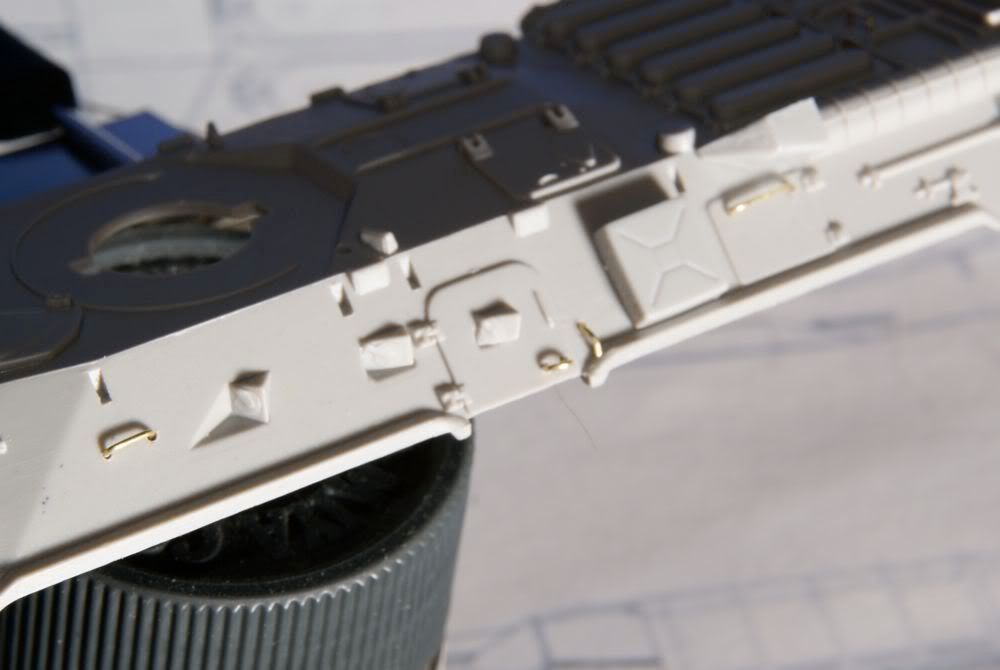
I thought that I pretty much had all the handles accounted for but in looking at pictures it seems that I missed one on the back of the engine compartment and one ring on the back engine deck. Will get those done ASAP and then on to more plastic.
Cheers,
Jan
In this next picture I attempted to use a remote flash with a 4X macro filter t get a closer shot. It's not the best as I should have used a tripod.
I thought that I pretty much had all the handles accounted for but in looking at pictures it seems that I missed one on the back of the engine compartment and one ring on the back engine deck. Will get those done ASAP and then on to more plastic.
Cheers,
Jan
tread_geek
Joined: March 23, 2008
KitMaker: 2,847 posts
Armorama: 2,667 posts
Posted: Friday, January 22, 2010 - 08:38 AM UTC
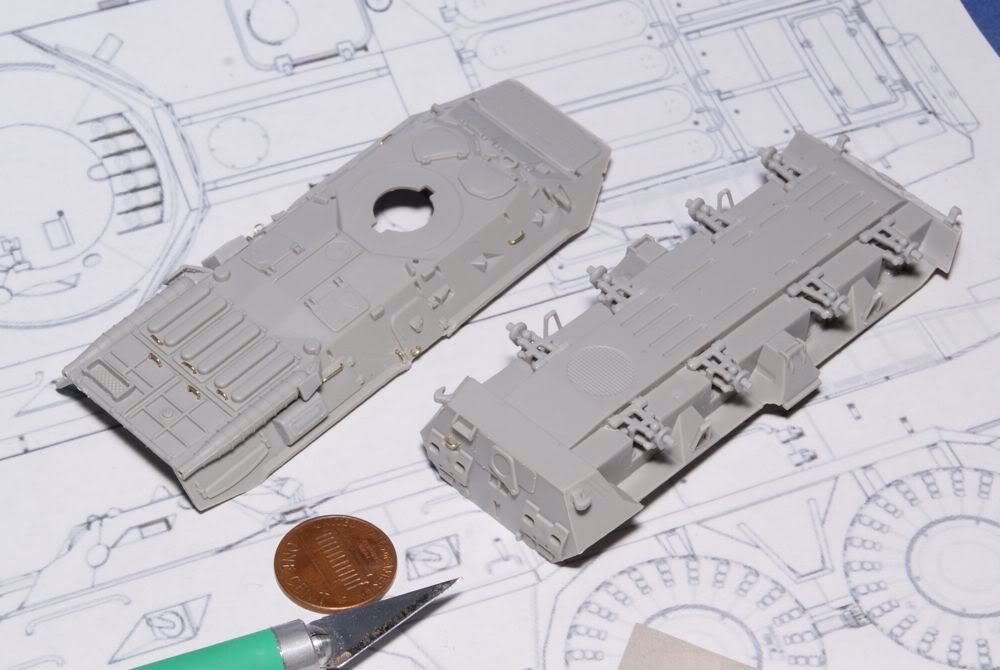
Had a bit more time at the bench today and I am happy (relieved) to report that all the extra brass handles/rails are finally done.  (I hope). The kit foot steps that come with the kit look quite fine to me so I decided to use them. Have a look at these pictures and you might get an impression on how small they are. Cutting and cleaning them was quite an exercise.
From here on it's pretty much the kit plastic parts. Again, the storage box on the right side, right muffler guard.
Finally the trim vane actuating handles and the start of hull top items.
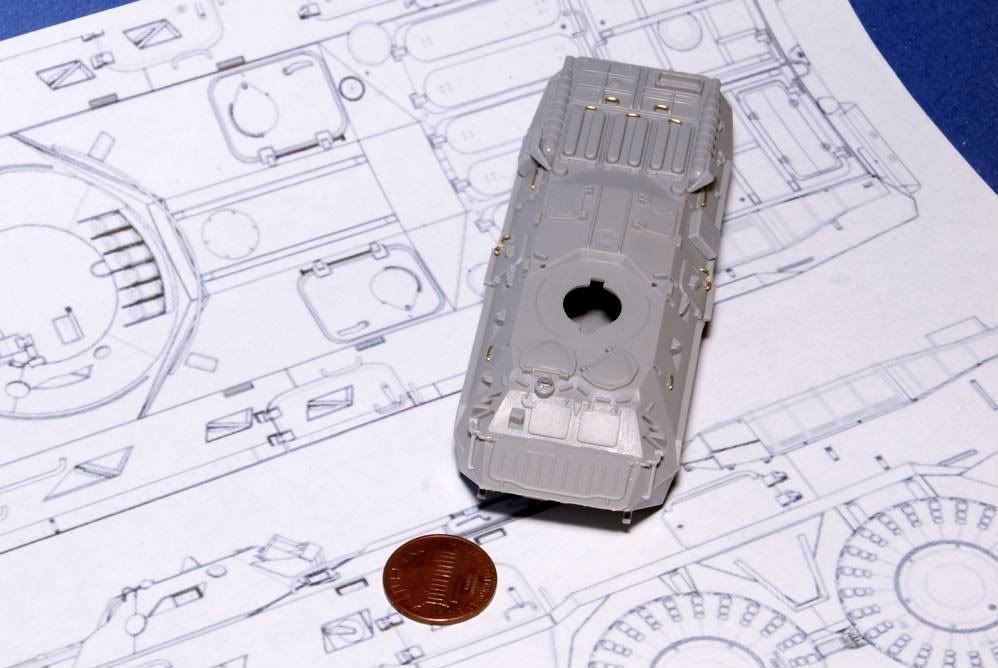
The upper and lower hulls aren't joined yet but some careful sanding and shaping got the two pieces to fit better than my last attempt.
Cheers,
Jan
(I hope). The kit foot steps that come with the kit look quite fine to me so I decided to use them. Have a look at these pictures and you might get an impression on how small they are. Cutting and cleaning them was quite an exercise. From here on it's pretty much the kit plastic parts. Again, the storage box on the right side, right muffler guard.
Finally the trim vane actuating handles and the start of hull top items.
The upper and lower hulls aren't joined yet but some careful sanding and shaping got the two pieces to fit better than my last attempt.
Cheers,
Jan
tread_geek
Joined: March 23, 2008
KitMaker: 2,847 posts
Armorama: 2,667 posts
Posted: Monday, January 25, 2010 - 12:50 PM UTC
I know that I'm taking a while with this kit but it's just the way I build. The upper and lower hulls are still not joined but I've tried to sand and shape them so there will be a better fit. Still having some problems with the hull rear but I will persevere.
The first picture is of the "main" turret parts. They required some careful shaping to get them all to fit properly.
Next is the turret completed and the bulk of the upper hull pieces in place. I still need to do the four larger hand rail.
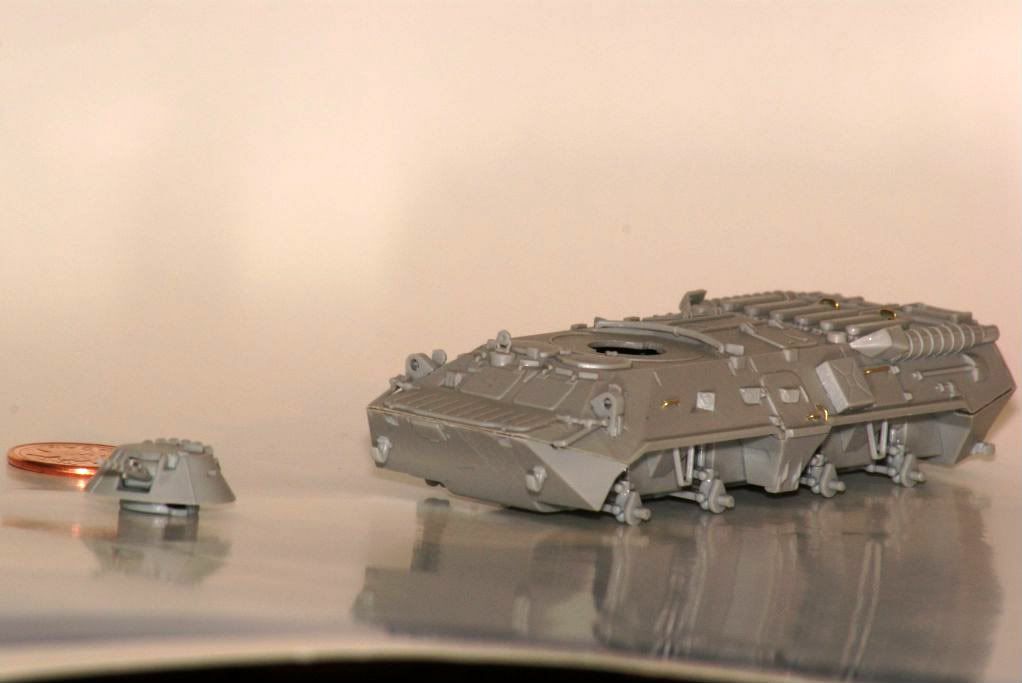
Next up is a view of each side with the turret in place.
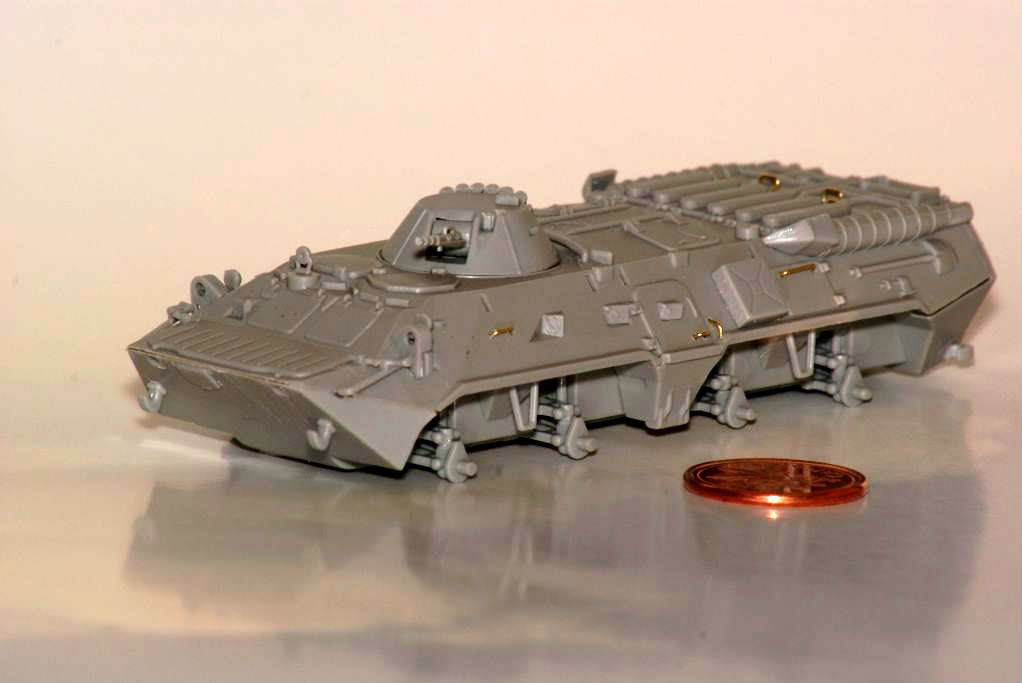

Now for a front view.
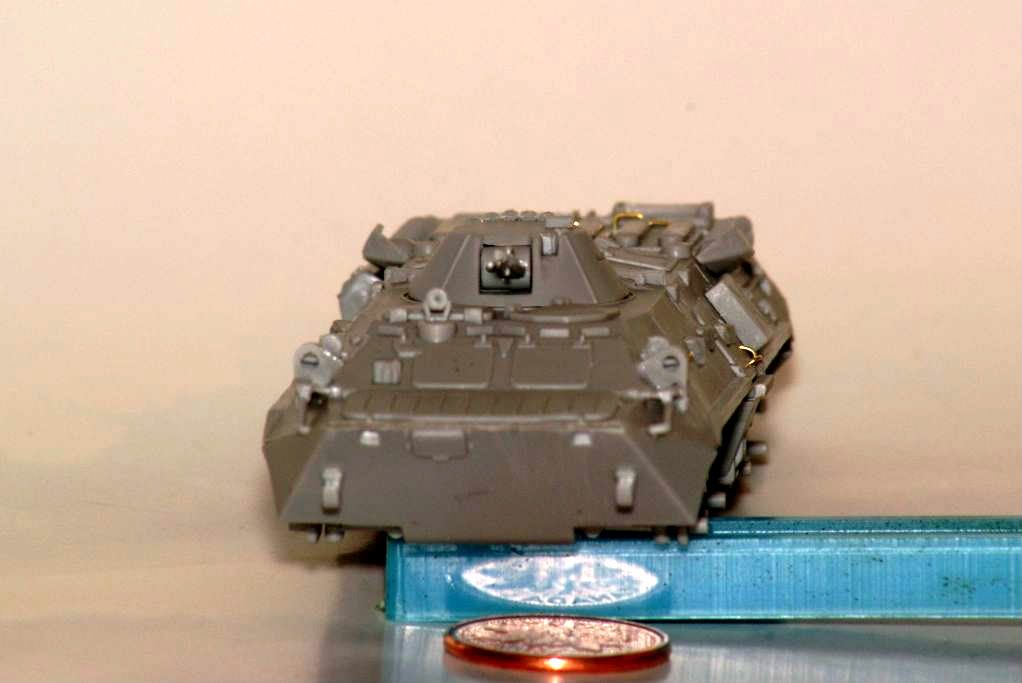
Finally is a shot with different camera settings trying to show more detail. In reality all these pictures are taken using different camera settings to see what works best. For those that care, some pictures are taken with a diffuser attachment to the flash called a Softbox and others with dual remote bounce flash.
You will note that in the front view there is a sink hole visible in the commanders searchlight. Not sure how I will handle that. Fill it or drill it out and replace it with pseudo glass. Anyone have an idea of what colours the various headlights and such are on these vehicles? It sort of looks like some might have solid covers over them?
Thanks for looking and comments appreciated.
Cheers,
Jan
The upper and lower hulls are still not joined but I've tried to sand and shape them so there will be a better fit. Still having some problems with the hull rear but I will persevere. The first picture is of the "main" turret parts. They required some careful shaping to get them all to fit properly.
Next is the turret completed and the bulk of the upper hull pieces in place. I still need to do the four larger hand rail.
Next up is a view of each side with the turret in place.
Now for a front view.
Finally is a shot with different camera settings trying to show more detail. In reality all these pictures are taken using different camera settings to see what works best. For those that care, some pictures are taken with a diffuser attachment to the flash called a Softbox and others with dual remote bounce flash.
You will note that in the front view there is a sink hole visible in the commanders searchlight. Not sure how I will handle that. Fill it or drill it out and replace it with pseudo glass. Anyone have an idea of what colours the various headlights and such are on these vehicles? It sort of looks like some might have solid covers over them?
Thanks for looking and comments appreciated.
Cheers,
Jan
Dmitriy_Dregval
Joined: January 15, 2010
KitMaker: 43 posts
Armorama: 42 posts
Posted: Tuesday, January 26, 2010 - 09:46 PM UTC
Quoted Text
I would be glad if it helps in building a model.
http://news.hobby.net.ua/forum/index.php?showtopic=1354
Jan Etal, William Ritchie!
The site decided to problems.
Try the link again.
Should work.
tread_geek
Joined: March 23, 2008
KitMaker: 2,847 posts
Armorama: 2,667 posts
Posted: Wednesday, January 27, 2010 - 09:34 AM UTC
Quoted Text
Quoted TextI would be glad if it helps in building a model.
http://news.hobby.net.ua/forum/index.php?showtopic=1354
Jan Etal, William Ritchie!
The site decided to problems.
Try the link again.
Should work.
Dmitriy, thank you very, very much. The pictures are superb and answer all my questions.
 I see a few handles that I somehow missed. Two on the back of the engine deck and those little ones on the turret. The engine deck ones I think that I can replicate but the turret ones might be too small even for my tiny tools.
 Are the Ukrainian BTR's painted similar to Russian ones?
Thanks again,
Jan
Let me try a Google translation:
Дмитро, дякую вам дуже, дуже багато. Фотографії є чудовим і відповісти на всі мої запитання. :-Я бачу кілька ручками, що я якось пропустив. Два на задній частині двигуна палубу і ті маленькі на вежі. Ті, двигун палубі я думаю, що я можу повторити, але вежу них може бути замалий навіть для моїх крихітних інструментів.
Чи є українські БТР's пофарбовані схожа на російську саме?
Dmitriy_Dregval
Joined: January 15, 2010
KitMaker: 43 posts
Armorama: 42 posts
Posted: Wednesday, January 27, 2010 - 11:35 AM UTC
Jan, I am glad that the information was helpful.
The color of the Ukrainian and Russian BTR usually similar.
Color scheme was developed in the Soviet Union and has not changed much in our days.
The color of the Ukrainian and Russian BTR usually similar.
Color scheme was developed in the Soviet Union and has not changed much in our days.

woltersk

Joined: May 27, 2003
KitMaker: 1,026 posts
Armorama: 654 posts
Posted: Wednesday, January 27, 2010 - 02:03 PM UTC
Jan,
That is a little work of art! It is such a nice, clean build it seems almost a shame to put paint on it. And now you are going to add even more handles!? Stop the madness!
Is that a 'south of the border' penny I see? Model building, photography, and coin collecting? What other hobbies do you have? Where do you ever find the time?
Keep up the good work. IMHO your progress is coming at a good pace. After all, quality takes time.
Keith

tread_geek
Joined: March 23, 2008
KitMaker: 2,847 posts
Armorama: 2,667 posts
Posted: Thursday, January 28, 2010 - 09:09 AM UTC
Quoted Text
Jan,
That is a little work of art! It is such a nice, clean build it seems almost a shame to put paint on it. And now you are going to add even more handles!? Stop the madness!
Thanks very much for your comments, Keith. I must admit that the SWMBO thinks that I've gone a little obsessive compulsive on this build.
Actually I will probably add one more handle. The lifting rings on the turret and the one on the rear deck appear to be beyond the abilities of my tools (at least at this point.). A primer of somewhat darkened Russian Green has been applied to the base vehicle and wheel hubs and I'll post pictures of how it looks later. Quoted Text
Is that a 'south of the border' penny I see? Model building, photography, and coin collecting? What other hobbies do you have? Where do you ever find the time?
The answer to your coinage question in a definite yes. U.S. coins are fairly common in our area (as Canadian are on the other side of the border); lots of cross border shopping.
I also have quite a souvenir collection of coins from our travels various places. Time is always a constant when it comes to hobbies and must be organized and distributed with careful forethought. OCD? Quoted Text
Keep up the good work. IMHO your progress is coming at a good pace. After all, quality takes time.
Keith
This project was to be completed by this coming Monday but I rather doubt I'll make that deadline. Thankfully the campaign leader for "Mighty Wheels" has agreed to a two week extension. Hopefully more progress to follow this weekend.
Cheers,
Jan

tread_geek
Joined: March 23, 2008
KitMaker: 2,847 posts
Armorama: 2,667 posts
Posted: Friday, January 29, 2010 - 06:38 AM UTC
Greetings everyone. Real life is still interfering with progress on this build but some has been made. Here's a shot after a base of Russian green has been applied. Actually there are two different shades at work here, one lighter than the other.

The next picture involved some experimenting with the flash settings to get a better colour image. It didn't really work out but I thought it shows some progress.

This last picture is after some more variations in the green to achieve affects similar to pre-shading. I rather like this picture and the two halves are not glued yet. Some further sanding/contouring on the rear of the vehicle is coming close to a far better fit than in previous pictures posted earlier in this thread.
I would like to do a three colour camouflage but am confounded by the many variations in colour schemes and variations of patterns in pictures that I've found on the Internet. It seems that no two vehicles, even in the same unit, are the same. On the other hand, this might prove advantageous as it gives me artistic licence.
Cheers,
Jan
Real life is still interfering with progress on this build but some has been made. Here's a shot after a base of Russian green has been applied. Actually there are two different shades at work here, one lighter than the other.The next picture involved some experimenting with the flash settings to get a better colour image. It didn't really work out but I thought it shows some progress.
This last picture is after some more variations in the green to achieve affects similar to pre-shading. I rather like this picture and the two halves are not glued yet. Some further sanding/contouring on the rear of the vehicle is coming close to a far better fit than in previous pictures posted earlier in this thread.
I would like to do a three colour camouflage but am confounded by the many variations in colour schemes and variations of patterns in pictures that I've found on the Internet. It seems that no two vehicles, even in the same unit, are the same. On the other hand, this might prove advantageous as it gives me artistic licence.
Cheers,
Jan

spaarndammer

Joined: January 28, 2007
KitMaker: 1,945 posts
Armorama: 282 posts
Posted: Friday, January 29, 2010 - 11:19 PM UTC
Hi Jan,
great work on the BTR, I am impressed by your perseverance to replicate those grabhandles. I you really should have steady nerves for that! Looking forward for more progress.
Jelger
great work on the BTR, I am impressed by your perseverance to replicate those grabhandles. I you really should have steady nerves for that! Looking forward for more progress.
Jelger
Gorizont
Joined: November 28, 2007
KitMaker: 1,462 posts
Armorama: 1,289 posts
Posted: Saturday, January 30, 2010 - 01:28 AM UTC
Hello, looks good so far!
Which 3 colors did you planned for your vehicle?
greetings...
Soeren
Which 3 colors did you planned for your vehicle?
greetings...
Soeren
tread_geek
Joined: March 23, 2008
KitMaker: 2,847 posts
Armorama: 2,667 posts
Posted: Saturday, January 30, 2010 - 03:31 AM UTC
Quoted Text
Hi Jan,
great work on the BTR, I am impressed by your perseverance to replicate those grabhandles. I you really should have steady nerves for that! Looking forward for more progress.
Jelger, thank you for your comments. I finally got the last grab handle on the rear deck done.
 Steadiness of hands and nerves is definitely an advantage, as is patience that I never believed I had.
 Quoted Text
Hello, looks good so far!
Which 3 colors did you planned for your vehicle?
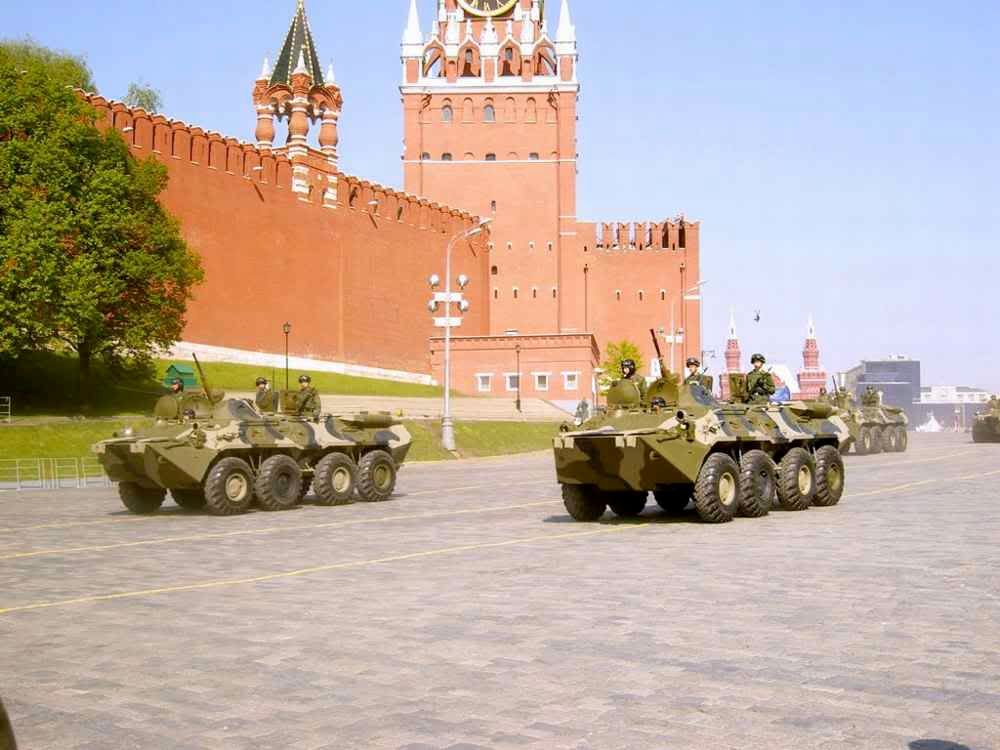
Soeren, I am somewhat leaning toward doing the green/black/desert yellow scheme that appears on the BTR in Dmitriy's pictures. As I stated above, it seems that there is no official standard that I can discern. In my searches on the Internet I have found more variations that I can count. There are even some four colour schemes with green, red brown, sand and black. Another scheme appears to be Russian green, olive drab and black. Several pictures I saw even show over-spray of the camo colours on the tires. The variety is almost bewildering.
Cheers,
Jan
Gorizont
Joined: November 28, 2007
KitMaker: 1,462 posts
Armorama: 1,289 posts
Posted: Saturday, January 30, 2010 - 05:52 AM UTC
tread_geek
Joined: March 23, 2008
KitMaker: 2,847 posts
Armorama: 2,667 posts
Posted: Sunday, January 31, 2010 - 07:57 AM UTC
Thanks for the link to the pictures Soeren. I've been looking at what must be hundreds of pictures of camouflaged BTR-80's. After reading a number of articles on Russian camouflage it appears that there is no standard. Because of the large size of the country and the varying geography almost anything goes. I guess that I'll just have to pick a picture and try to recreate it's colours and design. The models instructions call for a three colour of black, Russian green and dark green.
My build has experienced a couple of accidents over the last two days. While trying to sand a couple of the longer plastic hand rails they broke almost exactly in the middle and as the plastic is barely .5 mm in diameter you can imagine trying to repair them. In the picture below you can see the long grab rails attached and one of the broken ones that needed mending .

All the plastic pieces were finished yesterday evening but first thing today as I sat at the work bench I accidentally hit the edge and shook the table. The BTR was sitting on top of it's box, the box tipped from the shake and the vehicle fell off the table, bounced off a chair and landed on the tile floor. The damage was mainly to small pieces and I managed to find them all. The worst part was the the rear engine compartment plate seam cracked where it attaches to the upper body as well as seems where the body attaches to the hull. This is requiring me to re-glue the joints and use putty and sanding to correct the damaged area. Here's the more or less restored model.
Hopefully today I can get another base coat on the BTR and get back to worrying about the camo.
Cheers,
Jan
I've been looking at what must be hundreds of pictures of camouflaged BTR-80's. After reading a number of articles on Russian camouflage it appears that there is no standard. Because of the large size of the country and the varying geography almost anything goes. I guess that I'll just have to pick a picture and try to recreate it's colours and design. The models instructions call for a three colour of black, Russian green and dark green.My build has experienced a couple of accidents over the last two days. While trying to sand a couple of the longer plastic hand rails they broke almost exactly in the middle and as the plastic is barely .5 mm in diameter you can imagine trying to repair them. In the picture below you can see the long grab rails attached and one of the broken ones that needed mending .
All the plastic pieces were finished yesterday evening but first thing today as I sat at the work bench I accidentally hit the edge and shook the table. The BTR was sitting on top of it's box, the box tipped from the shake and the vehicle fell off the table, bounced off a chair and landed on the tile floor.
The damage was mainly to small pieces and I managed to find them all. The worst part was the the rear engine compartment plate seam cracked where it attaches to the upper body as well as seems where the body attaches to the hull. This is requiring me to re-glue the joints and use putty and sanding to correct the damaged area. Here's the more or less restored model.Hopefully today I can get another base coat on the BTR and get back to worrying about the camo.
Cheers,
Jan
tread_geek
Joined: March 23, 2008
KitMaker: 2,847 posts
Armorama: 2,667 posts
Posted: Wednesday, February 03, 2010 - 06:57 AM UTC
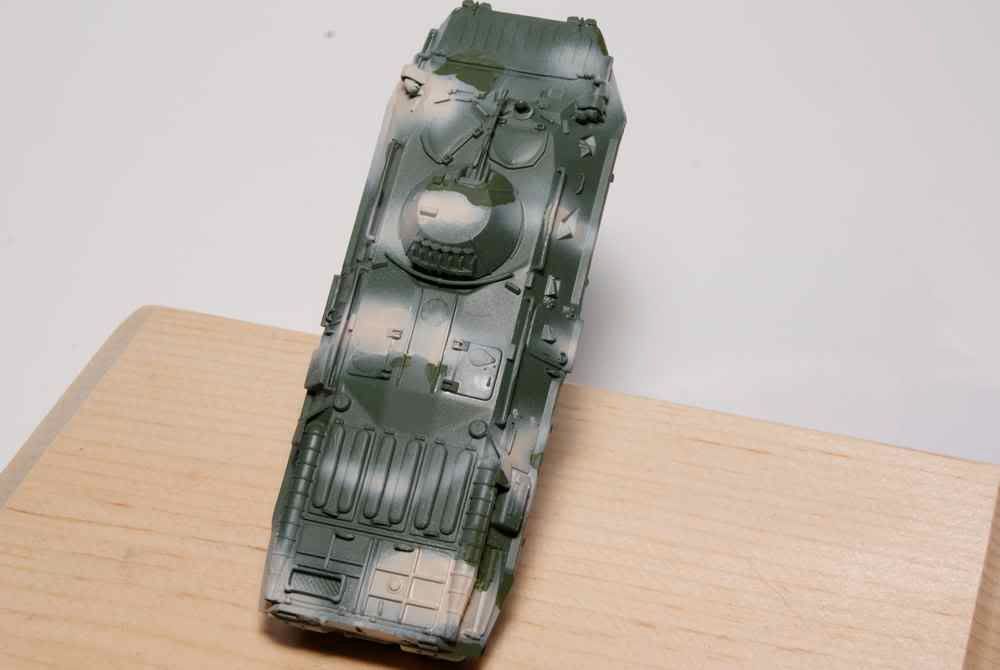
I've been spending an inordinate amount of time trying to think of a method to paint the camouflage. I've decided on a paint scheme but at this scale it's been a case of trial and mostly error. I've experimented with different paint to solvent ratios, airbrush pressures and masking techniques. I have also come to the conclusion that the Model Master Russian green is too dark. So today I sprayed some areas where the sand colour will appear. I will mask parts of those areas with stick tack, spray some black and mask that after it's dry and then over-spray the entire vehicle with a more appropriate green.
Here's the camo example.
The next two pictures are of the starting of the camo on the model.

As always, comments and questions are welcome.
Cheers,
Jan
I've experimented with different paint to solvent ratios, airbrush pressures and masking techniques. I have also come to the conclusion that the Model Master Russian green is too dark. So today I sprayed some areas where the sand colour will appear. I will mask parts of those areas with stick tack, spray some black and mask that after it's dry and then over-spray the entire vehicle with a more appropriate green.Here's the camo example.
The next two pictures are of the starting of the camo on the model.
As always, comments and questions are welcome.
Cheers,
Jan
Gorizont
Joined: November 28, 2007
KitMaker: 1,462 posts
Armorama: 1,289 posts
Posted: Wednesday, February 03, 2010 - 07:09 AM UTC
Good luck for painting/ spraying the camo!
Some parts of the sand-yellow looks a bit to soft, but perhaps you can use the thicker/ wider black parts to overpaint this.
greetings...
Soeren
Some parts of the sand-yellow looks a bit to soft, but perhaps you can use the thicker/ wider black parts to overpaint this.
greetings...
Soeren
tread_geek
Joined: March 23, 2008
KitMaker: 2,847 posts
Armorama: 2,667 posts
Posted: Wednesday, February 03, 2010 - 07:37 AM UTC
Quoted Text
Good luck for painting/ spraying the camo!
Thank you Soeren, I will need all the best wishes and luck I can get.
Quoted Text
Some parts of the sand-yellow looks a bit to soft, but perhaps you can use the thicker/ wider black parts to overpaint this.
I intend to mask the deeper shades of the sand and yes, the black bands will also help hide any over-spray.
Thanks for looking,
Jan
spaarndammer
Joined: January 28, 2007
KitMaker: 1,945 posts
Armorama: 282 posts
Posted: Wednesday, February 03, 2010 - 08:52 AM UTC
Hi Jan,
A pity to hear about your troubles with keeping the BTR alive. I like the camo you are painting on the BTR.
Can you show me a photo of the stick tack in place?
Jelger
A pity to hear about your troubles with keeping the BTR alive. I like the camo you are painting on the BTR.
Can you show me a photo of the stick tack in place?
Jelger
tread_geek
Joined: March 23, 2008
KitMaker: 2,847 posts
Armorama: 2,667 posts
Posted: Thursday, February 04, 2010 - 08:14 AM UTC
Quoted Text
Hi Jan,
A pity to hear about your troubles with keeping the BTR alive. I like the camo you are painting on the BTR.
Can you show me a photo of the stick tack in place?
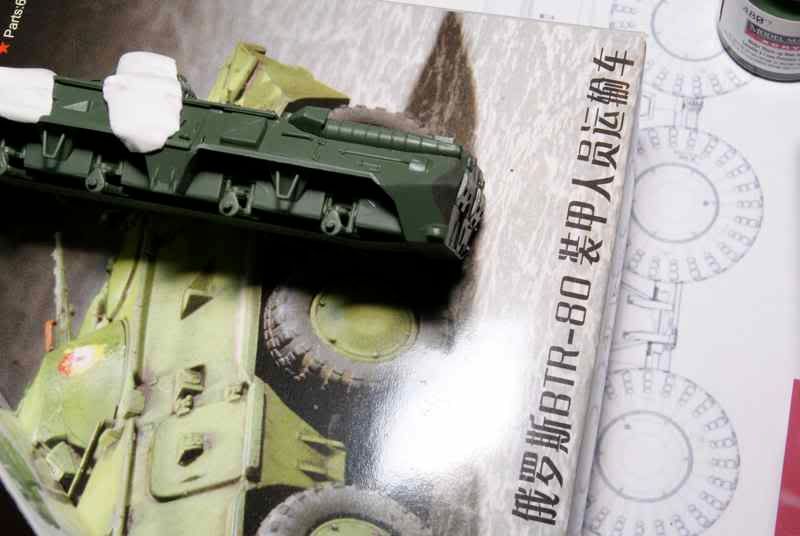
Well Jelger, I have had to take a step backward as things with the camo were not working out. I decided to try and strip off the old paints as the green was definitely wrong and I didn't want the paint to get too thick. My SWMBO suggested I try her acetone free nail polish remover to see if it would remove the acrylic paint. It worked quite well but man did it stink.
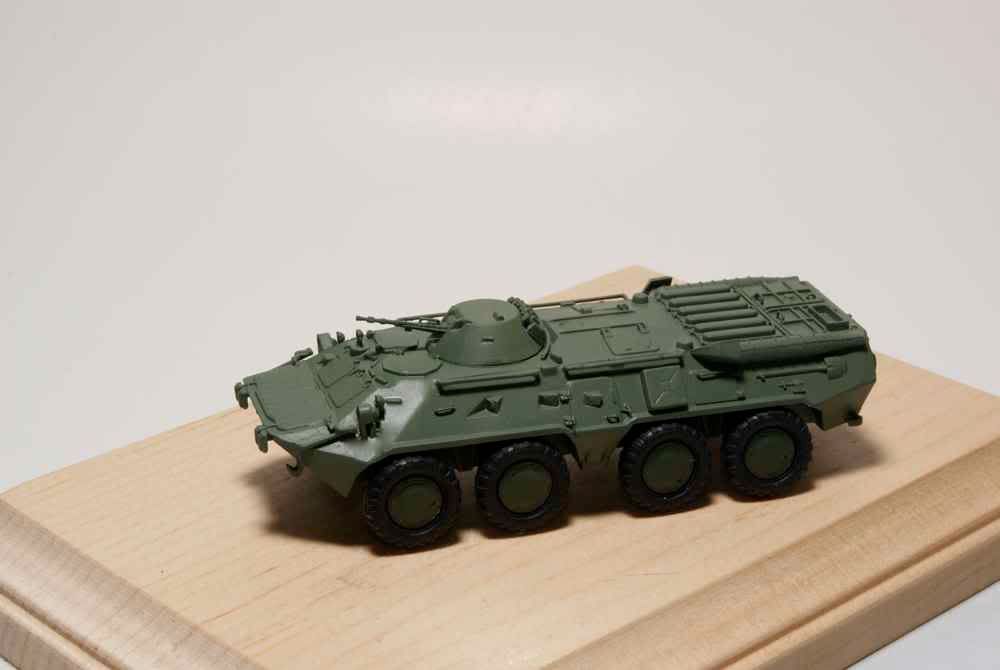
 I then mixed up a more appropriate green and sprayed the BTR. I'm using Model Master Acryl and even though the colour looked correct in the bottle it dries too dark. I ended up mixing 2/3 Russian green with 1/3 Sand to get a more correct colour.
As for the stick tack (I believe they call it various names, Blue Tack, Poster Putty...) I did an experiment and it appeared to work. You just have to be careful when you're spraying so that the paint sprays perpendicular to the surface. Here's a picture of the stuff applied to the BTR before I striped it.
Here's the BTR with the new paint.

I also put the wheels on to see how it would look. They aren't glued.
I also found that I do not have enough of the putty in the package to do more than half of the vehicle. At this point I am seriously considering leaving it green. I was building this for the Mighty Wheels campaign and I am running out of time. Now that I think of it, I could just finish it in green and then redo it in the Tank Overhaul campaign in camo.
Cheers,
Jan
tread_geek
Joined: March 23, 2008
KitMaker: 2,847 posts
Armorama: 2,667 posts
Posted: Monday, February 08, 2010 - 09:05 AM UTC
A lot of time and work but it seems so little to show for it. Despite numerous attempts to get my airbrush to co-operate I find that I can't do the camo version at this time. My airbrush is only a few months old but it is appearing that my 20+ year old compressor may be the culprit. They don't stock the one I want at the LHS so it is on back order.
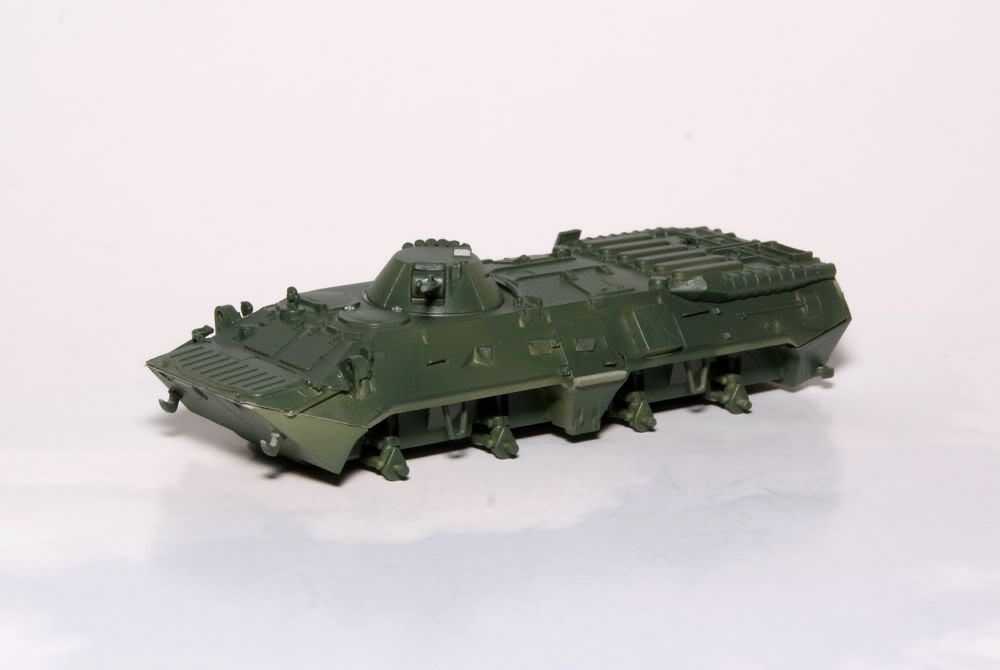
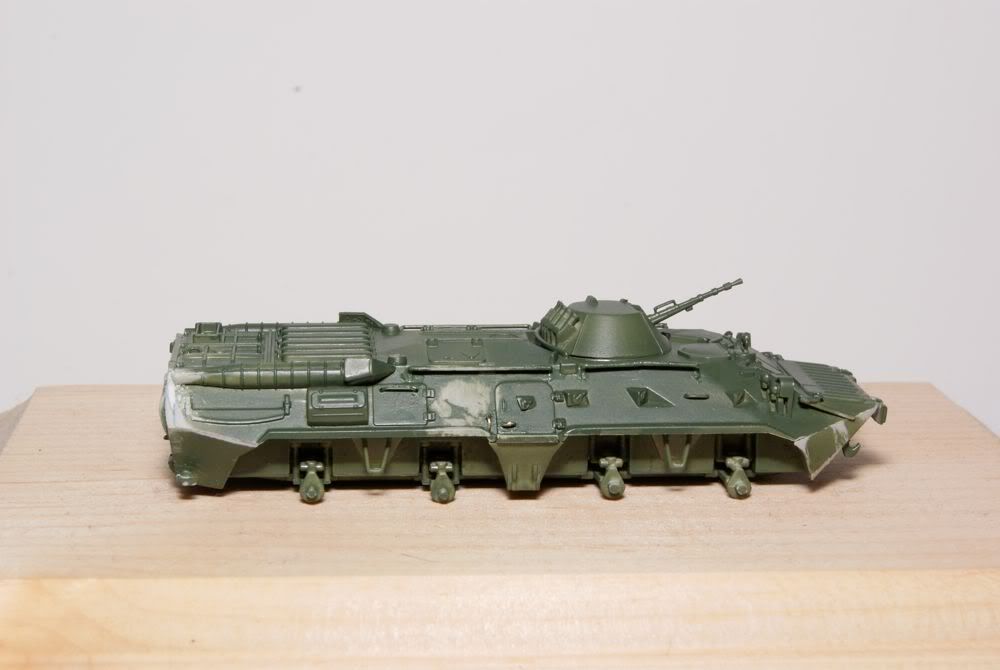
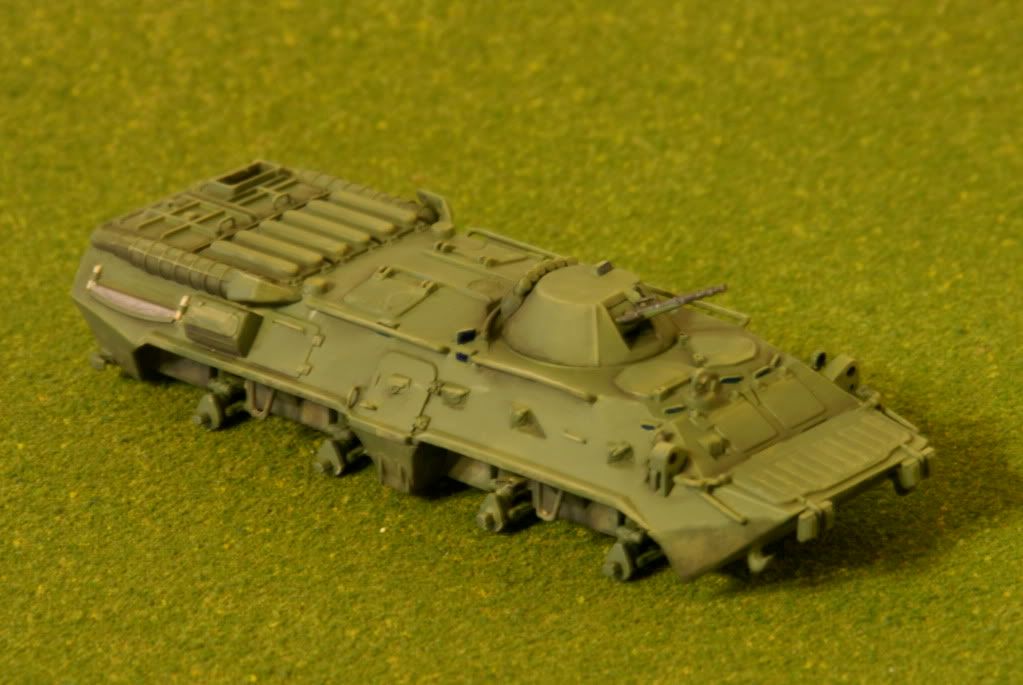
In the mean time I've decided to go with the standard green look and started the detail painting. Here's some pictures.
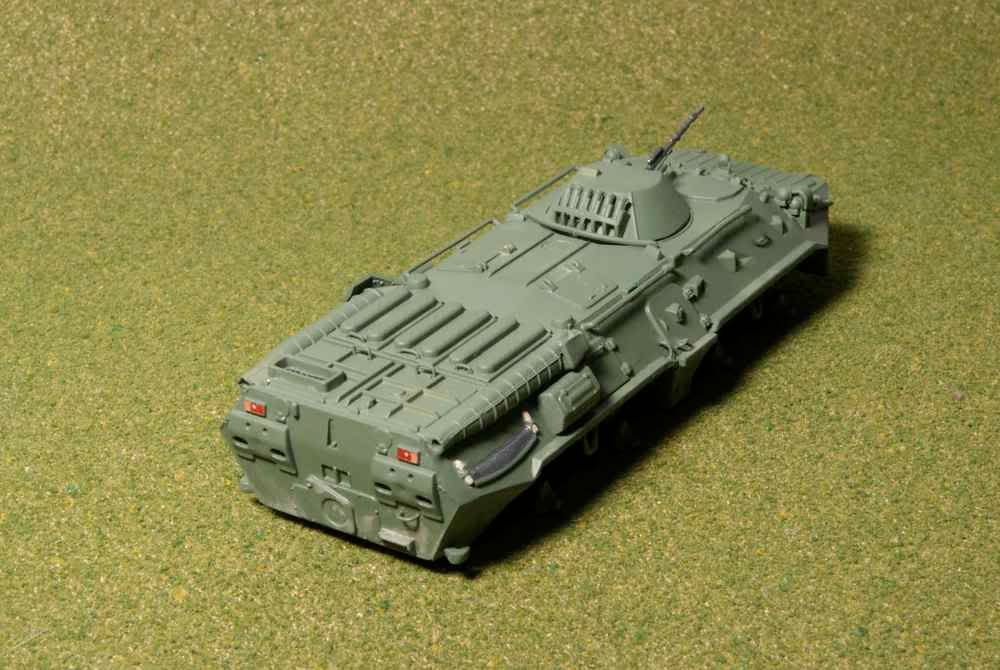
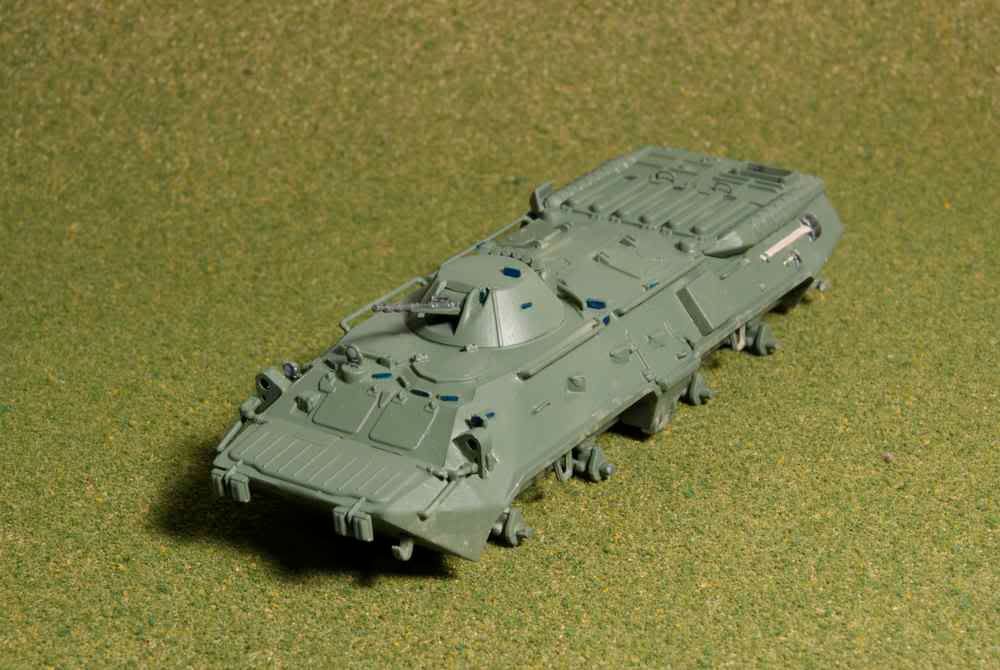
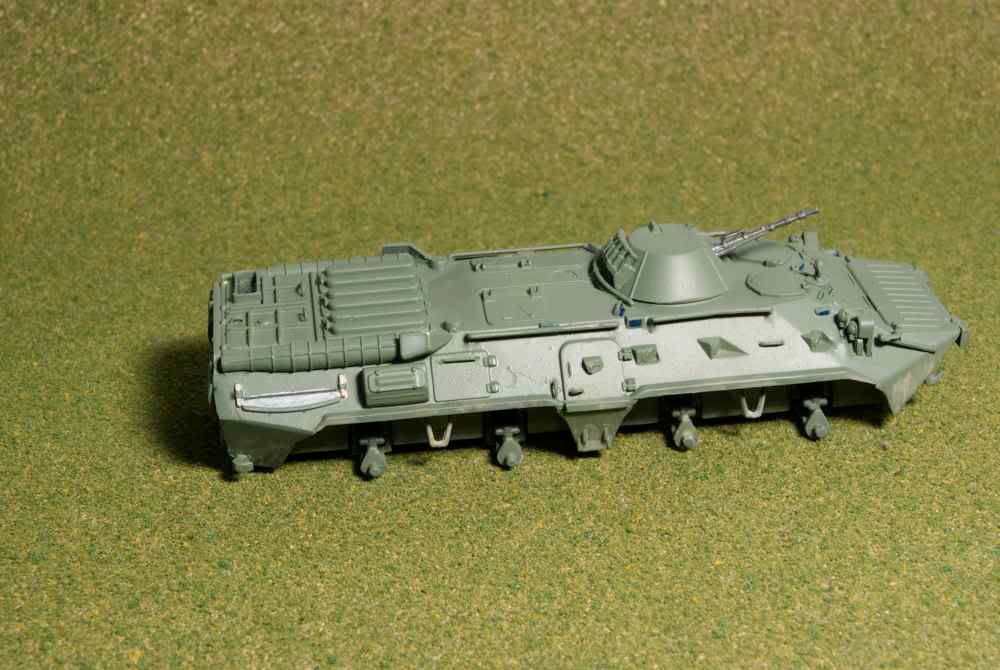
There are only four decals for this beast but after looking at dozens of pictures on the Internet it appears that a large number of the all green ones can be seen with no markings. For the time being I'll leave mine that way. With the details done I started the tedious process of shading and highlighting to give the vehicle more "depth." I've also decided to "dirty" it up just a touch as most of the one's I've seen pictures of seem quite well cared for. Here's the results of that effort.
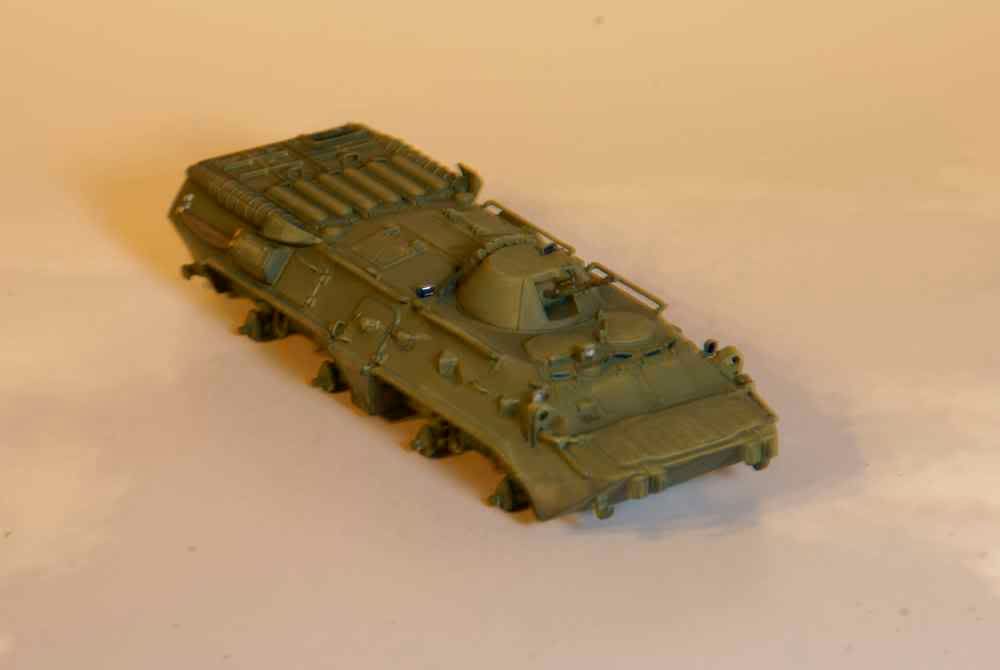
I am currently doing more shading and the like and hopefully I'll get it finished enough to post pictures in the campaign that I built it for.
Cheers,
Jan
Despite numerous attempts to get my airbrush to co-operate I find that I can't do the camo version at this time. My airbrush is only a few months old but it is appearing that my 20+ year old compressor may be the culprit. They don't stock the one I want at the LHS so it is on back order. In the mean time I've decided to go with the standard green look and started the detail painting. Here's some pictures.
There are only four decals for this beast but after looking at dozens of pictures on the Internet it appears that a large number of the all green ones can be seen with no markings. For the time being I'll leave mine that way. With the details done I started the tedious process of shading and highlighting to give the vehicle more "depth." I've also decided to "dirty" it up just a touch as most of the one's I've seen pictures of seem quite well cared for. Here's the results of that effort.
I am currently doing more shading and the like and hopefully I'll get it finished enough to post pictures in the campaign that I built it for.
Cheers,
Jan
 |

WEB HOSTING BY


Copyright ©2021 Armorama and Kitmaker Network, a subsidiary of Silver Star Enterprises
All Rights Reserved. Please read our Conditions of Use and Privacy Policy.
All Rights Reserved. Please read our Conditions of Use and Privacy Policy.