Hosted by Darren Baker
Trumpeter M1117 Guardian Step-By-Step
sopmod6

Joined: March 31, 2005
KitMaker: 761 posts
Armorama: 455 posts

Posted: Wednesday, March 17, 2010 - 12:44 AM UTC
In regards to your last pics posted, the cable holders on top of the hull ( upside down "L" shaped objects) the two in the middle should be facing inwards. When the cable is looped around it, it forms a sort of figure "8".
Posted: Wednesday, March 17, 2010 - 02:11 AM UTC
Quoted Text
In regards to your last pics posted, the cable holders on top of the hull ( upside down "L" shaped objects) the two in the middle should be facing inwards. When the cable is looped around it, it forms a sort of figure "8".
Thanks for the information Arnold. I followed the directions. Obviously, those aren't always correct. I'll see if I can relocate the parts after I get home this weekend.
sopmod6

Joined: March 31, 2005
KitMaker: 761 posts
Armorama: 455 posts

Posted: Wednesday, March 17, 2010 - 02:21 AM UTC
I forgot to mention that part on the instructions sheet.
corsutton

Joined: June 17, 2005
KitMaker: 544 posts
Armorama: 511 posts

Posted: Wednesday, March 17, 2010 - 03:58 AM UTC
From my experience with the building of this kit, I believe the instructions are backwards in regards to the photo etch armor pieces in the wheel wells. I believe the pieces that are shown on the forward edge of the front wheel wells, should actually go on the front edge of the rear wheel wells and visa versa. I also carved up one side of my front wells trying to make the part fit. Then I accidentally placed the part in the rear wheel well and it fit perfectly. I then took the part designated for the rear well and it fit perfectly in the uncarved well on the front. Sorry if this is confusing. I am at work now. I will try and remember to get the actual part numbers to clarify this when I get home later.
Posted: Saturday, March 20, 2010 - 06:37 PM UTC
Well, I'm back with another update.
STEP 12
Step 12 is the assembly of most of the turret.
The first part of step 12 is assembly the turret armament elevation assembly. This assembly consists of 7 parts. The barrels of both weapons are molded with hollow muzzles. However, the hollow muzzles of both weapons appear to be the same diameter. On the real weapons, the difference in muzzle diameter is very significant. This may bother some purists. For those desiring more accuracy with the weapon barrels, you should consider replacing both weapon barrels with aftermarket items. Overall, I feel the barrels provided for both weapons look pretty good and are adequate for a good out-of-box build.
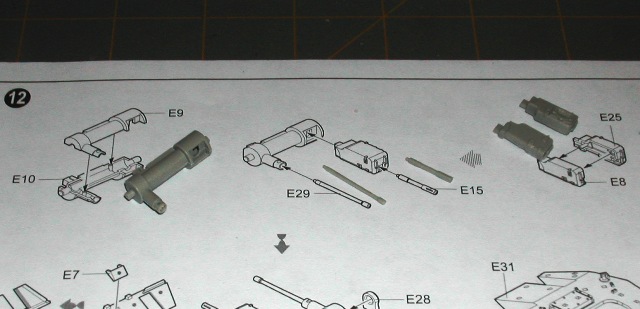
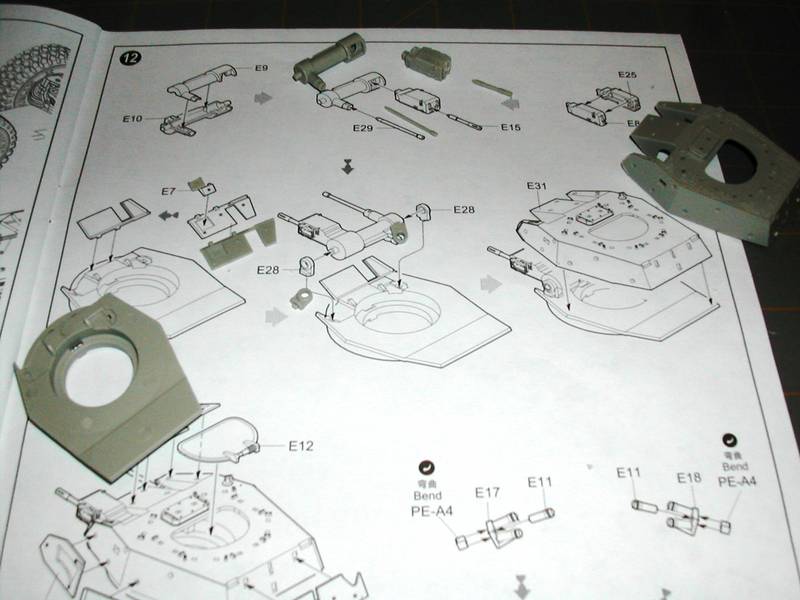
The only problem I ran into in this part of step 12 was fitting the MK. 19 grenade launcher houseing (E8/E25) into the elevation assembly (E9/E10). I had to trim up the opening in the elevation assembly so that it would allow the grenade launcher housing to fully recess like it is supposed to. A visual cue to wether are not the parts are fitting right can be taken of the sides of parts for the grenade launcher housing. The parts have curved recesses that fit into the contour of the armament elevation assembly. The parts are all the way in if the contour of the elevation assembly is flush with the curved recesses of the grenade launcher assembly.
The next part of step 12 has you completing assembly of the turret lower, front glacis plate, installing the armament/elevation assembly, and putting on the top of the turret.
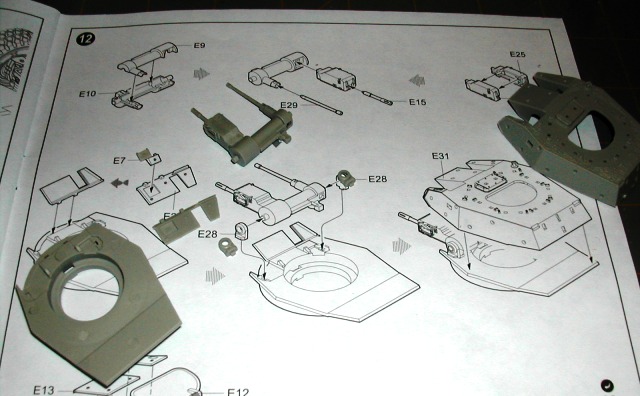
Part E21(front lower armor plate) in the photo above was very brittle at the base of 'U' shaped area. This piece broke on me as I was cleaning up the mold release point.
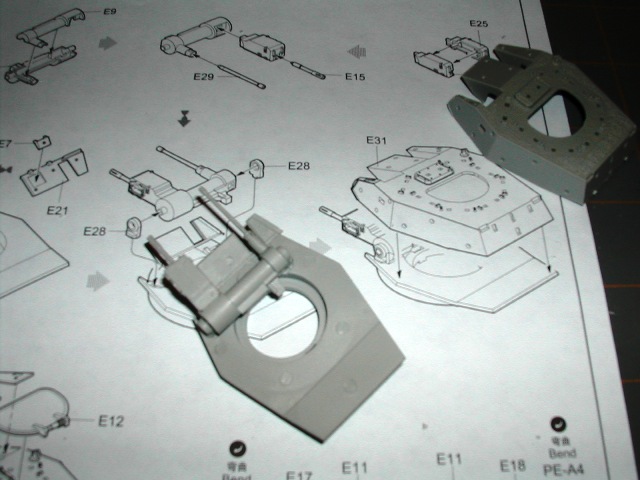
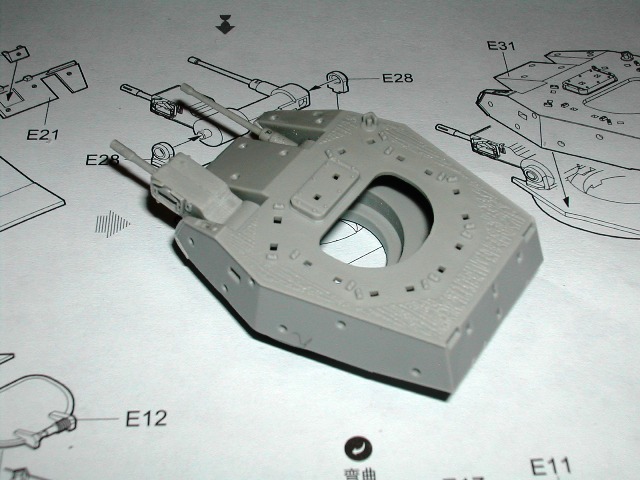
The next step has you assembly the turret exterior armor plates and the gunners hatch.
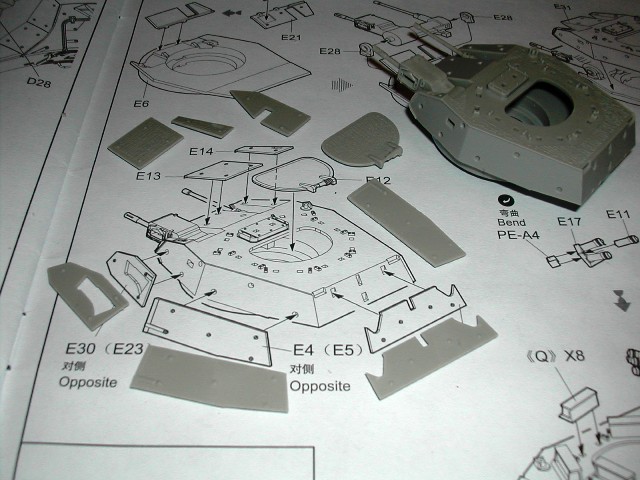
I did not encounter any problems here.
Next up was the assembly of the smoke grenade launchers. The smoke grenade launcher assemblies consist of 6 parts each. 1 PE part and 5 styrene parts.
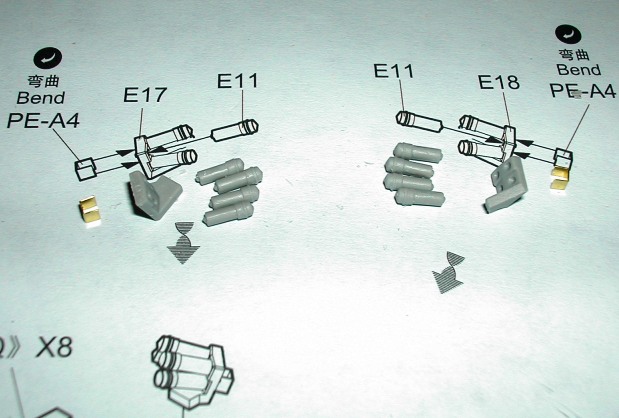
My only struggle through the photo above was cleaning up the mold seams on the grenade launcher barrels. It was very difficult to hold them while cleaning up the seams.
I did something here out of curiousity. I assembled one grenade launcher assembly using liquid glue and I did the second assembly using super glue. I additionally assembled one grenade launcher with the base already on the turret. The second launcher was completely assembled before being installed on the turret. The point of my little experiment was to see two things:
1. Which glue works best for assembling these? Super glue or regular liquid glue?
2. Is it easier to assemble the launchers after the base is installed on the turret or is it easier to assemble the launcher completely and then install it on the turret.
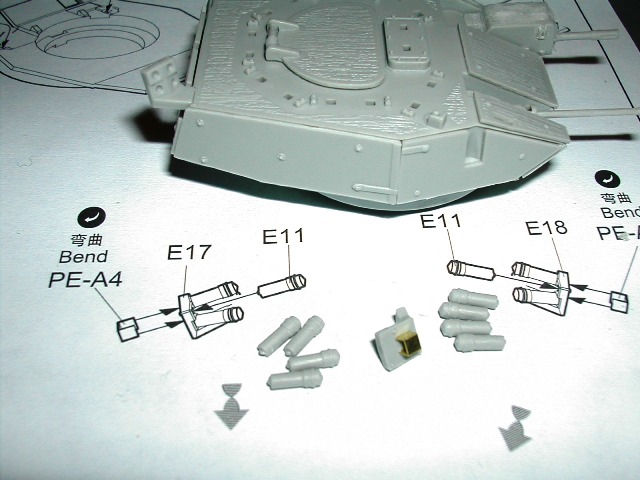
In the photo above, you see I have one grenade launcher base installed on the turret. The second launcher base is at the bottom of the photo with the rear facing you (showing you the PE bracket).
Well, my conclusion was this......It is easiest to install the launcher tubes onto the launcher base after the base has been installed on the turret. Additionally, super glue and a little accelerator works best for installing each set of 4 tubes on the launcher bases. With the launcher base already on the turret, it was much easier to install the tubes. Whereas, if you are assembling the launcher off of the turret, it is much more difficult to hold the small launcher base and install the launcher tubes at the same time. Hopefully, you will find my experiment of some benefit.
The last part of the step 12 has you installing the 8 periscope housings, installing the smoke grenade launchers (done above), assembling the Mk. 19 40mm grenade launcher ammo feed chute and installing the Mk. 19 grenade launcher ammo feed chute onto the turret/Mk. 19. The connector for the ammo feed chute that goes into E3 is very brittle. It broke off when i was inserting it into part E3. I was able to fix it with super glue though.
You have the option between a styrene ammo feed chute (E26) or a vinyl ammo feed chute (R). I opted for the styrene part because it will theoretically hold paint better than the vinyl part and I think it will be easier to detail than the vinyl part.
The 8 periscope housings sit up off the turret roof a bit. So, don't put effort into trying to get the periscope housings to sit flush on the turret roof. I left the clear parts off the periscope housings to make painting easier. After painting/weathering of the entire model is complete, I will install them using white glue.
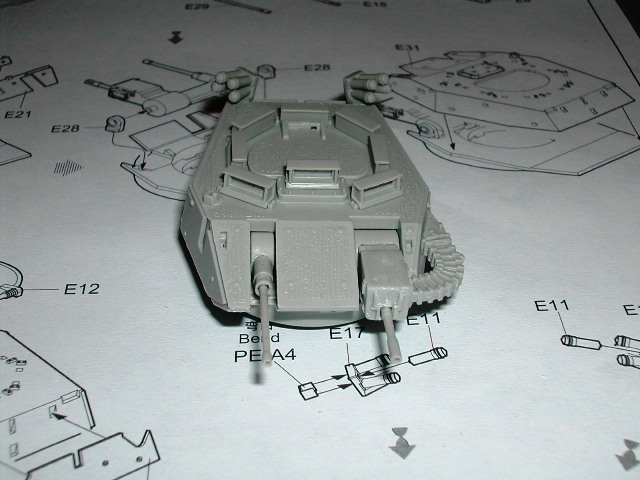
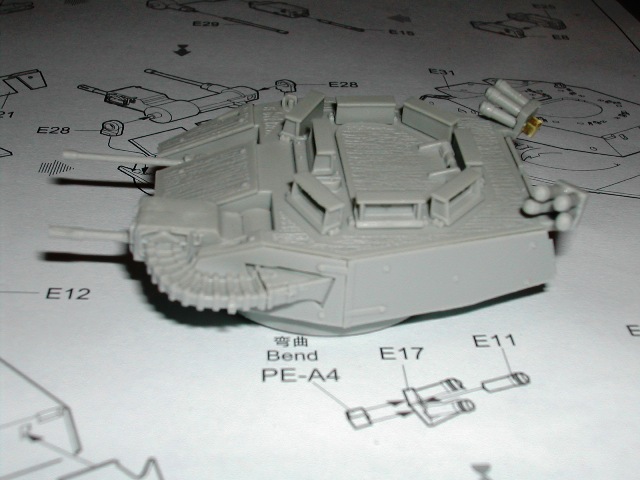
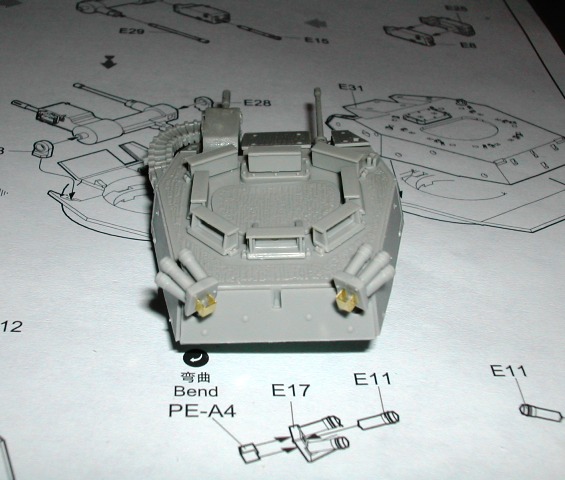
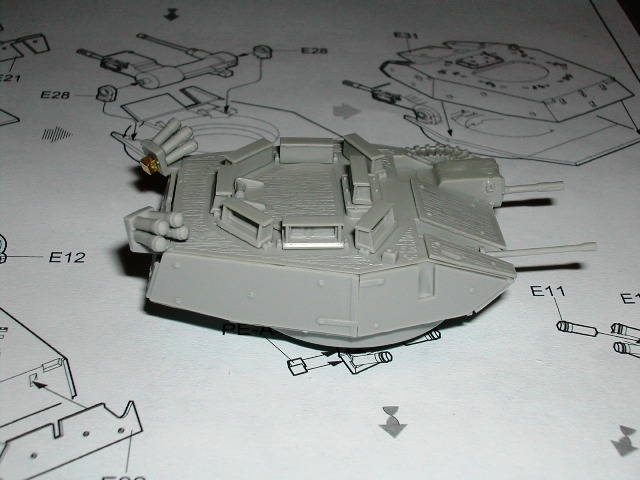
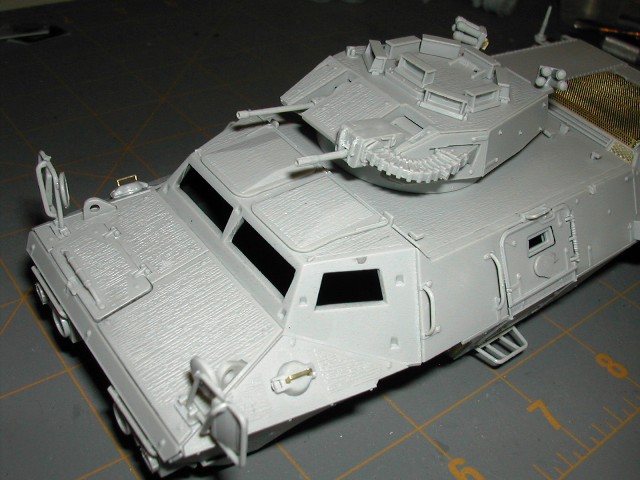
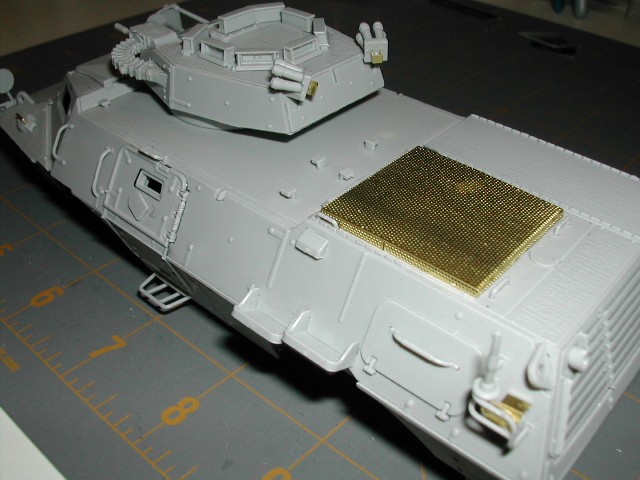
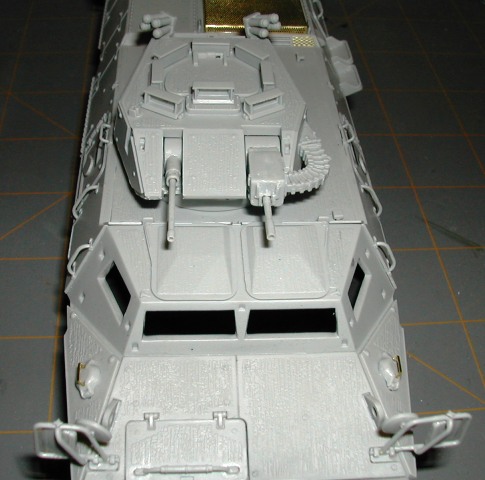
Here is how the overall vehicle looks at the end of step 12. You don't actually install the turret until step 14 but I just couldn't help putting it on to see how it looks.
See ya next time.
STEP 12
Step 12 is the assembly of most of the turret.
The first part of step 12 is assembly the turret armament elevation assembly. This assembly consists of 7 parts. The barrels of both weapons are molded with hollow muzzles. However, the hollow muzzles of both weapons appear to be the same diameter. On the real weapons, the difference in muzzle diameter is very significant. This may bother some purists. For those desiring more accuracy with the weapon barrels, you should consider replacing both weapon barrels with aftermarket items. Overall, I feel the barrels provided for both weapons look pretty good and are adequate for a good out-of-box build.


The only problem I ran into in this part of step 12 was fitting the MK. 19 grenade launcher houseing (E8/E25) into the elevation assembly (E9/E10). I had to trim up the opening in the elevation assembly so that it would allow the grenade launcher housing to fully recess like it is supposed to. A visual cue to wether are not the parts are fitting right can be taken of the sides of parts for the grenade launcher housing. The parts have curved recesses that fit into the contour of the armament elevation assembly. The parts are all the way in if the contour of the elevation assembly is flush with the curved recesses of the grenade launcher assembly.
The next part of step 12 has you completing assembly of the turret lower, front glacis plate, installing the armament/elevation assembly, and putting on the top of the turret.

Part E21(front lower armor plate) in the photo above was very brittle at the base of 'U' shaped area. This piece broke on me as I was cleaning up the mold release point.


The next step has you assembly the turret exterior armor plates and the gunners hatch.

I did not encounter any problems here.
Next up was the assembly of the smoke grenade launchers. The smoke grenade launcher assemblies consist of 6 parts each. 1 PE part and 5 styrene parts.

My only struggle through the photo above was cleaning up the mold seams on the grenade launcher barrels. It was very difficult to hold them while cleaning up the seams.
I did something here out of curiousity. I assembled one grenade launcher assembly using liquid glue and I did the second assembly using super glue. I additionally assembled one grenade launcher with the base already on the turret. The second launcher was completely assembled before being installed on the turret. The point of my little experiment was to see two things:
1. Which glue works best for assembling these? Super glue or regular liquid glue?
2. Is it easier to assemble the launchers after the base is installed on the turret or is it easier to assemble the launcher completely and then install it on the turret.

In the photo above, you see I have one grenade launcher base installed on the turret. The second launcher base is at the bottom of the photo with the rear facing you (showing you the PE bracket).
Well, my conclusion was this......It is easiest to install the launcher tubes onto the launcher base after the base has been installed on the turret. Additionally, super glue and a little accelerator works best for installing each set of 4 tubes on the launcher bases. With the launcher base already on the turret, it was much easier to install the tubes. Whereas, if you are assembling the launcher off of the turret, it is much more difficult to hold the small launcher base and install the launcher tubes at the same time. Hopefully, you will find my experiment of some benefit.
The last part of the step 12 has you installing the 8 periscope housings, installing the smoke grenade launchers (done above), assembling the Mk. 19 40mm grenade launcher ammo feed chute and installing the Mk. 19 grenade launcher ammo feed chute onto the turret/Mk. 19. The connector for the ammo feed chute that goes into E3 is very brittle. It broke off when i was inserting it into part E3. I was able to fix it with super glue though.
You have the option between a styrene ammo feed chute (E26) or a vinyl ammo feed chute (R). I opted for the styrene part because it will theoretically hold paint better than the vinyl part and I think it will be easier to detail than the vinyl part.
The 8 periscope housings sit up off the turret roof a bit. So, don't put effort into trying to get the periscope housings to sit flush on the turret roof. I left the clear parts off the periscope housings to make painting easier. After painting/weathering of the entire model is complete, I will install them using white glue.


Here is how the overall vehicle looks at the end of step 12. You don't actually install the turret until step 14 but I just couldn't help putting it on to see how it looks.


See ya next time.

Posted: Saturday, March 20, 2010 - 07:02 PM UTC
Quoted Text
In regards to your last pics posted, the cable holders on top of the hull ( upside down "L" shaped objects) the two in the middle should be facing inwards. When the cable is looped around it, it forms a sort of figure "8".
You are correct Arnold....I found this photo on Prime Portal that supports your statement.

So, I will be fixing that on my kit. Thank you very much for the "heads-up" on this matter.

shopkin4

Joined: March 29, 2009
KitMaker: 1,135 posts
Armorama: 1,030 posts

Posted: Sunday, March 21, 2010 - 02:45 AM UTC
Brent,
I actually started mine yesterday and I swear when I look here it feels like I'm looking at a color form of the instruction manual. VERY good work.
I actually started mine yesterday and I swear when I look here it feels like I'm looking at a color form of the instruction manual. VERY good work.
Herchealer

Joined: July 31, 2003
KitMaker: 1,523 posts
Armorama: 710 posts

Posted: Monday, March 22, 2010 - 01:32 AM UTC
Ok I have found a trick (I think) to add in the ease of removing/installing the tires for painting.
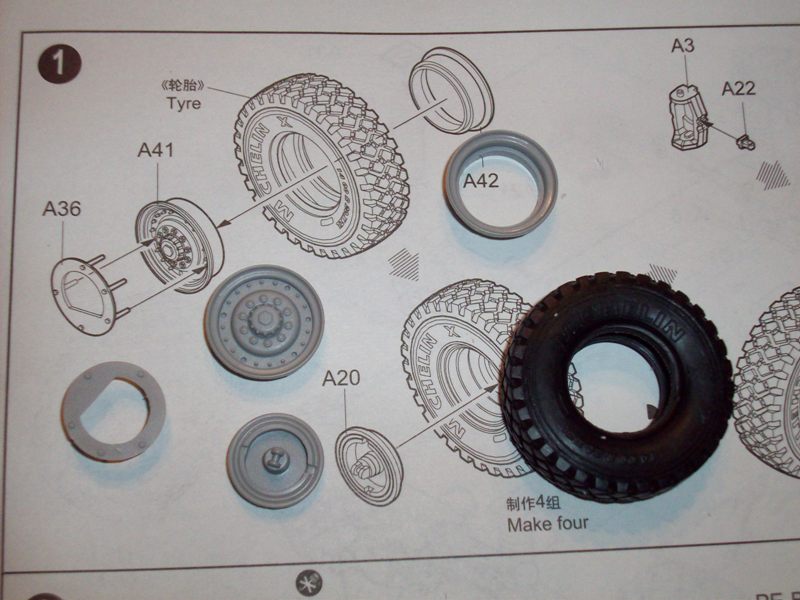
This picture comes from one of Brent's first posts. If you take A20 and do not glue it to the hub and wait until later, then you can slide the tire on and off the back of the rim easier. Also you can get a better painting job on the suspension. Of course I didnt discover this until I had already glued all my pieces together.
HTH!
Herky
Been using this Blog as a guide and so far has been very helpful!!
Posted: Monday, March 22, 2010 - 03:41 PM UTC
I'm back with another update...
STEP 13
Step 13 has you adding the final turret fittings/details. The final details consist of 3 turret lifting eyes, an armor cover for the MK. 19 40mm GMG feed chute, a spot light over the M2 .50 cal, and the PE cover over the center periscope.
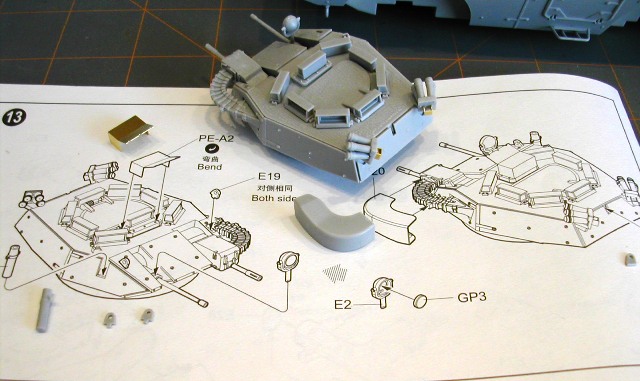
One thing I want to warn you of right away is the fragile nature of the spot light (part E2). When I tried to make my first cut to remove the part from the sprue, the support arms snapped off on the side of the spot light. Fortunately I was able to use super glue and reattach the support arms to the light body. As a result of the breakage and the ensuing repair, I was not able to show the spot light laid out with the rest of the parts. However, you can see it installed on the turret.
All other parts went on without any problems.
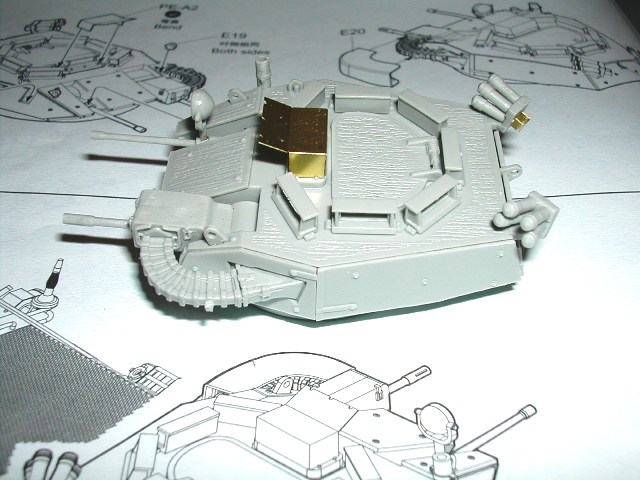
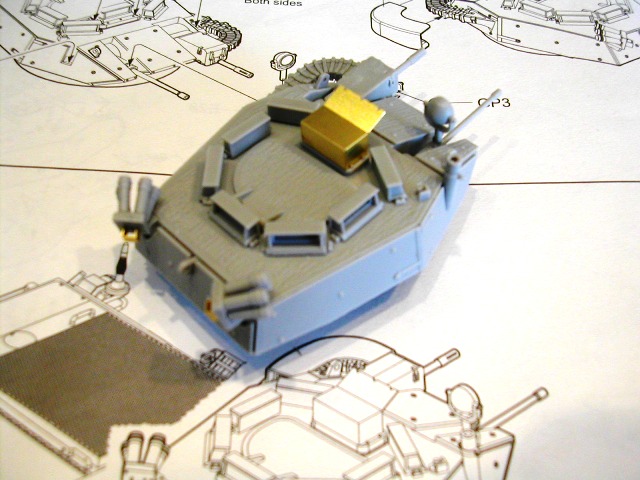
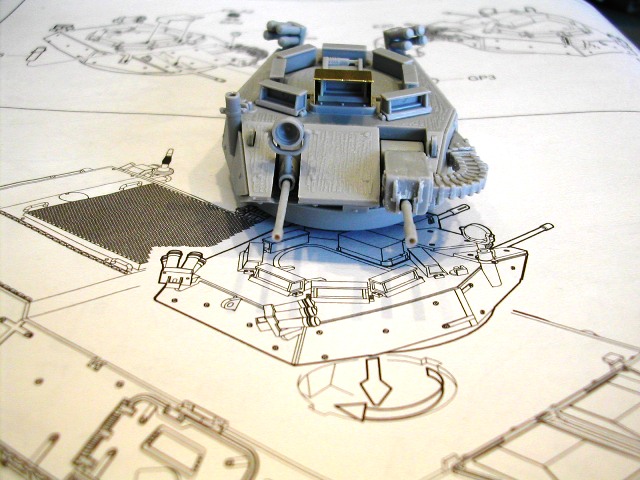
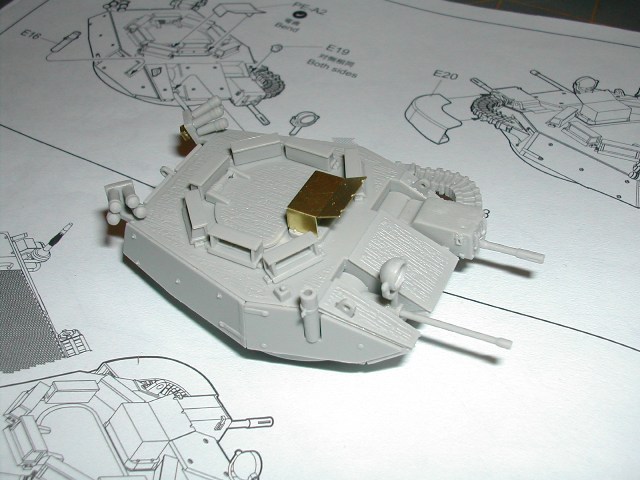
I have opted to leave off the armored feed chute cover. The feed chute is visible after the cover is in place so I want to be able to paint and dry brush the feed chute completely.
I have left off the clear lense for the spotlight. I will replace it with an MV lense as used in my previous post regarding the headlights.
I have left off the periscope lenses. I plan to paint the exterior of the vehicle first, paint the interior of the periscopes, then glue the lenses in place with white glue.
STEP 13
Step 13 has you adding the final turret fittings/details. The final details consist of 3 turret lifting eyes, an armor cover for the MK. 19 40mm GMG feed chute, a spot light over the M2 .50 cal, and the PE cover over the center periscope.

One thing I want to warn you of right away is the fragile nature of the spot light (part E2). When I tried to make my first cut to remove the part from the sprue, the support arms snapped off on the side of the spot light. Fortunately I was able to use super glue and reattach the support arms to the light body. As a result of the breakage and the ensuing repair, I was not able to show the spot light laid out with the rest of the parts. However, you can see it installed on the turret.
All other parts went on without any problems.


I have opted to leave off the armored feed chute cover. The feed chute is visible after the cover is in place so I want to be able to paint and dry brush the feed chute completely.
I have left off the clear lense for the spotlight. I will replace it with an MV lense as used in my previous post regarding the headlights.
I have left off the periscope lenses. I plan to paint the exterior of the vehicle first, paint the interior of the periscopes, then glue the lenses in place with white glue.
Posted: Tuesday, March 23, 2010 - 03:13 PM UTC
Here is an update….Sort of.
With my pending return home from TDY tomorrow night, I’m pondering my finishing plan for the M1117 Guardian.
I’m going to finish the M1117 in NATO 3-color camouflage using Model Master enamels with KFOR markings just like this vehicle in these pictures on PRIME PORTAL posted by Tobias Kroesel.


Here are the steps I plan to follow:
1. Prime
2. Pre-shade
3. Camo- Medium Green
4. Camo- Military Brown
5. Camo- Flat Black
6. Detail painting- winch chain, ammo feed chute, periscopes, etc.
7. Dry brushing
8. Gloss coat
9. Decals
10. Gloss coat
11. Wash
12. Flat coat
Hopefully tomorrow night I will have an update showing some paint.
With my pending return home from TDY tomorrow night, I’m pondering my finishing plan for the M1117 Guardian.
I’m going to finish the M1117 in NATO 3-color camouflage using Model Master enamels with KFOR markings just like this vehicle in these pictures on PRIME PORTAL posted by Tobias Kroesel.


Here are the steps I plan to follow:
1. Prime
2. Pre-shade
3. Camo- Medium Green
4. Camo- Military Brown
5. Camo- Flat Black
6. Detail painting- winch chain, ammo feed chute, periscopes, etc.
7. Dry brushing
8. Gloss coat
9. Decals
10. Gloss coat
11. Wash
12. Flat coat
Hopefully tomorrow night I will have an update showing some paint.

Posted: Thursday, March 25, 2010 - 04:49 PM UTC
Short update for tonight.....
I skipped the primer and shot the pre-shade. Nothing fancy. I did it quick, down and dirty. In some places the mixture was too thin. I don't think it will matter in the long run though.
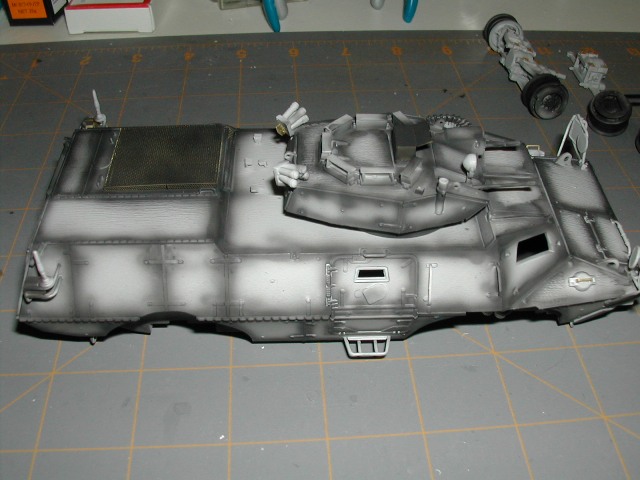
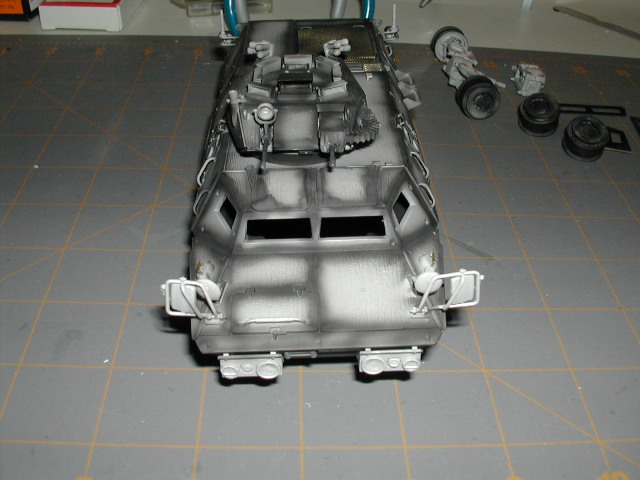
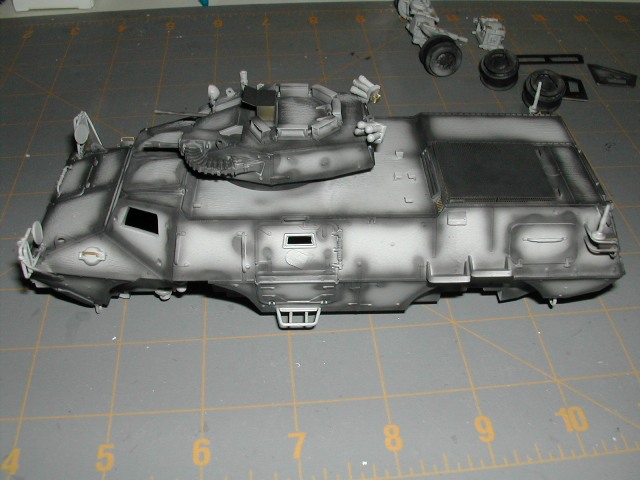
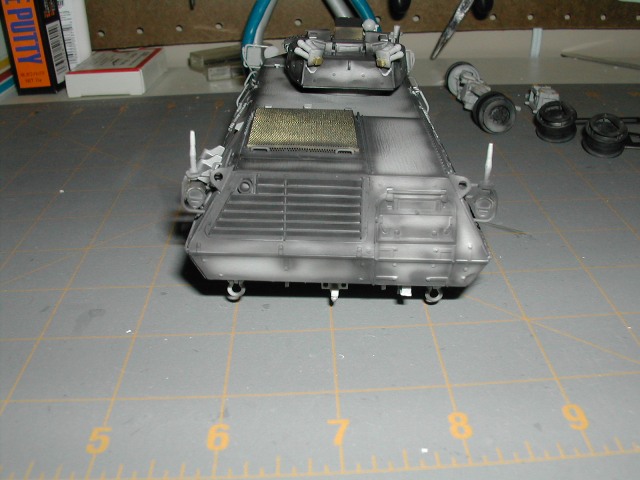
Not much else to say about it. I'm heading back to the bench to shoot the first camo color. See you next time.
I skipped the primer and shot the pre-shade. Nothing fancy. I did it quick, down and dirty. In some places the mixture was too thin. I don't think it will matter in the long run though.


Not much else to say about it. I'm heading back to the bench to shoot the first camo color. See you next time.

CaptGrim

Joined: March 16, 2010
KitMaker: 7 posts
Armorama: 5 posts

Posted: Friday, March 26, 2010 - 12:46 AM UTC
Looking really sharp so far Brent, excellent work. I have a question though. Alot of these steps you guys do here are all new to me. Can you explain the purpose and how you go about "pre-shading?" Is it always done with black if you are doing armor vehicles and what is the actual purpose of this step? Also, I should use a primer base before I spray my main colors? 


The3rdPlacer

Joined: July 29, 2008
KitMaker: 430 posts
Armorama: 407 posts

Posted: Friday, March 26, 2010 - 12:53 AM UTC
Making good progress Brent.
I'm working on a NATO tri-color M60, watching to see your paint job.
Ryan
I'm working on a NATO tri-color M60, watching to see your paint job.
Ryan
Posted: Tuesday, March 30, 2010 - 04:52 PM UTC
Well, I have to surrender...I thought I was going to be able to pull off a 30 day build for the MP CAMPAIGN but I'm just not going to be able to make it. I spent 7 days out of town working in the middle of the month and am leaving for 3 days of TDY in the morning which will put me back home after the 1 APR deadline.
Its a real drag I didn't finish in time. Please take a look at the blog as I continue to progress. There will be an update the this weekend, probably on Saturday night.
Its a real drag I didn't finish in time. Please take a look at the blog as I continue to progress. There will be an update the this weekend, probably on Saturday night.
Cuny12

Joined: April 04, 2010
KitMaker: 378 posts
Armorama: 348 posts

Posted: Wednesday, April 14, 2010 - 02:50 AM UTC
This would have to be one of the more enjoyable kits i have built in a While i found that the tires are quite easy to put on after painting and I had the same dramas with the p.e inserts in the guards and also stuffed up the clear window inserts which i did after painting it can be done but at great expense to your patience next time and there will be a next time i will try not to join the hull until after painting not sure if it will work but just putting it out there. All of the problems you encountered I had exactly the same as well that,s why I am keen to have another go at it this time in the woodland scheme.
With regards Ben.
With regards Ben.
Firecap4

Joined: December 12, 2007
KitMaker: 309 posts
Armorama: 288 posts

Posted: Saturday, April 17, 2010 - 11:33 AM UTC
Looking good, Brent. Can't wait to start mine,but will probably wait until I get back from my 2 week ADT with the Reserves which will be starting soon.
One question regarding the 1:1 item: do the vision blocks on the turret have any kind of anti-radiation coating like on the M1, are are they simply clear?
One question regarding the 1:1 item: do the vision blocks on the turret have any kind of anti-radiation coating like on the M1, are are they simply clear?
Posted: Sunday, May 09, 2010 - 08:02 AM UTC
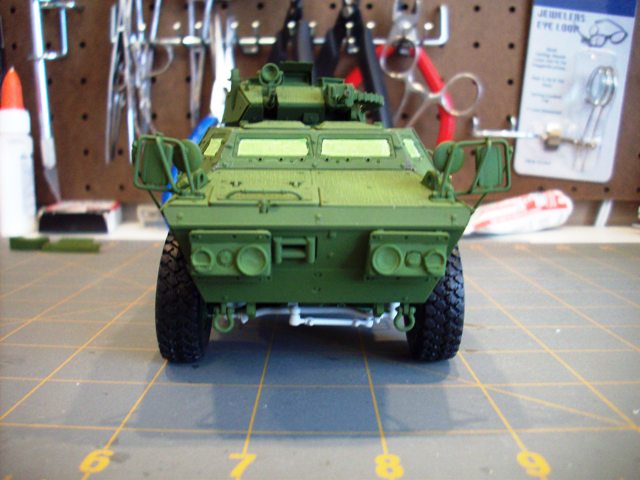
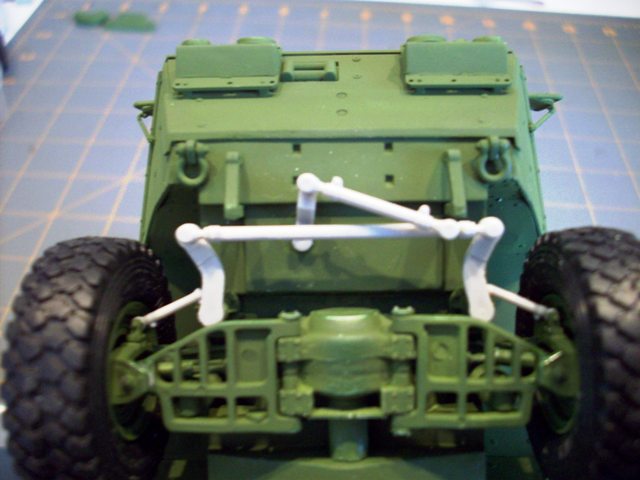
Well, here I am finally updating this blog almost a month later. The Army has had me extremely busy. I shot a base coat of Model Master Medium Green. It has worn off in places as a result of handling as you can see. After I shot the base coat, I installed the rest of suspension/drive train. I just wasn't confident I could complete assembly and still hit all the angles, nooks and crannies with the airbrush. So I painted some and then installed the remaining parts.
I've got the windows taped off, the rest of the suspension installed and I'm ready to shoot the base coat again. After I get the base coat shot, I will shot the other two colors of the 3-color camouflage.
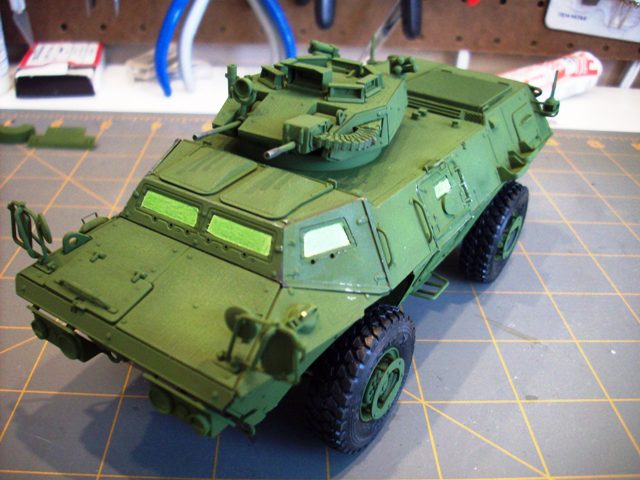
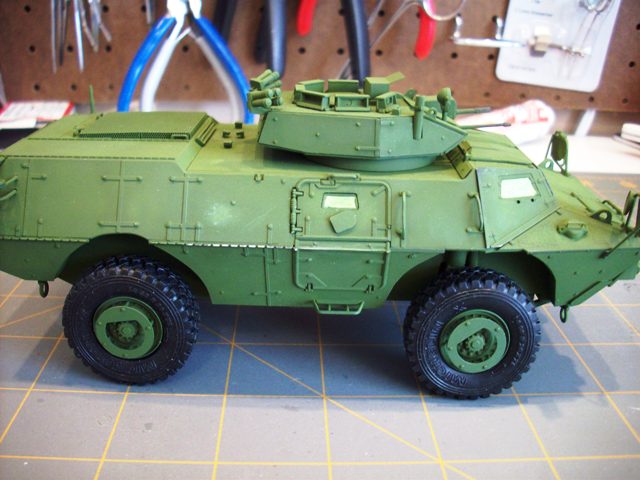
More to follow
I've got the windows taped off, the rest of the suspension installed and I'm ready to shoot the base coat again. After I get the base coat shot, I will shot the other two colors of the 3-color camouflage.


More to follow
GI_Odie

Joined: May 05, 2010
KitMaker: 38 posts
Armorama: 35 posts

Posted: Sunday, May 09, 2010 - 08:20 AM UTC
Looks to be a very nice build. I will keep this post in mind when I start mine.
Thanks for all the pictures too.
Mike
Thanks for all the pictures too.
Mike
seb43

Joined: August 30, 2005
KitMaker: 2,315 posts
Armorama: 2,158 posts

Posted: Sunday, May 09, 2010 - 10:10 AM UTC
Great Update Brent
I am interested on the flat coat and gloss coat which one are you going to use ??
Cheers
Seb
I am interested on the flat coat and gloss coat which one are you going to use ??
Cheers
Seb
Posted: Sunday, May 09, 2010 - 05:47 PM UTC
Shot some paint tonight and did the 3-color camouflage. However, I'm not liking the appearance of the Model Master Military Brown. It is too light compared to the color reference and the posted photos previously in this thread.
Here is a picture of it:
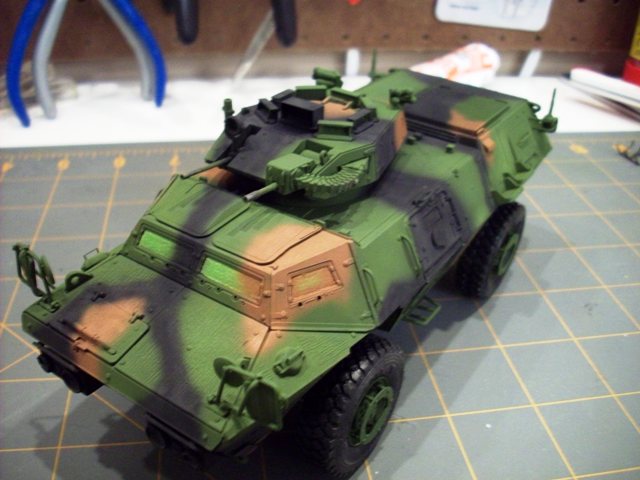
So, I'm going to wait 24 hours for the enamel Military Brown to cure and then I will shoot Tamiya NATO Brown over the top of it. I think that will provide a better appearance.
Here is a picture of it:

So, I'm going to wait 24 hours for the enamel Military Brown to cure and then I will shoot Tamiya NATO Brown over the top of it. I think that will provide a better appearance.
GI_Odie

Joined: May 05, 2010
KitMaker: 38 posts
Armorama: 35 posts

Posted: Sunday, May 09, 2010 - 05:58 PM UTC
I can see what you are saying about the brown, it does seema bit light, but the pattern is looking nice.
Mike
Mike
Posted: Thursday, May 13, 2010 - 06:01 PM UTC
After losing an airbrush part and going on a 3 day temporary duty assignment, I got back into action tonight.
I shot Tamiya NATO Brown over the Model Master Military Brown that I had used in the picture above. I think the brown looks much closer to the color shown in the color plate above and the photographs above.
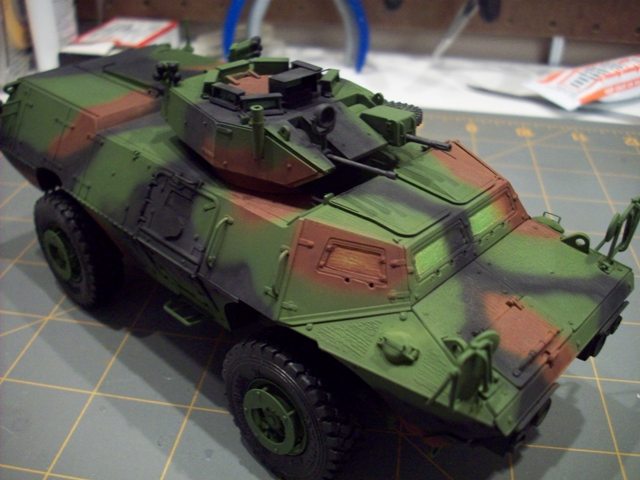
What do you think?
I recommend painting your smoke grenade launchers before installing them on the turret if at all possible. The black rubber caps are very difficult to paint with the smoke grenade launchers installed on the turret.
I shot Tamiya NATO Brown over the Model Master Military Brown that I had used in the picture above. I think the brown looks much closer to the color shown in the color plate above and the photographs above.

What do you think?
I recommend painting your smoke grenade launchers before installing them on the turret if at all possible. The black rubber caps are very difficult to paint with the smoke grenade launchers installed on the turret.
Petition2God

Joined: February 06, 2002
KitMaker: 1,526 posts
Armorama: 1,294 posts

Posted: Friday, May 14, 2010 - 06:45 AM UTC
It turned out great! Good job Brent! Can't wait to see the finished product.
Posted: Friday, May 14, 2010 - 04:47 PM UTC
Tonight, I shot my first coat of future floor finish for my 'gloss' coat. Tomorrow, I will begin applying the decals.
That is all of the excitement for tonight.
That is all of the excitement for tonight.
Posted: Saturday, May 15, 2010 - 12:38 PM UTC
Today I got the decals put on for the Guardian variant that I'm building. Here are the pics which are followed by a few comments about the decals.
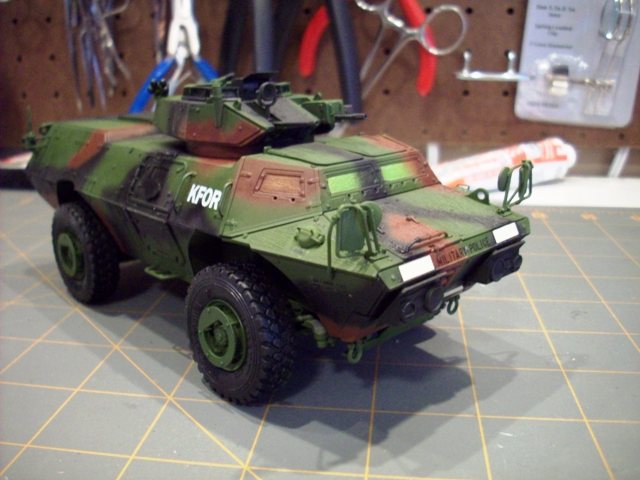
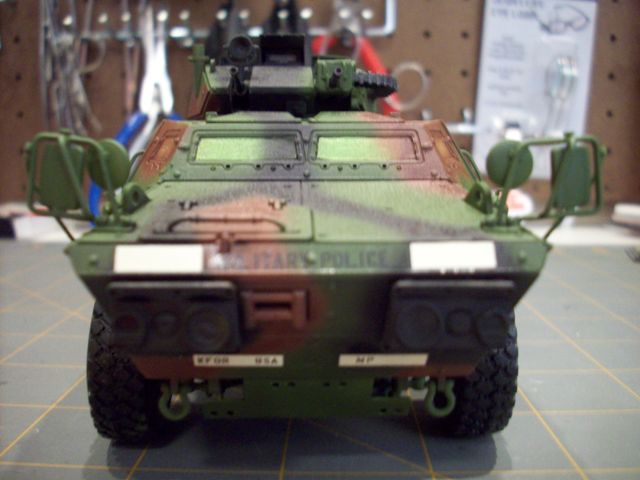
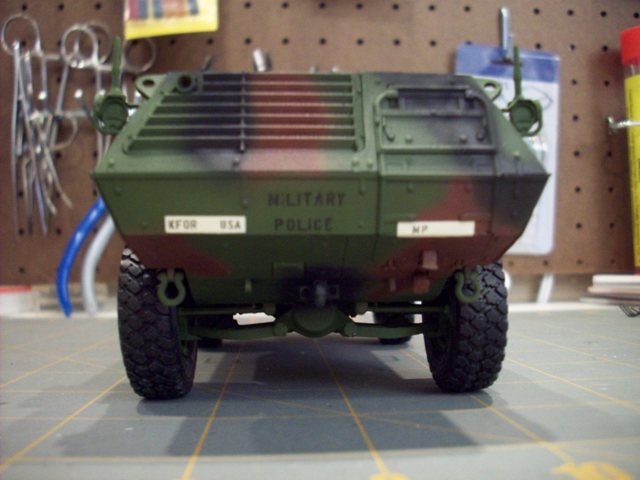
Overall, the decals were good to work with. The slide off the carrier film with no problem and settled down over the details just fine. I used a little solveset to help on a few.
The tan background on the front bumper next to the "Military Police" decal were too big. I did not try to trim them down because I didn't want to risk screwing up the decal. Other builders may be inclined to cut it down. I just didn't want to mess with it.
There are some additional small decals that I put on which were tire pressure markings, 'lift here' markings, JP-8 and Diesel markings. I had a hard time getting my camera to focus on the bigger decals so I didn't try to photograph those.
I will let the decals set over night. Tomorrow morning I will shoot a follow up 'Future' gloss coat.
 |


