Яusso-Soviэt Forum: WWII Soviet Armor
For discussions related to WW2 era Soviet armor.
DML #6564 T-34/76 m43 with Commanders Coupola
Kocic
Visit this Community
Novi Sad, Serbia & Montenegro
Joined: November 10, 2005
KitMaker: 17 posts
Armorama: 16 posts
Posted: Wednesday, April 14, 2010 - 06:35 PM UTC
Marks last picture show exactly what i mean with „upgraded“ turrets.


I reed in different sources that the russian had some “repair” factory / workshop where they used parts and elements from damaged or destroyed tanks to assembly a new tank. And the pistol ports from the kit looks for me exactly like they were made for such usage.
For my kit i going to remove the pistol ports from the turret of the AFV Club T-34/76 No112 and glue them on the DML turret. Add some putty around them and I think it would looks fine.

The Archer welding seams I would like to use on the early T-34/76 turret (kit #6205).
I have to rebuild the curved welding seam. Do you think it is possible to add some diluted putty over them befor apply on the kit when they are still on the “decal”? Or would you do that after?
MCR
Visit this Community
Arizona, United States
Joined: July 15, 2004
KitMaker: 464 posts
Armorama: 407 posts
Posted: Thursday, April 15, 2010 - 04:42 AM UTC

Quoted Text

The two side pistol ports look pretty good once glued on...I cannot speak to them being 100% correct for a Factory 183 m43 turret though. The rear pistol port plug looks goofy and out of place. I am not sure what to do about that just yet.


I think the thing is that the bulge doesn't fare into the rest of the turret shell like it should and admittedly that would be difficult to do with a separate piece like the kit provides. Still, a bit of putty will make it all much better.

The rear pistol port may be a little bit too low and the plug (part L16) itself isn't quite the right shape being round where it should have parallel clipped sides.


MCR
Visit this Community
Arizona, United States
Joined: July 15, 2004
KitMaker: 464 posts
Armorama: 407 posts
Posted: Monday, April 26, 2010 - 01:17 PM UTC
Jacques,
You haven't given up have you?

Mark
Jacques
Visit this Community
Minnesota, United States
Joined: March 04, 2003
KitMaker: 4,630 posts
Armorama: 4,498 posts
Posted: Tuesday, April 27, 2010 - 04:07 PM UTC
Nope, just had to go on hold for the AMPS Nationals. Now it is planting time at work, so I hope to be unpacked and back at the workbench by Friday night. No worries....
Jacques
Visit this Community
Minnesota, United States
Joined: March 04, 2003
KitMaker: 4,630 posts
Armorama: 4,498 posts
Posted: Sunday, May 02, 2010 - 09:28 AM UTC
The next step: glueing the hulls together. I started by glueing the front pieces with model cement, clamping it together, and letting it dry for 48hrs. Once dry, I used super glue to glue the back end down and then glue the sponsons down underneath. Glueing with regular model cement would have been too difficult.


The next problem was the rear deck/fan cover/ upper hull fit.


As can be seen, the rear deck sticks up too far. Essentially, this is because the transmission cover is about 1 mm too thick, or it in about 1mm too far. There are two answers to this problem:

1. Glue the upper/lower hulls together WITHOUT gluing the transmission cover on. Then glue the back plate and the transmission cover on at the same time and adjust the pieces so that they fit together. I had already glued my transmission cover on, so this was out. Also, I am not sure if this solution will adversly effect the fit of the transmission cover to the lower hull.

2. File away 1mm so they parts fit. FILE THE TRANSMISSION COVER, NOT THE REAR PLATE. Filing down the rear plate will be a LOT more noticable due to the line of bolts along its bottom edge. I used a large flat file to rough in the "cut" and then trimmed the very inside edges with a x-acto knife.


While being carefull not to take too much off the top of the transmission plate, remember that the 1mm removed has to go down deep enough for the entire rear plate to butt up against...in other words, it has to be at least 4-5mm down the inside of the transmission plate.

Once done, things fit.

MCR
Visit this Community
Arizona, United States
Joined: July 15, 2004
KitMaker: 464 posts
Armorama: 407 posts
Posted: Tuesday, May 04, 2010 - 05:42 PM UTC
Coming along nicely, Jacques.
Since you're on to the hull I though I'd post a photo that highlights some smaller problems with the kit.
Notice that the engine deck covers are held down by three fairly hefty bolts not four small rivets and that the sheet metal ends of the upper intake screens do not mate up neatly with the "bucket" or center tower.

Mark
pgb3476
Visit this Community
Texas, United States
Joined: March 11, 2007
KitMaker: 977 posts
Armorama: 976 posts
Posted: Wednesday, May 05, 2010 - 04:00 AM UTC
Mark, on the pix you posted, is that a log attached on the side? The vehicle looks fully stowed. My that's one shiny coat of paint...... I assume its in a muesum in Russia?

Thanks, Greg
MCR
Visit this Community
Arizona, United States
Joined: July 15, 2004
KitMaker: 464 posts
Armorama: 407 posts
Posted: Wednesday, May 05, 2010 - 08:42 AM UTC
Not a museum in Russia but part of the Littlefield collection.
This particular tank (the only hex turret in the Western hemisphere) was extensively refitted post war and appears to have come from Polish stocks initially though I'm told it was purchased from an owner in Germany.
Interestingly, it has been said that 4BO green was semi-glossy. I don't know for sure if that's true or not but some of the post war Soviet armor I've seen does have a little gloss to the paint.

Mark

(Oh, and, yes, that is an unditching log belted to the side of the tank.)
pgb3476
Visit this Community
Texas, United States
Joined: March 11, 2007
KitMaker: 977 posts
Armorama: 976 posts
Posted: Wednesday, May 05, 2010 - 09:05 AM UTC
Ok Mark, now for the next question....do you think the color is sort of correct? It's pretty close to what I paint my models in....I use Tamiya field gray(green) that I tweek some. And yes, I know there's no perfect 4BO green....I just want o be in the neibghorhood.....shiny or not
Jacques
Visit this Community
Minnesota, United States
Joined: March 04, 2003
KitMaker: 4,630 posts
Armorama: 4,498 posts
Posted: Wednesday, May 05, 2010 - 02:44 PM UTC
I have corrected, well enough anyhow, the rear turret pistol port. I took it off the turret, filed the edges down, adn drilled out the center. Then I glued it back on as it looked closest to the photo that way.

MCR
Visit this Community
Arizona, United States
Joined: July 15, 2004
KitMaker: 464 posts
Armorama: 407 posts
Posted: Thursday, May 06, 2010 - 02:01 PM UTC

Quoted Text

Ok Mark, now for the next question....do you think the color is sort of correct? It's pretty close to what I paint my models in....I use Tamiya field gray(green) that I tweek some. And yes, I know there's no perfect 4BO green....I just want o be in the neibghorhood.....shiny or not


I've read a few dissertations on 4BO and have come away with two main points: First, that weathering effected the color to a great extent (go figure, eh?) and, second, that it may have changed mid-war due to changes in the official formulation.
(To what extent either of these is true I have no really good feeling for.)

According to some research done by Steve Zaloga and based on color chips taken from the KV-1 and a T-34 (I think the Model '42 "flat turret") FS 34052 is a good match for 4BO. The FS color is a very dark grey olive color.
Littlefield's Gayka is painted something similar to FS 24098 as I recall it. Far more yellow.

I've seen a few other opinions on the color but don't recall off hand what the conclusions were.

One important thing to note is that 4BO is said to have darkened with age and that may well account for how dark the color chips were.

For modeling I try to shoot for something lighter and a bit more yellow than grey and don't spend too much time worrying about being "exact".

Mark
Jacques
Visit this Community
Minnesota, United States
Joined: March 04, 2003
KitMaker: 4,630 posts
Armorama: 4,498 posts
Posted: Tuesday, May 11, 2010 - 05:15 PM UTC
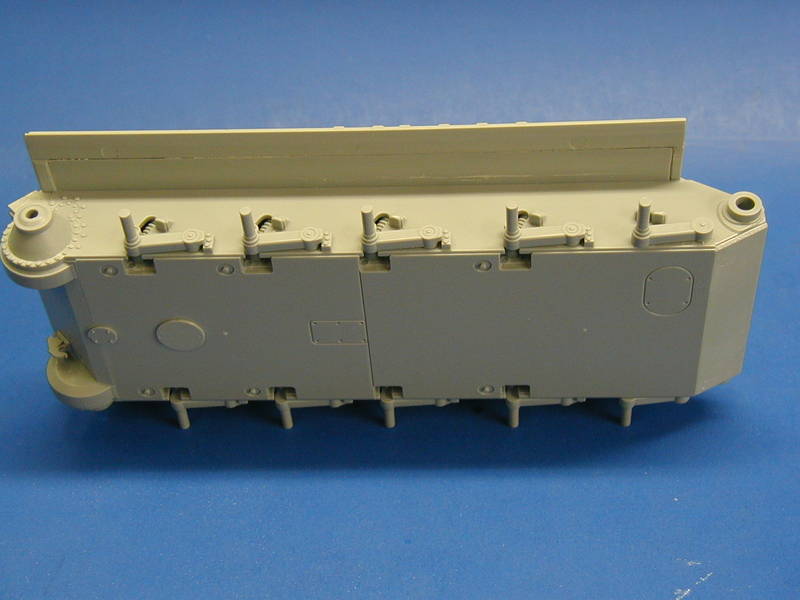
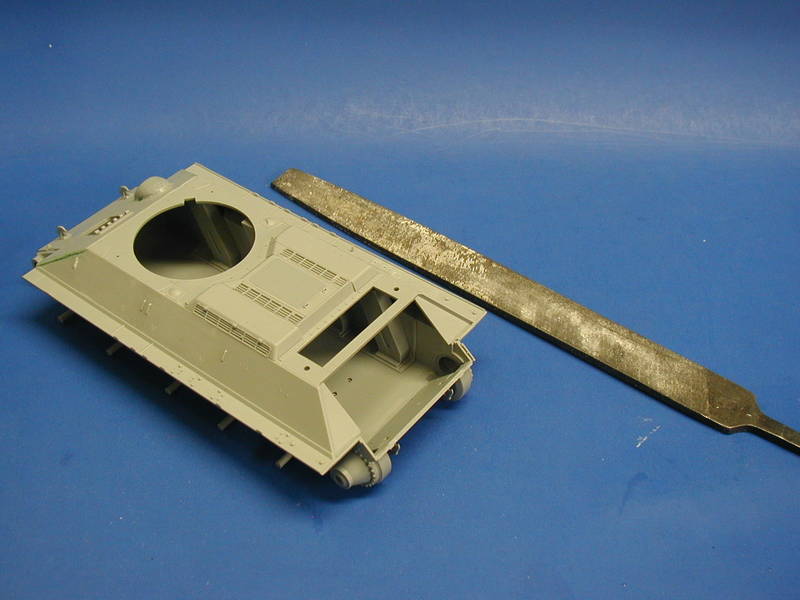
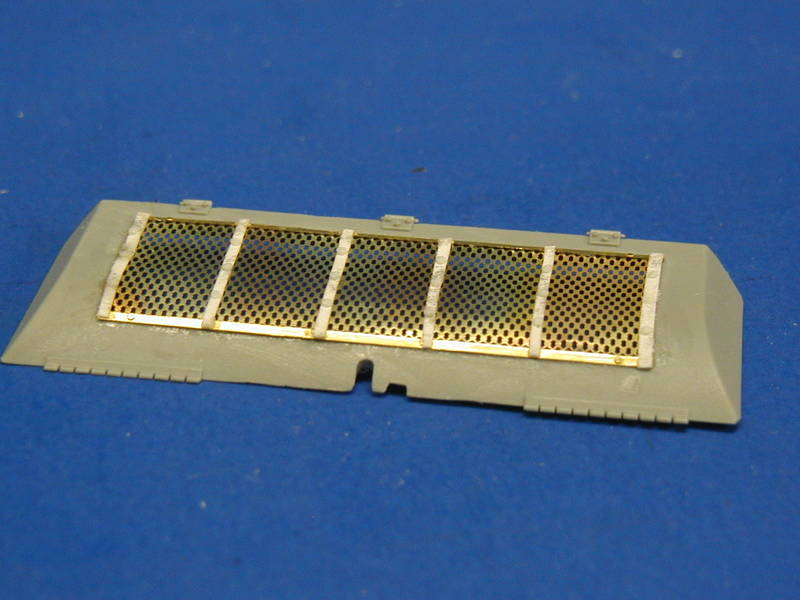
Working on the fan housing cover: I decided to try to use what was available in the PE fret to make the screen work. Seriously annoying that it does not, and DML T-34 kit 6479 also has the incorrect PE screen setup. I decided to use the screen as I did not want to wiat for mail-order to arrive (I can be impatient sometimes...)

I cut the screen itself to roughly the right size, and I then annealed it to make it pliable so that it woud not be too hard to impart the slight curve to the piece.

I cut up the framing and used the top and bottom pieces for the top and bottom. I then added thick paper as the cross bars and added sliced plastic rod for the bolts. In actuality these would be round head bolts, almost like rivets if not actually rivets. I would think that if someone came out with a PE screen and a paper cut frame with the rivet heads embeded or some such.

Anyhow...


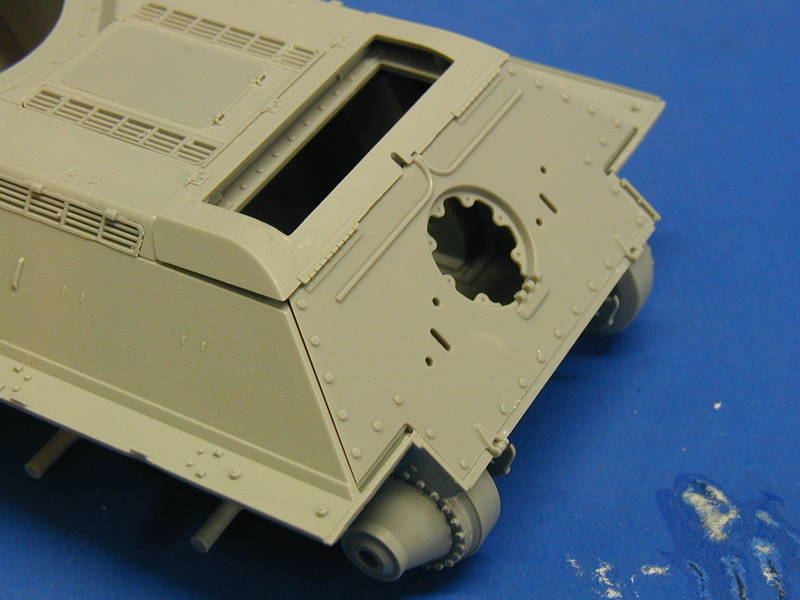
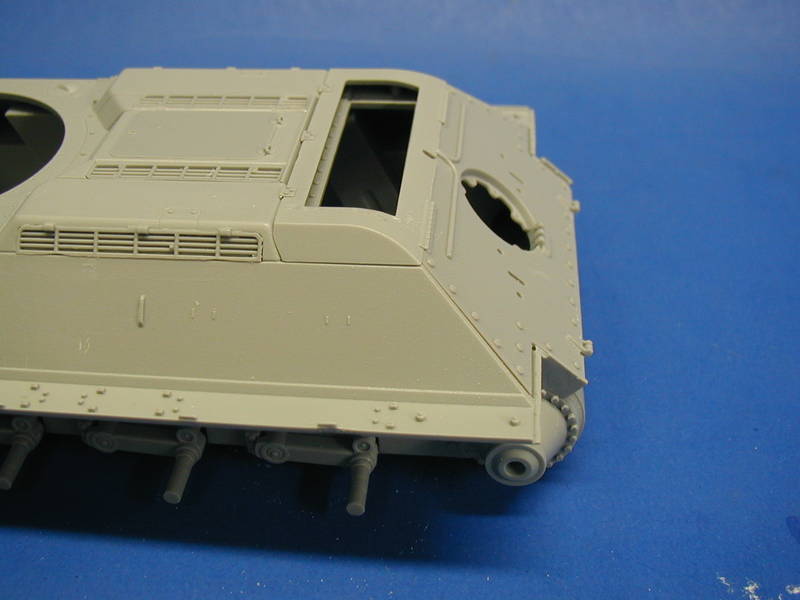
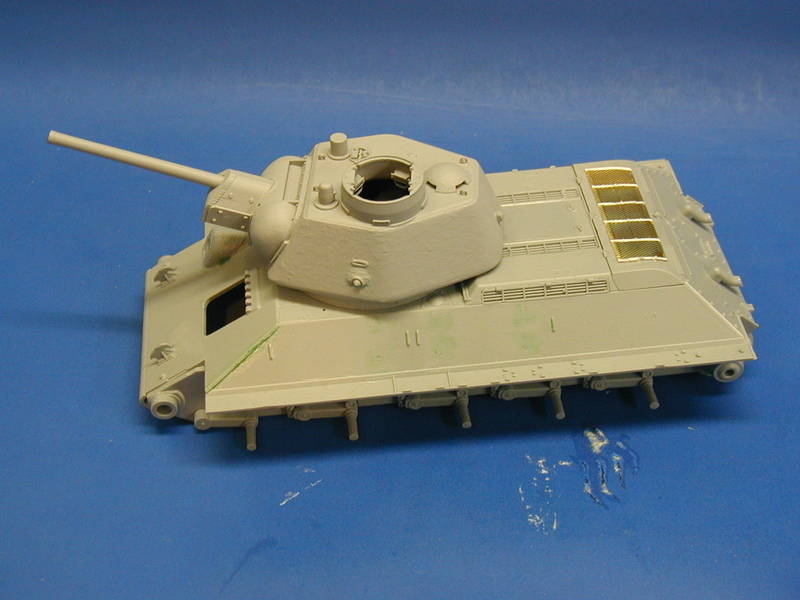
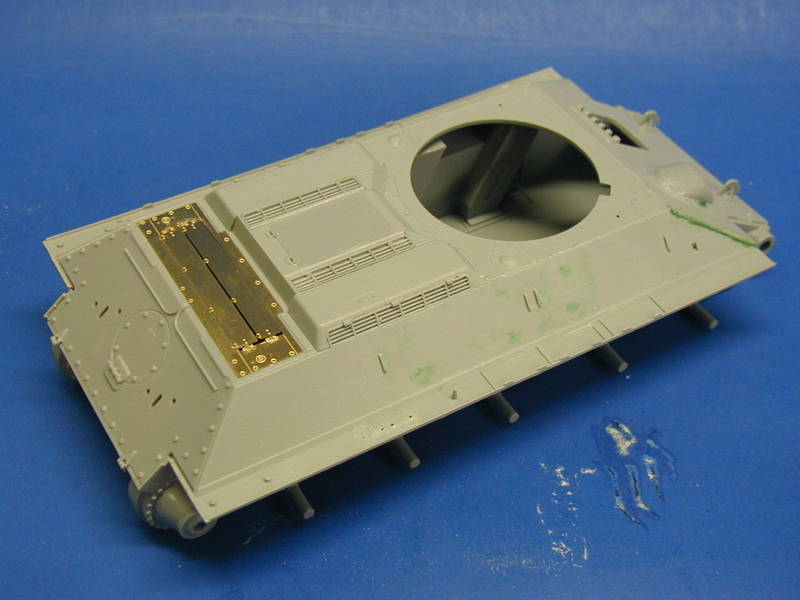
Hull with the added PE on the back. Yes, with the screen added to the cover and the louvres added underneath, it makes for a attractive display, at least enough to get me to rebuild the screen/framing. However, the details on the deck under the PE "sheet" need to be removed, something missing in DML's instructions.


all together...


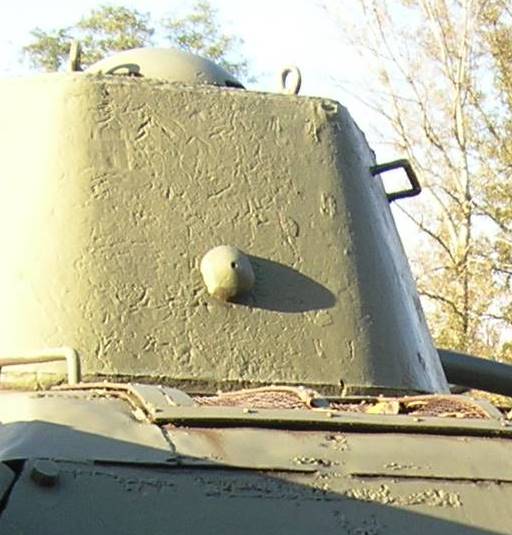
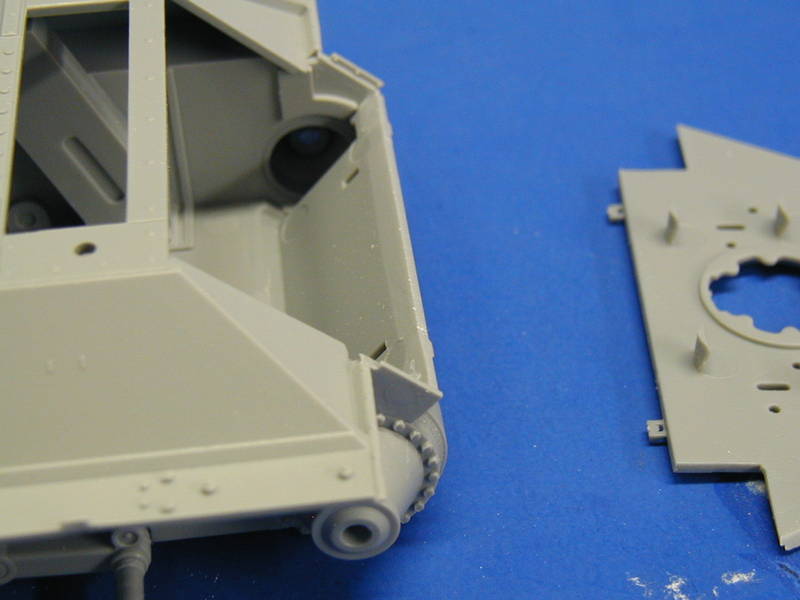
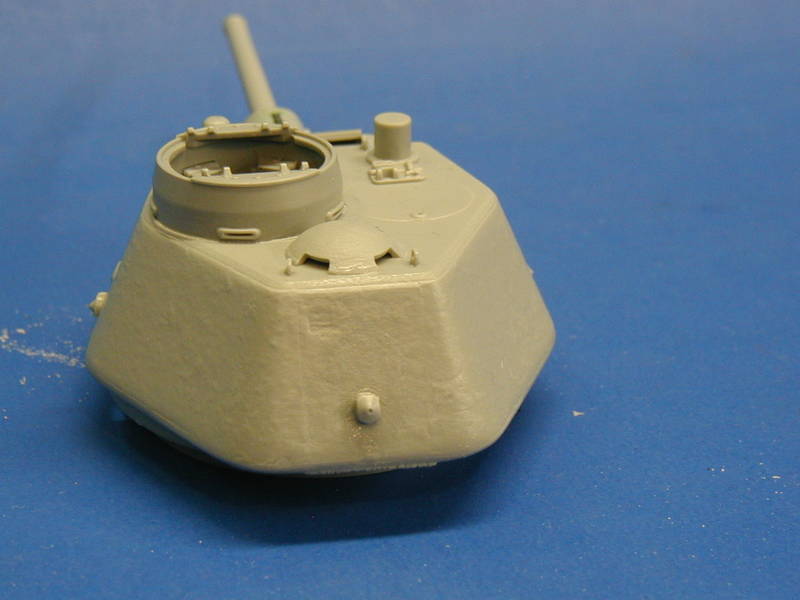
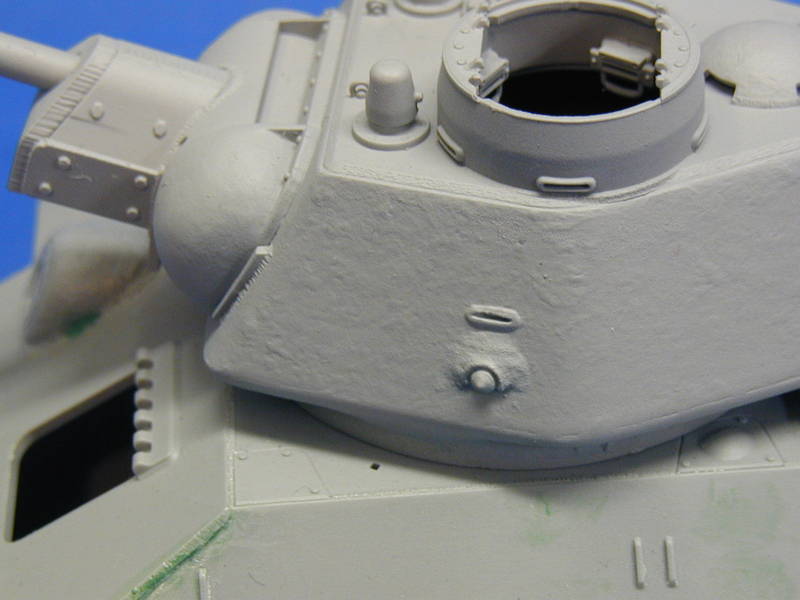
I wanted to make the pistol ports more appropriate as per Mark's commentary, so I used some putty to thicken and blend the pistol ports. Not sure how successfull yet, but ok so far...


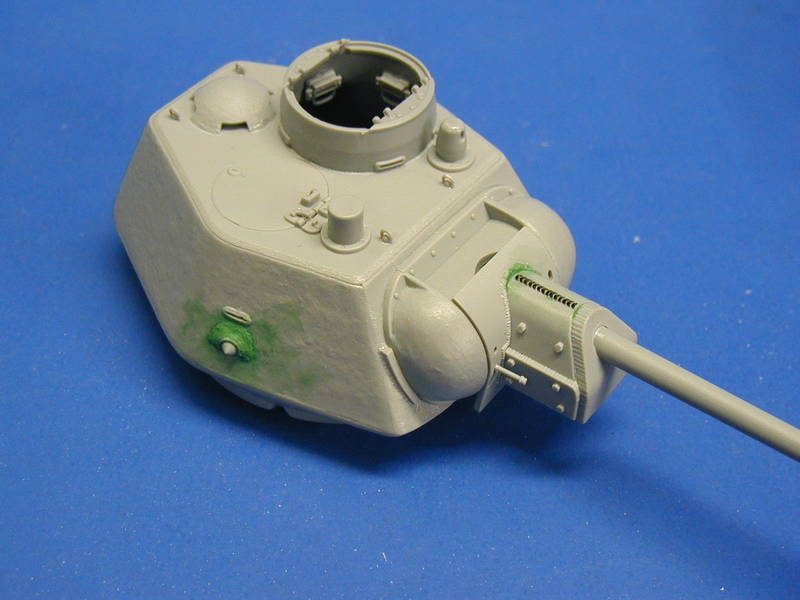
Here it is, all together now...


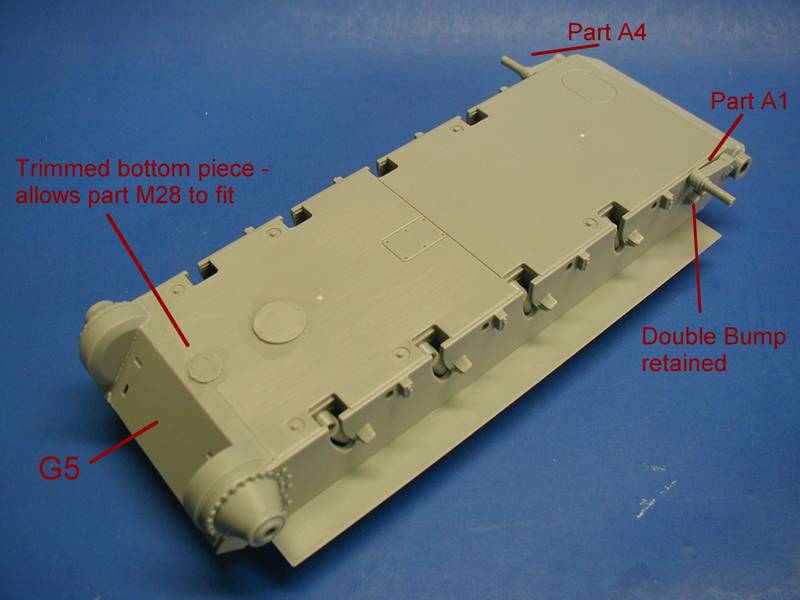
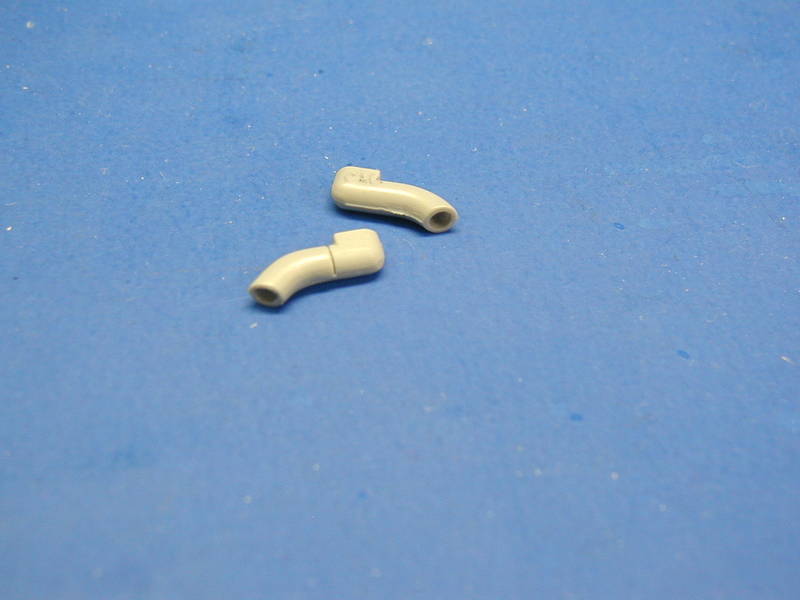
Finally, the exhaust pipes...unless I made a mistake, the exhaust pipes should not have too much variation in them. DML offers 3 types of exhaust pipes in the kit, evolutionary examples of DML's molding and detail as time/attention has progressed. So I was dumbfounded when DML called out for the use fo the oldest and WORST of the thrre types...B3/B4...a two piece part. Part C16 is better, but you should actually use part N6, a nicely hollowed one piece part that would look quite nice. They are the same size/length and only differ in the weld bead and the number of parts.


Now, to be totally fair, I decided to pull out my T-34 m43 from Italeri (a Zvezda rebox) and compare. More on that later but, let me just say that after that short experience, if you can get the DML or AFV Club T-34's in the mid $30's range, it is far far better to do it. Well worth the price, even though the Italeri kit COULD be worked into a award winner. Pictures later....
SteveReid
Visit this Community
Massachusetts, United States
Joined: September 07, 2007
KitMaker: 212 posts
Armorama: 159 posts
Posted: Wednesday, May 12, 2010 - 01:36 PM UTC
Jacques-
I like the work you are doing on this!
I have a couple of suggestions that hopefully will help you.

1. The four vertical strips on the hull sides are for positioning the rectangular fuel cells (common on early models). You may want to remove them now before you add any really fragile items.

2. One of THE BEST aftermarket items I have found for my T-34's are the exhaust pipes from TMD. They were $3.50 a pair and all you do is open the box- snip them off the resin pour plug- and glue them into the armored covers.

Simple- and a perfect centered hole and paper thin walls just as they should be.

If you can find a set they are well worth grabbing. I am not sure if these gems are going to make the transition from TMD to Themodelersproject.

Steve
Vartotojas
Visit this Community
Vilnius, Lithuania
Joined: May 12, 2010
KitMaker: 30 posts
Armorama: 27 posts
Posted: Tuesday, May 18, 2010 - 07:14 PM UTC
First of all, thanks for the review, tips and this great building blog. I this kit too, so I'm looking forward to the whole process. Secondly, I just wanna ask one question: maybe you know how you'll paint it and what type of paints you'll use (brands, color codes, etc.)?
Thanks in advance and good luck with this russian beast!
Jacques
Visit this Community
Minnesota, United States
Joined: March 04, 2003
KitMaker: 4,630 posts
Armorama: 4,498 posts
Posted: Thursday, May 20, 2010 - 03:56 PM UTC
Steve - Thanks for the advice; Yes, I have a set that I bought before they went OOP.

Lietuvis - I usually do a primer coat in black using a spray can enamel. Then I use Polly Scale black green as my base coat and Testors dark green as the middle coat, and finally I mix about 20% Testors tan with 80% dark green to make a faded top coat for the panel centers and such. If you want to know more about my painting style, take a look here at my SU-100 build

None of this is based on paint chips or anything, it is just what looks best to me.
Vartotojas
Visit this Community
Vilnius, Lithuania
Joined: May 12, 2010
KitMaker: 30 posts
Armorama: 27 posts
Posted: Thursday, May 20, 2010 - 07:22 PM UTC

Quoted Text


Lietuvis - I usually do a primer coat in black using a spray can enamel. Then I use Polly Scale black green as my base coat and Testors dark green as the middle coat, and finally I mix about 20% Testors tan with 80% dark green to make a faded top coat for the panel centers and such. If you want to know more about my painting style, take a look here at my SU-100 build

None of this is based on paint chips or anything, it is just what looks best to me.


Thank you very much for the tips.
Vartotojas
Visit this Community
Vilnius, Lithuania
Joined: May 12, 2010
KitMaker: 30 posts
Armorama: 27 posts
Posted: Monday, June 14, 2010 - 08:39 AM UTC
You haven't given up, have you?
Jacques
Visit this Community
Minnesota, United States
Joined: March 04, 2003
KitMaker: 4,630 posts
Armorama: 4,498 posts
Posted: Monday, June 14, 2010 - 04:48 PM UTC
Nope, I just hav not had time to take pictures and load them. Maybe tomorrow...? Thanks for the interest though...I will keep at it
Plasticbattle
#003
Visit this Community
Donegal, Ireland
Joined: May 14, 2002
KitMaker: 9,763 posts
Armorama: 7,444 posts
Posted: Monday, June 14, 2010 - 07:09 PM UTC
Another nice build Jacques. Keep plugging away at it!!
Jacques
Visit this Community
Minnesota, United States
Joined: March 04, 2003
KitMaker: 4,630 posts
Armorama: 4,498 posts
Posted: Tuesday, June 15, 2010 - 02:01 PM UTC
Here is where I am at. I have primed the turret after trying to fix the pistol port issue...not too thrilled with it, but I am tired of messing with this.


SteveReid
Visit this Community
Massachusetts, United States
Joined: September 07, 2007
KitMaker: 212 posts
Armorama: 159 posts
Posted: Thursday, June 17, 2010 - 02:14 AM UTC
Jacques-
Waaaaaaayyyyy to much excellent work in this to let it slip away.

Especially after the rear hull joint issues you were able to overcome!

I hope you stick with this Jacques! It has been fun to follow.
Steve
Jacques
Visit this Community
Minnesota, United States
Joined: March 04, 2003
KitMaker: 4,630 posts
Armorama: 4,498 posts
Posted: Thursday, June 17, 2010 - 03:36 PM UTC
"I didn't catch the issue about L5 and G5 parts.
MCR said that for a classical Factory 183 made tank (three hinges and four bolts on the angled outside edges) you can use parts L5 and L6 (the lower and upper rear plate respectively). For a Factory 174, et al, use parts B22 and G5 with the two hinges and five bolts. (There is a slight problem here in that G5 represents a version of the final drive housing, albeit with simplified detail, associated more with Factory 183 and it may be somewhat more correct to use part L5 but remove the center hinge).
So I'm confused about G5 and L5 parts: which one is more accurate for Factory 183 build?"


A note I received. I used G5 because it seemed to be the best match. I am not expert enough to explain the total reasoning, but going either way will work.
Vartotojas
Visit this Community
Vilnius, Lithuania
Joined: May 12, 2010
KitMaker: 30 posts
Armorama: 27 posts
Posted: Friday, June 18, 2010 - 10:47 PM UTC

Quoted Text


And the red line for Part M28 should point the the LARGE round cover, not Part M4 (small round hatch on the bottom of the hull).


One notice: part M28 should be part P28.
MCR
Visit this Community
Arizona, United States
Joined: July 15, 2004
KitMaker: 464 posts
Armorama: 407 posts
Posted: Saturday, June 19, 2010 - 08:10 AM UTC

Quoted Text


on 2010-06-17 07:24, Vartotojas wrote:
You said that for a classical Factory 183 made tank (three hinges and four bolts on the angled outside edges) you can use parts L5 and L6 (the lower and upper rear plate respectively). For a Factory 174, et al, use parts B22 and G5 with the two hinges and five bolts. (There is a slight problem here in that G5 represents a version of the final drive housing, albeit with simplified detail, associated more with Factory 183 and it may be somewhat more correct to use part L5 but remove the center hinge).


OK, here's the thing: Factory 183 UTZ (we "think", that is, the housing associates for the better part with tanks identifiable with UTZ) produced a uniquely shaped housing for the final drive gears, one of a couple designs they used.
This housing was more angular (something more of a truncated cone shape) as opposed to the common rounded profile. Part G5 represents the more angular type but with the two hinge arrangement rather than three.

Like I said, this is not the only version that UTZ used, they also having the rounded type.

The point I was trying to make is that for a Factory 174 made tank you would want to use the lower rear plate with rounded housings, like part L5 but removing the center hinge.

To muddy things up a bit more, it also appears that UTZ may have started to change the arrangement of hinges/bolts to something like what G5 gives you (two hinge not three), perhaps as soon as mid to late 1943. Certainly, the "classical" arrangement seems to become more rare in photographs dated 1944 and later though UTZ remained the largest producer of the tank. It is absolutely sure that they used the five bolt/two hinge pattern by the time they introduced the T-34-85 into production and may have started, as mentioned, much earlier.

Did that help or just make things more confusing?

Mark
Jacques
Visit this Community
Minnesota, United States
Joined: March 04, 2003
KitMaker: 4,630 posts
Armorama: 4,498 posts
Posted: Saturday, June 19, 2010 - 12:11 PM UTC
Mark,that is a good explanations but dear Lord in Heaven, I wish it was not quite so convoluted (not your explanation but Soviet wartime production...it's like they were not thinking of the confusion and pain they would cause future model builders when they just built what they could as fast as they could...the nerve).

Thanks